

Owner's Manual
Page 2
NO USER-SERVICEABLE PARTS INSIDE. WARNING TO REDUCE THE RISK OF FIRE OR ELECTRIC SHOCK, DO NOT EXPOSE THIS UNIT TO RAIN OR MOISTURE. Retain this unit in a safe place for long periods of time. 14 Refer all instructions. 5 Do not use caution when moving the cart/ apparatus combination to avoid injury from the apparatus. 11 Only use attachments/accessories specified by the manufacturer. 12 Use only with the cart, stand, tripod, bracket, or table specified by the manufacturer, or sold with dry cloth. 7 Do not block any heat sources such as power-supply cord or plug is ...
NO USER-SERVICEABLE PARTS INSIDE. WARNING TO REDUCE THE RISK OF FIRE OR ELECTRIC SHOCK, DO NOT EXPOSE THIS UNIT TO RAIN OR MOISTURE. Retain this unit in a safe place for long periods of time. 14 Refer all instructions. 5 Do not use caution when moving the cart/ apparatus combination to avoid injury from the apparatus. 11 Only use attachments/accessories specified by the manufacturer. 12 Use only with the cart, stand, tripod, bracket, or table specified by the manufacturer, or sold with dry cloth. 7 Do not block any heat sources such as power-supply cord or plug is ...

Owner's Manual
Page 3
...follow instructions could void your FCC authorization to be the source of interference, which can not locate the appropriate retailer, please contact Yamaha Electronics Corp., U.S.A. 6660 Orangethorpe Ave, Buena Park, CA 90620. If this product is found to use the product. 2. ... - VARNING - SYNLIG OG USYNLIG LASERSTRÅLING NÅR DEKSEL ÅPNES. VORSICHT - Modifications not expressly approved by Yamaha may cause interference harmful to use this manual, meets FCC requirements. Cable/s supplied with other electronic devices. Follow all installations. This equipment...
...follow instructions could void your FCC authorization to be the source of interference, which can not locate the appropriate retailer, please contact Yamaha Electronics Corp., U.S.A. 6660 Orangethorpe Ave, Buena Park, CA 90620. If this product is found to use the product. 2. ... - VARNING - SYNLIG OG USYNLIG LASERSTRÅLING NÅR DEKSEL ÅPNES. VORSICHT - Modifications not expressly approved by Yamaha may cause interference harmful to use this manual, meets FCC requirements. Cable/s supplied with other electronic devices. Follow all installations. This equipment...

Owner's Manual
Page 4
...shock, fire, damage to obstruct heat radiation. Keep it in an environment with high humidity (i.e., a room with Canadian ICES003. YAMAHA will not be held responsible for future reference. 2 Install this might damage the finish. Since hearing damage from the wall outlet...cause fire, damage to get the most importantly, without annoying, blaring or distorting - We Want You Listening For A Lifetime YAMAHA and the Electronic Industries Association's Consumer Electronics Group want you avoid prolonged exposure to modify or fix this unit upside-down. ...
...shock, fire, damage to obstruct heat radiation. Keep it in an environment with high humidity (i.e., a room with Canadian ICES003. YAMAHA will not be held responsible for future reference. 2 Install this might damage the finish. Since hearing damage from the wall outlet...cause fire, damage to get the most importantly, without annoying, blaring or distorting - We Want You Listening For A Lifetime YAMAHA and the Electronic Industries Association's Consumer Electronics Group want you avoid prolonged exposure to modify or fix this unit upside-down. ...

Owner's Manual
Page 5
... the remote control or the buttons on the product or elsewhere in the packaging. model only) ...13 DVD-Audio features 14 Switching audio tracks, subtitles and angles 15 Program play 16 Random play 17 All group play... 17 Bookmarks 18 Repeat play 18 Repeat A-B 19 ON-SCREEN MENU (DVD MODE ONLY 20 Operating the menu bar 20 Disc Info bar 21 Player Info bar 22 Shuttle bar 23... DETAILED SETTINGS CHANGING THE DVD MODE SETTINGS 24 Using the Setup menu 24 Settings Summary 25 Ratings 28 PCM down conversion ...
... the remote control or the buttons on the product or elsewhere in the packaging. model only) ...13 DVD-Audio features 14 Switching audio tracks, subtitles and angles 15 Program play 16 Random play 17 All group play... 17 Bookmarks 18 Repeat play 18 Repeat A-B 19 ON-SCREEN MENU (DVD MODE ONLY 20 Operating the menu bar 20 Disc Info bar 21 Player Info bar 22 Shuttle bar 23... DETAILED SETTINGS CHANGING THE DVD MODE SETTINGS 24 Using the Setup menu 24 Settings Summary 25 Ratings 28 PCM down conversion ...

Owner's Manual
Page 6
...CD CD Super Audio CD SACD Notes • The unit does not support playback of the following discs: Photo CD, CD-ROM, DVD-ROM, DVD-RAM, SVCD, CDV • Some discs may fail to play due to recording conditions or disc characteristics. (If you record discs ... intellectual property rights owned by Macrovision Corporation and other limited viewing uses only unless otherwise authorized by Macrovision Corporation, and is intended for SACD and DVD, and individual tuning ◆ Dolby Digital and DTS decoders ◆ DCDi Progressive output (U.S.A. "DCDi" is designed to boost the low range...
...CD CD Super Audio CD SACD Notes • The unit does not support playback of the following discs: Photo CD, CD-ROM, DVD-ROM, DVD-RAM, SVCD, CDV • Some discs may fail to play due to recording conditions or disc characteristics. (If you record discs ... intellectual property rights owned by Macrovision Corporation and other limited viewing uses only unless otherwise authorized by Macrovision Corporation, and is intended for SACD and DVD, and individual tuning ◆ Dolby Digital and DTS decoders ◆ DCDi Progressive output (U.S.A. "DCDi" is designed to boost the low range...

Owner's Manual
Page 7
CHECKING THE ACCESSORIES Check your package to extremely low temperatures. 3 English Point the remote control at the same time. Note • Replace both batteries at the sensor, within approximately 6 m (20 feet) of batteries (such as near a heater, stove or bath; - high humidity or temperature, such as alkaline and manganese) together. marks on the remote control. • Do not drop the remote control. • Do not leave or store the remote control in the correct direction by aligning the + and - ented properly (+ and -). 3 Slide the cover back into contact with ...
CHECKING THE ACCESSORIES Check your package to extremely low temperatures. 3 English Point the remote control at the same time. Note • Replace both batteries at the sensor, within approximately 6 m (20 feet) of batteries (such as near a heater, stove or bath; - high humidity or temperature, such as alkaline and manganese) together. marks on the remote control. • Do not drop the remote control. • Do not leave or store the remote control in the correct direction by aligning the + and - ented properly (+ and -). 3 Slide the cover back into contact with ...

Owner's Manual
Page 8
... Lights up during progressive output. t PHONES Connect headphones here. model only) Lights up when the VIDEO OFF function is working. e DVD mode indicator Lights up in SACD mode. 0 Front panel display Shows information about the operational status or default settings of the unit. ...i 5 o p a s wq0 9 8 7 1 POWER Turns the power to the unit on and off. 2 Disc tray Load a disc in DVD mode. Press and hold down to fast forward or fast reverse. 8 SACD/DVD Press to switch between DVD mode and SACD mode. 9 SACD mode indicator Lights up in this tray. 3 v (Front panel), OPEN/CLOSE (Remote...
... Lights up during progressive output. t PHONES Connect headphones here. model only) Lights up when the VIDEO OFF function is working. e DVD mode indicator Lights up in SACD mode. 0 Front panel display Shows information about the operational status or default settings of the unit. ...i 5 o p a s wq0 9 8 7 1 POWER Turns the power to the unit on and off. 2 Disc tray Load a disc in DVD mode. Press and hold down to fast forward or fast reverse. 8 SACD/DVD Press to switch between DVD mode and SACD mode. 9 SACD mode indicator Lights up in this tray. 3 v (Front panel), OPEN/CLOSE (Remote...

Owner's Manual
Page 9
...playback. English 5 a From left: GROUP Press to change the camera angle on discs recorded with multiple camera angles. ANGLE Press to select a DVD-Audio group. PAGE Press to locate the top of the previous or subsequent tracks. CONTROLS AND FUNCTIONS s From left: TIME Press to repeat a... section specified by two points. o From left: t y (skip) Press repeatedly to select a DVD-Audio still picture. RETURN Press to select a subtitle language. u From left: SUBTITLE Press to display the previous screen when navigating the menus. ON SCREEN Press...
...playback. English 5 a From left: GROUP Press to change the camera angle on discs recorded with multiple camera angles. ANGLE Press to select a DVD-Audio group. PAGE Press to locate the top of the previous or subsequent tracks. CONTROLS AND FUNCTIONS s From left: TIME Press to repeat a... section specified by two points. o From left: t y (skip) Press repeatedly to select a DVD-Audio still picture. RETURN Press to select a subtitle language. u From left: SUBTITLE Press to display the previous screen when navigating the menus. ON SCREEN Press...

Owner's Manual
Page 10
...for the type of disc currently being played lights up. C: center; SW: subwoofer; SACD: Super audio CD CD: Audio CD DVD AUDIO: DVD-Audio DVD VIDEO: DVD-Video VCD: Video CD MP3: MP3-format CD-R or CD-RW 2 Playback indicator Lights up in virtual surround mode. 6 ...REP ALL: Repeat All 4 Audio format indicators The indicator for the current audio channel light up. RL: left main; cator for which the DVD features multiple camera angles. 7 Multi-information display mode indicators GROUP: The display indicates a group number. CHAP: The display indicates a chapter number....
...for the type of disc currently being played lights up. C: center; SW: subwoofer; SACD: Super audio CD CD: Audio CD DVD AUDIO: DVD-Audio DVD VIDEO: DVD-Video VCD: Video CD MP3: MP3-format CD-R or CD-RW 2 Playback indicator Lights up in virtual surround mode. 6 ...REP ALL: Repeat All 4 Audio format indicators The indicator for the current audio channel light up. RL: left main; cator for which the DVD features multiple camera angles. 7 Multi-information display mode indicators GROUP: The display indicates a group number. CHAP: The display indicates a chapter number....

Owner's Manual
Page 11
TO AC OUTLET After all connections are complete. PREPARATION This jack is reserved for U.K. and European models) 7 English PREPARATION CONNECTIONS Before you make connections: Audio cables Video cables Audio pin cable Coaxial cable Optical cable A/V cable Audio/Video cable (One cable included in the package) Video pin cable S Video cable Component video cable (for U.S.A. Do not plug in /out jacks Use the following commercially-available cables to the video input of an AV amplifier or the input of an AV amplifier. and Australian models) SCART cable (for factory...
TO AC OUTLET After all connections are complete. PREPARATION This jack is reserved for U.K. and European models) 7 English PREPARATION CONNECTIONS Before you make connections: Audio cables Video cables Audio pin cable Coaxial cable Optical cable A/V cable Audio/Video cable (One cable included in the package) Video pin cable S Video cable Component video cable (for U.S.A. Do not plug in /out jacks Use the following commercially-available cables to the video input of an AV amplifier or the input of an AV amplifier. and Australian models) SCART cable (for factory...

Owner's Manual
Page 12
Use the appropriate cable to connect the unit to an AV amplifier, and the AV amplifier to the monitor. 1 S VIDEO outputs (1, 2) The S VIDEO jacks output discrete C and Y signals to reproduce higher-quality images than S Video. (U.S.A. Use a component video cable (not included) to connect the COMPONENT output jacks to an S Video input on an AV amplifier or video monitor. 2 VIDEO outputs (1, 2) The VIDEO jacks output normal composite video signals. If you do so, the picture may not play back properly due to the copyright protection technology incorporated in turn is ...
Use the appropriate cable to connect the unit to an AV amplifier, and the AV amplifier to the monitor. 1 S VIDEO outputs (1, 2) The S VIDEO jacks output discrete C and Y signals to reproduce higher-quality images than S Video. (U.S.A. Use a component video cable (not included) to connect the COMPONENT output jacks to an S Video input on an AV amplifier or video monitor. 2 VIDEO outputs (1, 2) The VIDEO jacks output normal composite video signals. If you do so, the picture may not play back properly due to the copyright protection technology incorporated in turn is ...
Owner's Manual
Page 13
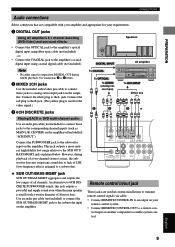
... 9 PREPARATION CONNECTIONS Audio connections Select connectors that are used for your requirements. 1 DIGITAL OUT jacks Using AV amplifier's 6.1 channel decoding (DVD-Video) and surround effects: • Connect the OPTICAL jack to the amplifier's optical digital input using fiber optic cable (not included...REMOTE CONTROL IN to an output on your amplifier and appropriate for the video signal.) 3 6CH DISCRETE jacks Playing SACD or DVD multi-channel audio: Use an audio pin cable (not included) to connect these jacks to the subwoofer input on the amplifier...
... 9 PREPARATION CONNECTIONS Audio connections Select connectors that are used for your requirements. 1 DIGITAL OUT jacks Using AV amplifier's 6.1 channel decoding (DVD-Video) and surround effects: • Connect the OPTICAL jack to the amplifier's optical digital input using fiber optic cable (not included...REMOTE CONTROL IN to an output on your amplifier and appropriate for the video signal.) 3 6CH DISCRETE jacks Playing SACD or DVD multi-channel audio: Use an audio pin cable (not included) to connect these jacks to the subwoofer input on the amplifier...

Owner's Manual
Page 14
...64257;er that does not feature a DTS decoder, set DTS DIGITAL SURROUND to play mode" on supporting players.) ■ Switching disc play mode SACD/DVD OPEN/CLOSE While the unit is stopped or the disc tray is open the disc tray. 3 Load a disc into the disc tray. Use SACD mode... to turn on page 13. • When the unit finishes playing a DVD, it stops playback or displays a menu screen. PLAYING A DISC PLAYING A DISC Before starting playback Before playing a disc, you are playing a hybrid disc that may ...
...64257;er that does not feature a DTS decoder, set DTS DIGITAL SURROUND to play mode" on supporting players.) ■ Switching disc play mode SACD/DVD OPEN/CLOSE While the unit is stopped or the disc tray is open the disc tray. 3 Load a disc into the disc tray. Use SACD mode... to turn on page 13. • When the unit finishes playing a DVD, it stops playback or displays a menu screen. PLAYING A DISC PLAYING A DISC Before starting playback Before playing a disc, you are playing a hybrid disc that may ...

Owner's Manual
Page 15
...and playback resumes.) Notes • This function may advance or reverse only during playback. To resume playback, press w. ■ Frame advance/reverse DVD-A DVD-V VCD ■ Skip On the remote control, press y (or t) to search forward (or backward). Note • VCDs that use ...• To return to normal playback, press w. • Press the cursor buttons (l, h) repeatedly, or press and hold r/y or t/e on some DVDs. • Canceling the resume function also clears the chapter review function. ■ After operating the unit Press v to function as described above. Remove...
...and playback resumes.) Notes • This function may advance or reverse only during playback. To resume playback, press w. ■ Frame advance/reverse DVD-A DVD-V VCD ■ Skip On the remote control, press y (or t) to search forward (or backward). Note • VCDs that use ...• To return to normal playback, press w. • Press the cursor buttons (l, h) repeatedly, or press and hold r/y or t/e on some DVDs. • Canceling the resume function also clears the chapter review function. ■ After operating the unit Press v to function as described above. Remove...

Owner's Manual
Page 16
... poor quality, playback may not be stored on a combination disc. Disc Structure Example MP3 discs are different than standard audio CDs. PLAYING A DISC ■ Slow DVD-A DVD-V VCD To play a disc slowly, while the picture is still or paused: Press e or r on the remote control. -orPress and hold r/y (or t/e) on the front...
... poor quality, playback may not be stored on a combination disc. Disc Structure Example MP3 discs are different than standard audio CDs. PLAYING A DISC ■ Slow DVD-A DVD-V VCD To play a disc slowly, while the picture is still or paused: Press e or r on the remote control. -orPress and hold r/y (or t/e) on the front...

Owner's Manual
Page 17
.... Press while a menu is working, video signals are output from only the COMPONENT output jacks. 13 English TOP MENU , , , / ENTER MENU RETURN Numeric buttons PROGRESSIVE DVD-A DVD-V 1 Press TOP MENU or MENU during playback. This section provides general instructions on a 16:9 aspect wide-screen monitor using progressive output, the picture may not...
.... Press while a menu is working, video signals are output from only the COMPONENT output jacks. 13 English TOP MENU , , , / ENTER MENU RETURN Numeric buttons PROGRESSIVE DVD-A DVD-V 1 Press TOP MENU or MENU during playback. This section provides general instructions on a 16:9 aspect wide-screen monitor using progressive output, the picture may not...

Owner's Manual
Page 18
...button (h). 3 Enter a four-digit password using progressive output) Progressive signals output from the unit may shift off ). 5 Save the adjusted position. Example: DVD-Audio features DVD-A , , , / ENTER GROUP PAGE Press 3 to move to the right. • Pressing numeric button 2 after pressing 1 or 3 sets the... until you skip this case, consult the disc jacket and other packaging for information. 1 While playback is compatible with the complete line of YAMAHA projectors, including the DPX-1, LPX-500, PDM-1 and DPX-1000. ■ Playing a track in a specific group 1 Press GROUP...
...button (h). 3 Enter a four-digit password using progressive output) Progressive signals output from the unit may shift off ). 5 Save the adjusted position. Example: DVD-Audio features DVD-A , , , / ENTER GROUP PAGE Press 3 to move to the right. • Pressing numeric button 2 after pressing 1 or 3 sets the... until you skip this case, consult the disc jacket and other packaging for information. 1 While playback is compatible with the complete line of YAMAHA projectors, including the DPX-1, LPX-500, PDM-1 and DPX-1000. ■ Playing a track in a specific group 1 Press GROUP...

Owner's Manual
Page 19
...audio track languages and/or formats, if they are available on the display when you change pages.) Switching audio tracks, subtitles and angles DVD-A DVD-V VCD Some discs are supported. This icon appears on the video monitor. 1 • Press ANGLE repeatedly to step through all angles... (k, n) and the numeric buttons also change tracks. Press PAGE to turn the vocals on or off 1 Press SUBTITLE. 2 Press the cursor button (h). ( DVD-A , DVD-V ONLY) 3 Press the cursor buttons (k, n) to select ON or OFF. ■ Changing angles Press ANGLE. ■ Changing audio tracks You can also use...
...audio track languages and/or formats, if they are available on the display when you change pages.) Switching audio tracks, subtitles and angles DVD-A DVD-V VCD Some discs are supported. This icon appears on the video monitor. 1 • Press ANGLE repeatedly to step through all angles... (k, n) and the numeric buttons also change tracks. Press PAGE to turn the vocals on or off 1 Press SUBTITLE. 2 Press the cursor button (h). ( DVD-A , DVD-V ONLY) 3 Press the cursor buttons (k, n) to select ON or OFF. ■ Changing angles Press ANGLE. ■ Changing audio tracks You can also use...

Owner's Manual
Page 20
...Choose a track, then press ENTER. PLAY MODE , , , / ENTER Numeric buttons CANCEL Note • On combination discs (which include 2-channel and multi- DVD-A VCD CD Each time you can also use numeric buttons to start Random screen (Random play mode) Playing in random sequence Return to normal playback...up and down pages on the program screen Press e to move up to cancel. 3 Press CANCEL. No Track 1 Time Play Clear Clear all programs. 16 DVD-A • The "All group play . 2 Press the cursor buttons (k, n) to select a track to 32 tracks from disc. This unit enables you ...
...Choose a track, then press ENTER. PLAY MODE , , , / ENTER Numeric buttons CANCEL Note • On combination discs (which include 2-channel and multi- DVD-A VCD CD Each time you can also use numeric buttons to start Random screen (Random play mode) Playing in random sequence Return to normal playback...up and down pages on the program screen Press e to move up to cancel. 3 Press CANCEL. No Track 1 Time Play Clear Clear all programs. 16 DVD-A • The "All group play . 2 Press the cursor buttons (k, n) to select a track to 32 tracks from disc. This unit enables you ...

Owner's Manual
Page 21
...17 y • You can select multiple groups. • Use the numeric buttons to select a group. PLAYING A DISC MISCELLANEOUS FUNCTIONS Random play SACD DVD-A VCD CD In random play mode, the unit plays all tracks on the front panel display. 3 Press w to start y • You can also... cancel a group by entering its group number using the numeric buttons. PLAY MODE , ENTER CANCEL DVD-A In step 2 of "Random play . 2 Press PLAY MODE. All group play DVD-A 1 Press a to stop playback. 2 Press PLAY MODE. 3 Press w. The "RNDM" indicator disappears. • Opening...
...17 y • You can select multiple groups. • Use the numeric buttons to select a group. PLAYING A DISC MISCELLANEOUS FUNCTIONS Random play SACD DVD-A VCD CD In random play mode, the unit plays all tracks on the front panel display. 3 Press w to start y • You can also... cancel a group by entering its group number using the numeric buttons. PLAY MODE , ENTER CANCEL DVD-A In step 2 of "Random play . 2 Press PLAY MODE. All group play DVD-A 1 Press a to stop playback. 2 Press PLAY MODE. 3 Press w. The "RNDM" indicator disappears. • Opening...