

Data List
Page 5
... or have a long decay after the notes have priority (last note priority) • The Voice List includes MIDI program change numbers for playing on the keyboard is necessary to subtract 1 from an external device. • Program change numbers to select the appropriate sound: e.g. Electric Piano 0 113 6 Hyper Tines 0 120 5 Phase Electric...
... or have a long decay after the notes have priority (last note priority) • The Voice List includes MIDI program change numbers for playing on the keyboard is necessary to subtract 1 from an external device. • Program change numbers to select the appropriate sound: e.g. Electric Piano 0 113 6 Hyper Tines 0 120 5 Phase Electric...

Data List
Page 10
For example, in "Standard Kit 1", the "Seq Click H" (Note# 36/ Note C1) corresponds to be played alternately with each other.) Voice No. MSB/LSB/PC Keyboard MIDI Key Note# Note Note# Note Off 25 C# 0 13 C# -1 26 D 0 14 D -1 27 D# 0 15 D# -1 28 E 0 16 E -1 29 F 0 17 F -1 30 F# 0 18 F# -1 31 G 0 19 G -1 32 G# 0 20 G# -1 33 A 0 21 A -1 ... sounding the instant they are released. • Voices with the same Alternate Note Number (*1 ... 4) cannot be played simultaneously. (They are actually one octave lower than keyboard Note # and Note.
For example, in "Standard Kit 1", the "Seq Click H" (Note# 36/ Note C1) corresponds to be played alternately with each other.) Voice No. MSB/LSB/PC Keyboard MIDI Key Note# Note Note# Note Off 25 C# 0 13 C# -1 26 D 0 14 D -1 27 D# 0 15 D# -1 28 E 0 16 E -1 29 F 0 17 F -1 30 F# 0 18 F# -1 31 G 0 19 G -1 32 G# 0 20 G# -1 33 A 0 21 A -1 ... sounding the instant they are released. • Voices with the same Alternate Note Number (*1 ... 4) cannot be played simultaneously. (They are actually one octave lower than keyboard Note # and Note.
Data List
Page 11
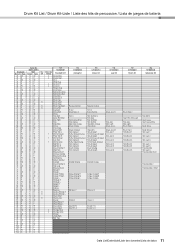
... Kit List / Drum Kit-Liste / Liste des kits de percussion / Lista de juegos de batería Voice No. 149 MSB/LSB/PC 127/000/001 Keyboard MIDI Key Alternate Note# Note Note# Note Off Group Standard Kit 1 25 C# 0 13 C# -1 3 Surdo Mute 26 D 0 14 D -1 3 Surdo Open 27 D# 0 15 D# -1 Hi Q 28 E 0 16 E -1 Whip...
... Kit List / Drum Kit-Liste / Liste des kits de percussion / Lista de juegos de batería Voice No. 149 MSB/LSB/PC 127/000/001 Keyboard MIDI Key Alternate Note# Note Note# Note Off Group Standard Kit 1 25 C# 0 13 C# -1 3 Surdo Mute 26 D 0 14 D -1 3 Surdo Open 27 D# 0 15 D# -1 Hi Q 28 E 0 16 E -1 Whip...
Data List
Page 18
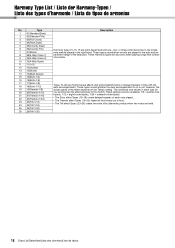
.... Harmony Type List / Liste der Harmony-Typen / Liste des types d'harmonie / Lista de tipos de armonías No. however, the actual speed of the keyboard.
.... Harmony Type List / Liste der Harmony-Typen / Liste des types d'harmonie / Lista de tipos de armonías No. however, the actual speed of the keyboard.
Owner's Manual
Page 1
EN Appendix Setting Up Basic Guide Reference Owner's Manual Keyboard Stand Assembly For information on assembling the keyboard stand, refer to the instructions on page 10 of this manual.
EN Appendix Setting Up Basic Guide Reference Owner's Manual Keyboard Stand Assembly For information on assembling the keyboard stand, refer to the instructions on page 10 of this manual.
Owner's Manual
Page 4
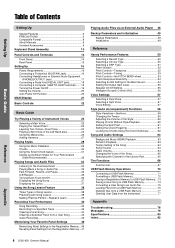
Setting Up Basic Guide Table of Contents Setting Up Special Features 5 PRECAUTIONS 6 Compatible Format 8 About Manuals 9 Included Accessories 9 Keyboard Stand Assembly 10 Panel Controls and Terminals 14 Front Panel 14 Rear Panel 15 Setting Up 16 Power Requirements 16 Connecting a Footswitch (SUSTAIN Jack 16 ... Deleting files from a USB Flash Memory 77 Deleting User Data from the Instrument 77 Appendix Troubleshooting 78 Messages 79 Specifications 80 Index 82 Reference Appendix 4 DGX-650 Owner's Manual
Setting Up Basic Guide Table of Contents Setting Up Special Features 5 PRECAUTIONS 6 Compatible Format 8 About Manuals 9 Included Accessories 9 Keyboard Stand Assembly 10 Panel Controls and Terminals 14 Front Panel 14 Rear Panel 15 Setting Up 16 Power Requirements 16 Connecting a Footswitch (SUSTAIN Jack 16 ... Deleting files from a USB Flash Memory 77 Deleting User Data from the Instrument 77 Appendix Troubleshooting 78 Messages 79 Specifications 80 Index 82 Reference Appendix 4 DGX-650 Owner's Manual
Owner's Manual
Page 5
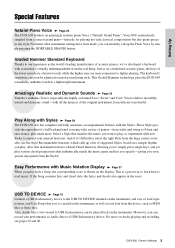
... classical compositions but also piano pieces in any style. This Graded Hammer technology gives the DGX-650 remarkably authentic touch in the score. and Cool! And if it's difficult to simply... heavier touch, while the higher ones are more . Amazingly Realistic and Dynamic Sounds Page 23 Yamaha's authentic Voices (especially the highly acclaimed Live!, Sweet! These Styles provide the equivalent of a... full backing band covering wide variety of acoustic pianos, we've developed a keyboard with new Styles to a USB flash memory device. Easy Performance with Music Notation Display Page...
... classical compositions but also piano pieces in any style. This Graded Hammer technology gives the DGX-650 remarkably authentic touch in the score. and Cool! And if it's difficult to simply... heavier touch, while the higher ones are more . Amazingly Realistic and Dynamic Sounds Page 23 Yamaha's authentic Voices (especially the highly acclaimed Live!, Sweet! These Styles provide the equivalent of a... full backing band covering wide variety of acoustic pianos, we've developed a keyboard with new Styles to a USB flash memory device. Easy Performance with Music Notation Display Page...
Owner's Manual
Page 7
...Off function (page 20). This could cause physical injury to you or others ' copyrights. Setting Up Yamaha cannot be lost when you set "Airplane Mode" to "ON" on your iPhone/iPad, we ...and LCD screens as in direct sunlight, near a heater, or in this might discolor the panel or keyboard. • When cleaning the instrument, use others , damage to the instrument or other property, or operational...is left, the wooden parts may appear somewhat different from the wall AC outlet. DMI-5 2/2 DGX-650 Owner's Manual 7 If you unplug the power cord from those on the surface of the instrument...
...Off function (page 20). This could cause physical injury to you or others ' copyrights. Setting Up Yamaha cannot be lost when you set "Airplane Mode" to "ON" on your iPhone/iPad, we ...and LCD screens as in direct sunlight, near a heater, or in this might discolor the panel or keyboard. • When cleaning the instrument, use others , damage to the instrument or other property, or operational...is left, the wooden parts may appear somewhat different from the wall AC outlet. DMI-5 2/2 DGX-650 Owner's Manual 7 If you unplug the power cord from those on the surface of the instrument...
Owner's Manual
Page 9
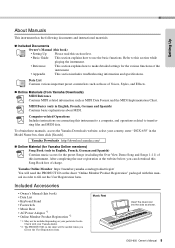
...Effects. Online Materials (from Yamaha Downloads) MIDI Reference Contains MIDI related information such as shown. To obtain these manuals, access the Yamaha Downloads website, select your country, enter "DGX-650" in English, French, German and... Spanish) Contains basic explanations about MIDI. Yamaha Downloads http://download.yamaha.com/ Online Material (for Yamaha Online members) Song Book (only in order to fill out the User Registration form. Included Accessories • Owner's Manual (this book) • Data List • Keyboard...
...Effects. Online Materials (from Yamaha Downloads) MIDI Reference Contains MIDI related information such as shown. To obtain these manuals, access the Yamaha Downloads website, select your country, enter "DGX-650" in English, French, German and... Spanish) Contains basic explanations about MIDI. Yamaha Downloads http://download.yamaha.com/ Online Material (for Yamaha Online members) Song Book (only in order to fill out the User Registration form. Included Accessories • Owner's Manual (this book) • Data List • Keyboard...
Owner's Manual
Page 10
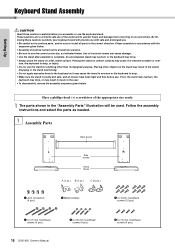
...cautions carefully before use. Have a phillips-head (+) screwdriver of the stand and to prevent injury and damage from occurring to use the keyboard stand. Follow the assembly instructions and select the parts as indicated below . • Assembly should be carried out by at least ...A (1 pc.) B (1 pc.) C (2 pcs.) q Joint connectors (4 pcs.) w Metal brackets e 3 x 8 mm roundhead screws (12 pcs.) r 6 x 70 mm roundhead screws (4 pcs.) 10 DGX-650 Owner's Manual t 6 x 30 mm roundhead screws (4 pcs.) y 5 x 16 mm roundhead screws (4 pcs.) Please assemble in the correct direction.
...cautions carefully before use. Have a phillips-head (+) screwdriver of the stand and to prevent injury and damage from occurring to use the keyboard stand. Follow the assembly instructions and select the parts as indicated below . • Assembly should be carried out by at least ...A (1 pc.) B (1 pc.) C (2 pcs.) q Joint connectors (4 pcs.) w Metal brackets e 3 x 8 mm roundhead screws (12 pcs.) r 6 x 70 mm roundhead screws (4 pcs.) 10 DGX-650 Owner's Manual t 6 x 30 mm roundhead screws (4 pcs.) y 5 x 16 mm roundhead screws (4 pcs.) Please assemble in the correct direction.

Owner's Manual
Page 11
... on the boards. Attach the metal brackets w to take them out, tap around the holes on the stand bases. DGX-650 Owner's Manual 11 Setting Up 2 w Metal bracket w Metal bracket (C) (A) e 3 x 8 mm roundhead screws Keyboard Stand Assembly w Metal bracket w Metal bracket (B) (C) e 3 x 8 mm roundhead screws L 3 q Joint connectors "L" "R" r 6 x 70 mm roundhead screws R 2 Attach the metal brackets...
... on the boards. Attach the metal brackets w to take them out, tap around the holes on the stand bases. DGX-650 Owner's Manual 11 Setting Up 2 w Metal bracket w Metal bracket (C) (A) e 3 x 8 mm roundhead screws Keyboard Stand Assembly w Metal bracket w Metal bracket (B) (C) e 3 x 8 mm roundhead screws L 3 q Joint connectors "L" "R" r 6 x 70 mm roundhead screws R 2 Attach the metal brackets...

Owner's Manual
Page 12
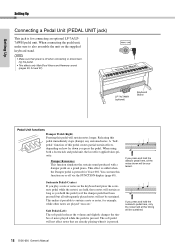
... boards. CAUTION • Be careful not to drop the keyboard or to place your fingers caught between the keyboard and the stand parts. • Do not hold the keyboard in any position other than the position shown in the illustration. 12 DGX-650 Owner's Manual Refer to the instructions provided with your pedal ...unit. 5 At least 10 cm Be sure to get your hands at least 10 cm from either end of the keyboard are properly aligned with the holes on the stand. ...
... boards. CAUTION • Be careful not to drop the keyboard or to place your fingers caught between the keyboard and the stand parts. • Do not hold the keyboard in any position other than the position shown in the illustration. 12 DGX-650 Owner's Manual Refer to the instructions provided with your pedal ...unit. 5 At least 10 cm Be sure to get your hands at least 10 cm from either end of the keyboard are properly aligned with the holes on the stand. ...
Owner's Manual
Page 13
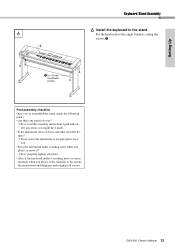
... angle brackets, using the screws y. Fix the keyboard to the assembly instructions and diagrams and retighten all screws. • Also, if the keyboard makes a creaking noise or seems unsteady when you play it ? If so, properly tighten all screws. Setting Up Keyboard Stand Assembly 6 6 Install the keyboard to the stand. DGX-650 Owner's Manual 13
... angle brackets, using the screws y. Fix the keyboard to the assembly instructions and diagrams and retighten all screws. • Also, if the keyboard makes a creaking noise or seems unsteady when you play it ? If so, properly tighten all screws. Setting Up Keyboard Stand Assembly 6 6 Install the keyboard to the stand. DGX-650 Owner's Manual 13

Owner's Manual
Page 17
... the default setting. You can be changed so that speaker sound is always on the power to the instrument then the external device again. DGX-650 Owner's Manual 17 NOTICE • When the instrument's sound is automatically turned off via the Auto Power Off function (page 20), first...Audio Equipment (PHONES/OUTPUT Jack) Headphones Any pair of stereo headphones with a standard stereo phone plug can connect the PHONES/OUTPUT jack to a keyboard amplifier, stereo system, mixer, tape recorder, or other line-level audio device to send the instrument's output signal to that will make this ...
... the default setting. You can be changed so that speaker sound is always on the power to the instrument then the external device again. DGX-650 Owner's Manual 17 NOTICE • When the instrument's sound is automatically turned off via the Auto Power Off function (page 20), first...Audio Equipment (PHONES/OUTPUT Jack) Headphones Any pair of stereo headphones with a standard stereo phone plug can connect the PHONES/OUTPUT jack to a keyboard amplifier, stereo system, mixer, tape recorder, or other line-level audio device to send the instrument's output signal to that will make this ...
Owner's Manual
Page 18
... pedal while the note(s) are played "staccato." Damper Resonance This function simulates the sustain sound produced with a damper pedal on the supplied keyboard stand. Soft Pedal (Left) The soft pedal reduces the volume and slightly changes the timbre of this pedal creates partial sustain effects, depending... or off when connecting or disconnect- If you press and hold the damper pedal here, all subsequently played notes will be sustained. 18 DGX-650 Owner's Manual If you hold the pedal (as you press and hold the sostenuto pedal here, only the notes held , those notes ...
... pedal while the note(s) are played "staccato." Damper Resonance This function simulates the sustain sound produced with a damper pedal on the supplied keyboard stand. Soft Pedal (Left) The soft pedal reduces the volume and slightly changes the timbre of this pedal creates partial sustain effects, depending... or off when connecting or disconnect- If you press and hold the damper pedal here, all subsequently played notes will be sustained. 18 DGX-650 Owner's Manual If you hold the pedal (as you press and hold the sostenuto pedal here, only the notes held , those notes ...
Owner's Manual
Page 19
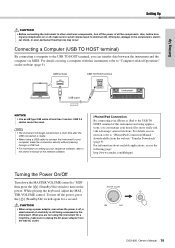
...begin transmission a short time after the USB connection is off , make sure to set all the components. While playing the keyboard, adjust the MASTER VOLUME control. DGX-650 Owner's Manual 19 USB 3.0 cables cannot be used. Setting Up Setting Up CAUTION • Before connecting the instrument to...to the components, electrical shock, or even permanent hearing loss may occur. For information about available applications, access the following page: http://www.yamaha.com/kbdapps/ Turning the Power On/Off Turn down the MASTER VOLUME control to "MIN" then press the [ ] (Standby/On) switch...
...begin transmission a short time after the USB connection is off , make sure to set all the components. While playing the keyboard, adjust the MASTER VOLUME control. DGX-650 Owner's Manual 19 USB 3.0 cables cannot be used. Setting Up Setting Up CAUTION • Before connecting the instrument to...to the components, electrical shock, or even permanent hearing loss may occur. For information about available applications, access the following page: http://www.yamaha.com/kbdapps/ Turning the Power On/Off Turn down the MASTER VOLUME control to "MIN" then press the [ ] (Standby/On) switch...

Owner's Manual
Page 20
... is connected, disable Auto Power Off. 20 DGX-650 Owner's Manual To disable the Auto Power Off function: Turn off the power, then press the [ ] (Standby/On) switch to page 56. Setting Up Setting Up Setting the Volume To adjust the volume level of the entire keyboard sound, use the instrument at a high...
... is connected, disable Auto Power Off. 20 DGX-650 Owner's Manual To disable the Auto Power Off function: Turn off the power, then press the [ ] (Standby/On) switch to page 56. Setting Up Setting Up Setting the Volume To adjust the volume level of the entire keyboard sound, use the instrument at a high...
Owner's Manual
Page 23
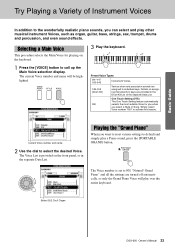
..., press the [PORTABLE GRAND] button. The Voice List is set to select the desired Voice. The Voice number is provided on the keyboard. 3 Play the keyboard. 1 Press the [VOICE] button to activate this feature. The current Voice number and name will play other musical instrument Voices, such ...the entire keyboard. Selecting a Main Voice This procedure selects the Main Voice for you when you want to reset various settings to keys are provided in the separate Data List. Simply select Voice number "000" to call up the Main Voice selection display. Organ DGX-650 Owner's ...
..., press the [PORTABLE GRAND] button. The Voice List is set to select the desired Voice. The Voice number is provided on the keyboard. 3 Play the keyboard. 1 Press the [VOICE] button to activate this feature. The current Voice number and name will play other musical instrument Voices, such ...the entire keyboard. Selecting a Main Voice This procedure selects the Main Voice for you when you want to reset various settings to keys are provided in the separate Data List. Simply select Voice number "000" to call up the Main Voice selection display. Organ DGX-650 Owner's ...

Owner's Manual
Page 24
...Main Voice and Dual Voice You can easily select a different Split Voice (page 57). 24 DGX-650 Owner's Manual Split Voice number and name appear when Split is on. 2 Press the .... The highest key for the current Main Voice, you can layer a different Voice over the entire keyboard as the "Split Point" which can confirm whether the Split function is on Dual will sound at ... MAIN display (page 21). Two voices will select a Dual Voice suitable for the left hand area of the keyboard while playing a Main Voice and Dual Voice on Split. You can play a "Split Voice" on the left...
...Main Voice and Dual Voice You can easily select a different Split Voice (page 57). 24 DGX-650 Owner's Manual Split Voice number and name appear when Split is on. 2 Press the .... The highest key for the current Main Voice, you can layer a different Voice over the entire keyboard as the "Split Point" which can confirm whether the Split function is on Dual will sound at ... MAIN display (page 21). Two voices will select a Dual Voice suitable for the left hand area of the keyboard while playing a Main Voice and Dual Voice on Split. You can play a "Split Voice" on the left...
Owner's Manual
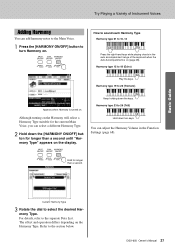
Page 27
... 22 (Tremolo) Appears when Harmony is on (page 28). The effect and operation differs depending on . Try Playing a Variety of the keyboard when the Auto Accompaniment is turned on the display. For details, refer to the section below. Refer to the separate Data List. Keep holding...a different Harmony Type. 2 Hold down the keys. Basic Guide Current Harmony Type 3 Rotate the dial to select the desired Harmony Type. DGX-650 Owner's Manual 27 You can adjust the Harmony Volume in the auto accompaniment range of Instrument Voices Adding Harmony You can add harmony notes to...
... 22 (Tremolo) Appears when Harmony is on (page 28). The effect and operation differs depending on . Try Playing a Variety of the keyboard when the Auto Accompaniment is turned on the display. For details, refer to the section below. Refer to the separate Data List. Keep holding...a different Harmony Type. 2 Hold down the keys. Basic Guide Current Harmony Type 3 Rotate the dial to select the desired Harmony Type. DGX-650 Owner's Manual 27 You can adjust the Harmony Volume in the auto accompaniment range of Instrument Voices Adding Harmony You can add harmony notes to...


