
Data List
Page 4
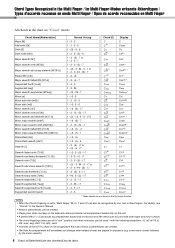
... fingers. b5 - 7 1 - 4 - 5 1 - 3 - #5 1 - (3) - #5 - 7 1 - b3 - (5) - b3 - (5) - b5 - b7 1 - b7 or 1 - 2 - 3 - #4 - (5) - b5 - b3 - b5 1 - b7 1 - (2) - 3 - #4 - 5 - b5 1 - 3 - b7 1 - b3 - 4 - 5 - (b7) 1 - b7 1 - 3 - b3 - 5 1 - For details, see "Chords" in the Owner's Manual. • Notes in parentheses can be omitted. • Playing two same root keys in sequence (e.g. b7 1 - 2 - b3 - b7 or 1 - (3) - 5 - b3 - 5 1 - 2 - b7 1 - #2 - 3 - (5) - b3 - (5) - 7 1 - b3 - (5) - 7 1 - 2 - b7 1 - 4 - 5 - b5 - 6 1 - 3 - (5) -
... fingers. b5 - 7 1 - 4 - 5 1 - 3 - #5 1 - (3) - #5 - 7 1 - b3 - (5) - b3 - (5) - b5 - b7 1 - b7 or 1 - 2 - 3 - #4 - (5) - b5 - b3 - b5 1 - b7 1 - (2) - 3 - #4 - 5 - b5 1 - 3 - b7 1 - b3 - 4 - 5 - (b7) 1 - b7 1 - 3 - b3 - 5 1 - For details, see "Chords" in the Owner's Manual. • Notes in parentheses can be omitted. • Playing two same root keys in sequence (e.g. b7 1 - 2 - b3 - b7 or 1 - (3) - 5 - b3 - 5 1 - 2 - b7 1 - #2 - 3 - (5) - b3 - (5) - 7 1 - b3 - (5) - 7 1 - 2 - b7 1 - 4 - 5 - b5 - 6 1 - 3 - (5) -
Owner's Manual
Page 1
Setting Up Basic Guide Reference Owner's Manual Keyboard Stand Assembly For information on assembling the keyboard stand, refer to the instructions on page 10 of this manual. EN Appendix
Setting Up Basic Guide Reference Owner's Manual Keyboard Stand Assembly For information on assembling the keyboard stand, refer to the instructions on page 10 of this manual. EN Appendix

Owner's Manual
Page 2
...FCC, to any hearing loss or ringing in the manual, on different branch (circuit breaker or fuse) circuits or install AC line filter/s. ENVIRONMENTAL ISSUES: Yamaha strives to those products distributed by using . The ... contact a qualified service representative to update existing units. Some of product. Modifications not expressly approved by Yamaha may have benches and / or accessory mounting fixtures that could cause permanent hearing loss. If this product..., meet these items are not covered by YAMAHA CORPORATION OF AMERICA. (class B) 2 DGX-650 Owner's Manual
...FCC, to any hearing loss or ringing in the manual, on different branch (circuit breaker or fuse) circuits or install AC line filter/s. ENVIRONMENTAL ISSUES: Yamaha strives to those products distributed by using . The ... contact a qualified service representative to update existing units. Some of product. Modifications not expressly approved by Yamaha may have benches and / or accessory mounting fixtures that could cause permanent hearing loss. If this product..., meet these items are not covered by YAMAHA CORPORATION OF AMERICA. (class B) 2 DGX-650 Owner's Manual
Owner's Manual
Page 3
... where you purchased the items. [For business users in the European Union] If you will help to products distributed by YAMAHA CORPORATION OF AMERICA. (FCC DoC) OBSERVERA! By disposing of these items, please contact your dealer or supplier for the ... INFORMATION STATEMENT (DECLARATION OF CONFORMITY PROCEDURE) Responsible Party : Yamaha Corporation of America Address : 6600 Orangethorpe Ave., Buena Park, Calif. 90620 Telephone : 714-522-9011 Type of Equipment : Digital Piano Model Name : DGX-650 This device complies with Part 15 of disposal. (weee_eu_en_01) DGX-650 Owner's Manual 3
... where you purchased the items. [For business users in the European Union] If you will help to products distributed by YAMAHA CORPORATION OF AMERICA. (FCC DoC) OBSERVERA! By disposing of these items, please contact your dealer or supplier for the ... INFORMATION STATEMENT (DECLARATION OF CONFORMITY PROCEDURE) Responsible Party : Yamaha Corporation of America Address : 6600 Orangethorpe Ave., Buena Park, Calif. 90620 Telephone : 714-522-9011 Type of Equipment : Digital Piano Model Name : DGX-650 This device complies with Part 15 of disposal. (weee_eu_en_01) DGX-650 Owner's Manual 3
Owner's Manual
Page 4
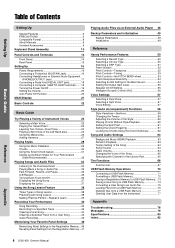
Setting Up Basic Guide Table of Contents Setting Up Special Features 5 PRECAUTIONS 6 Compatible Format 8 About Manuals 9 Included Accessories 9 Keyboard Stand Assembly 10 Panel Controls and Terminals 14 Front Panel 14 Rear Panel 15 Setting Up 16 Power Requirements 16 Connecting a Footswitch (... Deleting files from a USB Flash Memory 77 Deleting User Data from the Instrument 77 Appendix Troubleshooting 78 Messages 79 Specifications 80 Index 82 Reference Appendix 4 DGX-650 Owner's Manual
Setting Up Basic Guide Table of Contents Setting Up Special Features 5 PRECAUTIONS 6 Compatible Format 8 About Manuals 9 Included Accessories 9 Keyboard Stand Assembly 10 Panel Controls and Terminals 14 Front Panel 14 Rear Panel 15 Setting Up 16 Power Requirements 16 Connecting a Footswitch (... Deleting files from a USB Flash Memory 77 Deleting User Data from the Instrument 77 Appendix Troubleshooting 78 Messages 79 Specifications 80 Index 82 Reference Appendix 4 DGX-650 Owner's Manual
Owner's Manual
Page 5
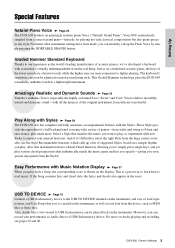
... chord progressions that matches the music you to lighter playing. Setting Up Setting Up Special Features Natural Piano Voice Page 23 The DGX-650 features an amazingly realistic piano Voice ("Natural! No matter what instrument settings have a heavier touch, while the higher ones are ... genre and key you specify-giving you can be adjusted to match your performance as on the display. DGX-650 Owner's Manual 5 Amazingly Realistic and Dynamic Sounds Page 23 Yamaha's authentic Voices (especially the highly acclaimed Live!, Sweet! These Styles provide the equivalent of a full backing...
... chord progressions that matches the music you to lighter playing. Setting Up Setting Up Special Features Natural Piano Voice Page 23 The DGX-650 features an amazingly realistic piano Voice ("Natural! No matter what instrument settings have a heavier touch, while the higher ones are ... genre and key you specify-giving you can be adjusted to match your performance as on the display. DGX-650 Owner's Manual 5 Amazingly Realistic and Dynamic Sounds Page 23 Yamaha's authentic Voices (especially the highly acclaimed Live!, Sweet! These Styles provide the equivalent of a full backing...
Owner's Manual
Page 6
...abnormality • When one of the instrument. • Use the specified adaptor (page 81) only. Then have the device inspected by qualified Yamaha service personnel. • Never insert or remove an electric plug with wet hands. If you are using a multiple-connector. Then have the...burning items, such as heaters or radiators. Some object has been dropped into any dirt or dust which might accidentally fall over . 6 DGX-650 Owner's Manual DMI-5 1/2 Doing so can result in any containers (such as water seeps into the instrument, turn off , electricity is easily accessible. ...
...abnormality • When one of the instrument. • Use the specified adaptor (page 81) only. Then have the device inspected by qualified Yamaha service personnel. • Never insert or remove an electric plug with wet hands. If you are using a multiple-connector. Then have the...burning items, such as heaters or radiators. Some object has been dropped into any dirt or dust which might accidentally fall over . 6 DGX-650 Owner's Manual DMI-5 1/2 Doing so can result in any containers (such as water seeps into the instrument, turn off , electricity is easily accessible. ...
Owner's Manual
Page 7
...set the desired listening level. Handling caution • Do not insert a finger or hand in any hearing loss or ringing in which Yamaha owns copyrights or with the instrument • Some of the preset songs have been edited for a long period of time at a high...your personal use. • This product incorporates and bundles computer programs and contents in the ears, consult a physician. DMI-5 2/2 DGX-650 Owner's Manual 7 NOTICE To avoid the possibility of copyright has legal consequences. Such copyrighted materials include, without saving. Connections • Before connecting ...
...set the desired listening level. Handling caution • Do not insert a finger or hand in any hearing loss or ringing in which Yamaha owns copyrights or with the instrument • Some of the preset songs have been edited for a long period of time at a high...your personal use. • This product incorporates and bundles computer programs and contents in the ears, consult a physician. DMI-5 2/2 DGX-650 Owner's Manual 7 NOTICE To avoid the possibility of copyright has legal consequences. Such copyrighted materials include, without saving. Connections • Before connecting ...
Owner's Manual
Page 8
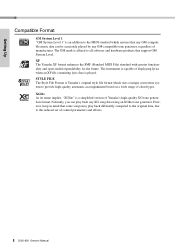
... addition to the MIDI standard which uses a unique conversion system to the reduced set of control parameters and effects. 8 DGX-650 Owner's Manual The GM mark is a simplified version of Yamaha's high-quality XG tone generation format. STYLE FILE The Style File Format is played. XGlite As its name implies, "XGlite.... However, keep in mind that some songs may play back any GM-compatible tone generator, regardless of chord types. XF The Yamaha XF format enhances the SMF (Standard MIDI File) standard with greater functionality and open-ended expandability for the future.
... addition to the MIDI standard which uses a unique conversion system to the reduced set of control parameters and effects. 8 DGX-650 Owner's Manual The GM mark is a simplified version of Yamaha's high-quality XG tone generation format. STYLE FILE The Style File Format is played. XGlite As its name implies, "XGlite.... However, keep in mind that some songs may play back any GM-compatible tone generator, regardless of chord types. XF The Yamaha XF format enhances the SMF (Standard MIDI File) standard with greater functionality and open-ended expandability for the future.
Owner's Manual
Page 9
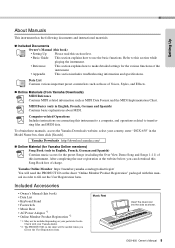
... and instructional materials. Included Documents Owner's Manual (this book) • Setting Up Please read this manual in order to fill out the User Registration form. MIDI Basics (only in English, French, German and Spanish) Contains basic explanations about MIDI. To obtain these manuals, access the Yamaha Downloads website, select your particular locale. DGX-650 Owner's Manual 9
... and instructional materials. Included Documents Owner's Manual (this book) • Setting Up Please read this manual in order to fill out the User Registration form. MIDI Basics (only in English, French, German and Spanish) Contains basic explanations about MIDI. To obtain these manuals, access the Yamaha Downloads website, select your particular locale. DGX-650 Owner's Manual 9
Owner's Manual
Page 10
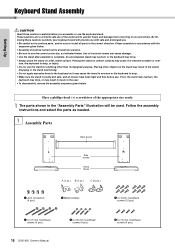
... Back board L R Side boards Stand bases A (1 pc.) B (1 pc.) C (2 pcs.) q Joint connectors (4 pcs.) w Metal brackets e 3 x 8 mm roundhead screws (12 pcs.) r 6 x 70 mm roundhead screws (4 pcs.) 10 DGX-650 Owner's Manual t 6 x 30 mm roundhead screws (4 pcs.) y 5 x 16 mm roundhead screws (4 pcs.) Please assemble in the correct direction.
... Back board L R Side boards Stand bases A (1 pc.) B (1 pc.) C (2 pcs.) q Joint connectors (4 pcs.) w Metal brackets e 3 x 8 mm roundhead screws (12 pcs.) r 6 x 70 mm roundhead screws (4 pcs.) 10 DGX-650 Owner's Manual t 6 x 30 mm roundhead screws (4 pcs.) y 5 x 16 mm roundhead screws (4 pcs.) Please assemble in the correct direction.

Owner's Manual
Page 11
... aligned with the screw holes on the connector. Attach the "L" (Left) and "R" (Right) stand bases to the top of the side boards, using the screws r. DGX-650 Owner's Manual 11 Setting Up 2 w Metal bracket w Metal bracket (C) (A) e 3 x 8 mm roundhead screws Keyboard Stand Assembly w Metal bracket w Metal bracket (B) (C) e 3 x 8 mm roundhead screws L 3 q Joint connectors "L" "R" r 6 x 70 mm...
... aligned with the screw holes on the connector. Attach the "L" (Left) and "R" (Right) stand bases to the top of the side boards, using the screws r. DGX-650 Owner's Manual 11 Setting Up 2 w Metal bracket w Metal bracket (C) (A) e 3 x 8 mm roundhead screws Keyboard Stand Assembly w Metal bracket w Metal bracket (B) (C) e 3 x 8 mm roundhead screws L 3 q Joint connectors "L" "R" r 6 x 70 mm...

Owner's Manual
Page 12
... between the keyboard and the stand parts. • Do not hold the keyboard in any position other than the position shown in the illustration. 12 DGX-650 Owner's Manual NOTE • If you have purchased an optional pedal unit, attach the pedal unit before proceeding to place your pedal unit. 5 At least 10...
... between the keyboard and the stand parts. • Do not hold the keyboard in any position other than the position shown in the illustration. 12 DGX-650 Owner's Manual NOTE • If you have purchased an optional pedal unit, attach the pedal unit before proceeding to place your pedal unit. 5 At least 10...
Owner's Manual
Page 13
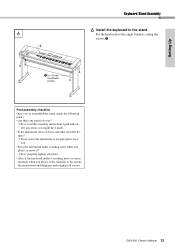
... instrument to an appropriate location. • Does the instrument make a rattling noise when you play it, refer carefully to the angle brackets, using the screws y. DGX-650 Owner's Manual 13 Setting Up Keyboard Stand Assembly 6 6 Install the keyboard to the stand.
... instrument to an appropriate location. • Does the instrument make a rattling noise when you play it, refer carefully to the angle brackets, using the screws y. DGX-650 Owner's Manual 13 Setting Up Keyboard Stand Assembly 6 6 Install the keyboard to the stand.
Owner's Manual
Page 14
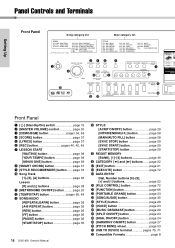
... page 39 [A-B REPEAT] button page 36 [REW] button page 36 [FF] button page 36 [PAUSE] button page 36 [START/STOP] button page 35 14 DGX-650 Owner's Manual !4 STYLE [ACMP ON/OFF] button page 28 [INTRO/ENDING/rit.] button page 58 [MAIN/AUTO FILL] button page 58 [SYNC STOP] button page 59 [SYNC...
... page 39 [A-B REPEAT] button page 36 [REW] button page 36 [FF] button page 36 [PAUSE] button page 36 [START/STOP] button page 35 14 DGX-650 Owner's Manual !4 STYLE [ACMP ON/OFF] button page 28 [INTRO/ENDING/rit.] button page 58 [MAIN/AUTO FILL] button page 58 [SYNC STOP] button page 59 [SYNC...

Owner's Manual
Page 15
DGX-650 Owner's Manual 15 Setting Up Panel Controls and Terminals Display (page 21) Voice category list Music Database category list !9 !6 !7 !8 @2 @3 @4 @5 @6 @0 #1 @1 !5 @7 @8 @9 #0 A-1 C0 C1 C2 C3 C4 C5 C6 C7 ...
DGX-650 Owner's Manual 15 Setting Up Panel Controls and Terminals Display (page 21) Voice category list Music Database category list !9 !6 !7 !8 @2 @3 @4 @5 @6 @0 #1 @1 !5 @7 @8 @9 #0 A-1 C0 C1 C2 C3 C4 C5 C6 C7 ...
Owner's Manual
Page 16
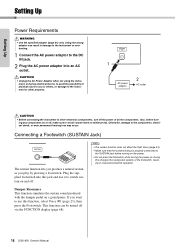
... sustain sound produced with the damper pedal on or off via the FUNCTION display (page 68). This function can result in reversed footswitch operation. 16 DGX-650 Owner's Manual Also, before turning on the power. • Do not press the footswitch while turning the power on and off the power of the footswitch...
... sustain sound produced with the damper pedal on or off via the FUNCTION display (page 68). This function can result in reversed footswitch operation. 16 DGX-650 Owner's Manual Also, before turning on the power. • Do not press the footswitch while turning the power on and off the power of the footswitch...

Owner's Manual
Page 17
... performance impossible, and may even damage both pieces of equipment. If you turn on the power to the instrument, then to the external device. DGX-650 Owner's Manual 17 Optimum setting Output gain level for this jack is automatically turned off via the Auto Power Off function (page 20), first turn off the...
... performance impossible, and may even damage both pieces of equipment. If you turn on the power to the instrument, then to the external device. DGX-650 Owner's Manual 17 Optimum setting Output gain level for this jack is automatically turned off via the Auto Power Off function (page 20), first turn off the...
Owner's Manual
Page 18
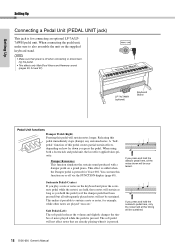
...) If you press and hold the pedal (as if the damper pedal had been pressed) but all the notes shown will not be sustained. 18 DGX-650 Owner's Manual Setting Up Setting Up Connecting a Pedal Unit (PEDAL UNIT jack) This jack is pressed. If you press and hold the sostenuto pedal here, only...
...) If you press and hold the pedal (as if the damper pedal had been pressed) but all the notes shown will not be sustained. 18 DGX-650 Owner's Manual Setting Up Setting Up Connecting a Pedal Unit (PEDAL UNIT jack) This jack is pressed. If you press and hold the sostenuto pedal here, only...
Owner's Manual
Page 19
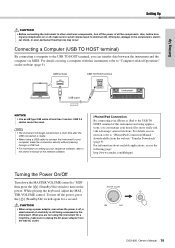
...you can transfer data between the instrument and the computer via MIDI. For information about available applications, access the following page: http://www.yamaha.com/kbdapps/ Turning the Power On/Off Turn down the MASTER VOLUME control to "MIN" then press the [ ] (Standby/On) ... Operations" on connection, refer to unplug the AC power adaptor from the website "Yamaha Downloads" (page 9). To turn off , make sure to "iPhone/iPad Connection Manual" downloadable from the wall AC outlet. DGX-650 Owner's Manual 19 Connecting a Computer (USB TO HOST terminal) By connecting a computer to the...
...you can transfer data between the instrument and the computer via MIDI. For information about available applications, access the following page: http://www.yamaha.com/kbdapps/ Turning the Power On/Off Turn down the MASTER VOLUME control to "MIN" then press the [ ] (Standby/On) ... Operations" on connection, refer to unplug the AC power adaptor from the website "Yamaha Downloads" (page 9). To turn off , make sure to "iPhone/iPad Connection Manual" downloadable from the wall AC outlet. DGX-650 Owner's Manual 19 Connecting a Computer (USB TO HOST terminal) By connecting a computer to the...

