
Owner's Manual
Page 1
OWNER'S MANUAL CONTENTS Safety Instructions 2 Features 4 Connections 5 Identification of Components 6 Basic Operation 8 Random-Sequence Play 13 Program Play 14 Repeat Play 16 Index Search 16 CD Synchronized Recording 17 Track Programming for Recording to Tape for selecting this YAMAHA Compact Disc Player. CDC-901/501 Natural Sound Compact Disc Player Thank you for CDC-901 only 18 Notes about the Remote Control Transmitter...... 22 Notes about Handling Compact Discs......... 22 Troubleshooting 23 Specifications 23
OWNER'S MANUAL CONTENTS Safety Instructions 2 Features 4 Connections 5 Identification of Components 6 Basic Operation 8 Random-Sequence Play 13 Program Play 14 Repeat Play 16 Index Search 16 CD Synchronized Recording 17 Track Programming for Recording to Tape for selecting this YAMAHA Compact Disc Player. CDC-901/501 Natural Sound Compact Disc Player Thank you for CDC-901 only 18 Notes about the Remote Control Transmitter...... 22 Notes about Handling Compact Discs......... 22 Troubleshooting 23 Specifications 23
Owner's Manual
Page 2
... should be unplugged from power lines. 18 Grounding or Polarization - The unit does not appear to service the unit beyond those means described in the operating instructions or as a bookcase or cabinet that may impede the flow of this Owner's Manual in performance; All other servicing should not attempt to operate normally or exhibits a marked change in a safe place for...
... should be unplugged from power lines. 18 Grounding or Polarization - The unit does not appear to service the unit beyond those means described in the operating instructions or as a bookcase or cabinet that may impede the flow of this Owner's Manual in performance; All other servicing should not attempt to operate normally or exhibits a marked change in a safe place for...

Owner's Manual
Page 3
... unit. Then gently disconnect the power plug and the cords connecting to qualified personel only. Do not place another component on switches, knobs or cords. As the laser beam used in a cool, dry, clean place - Refer servicing to other equipment. The apparatus is not disconnected from excessive volume levels. 3 and, most out of your equipment by playing it is not pictured as...
... unit. Then gently disconnect the power plug and the cords connecting to qualified personel only. Do not place another component on switches, knobs or cords. As the laser beam used in a cool, dry, clean place - Refer servicing to other equipment. The apparatus is not disconnected from excessive volume levels. 3 and, most out of your equipment by playing it is not pictured as...
Owner's Manual
Page 4
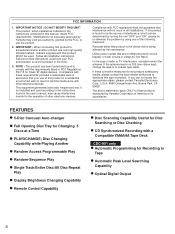
... antenna lead-in this product MUST be determined by turning the unit "OFF" and "ON", please try to be the source of America or its subsidiaries. Compliance with this manual, meets FCC requirements. FCC INFORMATION 1. This product, when installed as indicated in the instructions contained in is found to comply with a Compatible YAMAHA Tape Deck CDC-901 only q Automatic Programming for Changing 5 Discs at a Time...
... antenna lead-in this product MUST be determined by turning the unit "OFF" and "ON", please try to be the source of America or its subsidiaries. Compliance with this manual, meets FCC requirements. FCC INFORMATION 1. This product, when installed as indicated in the instructions contained in is found to comply with a Compatible YAMAHA Tape Deck CDC-901 only q Automatic Programming for Changing 5 Discs at a Time...
Owner's Manual
Page 5
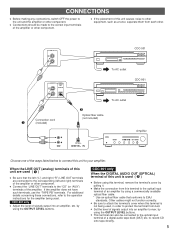
...; Connection cord (included) CDC-501 To AC outlet CDC-901 — Optical fiber cable (not included) To AC outlet Amplifier CD OPTICAL DIGITAL IN Choose one of the amplifier or other component. q This terminal can also be made to the correct input terminals of the ways listed below to connect this terminal, remove the terminal's cover by using the OUTPUT LEVEL buttons. CDC-901 only When the DIGITAL AUDIO OUT (OPTICAL) terminal of a digital audio tape deck...
...; Connection cord (included) CDC-501 To AC outlet CDC-901 — Optical fiber cable (not included) To AC outlet Amplifier CD OPTICAL DIGITAL IN Choose one of the amplifier or other component. q This terminal can also be made to the correct input terminals of the ways listed below to connect this terminal, remove the terminal's cover by using the OUTPUT LEVEL buttons. CDC-901 only When the DIGITAL AUDIO OUT (OPTICAL) terminal of a digital audio tape deck...
Owner's Manual
Page 6
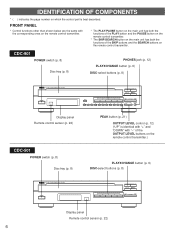
...-695051 POWER switch (p. 8) Disc tray (p. 8) PHONES jack (p. 12) PLAYXCHANGE button (p. 9) DISC-select buttons (p. 8) NATURAL SOUND COMPACT DISC PLAYER POWER Display panel Remote control sensor (p. 22) PLAYXCHANGE OPEN/CLOSE STOP PLAY/ PAUSE PROG DISC I 2 3 4 5 SKIP/SEARCH OUTPUT LEVEL PHONES +I0 I 2 3 4 5 SKIP/SEARCH Display panel Remote control sensor (p. 22) 6 IDENTIFICATION OF COMPONENTS * ( ) indicates the page number on which the control part is identical with "+" and "DOWN" with the corresponding ones on the remote control transmitter. * The PLAY/PAUSE button...
...-695051 POWER switch (p. 8) Disc tray (p. 8) PHONES jack (p. 12) PLAYXCHANGE button (p. 9) DISC-select buttons (p. 8) NATURAL SOUND COMPACT DISC PLAYER POWER Display panel Remote control sensor (p. 22) PLAYXCHANGE OPEN/CLOSE STOP PLAY/ PAUSE PROG DISC I 2 3 4 5 SKIP/SEARCH OUTPUT LEVEL PHONES +I0 I 2 3 4 5 SKIP/SEARCH Display panel Remote control sensor (p. 22) 6 IDENTIFICATION OF COMPONENTS * ( ) indicates the page number on which the control part is identical with "+" and "DOWN" with the corresponding ones on the remote control transmitter. * The PLAY/PAUSE button...
Owner's Manual
Page 8
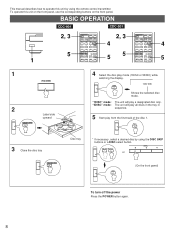
... Shows the selected disc mode. DISC SKIP DISC 2 3 4 or (On the front panel) PLAY To turn off the power Press the POWER button again. 8 "1DISC" mode: The unit will play all discs in the tray in sequence. 5 Start play a designated disc only. "5DISC" mode: The unit will play from the first track of the disc 1. BASIC OPERATION CDC-901 CDC-501 1 2, 3 5 OPEN/CLOSE DIMMER TIME PROG TAPE REPEAT RANDOM 1 2 3 MODE 4 5 6 +10 7 8 9 0 DISC SKIP SKIP DISC SCAN PAUSE PLAY SEARCH...
... Shows the selected disc mode. DISC SKIP DISC 2 3 4 or (On the front panel) PLAY To turn off the power Press the POWER button again. 8 "1DISC" mode: The unit will play all discs in the tray in sequence. 5 Start play a designated disc only. "5DISC" mode: The unit will play from the first track of the disc 1. BASIC OPERATION CDC-901 CDC-501 1 2, 3 5 OPEN/CLOSE DIMMER TIME PROG TAPE REPEAT RANDOM 1 2 3 MODE 4 5 6 +10 7 8 9 0 DISC SKIP SKIP DISC SCAN PAUSE PLAY SEARCH...
Owner's Manual
Page 9
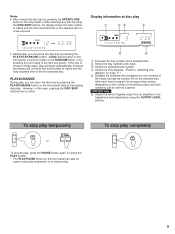
... buttons has no effect. CDC-901 only ‘ Shows the level of signals output into an amplifier or the headphone level adjusted by using the DISC SKIP buttons, the display shows the total number of tracks and the total recorded time of the selected disc for a few seconds. 5DISC 1 2 3 4 5 6 7 8 9 10 11 12 TOTAL q Additionally, you can close the disc tray by pressing the PLAY(PLAY/PAUSE) button, a DISC-select button on the front panel, a numeric button...
... buttons has no effect. CDC-901 only ‘ Shows the level of signals output into an amplifier or the headphone level adjusted by using the DISC SKIP buttons, the display shows the total number of tracks and the total recorded time of the selected disc for a few seconds. 5DISC 1 2 3 4 5 6 7 8 9 10 11 12 TOTAL q Additionally, you can close the disc tray by pressing the PLAY(PLAY/PAUSE) button, a DISC-select button on the front panel, a numeric button...
Owner's Manual
Page 10
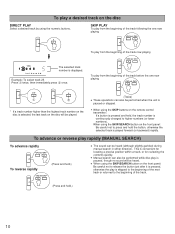
....) 10 q When using the SKIP/SEARCH button on the front panel: Be careful not to press and hold .) q The sound can also be heard. To play a desired track on the disc DIRECT PLAY Select a desired track by using the SKIP buttons on the remote control transmitter: If a button is pressed and held, the track number is continuously changed to higher numbers (or lower numbers). To play from the beginning...
....) 10 q When using the SKIP/SEARCH button on the front panel: Be careful not to press and hold .) q The sound can also be heard. To play a desired track on the disc DIRECT PLAY Select a desired track by using the SKIP buttons on the remote control transmitter: If a button is pressed and held, the track number is continuously changed to higher numbers (or lower numbers). To play from the beginning...
Owner's Manual
Page 12
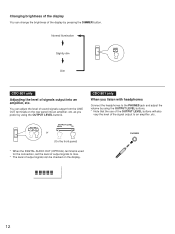
... DIMMER Dim CDC-901 only Adjusting the level of the signal output to max. * The level of sound signals output from the LINE OUT terminals on the display. OUTPUT LEVEL + OUTPUT LEVEL DOWN UP or (On the front panel) * When the DIGITAL AUDIO OUT (OPTICAL) terminal is used for the connection, set the level of output signals to an amplifier, etc. - You can adjust the level of output signals can change the brightness of the display by using the OUTPUT LEVEL buttons. PHONES 12 Changing brightness of...
... DIMMER Dim CDC-901 only Adjusting the level of the signal output to max. * The level of sound signals output from the LINE OUT terminals on the display. OUTPUT LEVEL + OUTPUT LEVEL DOWN UP or (On the front panel) * When the DIGITAL AUDIO OUT (OPTICAL) terminal is used for the connection, set the level of output signals to an amplifier, etc. - You can adjust the level of output signals can change the brightness of the display by using the OUTPUT LEVEL buttons. PHONES 12 Changing brightness of...
Owner's Manual
Page 13
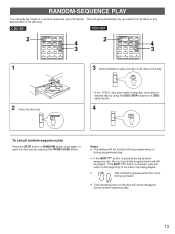
.../CLOSE button. RANDOM-SEQUENCE PLAY You can play the tracks in a random sequence (up tracks. q Total remaining time on the disc will be displayed during programmed play one disc or all discs or any desired disc in the disc tray. CDC-901 CDC-501 2 OPEN/CLOSE DIMMER TIME PROG TAPE REPEAT RANDOM 1 2 3 MODE 4 5 6 +10 7 8 9 0 4 3 2 OPEN/CLOSE DIMMER TIME PROG CLEAR REPEAT RANDOM 1 2 3 MODE 4 5 6 +10 7 8 9 0 4 3 1 3 Select whether to 99 tracks). MODE 2 Close the disc...
.../CLOSE button. RANDOM-SEQUENCE PLAY You can play the tracks in a random sequence (up tracks. q Total remaining time on the disc will be displayed during programmed play one disc or all discs or any desired disc in the disc tray. CDC-901 CDC-501 2 OPEN/CLOSE DIMMER TIME PROG TAPE REPEAT RANDOM 1 2 3 MODE 4 5 6 +10 7 8 9 0 4 3 2 OPEN/CLOSE DIMMER TIME PROG CLEAR REPEAT RANDOM 1 2 3 MODE 4 5 6 +10 7 8 9 0 4 3 1 3 Select whether to 99 tracks). MODE 2 Close the disc...
Owner's Manual
Page 14
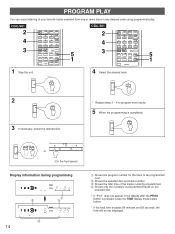
... TIME display mode-select button. * If the total time exceeds 99 minutes and 59 seconds, the time will not be programmed next. Shows the selected disc and track number. Ž Shows the total time of the tracks currently programmed. Shows only the numbers of programmed tracks on the selected disc. * If "P-01" does not appear in any desired order using programmed play. OUTPUT LEVEL + 5 1 CDC-501 2 4 3 PROG CLEAR REPEAT RANDOM 1 2 3 MODE 4 5 6 +10 7 8 9 0 DISC...
... TIME display mode-select button. * If the total time exceeds 99 minutes and 59 seconds, the time will not be programmed next. Shows the selected disc and track number. Ž Shows the total time of the tracks currently programmed. Shows only the numbers of programmed tracks on the selected disc. * If "P-01" does not appear in any desired order using programmed play. OUTPUT LEVEL + 5 1 CDC-501 2 4 3 PROG CLEAR REPEAT RANDOM 1 2 3 MODE 4 5 6 +10 7 8 9 0 DISC...
Owner's Manual
Page 15
... (sequentially in turn. Notes q You can program as many as described below. Without this operation, the total time of the track number can be changed to replace the one will be used during playing, but only within the range of the programmed tracks or no information. Press a numeric button to select a track to display the total time of the programmed tracks. The previously programmed track will be...
... (sequentially in turn. Notes q You can program as many as described below. Without this operation, the total time of the track number can be changed to replace the one will be used during playing, but only within the range of the programmed tracks or no information. Press a numeric button to select a track to display the total time of the programmed tracks. The previously programmed track will be...
Owner's Manual
Page 17
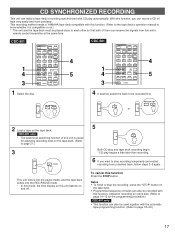
... disc. 4 If desired, select the track to be used together with the automatic tape-programming function. (Refer to stop the recording, press the "STOP" button on the tape deck. • Programmed sequence of them can receive the signals from a desired track, follow steps 3-5 again. This recording method needs a YAMAHA tape deck compatible with this function. (Refer to the tape deck's operation manual to know whether it is useful for the programming procedure.) CDC-901...
... disc. 4 If desired, select the track to be used together with the automatic tape-programming function. (Refer to stop the recording, press the "STOP" button on the tape deck. • Programmed sequence of them can receive the signals from a desired track, follow steps 3-5 again. This recording method needs a YAMAHA tape deck compatible with this function. (Refer to the tape deck's operation manual to know whether it is useful for the programming procedure.) CDC-901...
Owner's Manual
Page 18
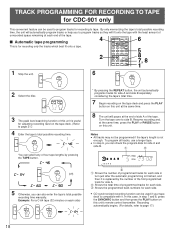
... PLAY button on this unit is not enough. TAPE You can also enter the tape's total possible recording time manually. Recording automatically begins. (For details, refer to page 21.) 4 Enter the tape's total possible recording time. Notes q All tracks may not be used to program tracks for adjusting recording level on this unit's remote control transmitter. In this case, in turn just after the automatic programming...
... PLAY button on this unit is not enough. TAPE You can also enter the tape's total possible recording time manually. Recording automatically begins. (For details, refer to page 21.) 4 Enter the tape's total possible recording time. Notes q All tracks may not be used to program tracks for adjusting recording level on this unit's remote control transmitter. In this case, in turn just after the automatic programming...

Owner's Manual
Page 19
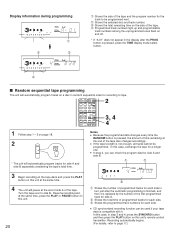
s Manual tape programming This is for recording desired tracks selected from one or more discs in any desired order onto tape. 1 Stop the unit STOP 2 If you will program tracks from more than one track. TAPE * "Pu" flashes in the display, you can begin programming for adjusting recording level on the disc cannot be used if your tape deck is compatible with it is a disc to track number 20. Turn the...
s Manual tape programming This is for recording desired tracks selected from one or more discs in any desired order onto tape. 1 Stop the unit STOP 2 If you will program tracks from more than one track. TAPE * "Pu" flashes in the display, you can begin programming for adjusting recording level on the disc cannot be used if your tape deck is compatible with it is a disc to track number 20. Turn the...
Owner's Manual
Page 20
... the tape. Programmed track numbers light up and programmable track numbers among the unprogrammed ones flash on and off. * If "A-01" does not appear in random sequential order for each side. Turn the tape over to page 17.) PROG TAPE REPEAT RANDOM 1 2 3 MODE 2 4 5 6 +10 7 8 9 0 DISC SKIP SKIP DISC SCAN PAUSE PLAY SEARCH INDEX STOP SYNCHRO - q If the tape's length is pressed, press the TIME display mode-select button...
... the tape. Programmed track numbers light up and programmable track numbers among the unprogrammed ones flash on and off. * If "A-01" does not appear in random sequential order for each side. Turn the tape over to page 17.) PROG TAPE REPEAT RANDOM 1 2 3 MODE 2 4 5 6 +10 7 8 9 0 DISC SKIP SKIP DISC SCAN PAUSE PLAY SEARCH INDEX STOP SYNCHRO - q If the tape's length is pressed, press the TIME display mode-select button...
Owner's Manual
Page 21
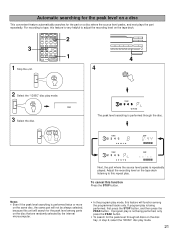
... source level peaks is being performed, only press the PEAK button. • To search for the peak level among the programmed tracks only. For recording to tape, this feature is very helpful to this function Press the STOP button. If program play is repeatedly played. OUTPUT LEVEL + STOP 2 1 4 4 0 PEAK 2 Select the "1DISC" disc play mode, this unit will function among parts on the tape deck. 3 1 Stop the unit. MODE 1DISC 3 Select the disc. Adjust the recording level...
... source level peaks is being performed, only press the PEAK button. • To search for the peak level among the programmed tracks only. For recording to tape, this feature is very helpful to this function Press the STOP button. If program play is repeatedly played. OUTPUT LEVEL + STOP 2 1 4 4 0 PEAK 2 Select the "1DISC" disc play mode, this unit will function among parts on the tape deck. 3 1 Stop the unit. MODE 1DISC 3 Select the disc. Adjust the recording level...
Owner's Manual
Page 22
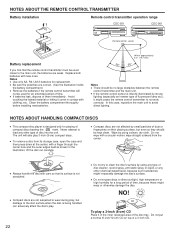
... might irreparably damage the disc's surface. NO! NOTES ABOUT THE REMOTE CONTROL TRANSMITTER Battery installation Remote control transmitter operation range 1 CDC-501 CDC-901 3 Remoto control sensor 2 Battery replacement If you find that its storage case, open the case and then press down at the center; q Be sure the polarities are not subjected to wear during play . 22 q Do not try to direct sunlight, high temperature...
... might irreparably damage the disc's surface. NO! NOTES ABOUT THE REMOTE CONTROL TRANSMITTER Battery installation Remote control transmitter operation range 1 CDC-501 CDC-901 3 Remoto control sensor 2 Battery replacement If you find that its storage case, open the case and then press down at the center; q Be sure the polarities are not subjected to wear during play . 22 q Do not try to direct sunlight, high temperature...
Owner's Manual
Page 23
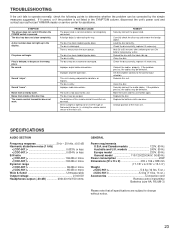
... down . The disc is dirty. The disc is dirty. The tuner is striking the remote control sensor of the main unit. Wait 20 to 30 minutes after switching the unit ON before trying to the correct input selection. Clean the disc. replace it if necessary. Securely connect the audio cables. Change position of the disc tray. SYMPTOM The player does not switch ON when the POWER switch is moisture...
... down . The disc is dirty. The disc is dirty. The tuner is striking the remote control sensor of the main unit. Wait 20 to 30 minutes after switching the unit ON before trying to the correct input selection. Clean the disc. replace it if necessary. Securely connect the audio cables. Change position of the disc tray. SYMPTOM The player does not switch ON when the POWER switch is moisture...


