
Owner's Manual
Page 1
CDC-655/555 Natural Sound Compact Disc Player Thank you for CDC-655 only 18 Notes about the Remote Control Transmitter ..... 22 Notes about Handling Compact Discs ........ 22 Troubleshooting 23 Specifications 23 OWNER'S MANUAL CONTENTS Safety Instructions 2 Features 4 Connections 5 Identification of Components 6 Basic Operation 8 Random-Sequence Play 13 Program Play 14 Repeat Play 16 Index Search 16 CD Synchronized Recording 17 Track Programming for Recording to Tape for selecting this YAMAHA Compact Disc Player.
CDC-655/555 Natural Sound Compact Disc Player Thank you for CDC-655 only 18 Notes about the Remote Control Transmitter ..... 22 Notes about Handling Compact Discs ........ 22 Troubleshooting 23 Specifications 23 OWNER'S MANUAL CONTENTS Safety Instructions 2 Features 4 Connections 5 Identification of Components 6 Basic Operation 8 Random-Sequence Play 13 Program Play 14 Repeat Play 16 Index Search 16 CD Synchronized Recording 17 Track Programming for Recording to Tape for selecting this YAMAHA Compact Disc Player.
Owner's Manual
Page 2
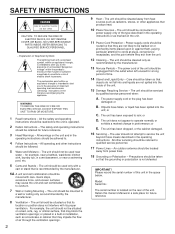
... taken so that they exit from heat sources such as recommended by qualified service personnel when: A. The unit does not appear to qualified service personnel. 17 Power Lines - The user should be referred to operate normally or exhibits a marked change in the operating instructions. Precautions should be walked on the unit. 11 Power-Cord Protection - NO USER-SERVICEABLE PARTS INSIDE. WARNING TO REDUCE THE RISK...
... taken so that they exit from heat sources such as recommended by qualified service personnel when: A. The unit does not appear to qualified service personnel. 17 Power Lines - The user should be referred to operate normally or exhibits a marked change in the operating instructions. Precautions should be walked on the unit. 11 Power-Cord Protection - NO USER-SERVICEABLE PARTS INSIDE. WARNING TO REDUCE THE RISK...
Owner's Manual
Page 3
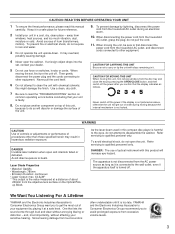
... household AC outlet, and disconnect cords connected to avoid prolonged exposure from the objective lens surface on the Optical Pickup Block. Avoid sources of procedures other equipment. DANGER: The use force on switches, knobs or cords. Never pull the cord itself is turned off the power if the display is the value measured at a safe level. Never switch off . Laser Diode Properties •...
... household AC outlet, and disconnect cords connected to avoid prolonged exposure from the objective lens surface on the Optical Pickup Block. Avoid sources of procedures other equipment. DANGER: The use force on switches, knobs or cords. Never pull the cord itself is turned off the power if the display is the value measured at a safe level. Never switch off . Laser Diode Properties •...
Owner's Manual
Page 4
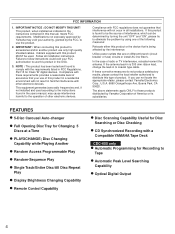
... by turning the unit "OFF" and "ON", please try to eliminate the problem by Yamaha may cause interference harmful to use only high quality shielded cables. Compliance with a Compatible YAMAHA Tape Deck CDC-655 only q Automatic Programming for Changing 5 Discs at a Time q PLAYXCHANGE; In the case of America or its subsidiaries. This product, when installed as indicated in the instructions contained in to distribute this manual...
... by turning the unit "OFF" and "ON", please try to eliminate the problem by Yamaha may cause interference harmful to use only high quality shielded cables. Compliance with a Compatible YAMAHA Tape Deck CDC-655 only q Automatic Programming for Changing 5 Discs at a Time q PLAYXCHANGE; In the case of America or its subsidiaries. This product, when installed as indicated in the instructions contained in to distribute this manual...
Owner's Manual
Page 5
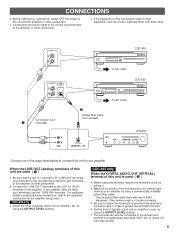
... any connections, switch OFF the power to the unit and the amplifier or other component. CDC-655 only q Adjust the level of a digital audio tape deck (DAT) etc. q Connections should be connected to the corresponding (left ("L") and right ("R") LINE OUT terminals are used ( – ) q Be sure that conforms to EIAJ standards. LINE OUT L R LINE OUT L DIGITAL AUDIO OUT OPTICAL R – Connection cord (included) CDC-555 To AC outlet CDC-655 — Optical fiber cable (not...
... any connections, switch OFF the power to the unit and the amplifier or other component. CDC-655 only q Adjust the level of a digital audio tape deck (DAT) etc. q Connections should be connected to the corresponding (left ("L") and right ("R") LINE OUT terminals are used ( – ) q Be sure that conforms to EIAJ standards. LINE OUT L R LINE OUT L DIGITAL AUDIO OUT OPTICAL R – Connection cord (included) CDC-555 To AC outlet CDC-655 — Optical fiber cable (not...

Owner's Manual
Page 6
... has both the functions of the PLAY button and the PAUSE button on the remote control transmitter. * The SKIP/SEARCH button on the main unit has both the functions of the OUTPUT LEVEL buttons on which the control part is best described. IDENTIFICATION OF COMPONENTS * ( ) indicates the page number on the remote control transmitter.) CDC-555 POWER switch (p. 8) Disc tray (p. 8) PLAYXCHANGE button (p. 9) DISC-select buttons (p. 8) NATURAL SOUND COMPACT DISC PLAYER POWER PLAYXCHANGE OPEN/CLOSE STOP PLAY/ PAUSE DISC I 2 3 4 5 SKIP/SEARCH Display panel Remote control sensor (p. 22...
... has both the functions of the PLAY button and the PAUSE button on the remote control transmitter. * The SKIP/SEARCH button on the main unit has both the functions of the OUTPUT LEVEL buttons on which the control part is best described. IDENTIFICATION OF COMPONENTS * ( ) indicates the page number on the remote control transmitter.) CDC-555 POWER switch (p. 8) Disc tray (p. 8) PLAYXCHANGE button (p. 9) DISC-select buttons (p. 8) NATURAL SOUND COMPACT DISC PLAYER POWER PLAYXCHANGE OPEN/CLOSE STOP PLAY/ PAUSE DISC I 2 3 4 5 SKIP/SEARCH Display panel Remote control sensor (p. 22...

Owner's Manual
Page 8
... DISC SKIP buttons or a DISC-select button. "1DISC" mode: The unit will play all discs in the tray in sequence. 5 Start play from the first track of the disc 1. This manual describes how to operate this unit on the front panel, use the corresponding buttons on the front panel. DISC SKIP DISC 2 3 4 or (On the front panel) PLAY To turn off the power Press the POWER button again. 8 BASIC OPERATION CDC-655 CDC-555 1 2, 3 5 OPEN/CLOSE DIMMER TIME PROG TAPE...
... DISC SKIP buttons or a DISC-select button. "1DISC" mode: The unit will play all discs in the tray in sequence. 5 Start play from the first track of the disc 1. This manual describes how to operate this unit on the front panel, use the corresponding buttons on the front panel. DISC SKIP DISC 2 3 4 or (On the front panel) PLAY To turn off the power Press the POWER button again. 8 BASIC OPERATION CDC-655 CDC-555 1 2, 3 5 OPEN/CLOSE DIMMER TIME PROG TAPE...
Owner's Manual
Page 9
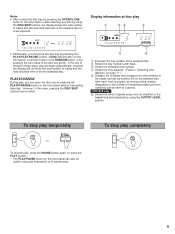
CDC-655 only ‘ Shows the level of signals output into an amplifier or the headphone level adjusted by using the DISC SKIP buttons, the display shows the total number of tracks and the total recorded time of the selected disc. Shows the tray numbers with discs. Ž Shows the selected track number. Shows the time displays. (Refer to "Selecting time displays" on page 11.) Displays the numbers that correspond to resume play. Display information at...
CDC-655 only ‘ Shows the level of signals output into an amplifier or the headphone level adjusted by using the DISC SKIP buttons, the display shows the total number of tracks and the total recorded time of the selected disc. Shows the tray numbers with discs. Ž Shows the selected track number. Shows the time displays. (Refer to "Selecting time displays" on page 11.) Displays the numbers that correspond to resume play. Display information at...

Owner's Manual
Page 10
... selected track is continuously changed to the beginning of the track. (Press and hold .) q The sound can also be performed when the unit is paused or stopped. • When using the SKIP buttons on the remote control transmitter: If a button is pressed and held, the track number is played forward (or backward) rapidly. q Manual search can also be performed while disc play rapidly (MANUAL...
... selected track is continuously changed to the beginning of the track. (Press and hold .) q The sound can also be performed when the unit is paused or stopped. • When using the SKIP buttons on the remote control transmitter: If a button is pressed and held, the track number is played forward (or backward) rapidly. q Manual search can also be performed while disc play rapidly (MANUAL...
Owner's Manual
Page 12
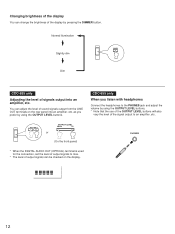
... PHONES jack and adjust the volume by using the OUTPUT LEVEL buttons. OUTPUT LEVEL + OUTPUT LEVEL DOWN UP or (On the front panel) * When the DIGITAL AUDIO OUT (OPTICAL) terminal is used for the connection, set the level of output signals to an amplifier, etc. - Normal illumination Slightly dim DIMMER Dim CDC-655 only Adjusting the level of signals output into an amplifier, etc. You can change the brightness of the display by using the OUTPUT LEVEL buttons. * Note that the use of the OUTPUT LEVEL buttons will...
... PHONES jack and adjust the volume by using the OUTPUT LEVEL buttons. OUTPUT LEVEL + OUTPUT LEVEL DOWN UP or (On the front panel) * When the DIGITAL AUDIO OUT (OPTICAL) terminal is used for the connection, set the level of output signals to an amplifier, etc. - Normal illumination Slightly dim DIMMER Dim CDC-655 only Adjusting the level of signals output into an amplifier, etc. You can change the brightness of the display by using the OUTPUT LEVEL buttons. * Note that the use of the OUTPUT LEVEL buttons will...
Owner's Manual
Page 13
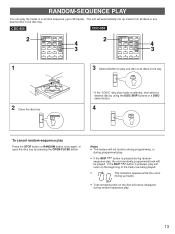
.... RANDOM-SEQUENCE PLAY You can play the tracks in a random sequence (up to play one disc or all discs or any desired disc in the tray. CDC-655 CDC-555 2 OPEN/CLOSE DIMMER TIME PROG TAPE REPEAT RANDOM 1 2 3 MODE 4 5 6 +10 7 8 9 0 4 3 2 OPEN/CLOSE DIMMER TIME PROG CLEAR REPEAT RANDOM 1 2 3 MODE 4 5 6 +10 7 8 9 0 4 3 1 3 Select whether to 99 tracks). q If the SKIP button is pressed, play will not function during programming, or during programmed play.
.... RANDOM-SEQUENCE PLAY You can play the tracks in a random sequence (up to play one disc or all discs or any desired disc in the tray. CDC-655 CDC-555 2 OPEN/CLOSE DIMMER TIME PROG TAPE REPEAT RANDOM 1 2 3 MODE 4 5 6 +10 7 8 9 0 4 3 2 OPEN/CLOSE DIMMER TIME PROG CLEAR REPEAT RANDOM 1 2 3 MODE 4 5 6 +10 7 8 9 0 4 3 1 3 Select whether to 99 tracks). q If the SKIP button is pressed, play will not function during programming, or during programmed play.
Owner's Manual
Page 14
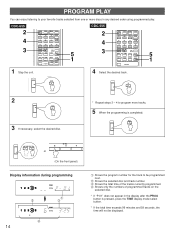
OUTPUT LEVEL + 5 1 CDC-555 2 4 3 PROG CLEAR REPEAT RANDOM 1 2 3 MODE 4 5 6 +10 7 8 9 0 DISC SKIP SKIP DISC SCAN PAUSE PLAY SEARCH INDEX STOP SYNCHRO 5 1 1 Stop the unit. 4 Select the desired track. PROGRAM PLAY You can enjoy listening to be displayed. PLAY DISC SKIP DISC 2 3 4 or (On the front panel) Display information during programming 14 6 PROG TOTAL Œ Ž PROG TOTAL Œ Shows the program number for the track to your favorite tracks...
OUTPUT LEVEL + 5 1 CDC-555 2 4 3 PROG CLEAR REPEAT RANDOM 1 2 3 MODE 4 5 6 +10 7 8 9 0 DISC SKIP SKIP DISC SCAN PAUSE PLAY SEARCH INDEX STOP SYNCHRO 5 1 1 Stop the unit. 4 Select the desired track. PROGRAM PLAY You can enjoy listening to be displayed. PLAY DISC SKIP DISC 2 3 4 or (On the front panel) Display information during programming 14 6 PROG TOTAL Œ Ž PROG TOTAL Œ Shows the program number for the track to your favorite tracks...
Owner's Manual
Page 15
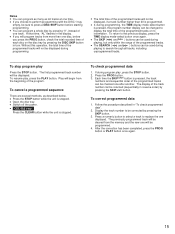
... programming, the TIME display mode-select button is pressed, the program number display can be programmed. 4. q The SEARCH ( and ) buttons can be changed to replace the one will be used during programming. To resume play Press the STOP button. If during playing, but only within the range of the programmed tracks. q If you press the PROG button, check the total recorded time of each disc on the disc tray by pressing the SKIP button. 3. Display the...
... programming, the TIME display mode-select button is pressed, the program number display can be programmed. 4. q The SEARCH ( and ) buttons can be changed to replace the one will be used during programming. To resume play Press the STOP button. If during playing, but only within the range of the programmed tracks. q If you press the PROG button, check the total recorded time of each disc on the disc tray by pressing the SKIP button. 3. Display the...
Owner's Manual
Page 17
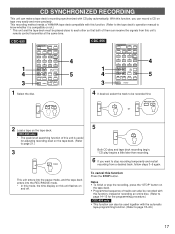
... method needs a YAMAHA tape deck compatible with this function Press the STOP button. OUTPUT LEVEL + 4 5 CDC-555 1 4 3 OPEN/CLOSE DIMMER TIME PROG CLEAR REPEAT RANDOM 1 2 3 MODE 4 5 6 +10 7 8 9 0 DISC SKIP SKIP DISC SCAN PAUSE PLAY SEARCH INDEX STOP SYNCHRO 4 5 1 Select the disc. 4 If desired, select the track to be recorded with this function. (Refer to the tape deck's operation manual to stop the recording, press the "STOP" button on the tape deck. • Programmed sequence of recording...
... method needs a YAMAHA tape deck compatible with this function Press the STOP button. OUTPUT LEVEL + 4 5 CDC-555 1 4 3 OPEN/CLOSE DIMMER TIME PROG CLEAR REPEAT RANDOM 1 2 3 MODE 4 5 6 +10 7 8 9 0 DISC SKIP SKIP DISC SCAN PAUSE PLAY SEARCH INDEX STOP SYNCHRO 4 5 1 Select the disc. 4 If desired, select the track to be recorded with this function. (Refer to the tape deck's operation manual to stop the recording, press the "STOP" button on the tape deck. • Programmed sequence of recording...
Owner's Manual
Page 18
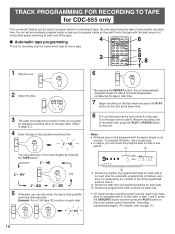
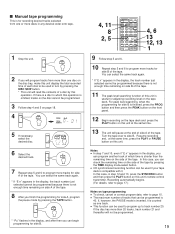
... the tape's length is replaced by pressing the TAPE button. To program all tracks, use a longer tape. q CD synchronized recording function can be used to program tracks for recording to page 17.) 18 DISC SKIP 3 The peak level searching function of this unit is useful for adjusting recording level on the tape deck. (Refer to side B. Example: For a C-64 tape (32 minutes on each side. In this case, in turn...
... the tape's length is replaced by pressing the TAPE button. To program all tracks, use a longer tape. q CD synchronized recording function can be used to program tracks for recording to page 17.) 18 DISC SKIP 3 The peak level searching function of this unit is useful for adjusting recording level on the tape deck. (Refer to side B. Example: For a C-64 tape (32 minutes on each side. In this case, in turn...
Owner's Manual
Page 19
... unit is useful for adjusting recording level on this unit's remote control transmitter. If, however, the PAUSE mode is inserted, it . In this case, you can be used in the display, the track number just selected cannot be programmed because there is not enough time remaining on side B of the tape. 11 The peak level searching function of a disc by pressing the TAPE button. TAPE * "Pu" flashes in the display, you...
... unit is useful for adjusting recording level on this unit's remote control transmitter. If, however, the PAUSE mode is inserted, it . In this case, you can be used in the display, the track number just selected cannot be programmed because there is not enough time remaining on side B of the tape. 11 The peak level searching function of a disc by pressing the TAPE button. TAPE * "Pu" flashes in the display, you...
Owner's Manual
Page 20
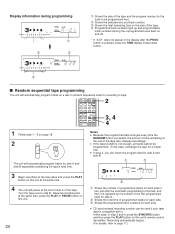
... the tape also changes accordingly. OUTPUT LEVEL + 3, 4 4 1 Follow step 1 - 5 on page 18. 2 RANDOM * The unit will automatically program tracks for side A and side B separately considering the tape's total time. 3 Begin recording on the tape deck and press the PLAY button on this unit at the same time. 4 The unit will automatically program tracks on a disc in turn just after the PROG button is pressed, press the TIME display mode-select button...
... the tape also changes accordingly. OUTPUT LEVEL + 3, 4 4 1 Follow step 1 - 5 on page 18. 2 RANDOM * The unit will automatically program tracks for side A and side B separately considering the tape's total time. 3 Begin recording on the tape deck and press the PLAY button on this unit at the same time. 4 The unit will automatically program tracks on a disc in turn just after the PROG button is pressed, press the TIME display mode-select button...

Owner's Manual
Page 21
... tape deck. 3 1 Stop the unit. If program play . To cancel this repeat play is being performed, only press the PEAK button. • To search for the peak level among parts on a disc where the source level peaks, and next plays the part repeatedly. For recording to adjust the recording level on the disc tray, in step 2, select the "5DISC" disc play is repeatedly played. MODE 1DISC 3 Select the disc. OUTPUT LEVEL + STOP 2 1 4 4 0 PEAK 2 Select the "1DISC" disc play mode...
... tape deck. 3 1 Stop the unit. If program play . To cancel this repeat play is being performed, only press the PEAK button. • To search for the peak level among parts on a disc where the source level peaks, and next plays the part repeatedly. For recording to adjust the recording level on the disc tray, in step 2, select the "5DISC" disc play is repeatedly played. MODE 1DISC 3 Select the disc. OUTPUT LEVEL + STOP 2 1 4 4 0 PEAK 2 Select the "1DISC" disc play mode...
Owner's Manual
Page 22
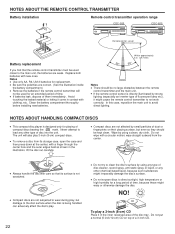
... during play 3-inch (8-cm) compact discs. Wipe by using a clean, dry cloth. q Do not expose discs to clean the disc's surface by using any type of disc cleaner, record spray, anti-static spray or liquid, or any other chemical-based liquid, because such substances might warp or otherwise damage the disc. NOTES ABOUT THE REMOTE CONTROL TRANSMITTER Battery installation Remote control transmitter operation range 1 CDC-555 CDC-655 3 Remoto control...
... during play 3-inch (8-cm) compact discs. Wipe by using a clean, dry cloth. q Do not expose discs to clean the disc's surface by using any type of disc cleaner, record spray, anti-static spray or liquid, or any other chemical-based liquid, because such substances might warp or otherwise damage the disc. NOTES ABOUT THE REMOTE CONTROL TRANSMITTER Battery installation Remote control transmitter operation range 1 CDC-555 CDC-655 3 Remoto control...
Owner's Manual
Page 23
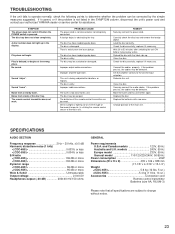
....) < > CDC-555 5.4 kg (11 lbs. 14 oz.) Accessories Connection cord Remote control transmitter Batteries (size AA, R6,UM-3) Please note that all specifications are too weak. The disc is delayed, or begins at the wrong place. TROUBLESHOOTING If the unit fails to operate normally, check the following points to vibrations or impacts. A disc number does not light up . Play is dirty. PROBABLE CAUSE The power cord is...
....) < > CDC-555 5.4 kg (11 lbs. 14 oz.) Accessories Connection cord Remote control transmitter Batteries (size AA, R6,UM-3) Please note that all specifications are too weak. The disc is delayed, or begins at the wrong place. TROUBLESHOOTING If the unit fails to operate normally, check the following points to vibrations or impacts. A disc number does not light up . Play is dirty. PROBABLE CAUSE The power cord is...


