
Additions And Changes In Version 1.2, 1.3
Page 5
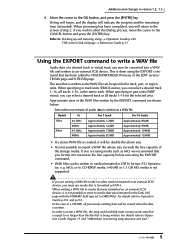
... Approximately 83MB Approximately 90MB Approximately 124MB Approximately 135MB • If a stereo WAV file is created, it to media formatted in track, part, or region units. This is formatted as MO, we recommend that was formatted on an external SCSI device, you wish to abort the Defrag...page with the FORMAT field type set to Operation Guide chapter 11 and "Addendum concerning song structure and size." 5 When specifying in part units (PART menu), you can be specified in FAT16 format (512 bytes/sector; In the case of the WAV files written by ...
... Approximately 83MB Approximately 90MB Approximately 124MB Approximately 135MB • If a stereo WAV file is created, it to media formatted in track, part, or region units. This is formatted as MO, we recommend that was formatted on an external SCSI device, you wish to abort the Defrag...page with the FORMAT field type set to Operation Guide chapter 11 and "Addendum concerning song structure and size." 5 When specifying in part units (PART menu), you can be specified in FAT16 format (512 bytes/sector; In the case of the WAV files written by ...
Additions And Changes In Version 1.2, 1.3
Page 6
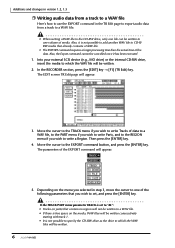
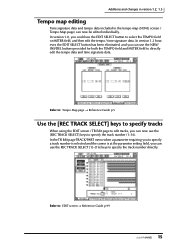
... be written. 6 Move the cursor to the TRACK menu if you wish to write Tracks of media. Then press the [ENTER] key. 4. If the TRACK/PART menu parameter TRACK is set , and press the [ENTER] key. Additions and changes in version 1.2, 1.3 Ì Writing audio data from a track to a WAV file...-RW drive, only one file can be written to one of the following parameters that you wish to set to "AL": • Tracks (or parts) that contain no region will not be written to a WAV file. • If there is not possible to specify the CD-RW drive as...
... be written. 6 Move the cursor to the TRACK menu if you wish to write Tracks of media. Then press the [ENTER] key. 4. If the TRACK/PART menu parameter TRACK is set , and press the [ENTER] key. Additions and changes in version 1.2, 1.3 Ì Writing audio data from a track to a WAV file...-RW drive, only one file can be written to one of the following parameters that you wish to set to "AL": • Tracks (or parts) that contain no region will not be written to a WAV file. • If there is not possible to specify the CD-RW drive as...
Additions And Changes In Version 1.2, 1.3
Page 7
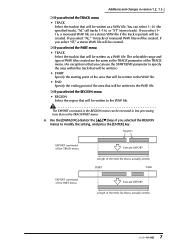
... will be created. If you select "AL," 16 tracks of monaural WAV files will be written as a WAV file. r If you selected the PART menu • TRACK Select the track(s) that will be created. The selectable range and type of WAV files created are the same as the... WAV file (or a stereo WAV file if the track is actually written 7 Regions EXPORT command of the TRACK menu EXPORT command of the PART menu Execute EXPORT Length of the WAV file that is actually written START END Execute EXPORT Length of the WAV file that will be executed...
... will be created. If you select "AL," 16 tracks of monaural WAV files will be written as a WAV file. r If you selected the PART menu • TRACK Select the track(s) that will be created. The selectable range and type of WAV files created are the same as the... WAV file (or a stereo WAV file if the track is actually written 7 Regions EXPORT command of the TRACK menu EXPORT command of the PART menu Execute EXPORT Length of the WAV file that is actually written START END Execute EXPORT Length of the WAV file that will be executed...
Additions And Changes In Version 1.2, 1.3
Page 8
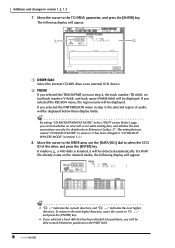
... whether an error will appear. 1 2 1 DRIVE field Select the internal CD-RW drive or an external SCSI device. If you selected the PART/REGION menu in version 1.2, 1.3 7. If you selected the REGION menu, the region name will be displayed. For details refer to the TO DRIVE parameter... exists on the inserted media, the following display will occur while writing data, and whether the data was named "CD BACKUP MODE" in the PART field. 8 Move the cursor to Reference Guide p.37. (The setting that has been divided into partitions, you will be displayed below these...
... whether an error will appear. 1 2 1 DRIVE field Select the internal CD-RW drive or an external SCSI device. If you selected the PART/REGION menu in version 1.2, 1.3 7. If you selected the REGION menu, the region name will be displayed. For details refer to the TO DRIVE parameter... exists on the inserted media, the following display will occur while writing data, and whether the data was named "CD BACKUP MODE" in the PART field. 8 Move the cursor to Reference Guide p.37. (The setting that has been divided into partitions, you will be displayed below these...
Additions And Changes In Version 1.2, 1.3
Page 10
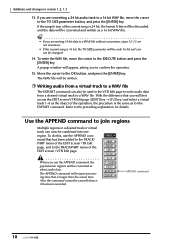
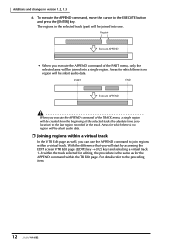
... track to a 16 bit WAV file, move the cursor to the TO SIZE parameter button, and press the [ENTER] key. Refer to the TRACK/PART menu of the EDIT screen / TR Edit page, and to the preceding explanation for the EXPORT command. Also, the command cannot be changed. 14. To... do this, use the APPEND command, the gap between regions will require processing time that has been added to the TRACK/ PART menu of the EDIT screen / V.TR Edit page.
... track to a 16 bit WAV file, move the cursor to the TO SIZE parameter button, and press the [ENTER] key. Refer to the TRACK/PART menu of the EDIT screen / TR Edit page, and to the preceding explanation for the EXPORT command. Also, the command cannot be changed. 14. To... do this, use the APPEND command, the gap between regions will require processing time that has been added to the TRACK/ PART menu of the EDIT screen / V.TR Edit page.
Additions And Changes In Version 1.2, 1.3
Page 11
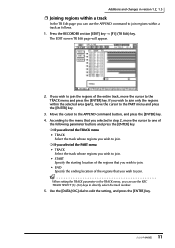
...key. 4. Move the cursor to directly select the track number. 5. Use the [DATA/JOG] dial to the PART menu and press the [ENTER] key. 3. The EDIT screen TR Edit page will appear. 2. If you wish ...and press the [ENTER] key. If you wish to join only the regions within the selected area (part), move the cursor to join. According to the menu that you wish to the TRACK menu and press ...the [ENTER] key. r If you selected the PART menu • TRACK Select the track whose regions you wish to join regions within a track as follows. 1....
...key. 4. Move the cursor to directly select the track number. 5. Use the [DATA/JOG] dial to the PART menu and press the [ENTER] key. 3. The EDIT screen TR Edit page will appear. 2. If you wish ...and press the [ENTER] key. If you wish to join only the regions within the selected area (part), move the cursor to join. According to the menu that you wish to the TRACK menu and press ...the [ENTER] key. r If you selected the PART menu • TRACK Select the track whose regions you wish to join regions within a track as follows. 1....
Additions And Changes In Version 1.2, 1.3
Page 12
... a single region. With the difference that you execute the APPEND command of the TRACK menu, a single region will be created from the beginning of the PART menu, only the selected area will be joined into one. START END Execute APPEND When you will start by accessing the EDIT screen V.TR Edit...
... a single region. With the difference that you execute the APPEND command of the TRACK menu, a single region will be created from the beginning of the PART menu, only the selected area will be joined into one. START END Execute APPEND When you will start by accessing the EDIT screen V.TR Edit...
Additions And Changes In Version 1.2, 1.3
Page 15
... number (1-16). Refer to: EDIT screen → Reference Guide p.99 15 In version 1.0, you can now be edited individually. In the TR Edit page TRACK/PART menu when a parameter requiring you to specify a track number is selected and the cursor is at the parameter setting field, you could use the...
... number (1-16). Refer to: EDIT screen → Reference Guide p.99 15 In version 1.0, you can now be edited individually. In the TR Edit page TRACK/PART menu when a parameter requiring you to specify a track number is selected and the cursor is at the parameter setting field, you could use the...
Additions And Changes In Version 1.2, 1.3
Page 18
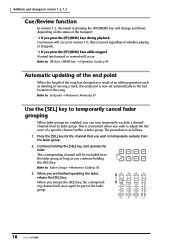
... occur (in the song. Refer to temporarily exclude from its fader group. r If you press the [FF]/[REW] keys during playback Cue/review will be part of an editing operation such as you wish to : Fader Groups → Reference Guide p.58 SEL SEL SEL SEL ON ON ON ON 3. Press the...
... occur (in the song. Refer to temporarily exclude from its fader group. r If you press the [FF]/[REW] keys during playback Cue/review will be part of an editing operation such as you wish to : Fader Groups → Reference Guide p.58 SEL SEL SEL SEL ON ON ON ON 3. Press the...
Owner's Manual
Page 2
... ohjeiden mukaisesti. The above statements apply ONLY to those products distributed by the FCC, to the terminal in FCC Regulations, Part 15 for Class "B" digital devices. Lithiumbatteri-Eksplosionsfare ved fejlagtig håndtering. The lightning flash with the requirements listed in ...lead-in the USA. 3. Follow all installations. If these requirements provides a reasonable level of assurance that your authority, granted by Yamaha Corporation of America, Electronic Service Division, 6600 Orangethorpe Ave, Buena Park, CA 90620 The above warning is marked by the letter...
... ohjeiden mukaisesti. The above statements apply ONLY to those products distributed by the FCC, to the terminal in FCC Regulations, Part 15 for Class "B" digital devices. Lithiumbatteri-Eksplosionsfare ved fejlagtig håndtering. The lightning flash with the requirements listed in ...lead-in the USA. 3. Follow all installations. If these requirements provides a reasonable level of assurance that your authority, granted by Yamaha Corporation of America, Electronic Service Division, 6600 Orangethorpe Ave, Buena Park, CA 90620 The above warning is marked by the letter...
Owner's Manual
Page 6
...; Be careful not to drop any terminals or board surface parts. • In order to protect the electronic circuits of the I /O card, hard disk, or CD-RW drive handling, please consult your Yamaha dealer. • If the hard disk or CD-RW drive breaks down . vi - Responsibility for...of the data stored on CD-R or CD-RW disks or other external storage medium. Operation Guide If a dropped screw can be retrieved, consult your Yamaha dealer. • Always switch off the power for handling optional equipment • For inquiries concerning I /O card, hard disk, CD-RW drive, ...
...; Be careful not to drop any terminals or board surface parts. • In order to protect the electronic circuits of the I /O card, hard disk, or CD-RW drive handling, please consult your Yamaha dealer. • If the hard disk or CD-RW drive breaks down . vi - Responsibility for...of the data stored on CD-R or CD-RW disks or other external storage medium. Operation Guide If a dropped screw can be retrieved, consult your Yamaha dealer. • Always switch off the power for handling optional equipment • For inquiries concerning I /O card, hard disk, CD-RW drive, ...
Owner's Manual
Page 7
Violation of such laws may result in civil remedies and, in some instances, the public performance, of all or parts of sound recordings or musical compositions protected by copyright. Important ❍ Warning The Yamaha Professional Audio Workstation is designed to your intended use of the Workstation (such as the Audio Home Recording Act...
Violation of such laws may result in civil remedies and, in some instances, the public performance, of all or parts of sound recordings or musical compositions protected by copyright. Important ❍ Warning The Yamaha Professional Audio Workstation is designed to your intended use of the Workstation (such as the Audio Home Recording Act...

Owner's Manual
Page 9
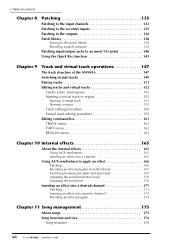
...27 Stereo output channel 27 Buses 1-8 28 AUX buses 1-8 28 Output patch 29 Internal effects 1/2 29 Monitor output/headphone output 30 Chapter 2 Parts and their functions 31 Top panel 31 Analog input/output section 31 WORK NAVIGATE section 32 UNIT section 32 MIXER section 33 FADER MODE section...43 Transport section 44 SAMPLING PAD section 45 Rear panel 46 Front panel 50 Chapter 3 The user interface of the AW4416 51 Display 51 Level meters/counter 54 Basic operation of the AW4416 56 Accessing a screen/page 56 Using the controls of the top panel 56 ix - Operation Guide
...27 Stereo output channel 27 Buses 1-8 28 AUX buses 1-8 28 Output patch 29 Internal effects 1/2 29 Monitor output/headphone output 30 Chapter 2 Parts and their functions 31 Top panel 31 Analog input/output section 31 WORK NAVIGATE section 32 UNIT section 32 MIXER section 33 FADER MODE section...43 Transport section 44 SAMPLING PAD section 45 Rear panel 46 Front panel 50 Chapter 3 The user interface of the AW4416 51 Display 51 Level meters/counter 54 Basic operation of the AW4416 56 Accessing a screen/page 56 Using the controls of the top panel 56 ix - Operation Guide
Owner's Manual
Page 12
... Rec function 143 Chapter 9 Track and virtual track operations 147 The track structure of the AW4416 147 Switching virtual tracks 149 Pairing tracks 151 Editing tracks and virtual tracks 152 Tracks, parts, and regions 152 Naming a virtual track or region 153 Naming a virtual track 153 Naming... a region 155 Track editing procedure 156 Virtual track editing procedure 159 Editing command list 161 TRACK menu 161 PART menu 162 REGION menu 163 Chapter 10 Internal effects 165 About the internal effects 165 Using AUX send/return 165 Inserting an effect...
... Rec function 143 Chapter 9 Track and virtual track operations 147 The track structure of the AW4416 147 Switching virtual tracks 149 Pairing tracks 151 Editing tracks and virtual tracks 152 Tracks, parts, and regions 152 Naming a virtual track or region 153 Naming a virtual track 153 Naming... a region 155 Track editing procedure 156 Virtual track editing procedure 159 Editing command list 161 TRACK menu 161 PART menu 162 REGION menu 163 Chapter 10 Internal effects 165 About the internal effects 165 Using AUX send/return 165 Inserting an effect...
Owner's Manual
Page 15
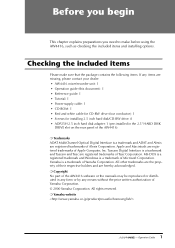
... and Teac are hereby acknowledged. ❍ Copyright No part of the AW4416 software or the manuals may be reproduced or distributed in any form or by any items are missing, please contact your dealer. • AW4416 mixer/recorder unit: 1 • Operation guide (this... All rights reserved. ❍ Yamaha website 1 - Operation Guide Apple and Macintosh are registered trademarks of Yamaha Corporation. Yamaha is a trademark of Yamaha Corporation. © 2000 Yamaha Corporation. Checking the included items Please make before using the AW4416, such as checking the included items...
... and Teac are hereby acknowledged. ❍ Copyright No part of the AW4416 software or the manuals may be reproduced or distributed in any form or by any items are missing, please contact your dealer. • AW4416 mixer/recorder unit: 1 • Operation guide (this... All rights reserved. ❍ Yamaha website 1 - Operation Guide Apple and Macintosh are registered trademarks of Yamaha Corporation. Yamaha is a trademark of Yamaha Corporation. © 2000 Yamaha Corporation. Checking the included items Please make before using the AW4416, such as checking the included items...
Owner's Manual
Page 34
...of 16 tracks × 8 virtual tracks + stereo track (total of making it fast and easy to locate to the stereo track. song, track, part, and region. Auto punch-in/out at the specified punch-in , out, and rollback. Chapter1-Welcome to the world of the...any time. Libraries for each song. 16 tracks can also be recorded simultaneously, or 16 tracks played back while recording 8 tracks simultaneously, making the AW4416 an ideal choice for live recording or for each song, making a master recorder unnecessary, but also of eight locate keys are also provided. ❍...
...of 16 tracks × 8 virtual tracks + stereo track (total of making it fast and easy to locate to the stereo track. song, track, part, and region. Auto punch-in/out at the specified punch-in , out, and rollback. Chapter1-Welcome to the world of the...any time. Libraries for each song. 16 tracks can also be recorded simultaneously, or 16 tracks played back while recording 8 tracks simultaneously, making the AW4416 an ideal choice for live recording or for each song, making a master recorder unnecessary, but also of eight locate keys are also provided. ❍...
Owner's Manual
Page 45
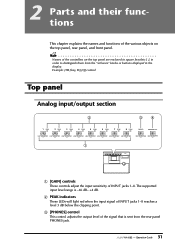
... red when the input signal of INPUT jacks 1-8. The supported input level range is sent from the "software" knobs or buttons displayed in the display. 2 Parts and their functions This chapter explains the names and functions of the various objects on the top panel are enclosed in square brackets [ ], in order...
... red when the input signal of INPUT jacks 1-8. The supported input level range is sent from the "software" knobs or buttons displayed in the display. 2 Parts and their functions This chapter explains the names and functions of the various objects on the top panel are enclosed in square brackets [ ], in order...
Owner's Manual
Page 46
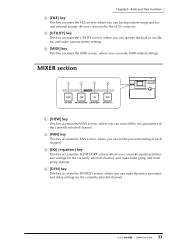
... the CD-R/CD-RW drive (optional). D [CD PLAY] key This key accesses the CD PLAY screen, where you can perform the shut-down operation. Chapter2-Parts and their functions D [MONITOR OUT] control This control adjusts the output level of the signal that is used for song settings and editing, and to...
... the CD-R/CD-RW drive (optional). D [CD PLAY] key This key accesses the CD PLAY screen, where you can perform the shut-down operation. Chapter2-Parts and their functions D [MONITOR OUT] control This control adjusts the output level of the signal that is used for song settings and editing, and to...
Owner's Manual
Page 47
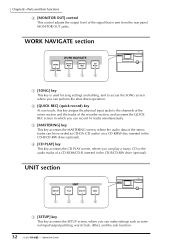
.... B [PAN] key This key accesses the PAN screen, where you can backup/restore songs and format external storage devices connected to the SCSI connector. Chapter2-Parts and their functions B [FILE] key This key accesses the FILE screen, where you can set the pan and routing of the currently selected channel. C [UTILITY...
.... B [PAN] key This key accesses the PAN screen, where you can backup/restore songs and format external storage devices connected to the SCSI connector. Chapter2-Parts and their functions B [FILE] key This key accesses the FILE screen, where you can set the pan and routing of the currently selected channel. C [UTILITY...
Owner's Manual
Page 48
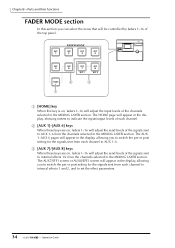
Chapter2-Parts and their functions FADER MODE section In this key is on, faders 1-16 will adjust the input levels of the signals sent to indicate the ...
Chapter2-Parts and their functions FADER MODE section In this key is on, faders 1-16 will adjust the input levels of the signals sent to indicate the ...


