User Guide
Page 31
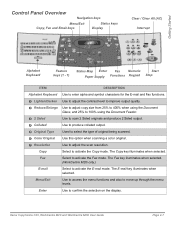
Enter Use to adjust the scan resolution. The E-mail key illuminates when selected. Xerox CopyCentre C20, WorkCentre M20 and WorkCentre M20i User Guide Page 2-7 Getting Started Control Panel Overview Navigation keys Menu/Exit Copy, Fax and Email keys Status keys Display Clear / Clear All (AC) Interrupt Alphabet Keyboard 1 2 35 46 7 Feature keys (1 - 7) Status Map Enter Fax Numeric...
Enter Use to adjust the scan resolution. The E-mail key illuminates when selected. Xerox CopyCentre C20, WorkCentre M20 and WorkCentre M20i User Guide Page 2-7 Getting Started Control Panel Overview Navigation keys Menu/Exit Copy, Fax and Email keys Status keys Display Clear / Clear All (AC) Interrupt Alphabet Keyboard 1 2 35 46 7 Feature keys (1 - 7) Status Map Enter Fax Numeric...
User Guide
Page 85
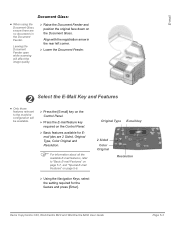
Leaving the Document Feeder open while scanning will be available. ¾ Press the [E-mail] key on the Control Panel. ¾ Press the E-mail feature key required on the Control Panel. ¾ Basic ... Navigation Keys, select the setting required for Email jobs are 2 Sided, Original Type, Color Original and Resolution. ) For information about all the available E-mail features, refer to "Basic E-mail Features" on page 5-7, and "Special E-mail Features" on the Document Glass. Xerox CopyCentre C20, WorkCentre M20 and WorkCentre M20i User Guide Page 5-3 Align with the registration...
Leaving the Document Feeder open while scanning will be available. ¾ Press the [E-mail] key on the Control Panel. ¾ Press the E-mail feature key required on the Control Panel. ¾ Basic ... Navigation Keys, select the setting required for Email jobs are 2 Sided, Original Type, Color Original and Resolution. ) For information about all the available E-mail features, refer to "Basic E-mail Features" on page 5-7, and "Special E-mail Features" on the Document Glass. Xerox CopyCentre C20, WorkCentre M20 and WorkCentre M20i User Guide Page 5-3 Align with the registration...
System Administration Guide
Page 5
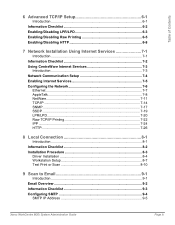
.../LPD 7-20 Raw TCP/IP Printing 7-22 IPP ...7-24 HTTP...7-26 8 Local Connection 8-1 Introduction 8-1 Information Checklist 8-2 Installation Procedure 8-3 Driver Installation 8-4 Workstation Setup 8-7 Test Print or Scan 8-10 9 Scan to Email 9-1 Introduction 9-1 Email Overview 9-2 Information Checklist 9-3 Configuring SMTP 9-4 SMTP IP Address 9-5 Xerox WorkCentre M20i System Administration Guide Page iii
.../LPD 7-20 Raw TCP/IP Printing 7-22 IPP ...7-24 HTTP...7-26 8 Local Connection 8-1 Introduction 8-1 Information Checklist 8-2 Installation Procedure 8-3 Driver Installation 8-4 Workstation Setup 8-7 Test Print or Scan 8-10 9 Scan to Email 9-1 Introduction 9-1 Email Overview 9-2 Information Checklist 9-3 Configuring SMTP 9-4 SMTP IP Address 9-5 Xerox WorkCentre M20i System Administration Guide Page iii
System Administration Guide
Page 7
... Macros 11-35 Downloading PostScript Fonts 11-36 Enabling or Disabling Auxiliary Access 11-37 12 Problem Solving 12-1 Introduction 12-1 Problem Solving Procedure 12-2 Scan to Email 12-3 13 Glossary 13-1 Xerox WorkCentre M20i System Administration Guide Page v
... Macros 11-35 Downloading PostScript Fonts 11-36 Enabling or Disabling Auxiliary Access 11-37 12 Problem Solving 12-1 Introduction 12-1 Problem Solving Procedure 12-2 Scan to Email 12-3 13 Glossary 13-1 Xerox WorkCentre M20i System Administration Guide Page v
System Administration Guide
Page 127
9 Scan to Email Introduction This chapter explains how to setup and enable the Email feature of WorkCentre M20i. The following information is provided: ¾ Email Overview 9-2 ¾ Information Checklist 9-3 ¾ Configuring SMTP 9-4 ¾ Configuring Email Settings 9-13 ¾ LDAP Directory Setup (Internal Address Book). . 9-18 ¾ Email Setup using Internet Services 9-20 ¾ Email forwarding 9-27 ¾ Test Email Transmission 9-30 Xerox WorkCentre M20i System Administration Guide Page 9-1
9 Scan to Email Introduction This chapter explains how to setup and enable the Email feature of WorkCentre M20i. The following information is provided: ¾ Email Overview 9-2 ¾ Information Checklist 9-3 ¾ Configuring SMTP 9-4 ¾ Configuring Email Settings 9-13 ¾ LDAP Directory Setup (Internal Address Book). . 9-18 ¾ Email Setup using Internet Services 9-20 ¾ Email forwarding 9-27 ¾ Test Email Transmission 9-30 Xerox WorkCentre M20i System Administration Guide Page 9-1
System Administration Guide
Page 128
After the Xerox WorkCentre M20i is installed, the Email feature allows users to scan an original document, convert the scanned document to an electronic format and then send that information to Email Email Overview By combining the power of the WorkCentre M20i and CentreWare Internet Services, Xerox provides an Email solution for all Email users. Page 9-2 Xerox WorkCentre M20i System Administration Guide NOTE: When entering a manual Email address...
After the Xerox WorkCentre M20i is installed, the Email feature allows users to scan an original document, convert the scanned document to an electronic format and then send that information to Email Email Overview By combining the power of the WorkCentre M20i and CentreWare Internet Services, Xerox provides an Email solution for all Email users. Page 9-2 Xerox WorkCentre M20i System Administration Guide NOTE: When entering a manual Email address...

System Administration Guide
Page 129
... recommended that the network has a fully functioning SMTP Mail Server. Before starting the installation procedures, please ensure the following items are encountered during the WorkCentre M20i installation, refer to installation. Xerox WorkCentre M20i System Administration Guide Page 9-3 Configuration can also be performed using Xerox CentreWare (Refer to -Email at the WorkCentre M20i. Scan to Email Information Checklist These instructions for assistance.
... recommended that the network has a fully functioning SMTP Mail Server. Before starting the installation procedures, please ensure the following items are encountered during the WorkCentre M20i installation, refer to installation. Xerox WorkCentre M20i System Administration Guide Page 9-3 Configuration can also be performed using Xerox CentreWare (Refer to -Email at the WorkCentre M20i. Scan to Email Information Checklist These instructions for assistance.
System Administration Guide
Page 130
see page 9-7. Scan to Email Configuring SMTP This section describes how to configure the Simple Mail Transfer Protocol used by the WorkCentre M20i for SMTP can be setup using Internet Services" on page 9-20. NOTE: All configurations for scan to "Email Setup using CentreWare Internet Services but not all settings can be setup at the machine. Refer to Email. Page 9-4 Xerox WorkCentre M20i System Administration Guide The settings are: ¾ SMTP IP Address - see page 9-6. ¾ User Authentication - see page 9-5. ¾ Maximum Mail Size -
see page 9-7. Scan to Email Configuring SMTP This section describes how to configure the Simple Mail Transfer Protocol used by the WorkCentre M20i for SMTP can be setup using Internet Services" on page 9-20. NOTE: All configurations for scan to "Email Setup using CentreWare Internet Services but not all settings can be setup at the machine. Refer to Email. Page 9-4 Xerox WorkCentre M20i System Administration Guide The settings are: ¾ SMTP IP Address - see page 9-6. ¾ User Authentication - see page 9-5. ¾ Maximum Mail Size -
System Administration Guide
Page 131
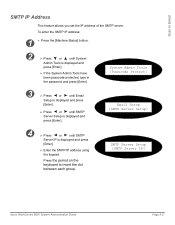
Scan to insert the dot between each group. To enter the SMTP IP address: 1 ¾ Press the [Machine Status] button. 2 ¾ Press or until SMTP Server IP is displayed and press [Enter] ¾ Enter the SMTP IP address using the keypad. Email Setup [SMTP Server Setup] ... or until Email Setup is displayed and press [Enter]. ¾ Press or until SMTP Server Setup is displayed and press [Enter]. ¾ If the System Admin Tools have been passcode protected, type in the password and press [Enter]. SMTP Server Setup [SMTP Server IP] Xerox WorkCentre M20i System Administration ...
Scan to insert the dot between each group. To enter the SMTP IP address: 1 ¾ Press the [Machine Status] button. 2 ¾ Press or until SMTP Server IP is displayed and press [Enter] ¾ Enter the SMTP IP address using the keypad. Email Setup [SMTP Server Setup] ... or until Email Setup is displayed and press [Enter]. ¾ Press or until SMTP Server Setup is displayed and press [Enter]. ¾ If the System Admin Tools have been passcode protected, type in the password and press [Enter]. SMTP Server Setup [SMTP Server IP] Xerox WorkCentre M20i System Administration ...
System Administration Guide
Page 132
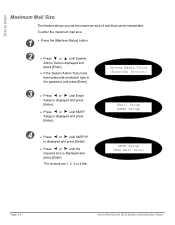
...] button. 2 ¾ Press or until the required size is displayed and press [Enter]. SMTP Setup [Max Mail Size] Page 9-6 Xerox WorkCentre M20i System Administration Guide Email Setup [SMTP Setup] 4 ¾ Press or until SMTP IP is displayed and press [Enter]. ¾ Press or until System Admin... Tools is displayed and press [Enter]. Scan to Email Maximum Mail Size This feature allows you set the maximum size of mail that can be transmitted. System Admin Tools [Passcode Protect] 3...
...] button. 2 ¾ Press or until the required size is displayed and press [Enter]. SMTP Setup [Max Mail Size] Page 9-6 Xerox WorkCentre M20i System Administration Guide Email Setup [SMTP Setup] 4 ¾ Press or until SMTP IP is displayed and press [Enter]. ¾ Press or until System Admin... Tools is displayed and press [Enter]. Scan to Email Maximum Mail Size This feature allows you set the maximum size of mail that can be transmitted. System Admin Tools [Passcode Protect] 3...
System Administration Guide
Page 133
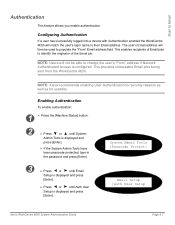
... to populate the "From" Email address field. This enables recipients of Email jobs to Email Authentication This feature allows you enable authentication. This prevents untraceable Email jobs being sent from the WorkCentre M20i. NOTE: Xerox recommends enabling User Authentication for security reasons as well as for usability. Scan to identify the originator of the Email job. Enabling Authentication To...
... to populate the "From" Email address field. This enables recipients of Email jobs to Email Authentication This feature allows you enable authentication. This prevents untraceable Email jobs being sent from the WorkCentre M20i. NOTE: Xerox recommends enabling User Authentication for security reasons as well as for usability. Scan to identify the originator of the Email job. Enabling Authentication To...

System Administration Guide
Page 134
Scan to Email 4 ¾ Press or until User Auth is displayed and press [Enter]. 5 ¾ If you want to enable User Authentication, press or until Enable is displayed and press [Enter]. Auth User Setup [User Auth] User Auth [Enable] Page 9-8 Xerox WorkCentre M20i System Administration Guide Otherwise choose Disable and press [Enter].
Scan to Email 4 ¾ Press or until User Auth is displayed and press [Enter]. 5 ¾ If you want to enable User Authentication, press or until Enable is displayed and press [Enter]. Auth User Setup [User Auth] User Auth [Enable] Page 9-8 Xerox WorkCentre M20i System Administration Guide Otherwise choose Disable and press [Enter].
System Administration Guide
Page 135
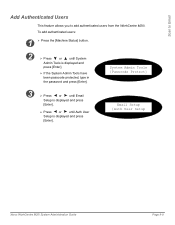
... User Setup Xerox WorkCentre M20i System Administration Guide Page 9-9 System Admin Tools [Passcode Protect] 3 ¾ Press or until Email Setup is displayed and press [Enter]. ¾ Press or until System Admin Tools is displayed and press [Enter]. Scan to Email Add Authenticated Users This feature allows you to add authenticated users from the WorkCentre M20i. To add authenticated...
... User Setup Xerox WorkCentre M20i System Administration Guide Page 9-9 System Admin Tools [Passcode Protect] 3 ¾ Press or until Email Setup is displayed and press [Enter]. ¾ Press or until System Admin Tools is displayed and press [Enter]. Scan to Email Add Authenticated Users This feature allows you to add authenticated users from the WorkCentre M20i. To add authenticated...

System Administration Guide
Page 136
...the [Menu/Exit] button. Auth User Setup [Add Auth Users] Add Auth Users [Add Another] Page 9-10 Xerox WorkCentre M20i System Administration Guide the password used to access Email. Email address - the Name of the sender that the you do not have to add another authenticated user. User password... - the User ID used to access Email - Scan to Email 4 ¾ Press or until Add Auth Users is : Name - Login ID - The information required is displayed and press [Enter]. ...
...the [Menu/Exit] button. Auth User Setup [Add Auth Users] Add Auth Users [Add Another] Page 9-10 Xerox WorkCentre M20i System Administration Guide the password used to access Email. Email address - the Name of the sender that the you do not have to add another authenticated user. User password... - the User ID used to access Email - Scan to Email 4 ¾ Press or until Add Auth Users is : Name - Login ID - The information required is displayed and press [Enter]. ...
System Administration Guide
Page 137
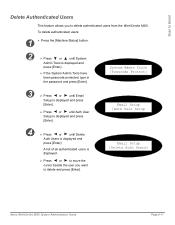
... User Setup 34 ¾ Press or until System Admin Tools is displayed and press [Enter]. Email Setup [Delete Auth Users] Xerox WorkCentre M20i System Administration Guide Page 9-11 To delete authenticated users: 1 ¾ Press the [Machine Status] button. 2 ¾...list of all authenticated users is displayed and press [Enter]. Scan to Email Delete Authenticated Users This feature allows you want to delete authenticated users from the WorkCentre M20i. System Admin Tools [Passcode Protect] 3 ¾ Press or until Email Setup is displayed and press [Enter]. ¾ Press ...
... User Setup 34 ¾ Press or until System Admin Tools is displayed and press [Enter]. Email Setup [Delete Auth Users] Xerox WorkCentre M20i System Administration Guide Page 9-11 To delete authenticated users: 1 ¾ Press the [Machine Status] button. 2 ¾...list of all authenticated users is displayed and press [Enter]. Scan to Email Delete Authenticated Users This feature allows you want to delete authenticated users from the WorkCentre M20i. System Admin Tools [Passcode Protect] 3 ¾ Press or until Email Setup is displayed and press [Enter]. ¾ Press ...

System Administration Guide
Page 138
Otherwise, press or until Yes is displayed and press [Enter]. ¾ Repeat this for each user that you want to delete then press the [Menu/Exit] button. Scan to Email 5 ¾ To delete the Authenticated User, press or until No is displayed and press [Enter]. Delete [Yes] Page 9-12 Xerox WorkCentre M20i System Administration Guide
Otherwise, press or until Yes is displayed and press [Enter]. ¾ Repeat this for each user that you want to delete then press the [Menu/Exit] button. Scan to Email 5 ¾ To delete the Authenticated User, press or until No is displayed and press [Enter]. Delete [Yes] Page 9-12 Xerox WorkCentre M20i System Administration Guide
System Administration Guide
Page 139
see page 9-17. ¾ Email Setup using Internet Services - Xerox WorkCentre M20i System Administration Guide Page 9-13 see page 9-14. ¾ Default From address - see page 9-16. ¾ Auto Send to configure or set the following Email features: ¾ Default Subject text - see page 9-20. ¾ Email forwarding - see page 9-15. ¾ Guest User Access - Scan to Email Configuring Email Settings This section describes how to Self - see page 9-27.
see page 9-17. ¾ Email Setup using Internet Services - Xerox WorkCentre M20i System Administration Guide Page 9-13 see page 9-14. ¾ Default From address - see page 9-16. ¾ Auto Send to configure or set the following Email features: ¾ Default Subject text - see page 9-20. ¾ Email forwarding - see page 9-15. ¾ Guest User Access - Scan to Email Configuring Email Settings This section describes how to Self - see page 9-27.
System Administration Guide
Page 140
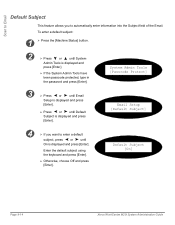
... have been passcode protected, type in the password and press [Enter]. Default Subject [On] Page 9-14 Xerox WorkCentre M20i System Administration Guide Scan to Email Default Subject This feature allows you want to automatically enter information into the Subject field of the... Email. Enter the default subject using the keyboard and press [Enter]. ¾ Otherwise, choose Off and press [Enter]. Email Setup [Default Subject] 4 ¾...
... have been passcode protected, type in the password and press [Enter]. Default Subject [On] Page 9-14 Xerox WorkCentre M20i System Administration Guide Scan to Email Default Subject This feature allows you want to automatically enter information into the Subject field of the... Email. Enter the default subject using the keyboard and press [Enter]. ¾ Otherwise, choose Off and press [Enter]. Email Setup [Default Subject] 4 ¾...
System Administration Guide
Page 141
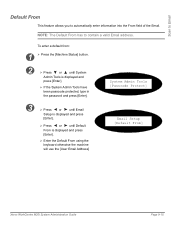
NOTE: The Default From has to automatically enter information into the From field of the Email. Scan to Email Default From This feature allows you to contain a valid Email address. To enter a default from: 1 ¾ Press the [Machine Status] button. 2 ¾ Press or until ... Email Setup is displayed and press [Enter]. ¾ Press or until Default From is displayed and press [Enter]. ¾ Enter the Default From using the keyboard otherwise the machine will use the [User Email Address] System Admin Tools [Passcode Protect] Email Setup [Default From] Xerox WorkCentre M20i ...
NOTE: The Default From has to automatically enter information into the From field of the Email. Scan to Email Default From This feature allows you to contain a valid Email address. To enter a default from: 1 ¾ Press the [Machine Status] button. 2 ¾ Press or until ... Email Setup is displayed and press [Enter]. ¾ Press or until Default From is displayed and press [Enter]. ¾ Enter the Default From using the keyboard otherwise the machine will use the [User Email Address] System Admin Tools [Passcode Protect] Email Setup [Default From] Xerox WorkCentre M20i ...

System Administration Guide
Page 142
... Xerox WorkCentre M20i System Administration Guide Enter the Guest User Login ID and password using the keyboard and press [Enter]. NOTE: "Guest" is displayed and press [Enter]. System Admin Tools [Passcode Protect] Email Setup [Guest User Access] 4 ¾ If you to permit a guest user to send an Email.... protected, type in the password and press [Enter]. 3 ¾ Press or until Email Setup is displayed and press [Enter]. ¾ Press or until On is displayed and press [Enter]. Scan to Email Guest User Access This feature allows you want to have been enabled. To enter a...
... Xerox WorkCentre M20i System Administration Guide Enter the Guest User Login ID and password using the keyboard and press [Enter]. NOTE: "Guest" is displayed and press [Enter]. System Admin Tools [Passcode Protect] Email Setup [Guest User Access] 4 ¾ If you to permit a guest user to send an Email.... protected, type in the password and press [Enter]. 3 ¾ Press or until Email Setup is displayed and press [Enter]. ¾ Press or until On is displayed and press [Enter]. Scan to Email Guest User Access This feature allows you want to have been enabled. To enter a...


