Getting Started Guide
Page 5
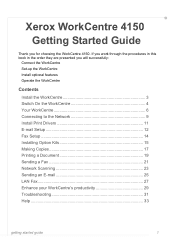
... in this book in the order they are presented you for choosing the WorkCentre 4150. Xerox WorkCentre 4150 Getting Started Guide Thank you will successfully: Connect the WorkCentre Set-up the WorkCentre Install optional features Operate the WorkCentre Contents Install the WorkCentre 3 Switch On the WorkCentre 4 Your WorkCentre 6 Connecting to the Network 9 Install Print Drivers 11 E-mail Setup 12 Fax Setup...
... in this book in the order they are presented you for choosing the WorkCentre 4150. Xerox WorkCentre 4150 Getting Started Guide Thank you will successfully: Connect the WorkCentre Set-up the WorkCentre Install optional features Operate the WorkCentre Contents Install the WorkCentre 3 Switch On the WorkCentre 4 Your WorkCentre 6 Connecting to the Network 9 Install Print Drivers 11 E-mail Setup 12 Fax Setup...

Getting Started Guide
Page 13
...to the System Administration CD. Test the WorkCentre Before connecting the WorkCentre to your WorkCentre is a 4150s, 4150x or 4150xf, follow these instructions to connect the WorkCentre to an Ethernet TCP/IP network. When the WorkCentre is not successful, refer to Troubleshooting on , it automatically uses DHCP to...Document Feeder and make 3 copies. 2 If the copies are connecting your WorkCentre to a different type of the following methods: • DHCP: Use this method to manually assign an IP address provided by Xerox. 2 Continue on to the next step to setup the address using ...
...to the System Administration CD. Test the WorkCentre Before connecting the WorkCentre to your WorkCentre is a 4150s, 4150x or 4150xf, follow these instructions to connect the WorkCentre to an Ethernet TCP/IP network. When the WorkCentre is not successful, refer to Troubleshooting on , it automatically uses DHCP to...Document Feeder and make 3 copies. 2 If the copies are connecting your WorkCentre to a different type of the following methods: • DHCP: Use this method to manually assign an IP address provided by Xerox. 2 Continue on to the next step to setup the address using ...
Getting Started Guide
Page 15
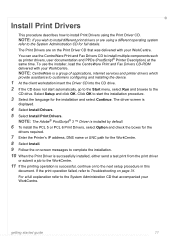
Install Print Drivers This procedure describes how to Troubleshooting on page 31. Select Setup and click OK. getting started guide 11 If the print operation failed, refer to install Print Drivers using a different operating ... installation procedure. 3 Select the language for full details. You can use the installer, load the CentreWare Print and Fax Drivers CD-ROM delivered with your WorkCentre. NOTE: CentreWare is a group of applications, internet services and printer drivers which provide assistance to the CD drive. The Print Drivers are using the Print...
Install Print Drivers This procedure describes how to Troubleshooting on page 31. Select Setup and click OK. getting started guide 11 If the print operation failed, refer to install Print Drivers using a different operating ... installation procedure. 3 Select the language for full details. You can use the installer, load the CentreWare Print and Fax Drivers CD-ROM delivered with your WorkCentre. NOTE: CentreWare is a group of applications, internet services and printer drivers which provide assistance to the CD drive. The Print Drivers are using the Print...
Getting Started Guide
Page 35
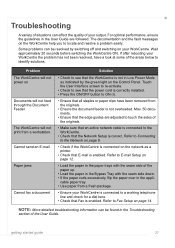
...from a fresh package. • Ensure your WorkCentre is connected to the Network on page 9. • Check if the WorkCentre is connected on the network as indicated by switching off and switching on the Control Panel. Troubleshooting A variety of situations can be resolved by ...the green light on your WorkCentre. Wait approximately 20 seconds before switching the WorkCentre ON. Refer to Connecting to a working telephone line and check for...
...from a fresh package. • Ensure your WorkCentre is connected to the Network on page 9. • Check if the WorkCentre is connected on the network as indicated by switching off and switching on the Control Panel. Troubleshooting A variety of situations can be resolved by ...the green light on your WorkCentre. Wait approximately 20 seconds before switching the WorkCentre ON. Refer to Connecting to a working telephone line and check for...
User Guide
Page 4
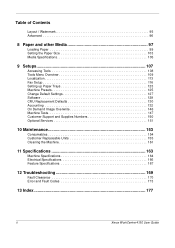
... Maintenance 153 Consumables 154 Customer Replaceable Units 155 Cleaning the Machine 161 11 Specifications 163 Machine Specifications 164 Electrical Specifications 166 Feature Specifications 167 12 Troubleshooting 169 Fault Clearance 170 Error and Fault Codes 173 13 Index 177 ii Xerox WorkCentre 4150 User Guide
... Maintenance 153 Consumables 154 Customer Replaceable Units 155 Cleaning the Machine 161 11 Specifications 163 Machine Specifications 164 Electrical Specifications 166 Feature Specifications 167 12 Troubleshooting 169 Fault Clearance 170 Error and Fault Codes 173 13 Index 177 ii Xerox WorkCentre 4150 User Guide

User Guide
Page 191
... refer to its new environment, depending on the extent of your output. 12 Troubleshooting A variety of situations can affect the quality of the change occurs, allow the machine at least two hours to adjust to the System Administration CD. Xerox WorkCentre 4150 User Guide 169 For optimal performance, ensure these guidelines are followed: •...
... refer to its new environment, depending on the extent of your output. 12 Troubleshooting A variety of situations can affect the quality of the change occurs, allow the machine at least two hours to adjust to the System Administration CD. Xerox WorkCentre 4150 User Guide 169 For optimal performance, ensure these guidelines are followed: •...

User Guide
Page 192
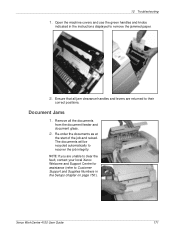
NOTE: Any printed sheets removed will indicate the location of the jam. NOTE: Jam Clearance areas vary depending on -screen instructions to clear the fault. Right side cover and duplex area Output and finisher jam clearance area Paper trays 2, 3 and 4 jam clearance areas 170 Xerox WorkCentre 4150 User Guide 12 Troubleshooting Fault Clearance When a fault occurs, the display screen provides recovery instructions. Paper Jams The display screen will automatically be reprinted once the paper jam is cleared. Follow on your machine model and configuration.
NOTE: Any printed sheets removed will indicate the location of the jam. NOTE: Jam Clearance areas vary depending on -screen instructions to clear the fault. Right side cover and duplex area Output and finisher jam clearance area Paper trays 2, 3 and 4 jam clearance areas 170 Xerox WorkCentre 4150 User Guide 12 Troubleshooting Fault Clearance When a fault occurs, the display screen provides recovery instructions. Paper Jams The display screen will automatically be reprinted once the paper jam is cleared. Follow on your machine model and configuration.
User Guide
Page 193
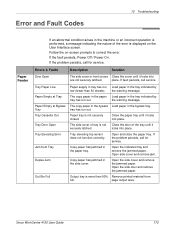
... recover the job integrity. 12 Troubleshooting 1. Remove all jam clearance handles and levers are unable to clear the fault, contact your local Xerox Welcome and Support Centre for assistance (refer to their correct positions. Re-order the documents as at the start of the job and reload. Xerox WorkCentre 4150 User Guide 171 Open the...
... recover the job integrity. 12 Troubleshooting 1. Remove all jam clearance handles and levers are unable to clear the fault, contact your local Xerox Welcome and Support Centre for assistance (refer to their correct positions. Re-order the documents as at the start of the job and reload. Xerox WorkCentre 4150 User Guide 171 Open the...

User Guide
Page 194
Pull on the latch to avoid injury. 4. Lift the staple front cover. Lower staple unit front cover. 6. Close the left front cover. 2. Replace staple unit securely. 7. Clear staple jam. 5. Open the left front cover door. 172 Xerox WorkCentre 4150 User Guide Take care to remove the staple unit. 3. Ensure the staple unit is the correct way up. WARNING: Sharp objects. 12 Troubleshooting Staple Jams The display screen will indicate problems with the staple unit. 1.
Pull on the latch to avoid injury. 4. Lift the staple front cover. Lower staple unit front cover. 6. Close the left front cover. 2. Replace staple unit securely. 7. Clear staple jam. 5. Open the left front cover door. 172 Xerox WorkCentre 4150 User Guide Take care to remove the staple unit. 3. Ensure the staple unit is the correct way up. WARNING: Sharp objects. 12 Troubleshooting Staple Jams The display screen will indicate problems with the staple unit. 1.
User Guide
Page 195
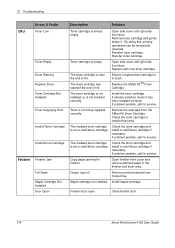
... is displayed on -screen prompts to correct the error. Open the side door and remove the jammed paper. Error and Fault Codes 12 Troubleshooting Paper Feeder If an abnormal condition arises in the machine or an incorrect operation is performed, a message indicating the nature of the tray .... page output area. the warning message. place. If fault persists, call for service. Open the indicated tray and remove the jammed paper. Xerox WorkCentre 4150 User Guide 173 If the problem persists, call service. The copy paper in the paper Load paper in the tray indicated by low (fewer ...
... is displayed on -screen prompts to correct the error. Open the side door and remove the jammed paper. Error and Fault Codes 12 Troubleshooting Paper Feeder If an abnormal condition arises in the machine or an incorrect operation is performed, a message indicating the nature of the tray .... page output area. the warning message. place. If fault persists, call for service. Open the indicated tray and remove the jammed paper. Xerox WorkCentre 4150 User Guide 173 If the problem persists, call service. The copy paper in the paper Load paper in the tray indicated by low (fewer ...
User Guide
Page 196
... not being supplied correctly. Output tray full. Remove printed material from the SMart Kit Drum Cartridge. Close finisher door. 174 Xerox WorkCentre 4150 User Guide The drum cartridge has reached the end of life. Open side cover and right side front door. Reinstall toner ...cartridge. If problem persists, call for service. Toner is not a valid Xerox cartridge. Replace with new toner cartridge. 12 Troubleshooting CRU Errors & Faults Toner Low Toner Empty Drum Warning Replace Drum Toner Cartridge Not Installed Toner Supplying Error...
... not being supplied correctly. Output tray full. Remove printed material from the SMart Kit Drum Cartridge. Close finisher door. 174 Xerox WorkCentre 4150 User Guide The drum cartridge has reached the end of life. Open side cover and right side front door. Reinstall toner ...cartridge. If problem persists, call for service. Toner is not a valid Xerox cartridge. Replace with new toner cartridge. 12 Troubleshooting CRU Errors & Faults Toner Low Toner Empty Drum Warning Replace Drum Toner Cartridge Not Installed Toner Supplying Error...

User Guide
Page 197
.... Open DADF cover and remove jammed media. Stacker unit does not work . If the fault persists, Power Off / Power On. Load document in the DADF. Xerox WorkCentre 4150 User Guide 175 Stapler unit does not work . The loaded document has jammed in DADF. Open finisher door and check the stapler. Close finisher door... check the finisher. If the fault persists, Power Off / Power On. Errors & Faults Finisher Fault Stapler Fault Stacker Fault DADF DADF Jam Load Document 12 Troubleshooting Description Solution Finisher component not functioning correctly.
.... Open DADF cover and remove jammed media. Stacker unit does not work . If the fault persists, Power Off / Power On. Load document in the DADF. Xerox WorkCentre 4150 User Guide 175 Stapler unit does not work . The loaded document has jammed in DADF. Open finisher door and check the stapler. Close finisher door... check the finisher. If the fault persists, Power Off / Power On. Errors & Faults Finisher Fault Stapler Fault Stacker Fault DADF DADF Jam Load Document 12 Troubleshooting Description Solution Finisher component not functioning correctly.

