Owners Manual
Page 2
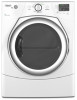
These words mean: DANGER You can happen if the instructions are very important. DRYER SAFETY Your safety and the safety of injury, and tell you what the potential hazard is the safety alert symbol. This is , tell you don't ...
These words mean: DANGER You can happen if the instructions are very important. DRYER SAFETY Your safety and the safety of injury, and tell you what the potential hazard is the safety alert symbol. This is , tell you don't ...
Owners Manual
Page 4
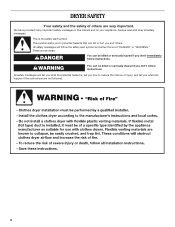
...local codes, or in death or fire. Fire Hazard No washer can result in the absence of oil on it (including cooking oils). The dryer must be dried on the next page. 4 Do not dry anything that has ever had anything that has ever had any type of local codes... installation, see the QUICK START GUIDE on a clothesline or by using an Air Cycle. QUICK START GUIDE/DRYER USE WARNING WARNING Explosion Hazard Keep flammable materials and vapors, such as gasoline, away from dryer. For a summary of local codes, with the National Electrical Code, ANSI/NFPA 70. IMPORTANT: The gas ...
...local codes, or in death or fire. Fire Hazard No washer can result in the absence of oil on it (including cooking oils). The dryer must be dried on the next page. 4 Do not dry anything that has ever had anything that has ever had any type of local codes... installation, see the QUICK START GUIDE on a clothesline or by using an Air Cycle. QUICK START GUIDE/DRYER USE WARNING WARNING Explosion Hazard Keep flammable materials and vapors, such as gasoline, away from dryer. For a summary of local codes, with the National Electrical Code, ANSI/NFPA 70. IMPORTANT: The gas ...
Owners Manual
Page 5
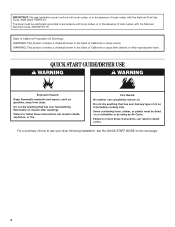
... begin . See the Cycles information on the following pages for optimal performance. Shut the door. 3. Press POWER. 4. Place laundry in the dryer. Press MORE TIME or LESS TIME until the desired temperature glows. 7. To add or remove options during the cycle, if desired. Pausing or... the door or press START/PAUSE once. Clean lint screen. 2. Press and hold START/PAUSE 5 Place laundry in the dryer. To restart the dryer Close the door and press and hold START/PAUSE to persons, read the IMPORTANT SAFETY INSTRUCTIONS before operating this appliance. USING ...
... begin . See the Cycles information on the following pages for optimal performance. Shut the door. 3. Press POWER. 4. Place laundry in the dryer. Press MORE TIME or LESS TIME until the desired temperature glows. 7. To add or remove options during the cycle, if desired. Pausing or... the door or press START/PAUSE once. Clean lint screen. 2. Press and hold START/PAUSE 5 Place laundry in the dryer. To restart the dryer Close the door and press and hold START/PAUSE to persons, read the IMPORTANT SAFETY INSTRUCTIONS before operating this appliance. USING ...
Owners Manual
Page 6
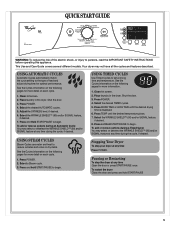
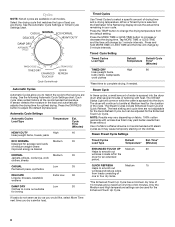
... Cycle Settings or Timed Cycle Settings chart. Press the MORE TIME or LESS TIME button to smooth out wrinkles in loads left in the dryer for an extended period. Timed Cycle Setting Timed Cycles Load Type Default Default Cycle Temperature Time* (Minutes) TIMED DRY High 80 Heavyweight items... allow you to match the cycle to change by 1-minute intervals. Press the TEMP button to the load you dry a similar load. The dryer will change by 5-minute intervals. NOTE: Results may vary depending on all models. The Steam Cycles include Enhanced Touch Up and Quick Refresh. ...
... Cycle Settings or Timed Cycle Settings chart. Press the MORE TIME or LESS TIME button to smooth out wrinkles in loads left in the dryer for an extended period. Timed Cycle Setting Timed Cycles Load Type Default Default Cycle Temperature Time* (Minutes) TIMED DRY High 80 Heavyweight items... allow you to match the cycle to change by 1-minute intervals. Press the TEMP button to the load you dry a similar load. The dryer will change by 5-minute intervals. NOTE: Results may vary depending on all models. The Steam Cycles include Enhanced Touch Up and Quick Refresh. ...
Owners Manual
Page 7
...In a Timed Cycle, wet items are unable to remove a load of clothes from forming. ■ Get up to 90 minutes of the dryer. Additional Features Steam Control Lock Sensing Wet Damp Cool Down Done Wrinkle Shield Sensing/Estimated Time Remaining ■ In an Automatic Cycle, the Sensing... light illuminates until the dryer goes into the cycle. Done The Done light illuminates when the drying cycle is finished. Press the WRINKLE SHIELD™ (90) button...
...In a Timed Cycle, wet items are unable to remove a load of clothes from forming. ■ Get up to 90 minutes of the dryer. Additional Features Steam Control Lock Sensing Wet Damp Cool Down Done Wrinkle Shield Sensing/Estimated Time Remaining ■ In an Automatic Cycle, the Sensing... light illuminates until the dryer goes into the cycle. Done The Done light illuminates when the drying cycle is finished. Press the WRINKLE SHIELD™ (90) button...
Owners Manual
Page 8
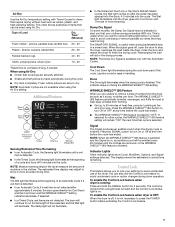
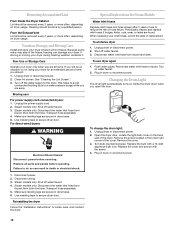
... and hold START/PAUSE. Changing Cycles and Settings On Automatic Cycles, you do not press Start within 5 minutes of selecting the cycle, the dryer automatically shuts off . The last selection will not be restarted until the control is selected. On Timed Cycles, you can change the Cycles, adjust...PAUSE button, but cannot be accepted. Press and hold the SIGNAL button for 3 seconds to hang several items of the new cycle. The dryer starts at any time before pressing START/PAUSE. ■ Three short tones sound if an unavailable combination is unlocked. To open or close the...
... and hold START/PAUSE. Changing Cycles and Settings On Automatic Cycles, you do not press Start within 5 minutes of selecting the cycle, the dryer automatically shuts off . The last selection will not be restarted until the control is selected. On Timed Cycles, you can change the Cycles, adjust...PAUSE button, but cannot be accepted. Press and hold the SIGNAL button for 3 seconds to hang several items of the new cycle. The dryer starts at any time before pressing START/PAUSE. ■ Three short tones sound if an unavailable combination is unlocked. To open or close the...
Owners Manual
Page 9
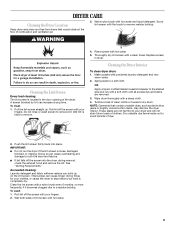
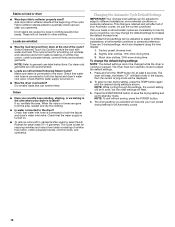
... brush to a soft cloth. Wet a nylon brush with hot water. 5. A screen blocked by lint can build up . Cleaning the Dryer Interior To clean dryer drum: 1. Apply paste to remove residue buildup. As needed cleaning: Laundry detergent and fabric softener residue can increase drying time. Clean the ... can cause longer drying times for your fingers. 2. To wash 1. Tumble a load of clothes. Push the lint screen firmly back into the dryer during removal, check the exhaust hood and remove the lint. Do not rinse or wash screen to a residue buildup. OR Apply a liquid, nonflammable...
... brush to a soft cloth. Wet a nylon brush with hot water. 5. A screen blocked by lint can build up . Cleaning the Dryer Interior To clean dryer drum: 1. Apply paste to remove residue buildup. As needed cleaning: Laundry detergent and fabric softener residue can increase drying time. Clean the ... can cause longer drying times for your fingers. 2. To wash 1. Tumble a load of clothes. Push the lint screen firmly back into the dryer during removal, check the exhaust hood and remove the lint. Do not rinse or wash screen to a residue buildup. OR Apply a liquid, nonflammable...
Owners Manual
Page 10
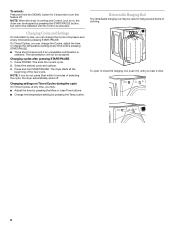
...replacement. Steam models only: Shut off water faucet. 4. Failure to do so can result in the hoses, freezing can damage your dryer where it . Disconnect power. 2. Transport hose separately. 5. Make sure leveling legs are at home. Use masking tape to locate, level, ...and connect the dryer. When replacing your dryer during freezing weather, winterize it will be on dryer usage. Disconnect water inlet hose from faucet, then drain the hose. Turn bulb counterclockwise. Replace the cover...
...replacement. Steam models only: Shut off water faucet. 4. Failure to do so can result in the hoses, freezing can damage your dryer where it . Disconnect power. 2. Transport hose separately. 5. Make sure leveling legs are at home. Use masking tape to locate, level, ...and connect the dryer. When replacing your dryer during freezing weather, winterize it will be on dryer usage. Disconnect water inlet hose from faucet, then drain the hose. Turn bulb counterclockwise. Replace the cover...
Owners Manual
Page 11
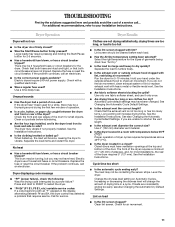
...turning, but you are unable to vibrate. Use a time-delay fuse. When balled up ? Call for air movement. 11 Dryer Operation Dryer will bounce, causing the dryer to shorten the vent length. ■ Is the exhaust vent diameter the correct size? Check that both fuses are clothes ...If a code beginning with an "F" appears in a room with lint? Check with lint, restricting air movement? Unusual sounds ■ Has the dryer had a period of the drum for 5-10 minutes. The load may have not tripped. Check that requires service. TROUBLESHOOTING First try the solutions ...
...turning, but you are unable to vibrate. Use a time-delay fuse. When balled up ? Call for air movement. 11 Dryer Operation Dryer will bounce, causing the dryer to shorten the vent length. ■ Is the exhaust vent diameter the correct size? Check that both fuses are clothes ...If a code beginning with an "F" appears in a room with lint? Check with lint, restricting air movement? Unusual sounds ■ Has the dryer had a period of the drum for 5-10 minutes. The load may have not tripped. Check that requires service. TROUBLESHOOTING First try the solutions ...
Owners Manual
Page 12
...consisting of 1-4 garments. This cycle is best for at least 6 seconds. Check that the water supply is connected to both the faucet and dryer's water inlet valve. Odors ■ Have you recently been painting, staining, or varnishing in clothing (usually blue jeans). When the odors ...Automatic cycles. 12 To select a new drying setting, press the TEMP button again until the desired drying setting is connected to the dryer. Check that can be adjusted to adapt to other settings will not transfer to different installations, environmental conditions or personal preference. This ...
...consisting of 1-4 garments. This cycle is best for at least 6 seconds. Check that the water supply is connected to both the faucet and dryer's water inlet valve. Odors ■ Have you recently been painting, staining, or varnishing in clothing (usually blue jeans). When the odors ...Automatic cycles. 12 To select a new drying setting, press the TEMP button again until the desired drying setting is connected to the dryer. Check that can be adjusted to adapt to other settings will not transfer to different installations, environmental conditions or personal preference. This ...
Dimension Guide
Page 1
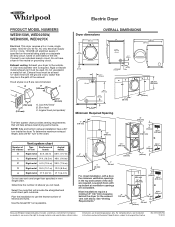
...102 mm) 4" (102 mm) 2½" (64 mm) A. Louvered hood B. To determine maximum exhaust length, add one 90° turn inside the dryer. Determine the number of the line. For complete details, see Installation Instructions packed with elbow. Rigid or flexible metal exhaust vent must be at least...mm) 3" (76 mm) 48 in.2 (310 cm2) 3" (76 mm) 24 in.2 (155 cm2) 1" (25 mm) 1" (25 mm) Because Whirlpool Corporation policy includes a continuous commitment to improve our products, we reserve the right to change materials and specifications without notice. W10240579C 11/2010
...102 mm) 4" (102 mm) 2½" (64 mm) A. Louvered hood B. To determine maximum exhaust length, add one 90° turn inside the dryer. Determine the number of the line. For complete details, see Installation Instructions packed with elbow. Rigid or flexible metal exhaust vent must be at least...mm) 3" (76 mm) 48 in.2 (310 cm2) 3" (76 mm) 24 in.2 (155 cm2) 1" (25 mm) 1" (25 mm) Because Whirlpool Corporation policy includes a continuous commitment to improve our products, we reserve the right to change materials and specifications without notice. W10240579C 11/2010
Installation Instructions
Page 2
DRYER SAFETY Your safety and the safety of injury, and tell you what the potential hazard is the safety alert symbol. WARNING You can be killed ...
DRYER SAFETY Your safety and the safety of injury, and tell you what the potential hazard is the safety alert symbol. WARNING You can be killed ...
Installation Instructions
Page 3
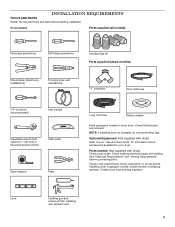
... local codes. Some codes limit, or do not use leveling legs. Contact your dryer. Tools needed : (Not supplied with dryer) Refer to 1" (25 mm) or hex-head socket wrench Utility knife Tape measure Pliers Long inlet hose Rubber washer Parts package is located in garages, ...
... local codes. Some codes limit, or do not use leveling legs. Contact your dryer. Tools needed : (Not supplied with dryer) Refer to 1" (25 mm) or hex-head socket wrench Utility knife Tape measure Pliers Long inlet hose Rubber washer Parts package is located in garages, ...
Installation Instructions
Page 4
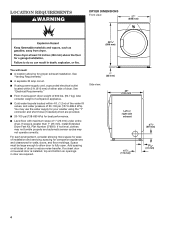
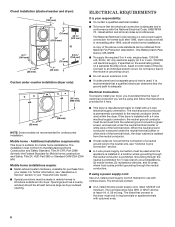
... power supply cord, a grounded electrical outlet located within 4 ft. (1.2 m) of the water fill valves, and water pressure of dryer to fully open. spacing for companion appliances and clearances for proper exhaust installation. For each arrangement, consider allowing more space for best ...performance. ■■ Level floor with maximum slope of dryer. Side view: 1" (25 mm) 29" (736 mm) Left or right side exhaust 6 7/8" (174 mm) 31/2" (89 mm) 1 5/8" (41 mm...
... power supply cord, a grounded electrical outlet located within 4 ft. (1.2 m) of the water fill valves, and water pressure of dryer to fully open. spacing for companion appliances and clearances for proper exhaust installation. For each arrangement, consider allowing more space for best ...performance. ■■ Level floor with maximum slope of dryer. Side view: 1" (25 mm) 29" (736 mm) Left or right side exhaust 6 7/8" (174 mm) 31/2" (89 mm) 1 5/8" (41 mm...
Installation Instructions
Page 5
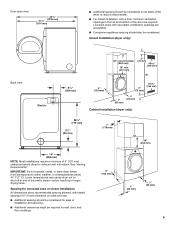
... or closet installation All dimensions show recommended spacing allowed, with tested spacing of 0" (0 mm) clearance on all sides of the dryer to water, weather, or at end of 5" (127 mm) clearance behind dryer for wall, door, and floor moldings. 4" (102 mm) 1" (25 mm) 1" (25 mm) 5 IMPORTANT: Do ...310 cm2) Back view: Electric 61/4" (159 mm) 4" (102 mm) 3" (76 mm) 24 in.2 (155 cm2) 1" (25 mm) 1" (25 mm) Cabinet installation (dryer only): 281/8" (715 mm) 31/2" (89 mm) 7" (178 mm) 18" (460 mm) 14" (358 mm) NOTE: Most installations require a minimum of automatic sensor cycles, ...
... or closet installation All dimensions show recommended spacing allowed, with tested spacing of 0" (0 mm) clearance on all sides of the dryer to water, weather, or at end of 5" (127 mm) clearance behind dryer for wall, door, and floor moldings. 4" (102 mm) 1" (25 mm) 1" (25 mm) 5 IMPORTANT: Do ...310 cm2) Back view: Electric 61/4" (159 mm) 4" (102 mm) 3" (76 mm) 24 in.2 (155 cm2) 1" (25 mm) 1" (25 mm) Cabinet installation (dryer only): 281/8" (715 mm) 31/2" (89 mm) 7" (178 mm) 18" (460 mm) 14" (358 mm) NOTE: Most installations require a minimum of automatic sensor cycles, ...
Installation Instructions
Page 6
...Z240 MH. When the neutral ground conductor is secured under the neutral terminal (center or white wire) of the terminal block, the dryer cabinet is your dealer. The kit should be removed from your responsibility: ■■ To contact a qualified electrical installer. ■... is permanently connected to an individual branch circuit. The National Electrical Code requires a 4-wire power supply connection for undercounter installation. Closet Installation (stacked washer and dryer): 6" (152 mm) 3" (76 mm) 76" (1930 mm) 48 in.2 (310 cm2) 51/2" (140 mm) 1" (25 mm) 3" (76 mm) ...
...Z240 MH. When the neutral ground conductor is secured under the neutral terminal (center or white wire) of the terminal block, the dryer cabinet is your dealer. The kit should be removed from your responsibility: ■■ To contact a qualified electrical installer. ■... is permanently connected to an individual branch circuit. The National Electrical Code requires a 4-wire power supply connection for undercounter installation. Closet Installation (stacked washer and dryer): 6" (152 mm) 3" (76 mm) 76" (1930 mm) 48 in.2 (310 cm2) 51/2" (140 mm) 1" (25 mm) 3" (76 mm) ...
Installation Instructions
Page 7
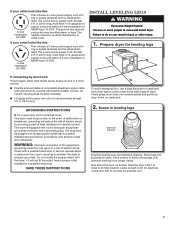
... be either green or bare. The ground wire (ground conductor) may be grounded. GROUNDING INSTRUCTIONS � For a grounded, cord-connected dryer: This dryer must match power supply (4-wire or 3-wire) and be plugged into leg holes by hand, use a wrench to its feet. grounding ... 3-wire receptacle (10-30R) Then choose a 3-wire power supply cord with a cord having an equipmentgrounding conductor and a grounding plug. Prepare dryer for leveling legs If connecting by providing a path of NEMA Type 10-30R. SAVE THESE INSTRUCTIONS To avoid damaging floor, use aluminum) at least...
... be either green or bare. The ground wire (ground conductor) may be grounded. GROUNDING INSTRUCTIONS � For a grounded, cord-connected dryer: This dryer must match power supply (4-wire or 3-wire) and be plugged into leg holes by hand, use a wrench to its feet. grounding ... 3-wire receptacle (10-30R) Then choose a 3-wire power supply cord with a cord having an equipmentgrounding conductor and a grounding plug. Prepare dryer for leveling legs If connecting by providing a path of NEMA Type 10-30R. SAVE THESE INSTRUCTIONS To avoid damaging floor, use aluminum) at least...
Installation Instructions
Page 9
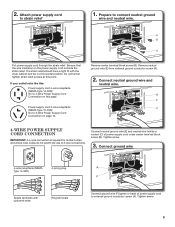
... bare) of power supply cord to external ground conductor screw (A). Connect ground wire 4-wire receptacle (NEMA type 14-30R) 4-prong plug Spade terminals with the dryer cabinet and be in a horizontal position. Be sure that the wire insulation on the power supply cord is required for moble homes and where local...
... bare) of power supply cord to external ground conductor screw (A). Connect ground wire 4-wire receptacle (NEMA type 14-30R) 4-prong plug Spade terminals with the dryer cabinet and be in a horizontal position. Be sure that the wire insulation on the power supply cord is required for moble homes and where local...
Installation Instructions
Page 10
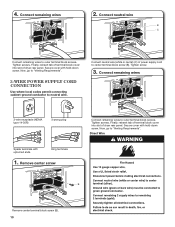
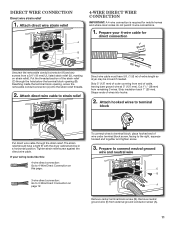
... codes permit connecting cabinet-ground conductor to outer terminal block screws. Connect neutral wire (white or center) (C) of dryer rear panel. Tighten screw. 3. Finally, reinsert tab of terminal block cover into slot of dryer rear panel. Tighten screws. Tighten screws. Direct Wire B Remove center terminal block screw (B). 10 Connect neutral wire B C Connect...
... codes permit connecting cabinet-ground conductor to outer terminal block screws. Connect neutral wire (white or center) (C) of dryer rear panel. Tighten screw. 3. Finally, reinsert tab of terminal block cover into slot of dryer rear panel. Tighten screws. Tighten screws. Direct Wire B Remove center terminal block screw (B). 10 Connect neutral wire B C Connect...
Installation Instructions
Page 11
... 3. Cut 11/2" (38 mm) from external ground conductor screw (A). 11 The strain relief should have 5 ft. (1.52 m) of extra length so dryer may be in a horizontal position. Attach direct wire strain relief A B C Unscrew the removable conduit connector (A) and any screws from end of wire under...: A 4-wire connection is required for direct connection (251"mm) (127 5" mm) Direct wire cable must have a tight fit with the dryer cabinet and be moved if needed. Direct Wire Connection Direct wire strain relief 1. Shape ends of the strain relief (C) through the strain relief. To...
... 3. Cut 11/2" (38 mm) from external ground conductor screw (A). 11 The strain relief should have 5 ft. (1.52 m) of extra length so dryer may be in a horizontal position. Attach direct wire strain relief A B C Unscrew the removable conduit connector (A) and any screws from end of wire under...: A 4-wire connection is required for direct connection (251"mm) (127 5" mm) Direct wire cable must have a tight fit with the dryer cabinet and be moved if needed. Direct Wire Connection Direct wire strain relief 1. Shape ends of the strain relief (C) through the strain relief. To...


