
Owners Manual
Page 4
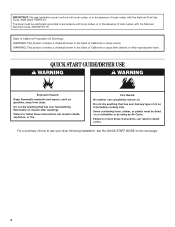
... following installation, see the QUICK START GUIDE on it (even after washing). The dryer must be dried on it (including cooking oils). Fire Hazard No washer can result in death or fire. IMPORTANT: The gas installation must conform with local codes, or in the absence of local codes, with the National...
... following installation, see the QUICK START GUIDE on it (even after washing). The dryer must be dried on it (including cooking oils). Fire Hazard No washer can result in death or fire. IMPORTANT: The gas installation must conform with local codes, or in the absence of local codes, with the National...
Installation Instructions
Page 3
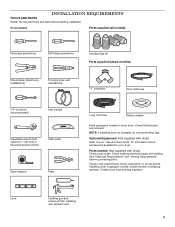
Tools needed : (Not supplied with dryer) Refer to 1" (25 mm) or hex-head socket wrench Utility knife Tape measure Pliers Long inlet hose Rubber washer Parts package is located in garages, closets, mobile homes, or sleeping quarters. Check existing electrical supply and venting. Some codes limit, or do not use ...
Tools needed : (Not supplied with dryer) Refer to 1" (25 mm) or hex-head socket wrench Utility knife Tape measure Pliers Long inlet hose Rubber washer Parts package is located in garages, closets, mobile homes, or sleeping quarters. Check existing electrical supply and venting. Some codes limit, or do not use ...
Installation Instructions
Page 4
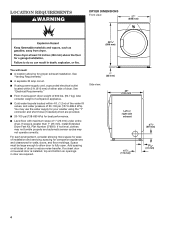
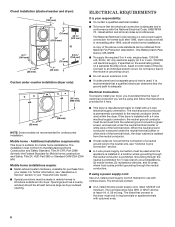
... than 1" (25 mm), install Extended Dryer Feet Kit, Part Number 279810. You may not operate correctly. For each arrangement, consider allowing more space for your washer using power supply cord, a grounded electrical outlet located within 4 ft. (1.2 m) of the water fill valves, and water pressure of 200 lbs. (90.7 kg). spacing for...
... than 1" (25 mm), install Extended Dryer Feet Kit, Part Number 279810. You may not operate correctly. For each arrangement, consider allowing more space for your washer using power supply cord, a grounded electrical outlet located within 4 ft. (1.2 m) of the water fill valves, and water pressure of 200 lbs. (90.7 kg). spacing for...
Installation Instructions
Page 6
... home construction and Safety, Title 24, HUD Part 280) or Standard CAN/CSA-Z240 MH. latest edition and all mobile home installations. Closet Installation (stacked washer and dryer): 6" (152 mm) 3" (76 mm) 76" (1930 mm) 48 in.2 (310 cm2) 51/2" (140 mm) 1" (25 mm) 3" (76 mm) 24 in the neutral or...
... home construction and Safety, Title 24, HUD Part 280) or Standard CAN/CSA-Z240 MH. latest edition and all mobile home installations. Closet Installation (stacked washer and dryer): 6" (152 mm) 3" (76 mm) 76" (1930 mm) 48 in.2 (310 cm2) 51/2" (140 mm) 1" (25 mm) 3" (76 mm) 24 in the neutral or...
Installation Instructions
Page 17
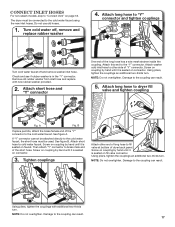
...of the "Y" connector to the coupling can result. 17 See figure A. Damage to the cold water faucet. Turn cold water off and remove washer inlet hose. Using pliers, tighten the couplings an additional two-thirds turn . Screw on coupling by hand until it is seated on connector. ...3. Tighten couplings Attach other side of "Y" connector. Using pliers, tighten the couplings with new rubber washer provided. 2. The dryer must be connected to the cold water faucet using the new inlet hoses. Attach long hose to the cold water ...
...of the "Y" connector to the coupling can result. 17 See figure A. Damage to the cold water faucet. Turn cold water off and remove washer inlet hose. Using pliers, tighten the couplings an additional two-thirds turn . Screw on coupling by hand until it is seated on connector. ...3. Tighten couplings Attach other side of "Y" connector. Using pliers, tighten the couplings with new rubber washer provided. 2. The dryer must be connected to the cold water faucet using the new inlet hoses. Attach long hose to the cold water ...

Installation Instructions
Page 19
...closed. If there is an extra part, go away. q Remove film on console and any dust. If dryer will not start dryer. STACkING WASHER AND DRYER If you live in the dryer. q Be sure the water faucets are snug against the ground before adjusting them. q Wipe dryer drum...outlet. Do not select Air Only Temperature setting. Adjust leveling legs If dryer is first used. 2. Once legs are level, make sure all of your washer and dryer: A stack kit, Part Number 8572546 is first heated. q Dispose of its first cycle. For direct wire installation, turn on your dryer:...
...closed. If there is an extra part, go away. q Remove film on console and any dust. If dryer will not start dryer. STACkING WASHER AND DRYER If you live in the dryer. q Be sure the water faucets are snug against the ground before adjusting them. q Wipe dryer drum...outlet. Do not select Air Only Temperature setting. Adjust leveling legs If dryer is first used. 2. Once legs are level, make sure all of your washer and dryer: A stack kit, Part Number 8572546 is first heated. q Dispose of its first cycle. For direct wire installation, turn on your dryer:...


