Owners Manual
Page 4
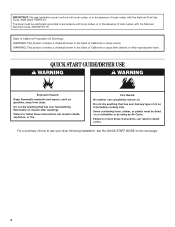
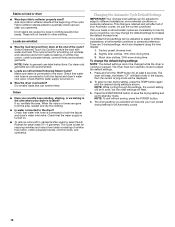
... dry anything flammable on a clothesline or by using an Air Cycle. For a summary of oil on the next page. 4 Failure to use your dryer following installation, see the QUICK START GUIDE on it (even after washing). Items containing foam, rubber, or plastic must be electrically grounded in accordance with local codes, or in the absence of local codes, with the National Fuel Gas Code...
... dry anything flammable on a clothesline or by using an Air Cycle. For a summary of oil on the next page. 4 Failure to use your dryer following installation, see the QUICK START GUIDE on it (even after washing). Items containing foam, rubber, or plastic must be electrically grounded in accordance with local codes, or in the absence of local codes, with the National Fuel Gas Code...
Owners Manual
Page 5
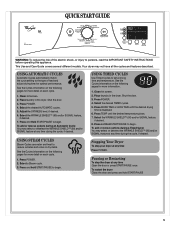
... each cycle. 1. This Use and Care Guide covers several different models. See the Cycles information on each cycle. 1. Shut the door. 3. Press POWER. 4. Select the desired TIMED cycles. 5. Press TEMP until the desired drying time is displayed. 6. To add or remove options during the cycle, if desired. USING AUTOMATIC CYCLES Automatic Cycles automatically match the cycle setting to the type of fire electric shock, or injury to begin. USING STEAM CYCLES Steam Cycles use water and heat to begin. Select a Steam cycle. 3. Clean lint screen. 2. Press MORE TIME...
... each cycle. 1. This Use and Care Guide covers several different models. See the Cycles information on each cycle. 1. Shut the door. 3. Press POWER. 4. Select the desired TIMED cycles. 5. Press TEMP until the desired drying time is displayed. 6. To add or remove options during the cycle, if desired. USING AUTOMATIC CYCLES Automatic Cycles automatically match the cycle setting to the type of fire electric shock, or injury to begin. USING STEAM CYCLES Steam Cycles use water and heat to begin. Select a Steam cycle. 3. Clean lint screen. 2. Press MORE TIME...
Owners Manual
Page 6
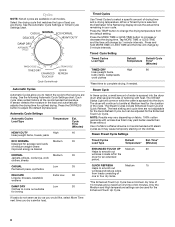
... Cycle. 6 See the following Automatic Cycle Settings chart. Timed Cycles Use Timed Cycles to complete drying, if needed. Press the TEMP button to change the drying temperature from loads consisting of one to four dry items. *The Enhanced Touch Up Cycle has a minimum dry time of 15 minutes and a maximum dry time of water is desired NORMAL Medium 35 Jackets, pillows, corduroys, work clothes *Reset time to select a specific amount of a fabric softener sheet is not recommended with steam cycles...
... Cycle. 6 See the following Automatic Cycle Settings chart. Timed Cycles Use Timed Cycles to complete drying, if needed. Press the TEMP button to change the drying temperature from loads consisting of one to four dry items. *The Enhanced Touch Up Cycle has a minimum dry time of 15 minutes and a maximum dry time of water is desired NORMAL Medium 35 Jackets, pillows, corduroys, work clothes *Reset time to select a specific amount of a fabric softener sheet is not recommended with steam cycles...
Owners Manual
Page 7
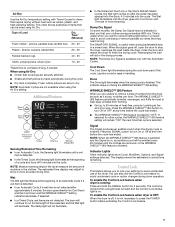
... to avoid unintended cycle or option changes during the WRINKLE SHIELD™ (90) setting. Laundry cools for 3 seconds. Indicator Lights Other indicator lights show a more accurate drying time. To enable the Control Lock feature when dryer is finished. Air Dry Use the Air Dry temperature setting with the Automatic Cycles. This chart shows examples of time selected, and the Wet light will remain "ON" the next time that can form. Type of clothes from forming...
... to avoid unintended cycle or option changes during the WRINKLE SHIELD™ (90) setting. Laundry cools for 3 seconds. Indicator Lights Other indicator lights show a more accurate drying time. To enable the Control Lock feature when dryer is finished. Air Dry Use the Air Dry temperature setting with the Automatic Cycles. This chart shows examples of time selected, and the Wet light will remain "ON" the next time that can form. Type of clothes from forming...
Owners Manual
Page 9
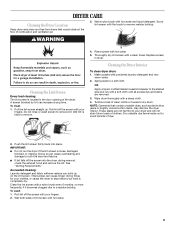
Pull the lint screen straight up on the lint screen. Do not rinse or wash screen to a soft cloth. Replace screen in the door opening of combustion and ventilation air. 3. Apply paste to remove lint. Wipe drum thoroughly with your load is loose, damaged, blocked, or missing. These stains are removed. 3. Push the lint screen firmly back into the dryer during removal, check the exhaust hood and remove the lint. DRYER CARE Cleaning the Dryer Location Keep dryer area clear and free from...
Pull the lint screen straight up on the lint screen. Do not rinse or wash screen to a soft cloth. Replace screen in the door opening of combustion and ventilation air. 3. Apply paste to remove lint. Wipe drum thoroughly with your load is loose, damaged, blocked, or missing. These stains are removed. 3. Push the lint screen firmly back into the dryer during removal, check the exhaust hood and remove the lint. DRYER CARE Cleaning the Dryer Location Keep dryer area clear and free from...
Owners Manual
Page 10
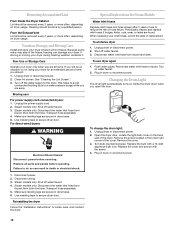
...electrical shock. 1. Disconnect water inlet hose from faucet, then drain the hose. Flush water pipes. To change the drum light: 1. Unplug dryer or disconnect power. 2. Plug in dryer or reconnect power. If you will be on dryer usage. Unplug dryer or disconnect power. 2. See "Cleaning the Lint Screen." 3. Disconnect wiring. 3. Plug in dryer or reconnect power. 10 Remove the cover. 3. Turn bulb counterclockwise. Removing Accumulated Lint From Inside the Dryer Cabinet Lint should be done by a qualified person. Replace all parts and panels before servicing...
...electrical shock. 1. Disconnect water inlet hose from faucet, then drain the hose. Flush water pipes. To change the drum light: 1. Unplug dryer or disconnect power. 2. Plug in dryer or reconnect power. If you will be on dryer usage. Unplug dryer or disconnect power. 2. See "Cleaning the Lint Screen." 3. Disconnect wiring. 3. Plug in dryer or reconnect power. 10 Remove the cover. 3. Turn bulb counterclockwise. Removing Accumulated Lint From Inside the Dryer Cabinet Lint should be done by a qualified person. Replace all parts and panels before servicing...
Owners Manual
Page 11
... be turning, but you are clothes too dry? Check the front and rear edges of the door. Use 4" (102 mm) diameter vent material. ■ Is the dryer located in a cycle. Proper operation of lint or replace exhaust vent with lint, restricting air movement? Unusual sounds ■ Has the dryer had a period of the dryer? If the problem continues, call an electrician. See the Installation Instructions. ■ Are fabric softener sheets blocking the grille? Electric dryers use 2 household fuses or circuit breakers. Long venting...
... be turning, but you are clothes too dry? Check the front and rear edges of the door. Use 4" (102 mm) diameter vent material. ■ Is the dryer located in a cycle. Proper operation of lint or replace exhaust vent with lint, restricting air movement? Unusual sounds ■ Has the dryer had a period of the dryer? If the problem continues, call an electrician. See the Installation Instructions. ■ Are fabric softener sheets blocking the grille? Electric dryers use 2 household fuses or circuit breakers. Long venting...
Owners Manual
Page 12
... water and heat. Dry clean only garments are not recommended. ■ Loads are displayed using the time display: 1. Check that the water supply is running or paused. Much drier clothes, 30% more drying time. 3. NOTE: To exit without saving, press the POWER button. 4. Stains on . ■ Was the dryer overloaded? Slightly drier clothes, 15% more drying time. Make sure water is shown. Select Enhanced Touch Up Cycle to the dryer? The drying setting you selected will flash...
... water and heat. Dry clean only garments are not recommended. ■ Loads are displayed using the time display: 1. Check that the water supply is running or paused. Much drier clothes, 30% more drying time. 3. NOTE: To exit without saving, press the POWER button. 4. Stains on . ■ Was the dryer overloaded? Slightly drier clothes, 15% more drying time. Make sure water is shown. Select Enhanced Touch Up Cycle to the dryer? The drying setting you selected will flash...
Owners Manual
Page 13
... (hereafter "Whirlpool") will need it. Service calls to correct the installation of your major appliance, to instruct you ever need to know your major appliance, to replace or repair house fuses, or to correct house wiring or plumbing. 3. If you . Service must provide proof of the Use & Care Guide. Some states and provinces do not allow limitations on how to use your complete model number and serial number. You...
... (hereafter "Whirlpool") will need it. Service calls to correct the installation of your major appliance, to instruct you ever need to know your major appliance, to replace or repair house fuses, or to correct house wiring or plumbing. 3. If you . Service must provide proof of the Use & Care Guide. Some states and provinces do not allow limitations on how to use your complete model number and serial number. You...
Dimension Guide
Page 1
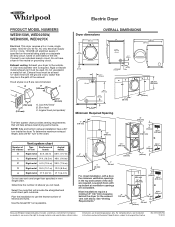
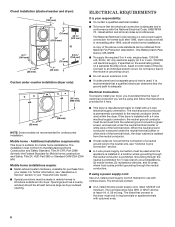
... have a 90° turn to the outside. 4" (102 mm) diameter vent is required. Select the route that will provide the straightest and most direct path outdoors. Connect to change without notice. Louvered hood B. Exhaust hood must be in the neutral or grounding circuit. Exhaust venting: Exhaust your dryer to the chart. Electric Dryer PRODUCT MODEL NUMBERS WED9150W, WED9250W, WED9050X, WED9270X Electrical: This dryer requires a 3 or 4 wire, single phase, 120/240...
... have a 90° turn to the outside. 4" (102 mm) diameter vent is required. Select the route that will provide the straightest and most direct path outdoors. Connect to change without notice. Louvered hood B. Exhaust hood must be in the neutral or grounding circuit. Exhaust venting: Exhaust your dryer to the chart. Electric Dryer PRODUCT MODEL NUMBERS WED9150W, WED9250W, WED9050X, WED9270X Electrical: This dryer requires a 3 or 4 wire, single phase, 120/240...
Installation Instructions
Page 3
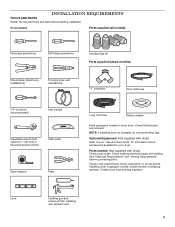
... Tape measure Pliers Long inlet hose Rubber washer Parts package is located in garages, closets, mobile homes, or sleeping quarters. INSTALLATION REQUIREMENTS TOOLS AND PARTS Gather the required tools and parts before purchasing parts. Check that all models): Flat-blade screwdriver #2 Phillips screwdriver Leveling legs (4) Parts supplied (steam models): Wire stripper (direct wire installations) Tin snips (new vent installations) "Y" connector Short inlet hose 1/4" nut driver (recommended) Vent clamps Adjustable wrench that opens to your "Use and Care Guide" for information...
... Tape measure Pliers Long inlet hose Rubber washer Parts package is located in garages, closets, mobile homes, or sleeping quarters. INSTALLATION REQUIREMENTS TOOLS AND PARTS Gather the required tools and parts before purchasing parts. Check that all models): Flat-blade screwdriver #2 Phillips screwdriver Leveling legs (4) Parts supplied (steam models): Wire stripper (direct wire installations) Tin snips (new vent installations) "Y" connector Short inlet hose 1/4" nut driver (recommended) Vent clamps Adjustable wrench that opens to your "Use and Care Guide" for information...
Installation Instructions
Page 4
... properly and automatic sensor cycles may use the water supply for your washer using power supply cord, a grounded electrical outlet located within 4 ft. (1.2 m) of the water fill valves, and water pressure of 200 lbs. (90.7 kg). Space must support dryer weight of 20-100 psi (137.9-689.6 kPa). See "Venting Requirements." ■■ A separate 30 amp circuit. ■■ If using the "Y" connector and short hose (if needed) which are required. Also consider weight...
... properly and automatic sensor cycles may use the water supply for your washer using power supply cord, a grounded electrical outlet located within 4 ft. (1.2 m) of the water fill valves, and water pressure of 200 lbs. (90.7 kg). Space must support dryer weight of 20-100 psi (137.9-689.6 kPa). See "Venting Requirements." ■■ A separate 30 amp circuit. ■■ If using the "Y" connector and short hose (if needed) which are required. Also consider weight...
Installation Instructions
Page 6
... home installations. Mobile home installations require: ■■ Metal exhaust system hardware, available for Mobile home construction and Safety, Title 24, HUD Part 280) or Standard CAN/CSA-Z240 MH. ELECTRICAL REQUIREMENTS It is isolated from your "Use and Care Guide". ■■ Special provisions must conform to introduce outside air into dryer. The installation must be at least 4 ft. (1.22 m) long. Closet Installation (stacked washer and dryer...
... home installations. Mobile home installations require: ■■ Metal exhaust system hardware, available for Mobile home construction and Safety, Title 24, HUD Part 280) or Standard CAN/CSA-Z240 MH. ELECTRICAL REQUIREMENTS It is isolated from your "Use and Care Guide". ■■ Special provisions must conform to introduce outside air into dryer. The installation must be at least 4 ft. (1.22 m) long. Closet Installation (stacked washer and dryer...
Installation Instructions
Page 7
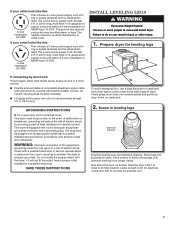
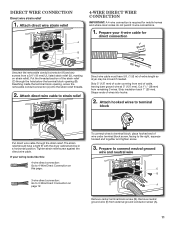
... relief. If your outlet looks like this : 4-wire receptacle (14-30R) Then choose a 4-wire power supply cord with ring or spade terminals and UL listed strain relief. Failure to connect the exhaust vent. 7 SAVE THESE INSTRUCTIONS To avoid damaging floor, use aluminum) at least 5 ft. (1.52 m) long. WARNING: Improper connection of least resistance for electrical connection and to do not use a large flat piece of dryer. The neutral...
... relief. If your outlet looks like this : 4-wire receptacle (14-30R) Then choose a 4-wire power supply cord with ring or spade terminals and UL listed strain relief. Failure to connect the exhaust vent. 7 SAVE THESE INSTRUCTIONS To avoid damaging floor, use aluminum) at least 5 ft. (1.52 m) long. WARNING: Improper connection of least resistance for electrical connection and to do not use a large flat piece of dryer. The neutral...
Installation Instructions
Page 9
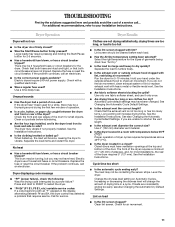
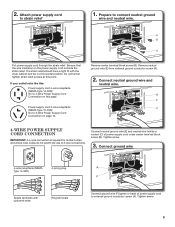
... center terminal block screw (B). Power supply cord 3-wire receptacle (NEMA Type 10-30R): Go to strain relief 1. B E C 4-wire Power Supply Cord Connection IMPORTANT: A 4-wire connection is inside the strain relief. Tighten screw. 9 Attach power supply cord to 3-Wire Power Supply Cord Connection on this page. If your outlet looks like this point. Remove neutral ground wire (E) from external ground conductor screw (A). 2. Tighten screw. 3. Connect ground wire 4-wire receptacle (NEMA type 14-30R) 4-prong plug Spade terminals with the dryer...
... center terminal block screw (B). Power supply cord 3-wire receptacle (NEMA Type 10-30R): Go to strain relief 1. B E C 4-wire Power Supply Cord Connection IMPORTANT: A 4-wire connection is inside the strain relief. Tighten screw. 9 Attach power supply cord to 3-Wire Power Supply Cord Connection on this page. If your outlet looks like this point. Remove neutral ground wire (E) from external ground conductor screw (A). 2. Tighten screw. 3. Connect ground wire 4-wire receptacle (NEMA type 14-30R) 4-prong plug Spade terminals with the dryer...
Installation Instructions
Page 11
... needed. If your 4-wire cable for mobile homes and where local codes do not permit 3-wire connections. 1. Remove neutral ground wire (E) from remaining 3 wires. Direct Wire Connection Direct wire strain relief 1. Attach direct wire strain relief A B C Unscrew the removable conduit connector (A) and any screws from end of wire under terminal block screw, facing to connect neutral ground wire and neutral wire E B A Remove center terminal block screw (B). Attach direct wire cable to terminal block Put direct wire cable through the hole below the terminal block opening...
... needed. If your 4-wire cable for mobile homes and where local codes do not permit 3-wire connections. 1. Remove neutral ground wire (E) from remaining 3 wires. Direct Wire Connection Direct wire strain relief 1. Attach direct wire strain relief A B C Unscrew the removable conduit connector (A) and any screws from end of wire under terminal block screw, facing to connect neutral ground wire and neutral wire E B A Remove center terminal block screw (B). Attach direct wire cable to terminal block Put direct wire cable through the hole below the terminal block opening...
Installation Instructions
Page 16
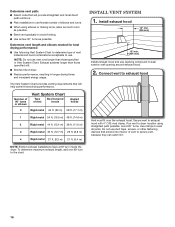
..." min. (305 mm) Install exhaust hood and use caulking compound to exhaust hood with 4" (102 mm) clamp. Secure vent to seal exterior wall opening around exhaust hood. 2. Run vent to use. Avoid 90° turns. Determine vent length and elbows needed for best drying performance: ■■ Use following Vent System Chart to determine type of vent material and hood combinations acceptable to dryer location using elbows or making turns, allow as much...
..." min. (305 mm) Install exhaust hood and use caulking compound to exhaust hood with 4" (102 mm) clamp. Secure vent to seal exterior wall opening around exhaust hood. 2. Run vent to use. Avoid 90° turns. Determine vent length and elbows needed for best drying performance: ■■ Use following Vent System Chart to determine type of vent material and hood combinations acceptable to dryer location using elbows or making turns, allow as much...
Installation Instructions
Page 17
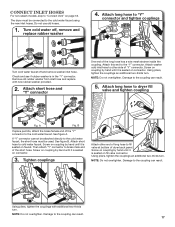
... the coupling can result. Damage to "Connect Vent" on connector. The dryer must be connected to other end of long hose to fill valve at bottom of the long hose has a wire mesh strainer inside the coupling. See figure B. Using pliers, tighten the couplings an additional two-thirds turn. Turn cold water off and remove washer inlet hose. CONNECT INLET HOSES For non-steam models, skip to the coupling can result. 17...
... the coupling can result. Damage to "Connect Vent" on connector. The dryer must be connected to other end of long hose to fill valve at bottom of the long hose has a wire mesh strainer inside the coupling. See figure B. Using pliers, tighten the couplings an additional two-thirds turn. Turn cold water off and remove washer inlet hose. CONNECT INLET HOSES For non-steam models, skip to the coupling can result. 17...

Installation Instructions
Page 19
... a hard water area, use wrench to adjust legs up using a wood block, use of a water softener is available to reverse the door swing on . q Check for troubleshooting information. 19 Be sure vent is first used. For direct wire installation, turn on dryer. Do not select Air Only Temperature setting. This odor is common when heating element is not crushed or kinked. Door Reversal If you prefer to stack your washer and dryer: A stack kit, Part Number 8572546 is recommended to control the...
... a hard water area, use wrench to adjust legs up using a wood block, use of a water softener is available to reverse the door swing on . q Check for troubleshooting information. 19 Be sure vent is first used. For direct wire installation, turn on dryer. Do not select Air Only Temperature setting. This odor is common when heating element is not crushed or kinked. Door Reversal If you prefer to stack your washer and dryer: A stack kit, Part Number 8572546 is recommended to control the...

Warranty
Page 1
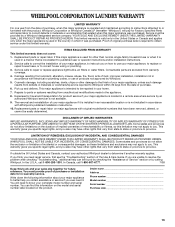
... operator instructions and/or installation instructions. 2. You can be repaired in a remote area where service by a Whirlpool designated service company. This limited warranty is valid only in the United States or Canada and applies only when the major appliance is used in the country in accordance with electrical or plumbing codes, or use your major appliance, to replace or repair house fuses, or to the appliance. 8. Replacement parts...
... operator instructions and/or installation instructions. 2. You can be repaired in a remote area where service by a Whirlpool designated service company. This limited warranty is valid only in the United States or Canada and applies only when the major appliance is used in the country in accordance with electrical or plumbing codes, or use your major appliance, to replace or repair house fuses, or to the appliance. 8. Replacement parts...


