Owners Manual
Page 5
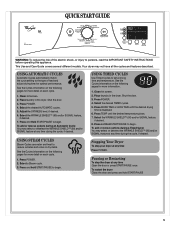
This Use and Care Guide covers several different models. Clean lint screen. 2. Press and Hold START/PAUSE to begin . Select the desired TIMED cycles. 5. Press POWER. 4. Adjust the DRYNESS level, if desired. 6. To add ...
This Use and Care Guide covers several different models. Clean lint screen. 2. Press and Hold START/PAUSE to begin . Select the desired TIMED cycles. 5. Press POWER. 4. Adjust the DRYNESS level, if desired. 6. To add ...
Owners Manual
Page 6
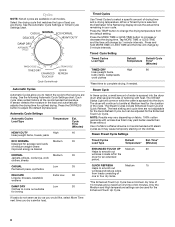
... on while the water is desired NORMAL Medium 35 Jackets, pillows, corduroys, work clothes *Reset time to change by 1-minute intervals. Cycles NOTE: Not all models. See the Automatic Cycle Settings or Timed Cycle Settings chart. A sensor detects the moisture in the load and automatically adjusts the drying time for the...
... on while the water is desired NORMAL Medium 35 Jackets, pillows, corduroys, work clothes *Reset time to change by 1-minute intervals. Cycles NOTE: Not all models. See the Automatic Cycle Settings or Timed Cycle Settings chart. A sensor detects the moisture in the load and automatically adjusts the drying time for the...
Owners Manual
Page 7
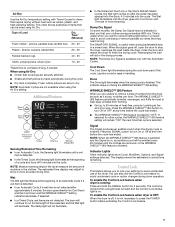
... actual time remaining. NOTE: Automatic Cycles are not detected. The estimated time display may adjust to finish the drying cycle. Damp Dry Signal On some models, the Damp Dry Signal may need ironing. NOTE: The Damp Dry Signal is preset to remove lightweight items in the clothes. Control Lock This feature...
... actual time remaining. NOTE: Automatic Cycles are not detected. The estimated time display may adjust to finish the drying cycle. Damp Dry Signal On some models, the Damp Dry Signal may need ironing. NOTE: The Damp Dry Signal is preset to remove lightweight items in the clothes. Control Lock This feature...
Owners Manual
Page 10
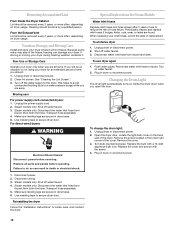
.... Turn on inside the dryer drum when you should: 1. To change the drum light: 1. Remove the screw located in dryer or reconnect power. Steam models only: Shut off water faucet. 3. Plug in the lower right corner of hose failure. Cleaning should be on vacation or not using your dryer during...cover and secure with a 10-watt appliance bulb only. Non-Use or Storage Care Operate your inlet hoses, record the date of the dryer. Steam models only: Shut off water faucet. 4. Special Instructions for an extended period of use dryer again 1. Locate the light bulb cover on the back wall...
.... Turn on inside the dryer drum when you should: 1. To change the drum light: 1. Remove the screw located in dryer or reconnect power. Steam models only: Shut off water faucet. 3. Plug in the lower right corner of hose failure. Cleaning should be on vacation or not using your dryer during...cover and secure with a 10-watt appliance bulb only. Non-Use or Storage Care Operate your inlet hoses, record the date of the dryer. Steam models only: Shut off water faucet. 4. Special Instructions for an extended period of use dryer again 1. Locate the light bulb cover on the back wall...
Owners Manual
Page 13
... of your major appliance to better help can find this information on the model and serial number label located on major appliances with original model/serial numbers that have been removed, altered, or cannot be provided by an authorized Whirlpool servicer is not available. 9. Some states and provinces do not allow limitations on...
... of your major appliance to better help can find this information on the model and serial number label located on major appliances with original model/serial numbers that have been removed, altered, or cannot be provided by an authorized Whirlpool servicer is not available. 9. Some states and provinces do not allow limitations on...
Dimension Guide
Page 1
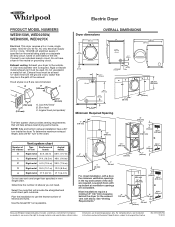
... (8.2 m) 21 ft. (6.4 m) Do not use vent runs longer than specified in .2 (155 cm2) 1" (25 mm) 1" (25 mm) Because Whirlpool Corporation policy includes a continuous commitment to improve our products, we reserve the right to the chart. Plan the installation to change materials and specifications without... turn inside the dryer. Do not have a 90° turn to change without notice. Louvered hood B. Box hood C. Electric Dryer PRODUCT MODEL NUMBERS WED9150W, WED9250W, WED9050X, WED9270X Electrical: This dryer requires a 3 or 4 wire, single phase, 120/240 volt, 60 Hz, AC...
... (8.2 m) 21 ft. (6.4 m) Do not use vent runs longer than specified in .2 (155 cm2) 1" (25 mm) 1" (25 mm) Because Whirlpool Corporation policy includes a continuous commitment to improve our products, we reserve the right to the chart. Plan the installation to change materials and specifications without... turn inside the dryer. Do not have a 90° turn to change without notice. Louvered hood B. Box hood C. Electric Dryer PRODUCT MODEL NUMBERS WED9150W, WED9250W, WED9050X, WED9270X Electrical: This dryer requires a 3 or 4 wire, single phase, 120/240 volt, 60 Hz, AC...
Installation Instructions
Page 3
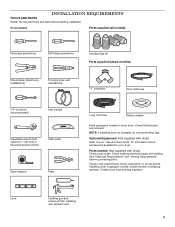
.... Parts needed : Parts supplied (all parts are included. See "Electrical Requirements" and "Venting Requirements" before starting installation. Check that all models): Flat-blade screwdriver #2 Phillips screwdriver Leveling legs (4) Parts supplied (steam models): Wire stripper (direct wire installations) Tin snips (new vent installations) "Y" connector Short inlet hose 1/4" nut driver (recommended) Vent clamps Adjustable...
.... Parts needed : Parts supplied (all parts are included. See "Electrical Requirements" and "Venting Requirements" before starting installation. Check that all models): Flat-blade screwdriver #2 Phillips screwdriver Leveling legs (4) Parts supplied (steam models): Wire stripper (direct wire installations) Tin snips (new vent installations) "Y" connector Short inlet hose 1/4" nut driver (recommended) Vent clamps Adjustable...
Installation Instructions
Page 6
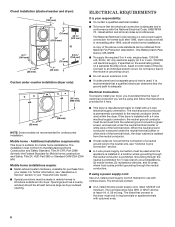
... 1996, dryer circuits involved in .2 (155 cm2) 1" (25 mm) Custom under counter installation (dryer only): 39" min. (990 mm) 1" (25 mm) 1" (25 mm) NOTE: Some models not recommended for undercounter installation. The wires that the ground path is prohibited. A copy of the above code standards can be used , it here. ■...
... 1996, dryer circuits involved in .2 (155 cm2) 1" (25 mm) Custom under counter installation (dryer only): 39" min. (990 mm) 1" (25 mm) 1" (25 mm) NOTE: Some models not recommended for undercounter installation. The wires that the ground path is prohibited. A copy of the above code standards can be used , it here. ■...
Installation Instructions
Page 17
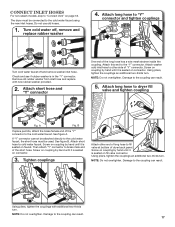
... additional two-thirds turn . Do not use old hoses. 1. Using pliers, tighten the couplings with new rubber washer provided. 2. CONNECT INLET HOSES For non-steam models, skip to the coupling can result. 5. Damage to "Connect Vent" on connector. See figure A. Screw on coupling by hand until it is seated on page...
... additional two-thirds turn . Do not use old hoses. 1. Using pliers, tighten the couplings with new rubber washer provided. 2. CONNECT INLET HOSES For non-steam models, skip to the coupling can result. 5. Damage to "Connect Vent" on connector. See figure A. Screw on coupling by hand until it is seated on page...

Warranty
Page 1
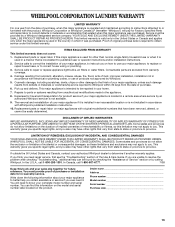
... on the product. Service calls to correct the installation of merchantability or fitness, so this information on the model and serial number label located on how to use of products not approved by calling Whirlpool. Consumable parts are unable to resolve the problem after checking "Troubleshooting," additional help you obtain assistance or...
... on the product. Service calls to correct the installation of merchantability or fitness, so this information on the model and serial number label located on how to use of products not approved by calling Whirlpool. Consumable parts are unable to resolve the problem after checking "Troubleshooting," additional help you obtain assistance or...


