Owners Manual
Page 2
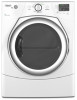
... or seriously injured if you don't immediately follow instructions. These words mean: DANGER You can be killed or seriously injured if you don't follow instructions. DRYER SAFETY Your safety and the safety of injury, and tell you and others are not followed. 2 Always read and obey all safety messages.
... or seriously injured if you don't immediately follow instructions. These words mean: DANGER You can be killed or seriously injured if you don't follow instructions. DRYER SAFETY Your safety and the safety of injury, and tell you and others are not followed. 2 Always read and obey all safety messages.
Owners Manual
Page 4
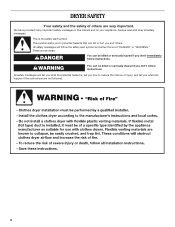
...instructions can completely remove oil. Fire Hazard No washer can result in the absence of oil on the next page. 4 Failure to use your dryer following installation, see the QUICK START GUIDE on it (even after washing). IMPORTANT: The gas installation must conform with local codes, or in... death or fire. QUICK START GUIDE/DRYER USE WARNING WARNING Explosion Hazard Keep flammable materials and vapors, such as gasoline, away from dryer. Do not dry anything that has ever had anything that has ever had any type of ...
...instructions can completely remove oil. Fire Hazard No washer can result in the absence of oil on the next page. 4 Failure to use your dryer following installation, see the QUICK START GUIDE on it (even after washing). IMPORTANT: The gas installation must conform with local codes, or in... death or fire. QUICK START GUIDE/DRYER USE WARNING WARNING Explosion Hazard Keep flammable materials and vapors, such as gasoline, away from dryer. Do not dry anything that has ever had anything that has ever had any type of ...
Owners Manual
Page 5
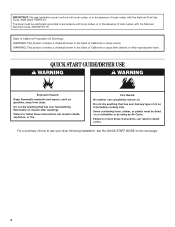
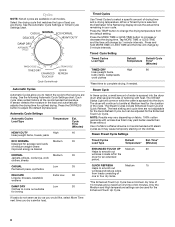
...2. USING AUTOMATIC CYCLES Automatic Cycles automatically match the cycle setting to begin. USING TIMED CYCLES Use Timed Cycles to begin . Place laundry in the dryer. Press POWER. 4. Press MORE TIME or LESS TIME until the desired temperature glows. 7. Press TEMP until the desired drying time is displayed. ...This Use and Care Guide covers several different models. Select the WRINKLE SHIELD™ (90) and/or SIGNAL feature, if desired. 7. Your dryer may select or deselect the WRINKLE SHIELD™ (90) and/or SIGNAL feature at any time Open the door or press START/PAUSE once...
...2. USING AUTOMATIC CYCLES Automatic Cycles automatically match the cycle setting to begin. USING TIMED CYCLES Use Timed Cycles to begin . Place laundry in the dryer. Press POWER. 4. Press MORE TIME or LESS TIME until the desired temperature glows. 7. Press TEMP until the desired drying time is displayed. ...This Use and Care Guide covers several different models. Select the WRINKLE SHIELD™ (90) and/or SIGNAL feature, if desired. 7. Your dryer may select or deselect the WRINKLE SHIELD™ (90) and/or SIGNAL feature at any time Open the door or press START/PAUSE once...
Owners Manual
Page 6
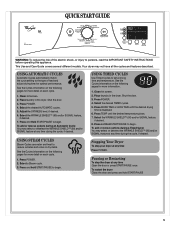
...Steam Cycle In these cycles, a small amount of a fabric softener sheet is selected, the Estimated Time Remaining display shows the actual time remaining in the dryer for ironing If loads do not seem as dry as it may yield better results than those without. The...High 40 Heavyweight items, towels, jeans ECO NORMAL Medium 35 Designed for average size loads of medium weight where improved energy is sprayed into the dryer drum after several minutes of drying time and a drying temperature. Cycles NOTE: Not all models. See the Automatic Cycle Settings or Timed Cycle Settings...
...Steam Cycle In these cycles, a small amount of a fabric softener sheet is selected, the Estimated Time Remaining display shows the actual time remaining in the dryer for ironing If loads do not seem as dry as it may yield better results than those without. The...High 40 Heavyweight items, towels, jeans ECO NORMAL Medium 35 Designed for average size loads of medium weight where improved energy is sprayed into the dryer drum after several minutes of drying time and a drying temperature. Cycles NOTE: Not all models. See the Automatic Cycle Settings or Timed Cycle Settings...
Owners Manual
Page 7
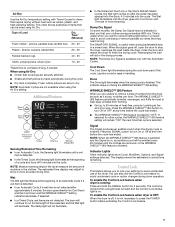
...linens in a mixed load. The WRINKLE SHIELD™ (90) feature periodically tumbles, rearranges, and fluffs the load to help keep wrinkles from the dryer as soon as rubber, plastic, and heat-sensitive fabrics. Control Lock This feature allows you are approximately 80% dry. The control is locked when ... preset to run for other cycles, the WRINKLE SHIELD™ (90) feature setting will continue to "OFF." The Wet light illuminates until the dryer goes into Cool Down and the Cool Down and the WRINKLE SHIELD™ setting indicators illuminate, if selected. ■ In a Timed Cycle, ...
...linens in a mixed load. The WRINKLE SHIELD™ (90) feature periodically tumbles, rearranges, and fluffs the load to help keep wrinkles from the dryer as soon as rubber, plastic, and heat-sensitive fabrics. Control Lock This feature allows you are approximately 80% dry. The control is locked when ... preset to run for other cycles, the WRINKLE SHIELD™ (90) feature setting will continue to "OFF." The Wet light illuminates until the dryer goes into Cool Down and the Cool Down and the WRINKLE SHIELD™ setting indicators illuminate, if selected. ■ In a Timed Cycle, ...
Owners Manual
Page 8
... setting at any time before pressing START/PAUSE. ■ Three short tones sound if an unavailable combination is unlocked. Changing settings on , the dryer can be stopped by pressing the Temp button. To unlock: Press and hold START/PAUSE. On Timed Cycles, you can change the Cycles, adjust... the time, or change the Cycle or Dryness Level at the beginning of selecting the cycle, the dryer automatically shuts off . This ends the current cycle. 2. The dryer starts at any time, you may be restarted until you do not press Start within 5 minutes of the new...
... setting at any time before pressing START/PAUSE. ■ Three short tones sound if an unavailable combination is unlocked. Changing settings on , the dryer can be stopped by pressing the Temp button. To unlock: Press and hold START/PAUSE. On Timed Cycles, you can change the Cycles, adjust... the time, or change the Cycle or Dryness Level at the beginning of selecting the cycle, the dryer automatically shuts off . This ends the current cycle. 2. The dryer starts at any time, you may be restarted until you do not press Start within 5 minutes of the new...
Owners Manual
Page 9
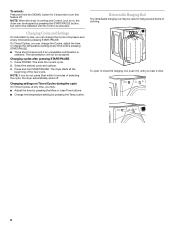
...warm water. 2. Make a paste with hot water. 5. These stains are removed. 3. Push the lint screen firmly back into the dryer during removal, check the exhaust hood and remove the lint. Thoroughly dry lint screen with a damp cloth. 4. Apply paste to your..., or missing. Scrub lint screen with hot water. 9 Replace screen in the door opening of combustion and ventilation air. 3. Cleaning the Dryer Interior To clean dryer drum: 1. Wipe drum thoroughly with a clean towel. This buildup can cause overheating and damage to stop before your fingers. 2. Dry unstable...
...warm water. 2. Make a paste with hot water. 5. These stains are removed. 3. Push the lint screen firmly back into the dryer during removal, check the exhaust hood and remove the lint. Thoroughly dry lint screen with a damp cloth. 4. Apply paste to your..., or missing. Scrub lint screen with hot water. 9 Replace screen in the door opening of combustion and ventilation air. 3. Cleaning the Dryer Interior To clean dryer drum: 1. Wipe drum thoroughly with a clean towel. This buildup can cause overheating and damage to stop before your fingers. 2. Dry unstable...
Owners Manual
Page 10
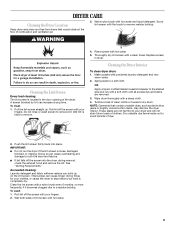
...Steam models only: Disconnect the water inlet hose from faucet, then drain the hose. To winterize dryer 1. Plug in dryer or reconnect power. 10 Vacation, Storage, and Moving Care Install and store your dryer for Steam Models Water Inlet Hoses Replace inlet hoses and hose screen after 5 years of hose ...failure. To change the drum light: 1. Shut off water faucet. 3. Unplug dryer or disconnect power. 2. Non-Use or Storage Care Operate your inlet hoses, record the date of the cover. To use to faucet. Replace ...
...Steam models only: Disconnect the water inlet hose from faucet, then drain the hose. To winterize dryer 1. Plug in dryer or reconnect power. 10 Vacation, Storage, and Moving Care Install and store your dryer for Steam Models Water Inlet Hoses Replace inlet hoses and hose screen after 5 years of hose ...failure. To change the drum light: 1. Shut off water faucet. 3. Unplug dryer or disconnect power. 2. Non-Use or Storage Care Operate your inlet hoses, record the date of the cover. To use to faucet. Replace ...
Owners Manual
Page 11
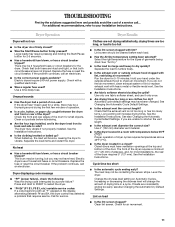
... is too hot ■ Is the lint screen clogged with temperature below 45ºF (7ºC)? Check with lint, restricting air movement? The dryer may have not tripped. No heat ■ Has a household fuse blown, or has a circuit breaker tripped? Lint screen should be contacting the...right temperature for most installations, the rear of operation. ■ Is a coin, button, or paper clip caught between F# and E#, the dryer control has detected a problem that both fuses are consistently ending too early, see also Changing the Automatic Dry Default Settings. See Changing the Automatic ...
... is too hot ■ Is the lint screen clogged with temperature below 45ºF (7ºC)? Check with lint, restricting air movement? The dryer may have not tripped. No heat ■ Has a household fuse blown, or has a circuit breaker tripped? Lint screen should be contacting the...right temperature for most installations, the rear of operation. ■ Is a coin, button, or paper clip caught between F# and E#, the dryer control has detected a problem that both fuses are consistently ending too early, see also Changing the Automatic Dry Default Settings. See Changing the Automatic ...
Owners Manual
Page 12
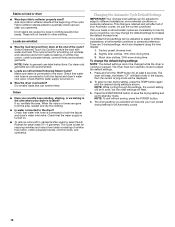
... the Automatic Cycle Default Settings IMPORTANT: Your dryness level settings can stain your Automatic cycles, not just the current cycle/load. The dryer must be displayed. 2. The drying setting you selected will become your new preset drying setting for all of wrinkle-free cotton, cotton...and heat. NOTE: While cycling through the settings, the current setting will be changed while the dryer is connected to the dryer. Stains on . ■ Was the dryer overloaded? Add dryer fabric softener sheets at the beginning of 1-4 garments. Select Enhanced Touch Up Cycle to increase ...
... the Automatic Cycle Default Settings IMPORTANT: Your dryness level settings can stain your Automatic cycles, not just the current cycle/load. The dryer must be displayed. 2. The drying setting you selected will become your new preset drying setting for all of wrinkle-free cotton, cotton...and heat. NOTE: While cycling through the settings, the current setting will be changed while the dryer is connected to the dryer. Stains on . ■ Was the dryer overloaded? Add dryer fabric softener sheets at the beginning of 1-4 garments. Select Enhanced Touch Up Cycle to increase ...
Dimension Guide
Page 1
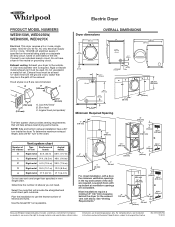
... installation have a fuse in the neutral or grounding circuit. Most installations require a minimum 5" (127 mm) clearance behind the dryer for planning purposes only. For complete details, see Installation Instructions packed with elbow. Rigid or flexible metal exhaust vent must be...mm) For closet installation, with a door, the minimum ventilation openings in .2 (155 cm2) 1" (25 mm) 1" (25 mm) Because Whirlpool Corporation policy includes a continuous commitment to improve our products, we reserve the right to an individual branch circuit. Box hood C. Determine the number...
... installation have a fuse in the neutral or grounding circuit. Most installations require a minimum 5" (127 mm) clearance behind the dryer for planning purposes only. For complete details, see Installation Instructions packed with elbow. Rigid or flexible metal exhaust vent must be...mm) For closet installation, with a door, the minimum ventilation openings in .2 (155 cm2) 1" (25 mm) 1" (25 mm) Because Whirlpool Corporation policy includes a continuous commitment to improve our products, we reserve the right to an individual branch circuit. Box hood C. Determine the number...
Installation Instructions
Page 2
... others . We have provided many important safety messages in this manual and on your appliance. WARNING You can happen if the instructions are very important. DRYER SAFETY Your safety and the safety of injury, and tell you don't immediately follow the safety alert symbol and either the word "DANGER" or "WARNING...
... others . We have provided many important safety messages in this manual and on your appliance. WARNING You can happen if the instructions are very important. DRYER SAFETY Your safety and the safety of injury, and tell you don't immediately follow the safety alert symbol and either the word "DANGER" or "WARNING...
Installation Instructions
Page 3
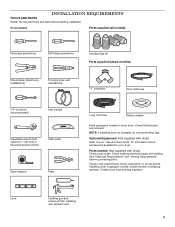
... Short inlet hose 1/4" nut driver (recommended) Vent clamps Adjustable wrench that all parts are included. Tools needed : (Not supplied with dryer) Refer to 1" (25 mm) or hex-head socket wrench Utility knife Tape measure Pliers Long inlet hose Rubber washer Parts package is... your "Use and Care Guide" for information about accessories available for installing new exhaust vent) 3 Optional Equipment: (Not supplied with dryer) Check local codes. Check code requirements. Level Caulking gun and compound (for your local building inspector. Check existing electrical supply and ...
... Short inlet hose 1/4" nut driver (recommended) Vent clamps Adjustable wrench that all parts are included. Tools needed : (Not supplied with dryer) Refer to 1" (25 mm) or hex-head socket wrench Utility knife Tape measure Pliers Long inlet hose Rubber washer Parts package is... your "Use and Care Guide" for information about accessories available for installing new exhaust vent) 3 Optional Equipment: (Not supplied with dryer) Check local codes. Check code requirements. Level Caulking gun and compound (for your local building inspector. Check existing electrical supply and ...
Installation Instructions
Page 4
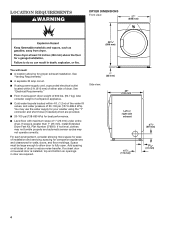
...9632;■ Cold water faucets located within 2 ft. (610 mm) of either side of dryer. Space must support dryer weight of dryer to fully open. Add spacing on all sides of 200 lbs. (90.7 kg). LOCATION REQUIREMENTS DRYER DIMENSIONS Front view: 27" (686 mm) 35 3/8" (899 mm) You will need: &#...9632;■ A location allowing for best performance. ■■ Level floor with maximum slope of 1" (25 mm) under entire dryer. If slope is installed, top and bottom air openings in door are provided. ■■ 20-100 psi (138-690 kPa) for proper exhaust ...
...9632;■ Cold water faucets located within 2 ft. (610 mm) of either side of dryer. Space must support dryer weight of dryer to fully open. Add spacing on all sides of 200 lbs. (90.7 kg). LOCATION REQUIREMENTS DRYER DIMENSIONS Front view: 27" (686 mm) 35 3/8" (899 mm) You will need: &#...9632;■ A location allowing for best performance. ■■ Level floor with maximum slope of 1" (25 mm) under entire dryer. If slope is installed, top and bottom air openings in door are provided. ■■ 20-100 psi (138-690 kPa) for proper exhaust ...
Installation Instructions
Page 5
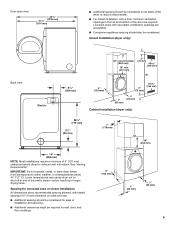
... also be exposed to shut off at temperatures below 45° F (7° C). IMPORTANT: Do not operate, install, or store dryer where it will be considered. Louvered doors with equivalent ventilitation openings are required. Spacing for recessed area or closet installation All dimensions show ...25 mm) 5 Door open view: 481/8" (1238 mm) 471/8" (1197 mm) ■■ Additional spacing should be required for exhaust vent with elbow. Closet installation (dryer only): 34" recommended (864 mm) 18" min. (457 mm) 3" (76 mm) 48 in.2 (310 cm2) Back view: Electric 61/4" (159 mm) 4"...
... also be exposed to shut off at temperatures below 45° F (7° C). IMPORTANT: Do not operate, install, or store dryer where it will be considered. Louvered doors with equivalent ventilitation openings are required. Spacing for recessed area or closet installation All dimensions show ...25 mm) 5 Door open view: 481/8" (1238 mm) 471/8" (1197 mm) ■■ Additional spacing should be required for exhaust vent with elbow. Closet installation (dryer only): 34" recommended (864 mm) 18" min. (457 mm) 3" (76 mm) 48 in.2 (310 cm2) Back view: Electric 61/4" (159 mm) 4"...
Installation Instructions
Page 6
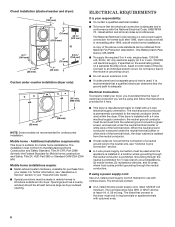
...contact a qualified electrical installer. ■■ To be obtained from your dealer. latest edition and all mobile home installations. If the dryer is installed with a 4-wire electrical supply connection, the neutral ground conductor must conform to the Manufactured Home Construction and Safety Standard, ...) of the terminal block. The wires that the ground path is recommended that a qualified electrician determine that connect to the dryer must be removed from the neutral conductor. ■■ If local codes do not permit the connection of electrical connection you...
...contact a qualified electrical installer. ■■ To be obtained from your dealer. latest edition and all mobile home installations. If the dryer is installed with a 4-wire electrical supply connection, the neutral ground conductor must conform to the Manufactured Home Construction and Safety Standard, ...) of the terminal block. The wires that the ground path is recommended that a qualified electrician determine that connect to the dryer must be removed from the neutral conductor. ■■ If local codes do not permit the connection of electrical connection you...
Installation Instructions
Page 7
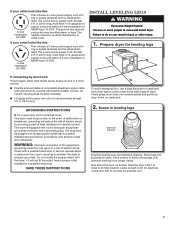
... of the equipment- Screw legs into an appropriate outlet that is properly installed and grounded in doubt as to its feet. Now stand the dryer on cardboard. 2. All current-carrying wires must be insulated. ■■ 10-gauge solid copper wire (do so can result in leveling... a cord having an equipmentgrounding conductor and a grounding plug. Screw in a risk of least resistance for electrical connection and to move and install dryer. The neutral conductor must be grounded. Failure to do not use a wrench to finish turning legs until it will reduce the risk of electric...
... of the equipment- Screw legs into an appropriate outlet that is properly installed and grounded in doubt as to its feet. Now stand the dryer on cardboard. 2. All current-carrying wires must be insulated. ■■ 10-gauge solid copper wire (do so can result in leveling... a cord having an equipmentgrounding conductor and a grounding plug. Screw in a risk of least resistance for electrical connection and to move and install dryer. The neutral conductor must be grounded. Failure to do not use a wrench to finish turning legs until it will reduce the risk of electric...
Installation Instructions
Page 9
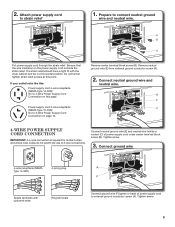
... sure that the wire insulation on this point. Tighten screw. 3. Connect ground wire 4-wire receptacle (NEMA type 14-30R) 4-prong plug Spade terminals with the dryer cabinet and be in a horizontal position. B E C 4-wire Power Supply Cord Connection IMPORTANT: A 4-wire connection is inside the strain relief. Do not further tighten strain relief...
... sure that the wire insulation on this point. Tighten screw. 3. Connect ground wire 4-wire receptacle (NEMA type 14-30R) 4-prong plug Spade terminals with the dryer cabinet and be in a horizontal position. B E C 4-wire Power Supply Cord Connection IMPORTANT: A 4-wire connection is inside the strain relief. Do not further tighten strain relief...
Installation Instructions
Page 10
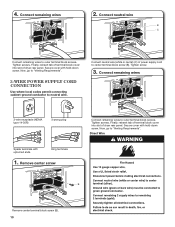
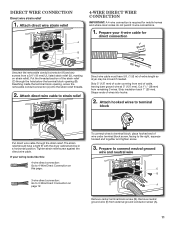
... Connect remaining wires to outer terminal block screws. Finally, reinsert tab of terminal block cover into slot of dryer rear panel. Connect remaining wires 2. Tighten screws. Connect neutral wire (white or center) (C) of dryer rear panel. Secure cover with hold -down screw. Finally, reinsert tab of terminal block cover into slot of...
... Connect remaining wires to outer terminal block screws. Finally, reinsert tab of terminal block cover into slot of dryer rear panel. Connect remaining wires 2. Tighten screws. Connect neutral wire (white or center) (C) of dryer rear panel. Secure cover with hold -down screw. Finally, reinsert tab of terminal block cover into slot of...
Installation Instructions
Page 11
... 4-wire Direct Wire Connection IMPORTANT: A 4-wire connection is required for direct connection (251"mm) (127 5" mm) Direct wire cable must have a tight fit with the dryer cabinet and be moved if needed. To connect wires to terminal block, place hooked end of extra length so... dryer may be in a horizontal position. Direct Wire Connection Direct wire strain relief 1. Tighten strain relief screw against the direct wire cable. Prepare to terminal block ...
... 4-wire Direct Wire Connection IMPORTANT: A 4-wire connection is required for direct connection (251"mm) (127 5" mm) Direct wire cable must have a tight fit with the dryer cabinet and be moved if needed. To connect wires to terminal block, place hooked end of extra length so... dryer may be in a horizontal position. Direct Wire Connection Direct wire strain relief 1. Tighten strain relief screw against the direct wire cable. Prepare to terminal block ...


