
Owners Manual
Page 10
...pipe. 4. Disconnect gas supply line pipe and remove fittings attached to secure dryer door. Unplug dryer or disconnect power. 2. (For gas dryers only): Close shut off power at home. Unplug the power supply cord. 2. Disconnect wiring. 3. For gas dryers: 1. Cap the open fuel supply line. 5. Using a Phillips-...cover and secure with a 10-watt appliance bulb only. See "Cleaning the Lint Screen." Remove the cover. 3. Moving Care For power supply cord-connected dryers: 1. Locate the light bulb cover on some models) 1. Make sure leveling legs are secure in dryer base. 3. ...
...pipe. 4. Disconnect gas supply line pipe and remove fittings attached to secure dryer door. Unplug dryer or disconnect power. 2. (For gas dryers only): Close shut off power at home. Unplug the power supply cord. 2. Disconnect wiring. 3. For gas dryers: 1. Cap the open fuel supply line. 5. Using a Phillips-...cover and secure with a 10-watt appliance bulb only. See "Cleaning the Lint Screen." Remove the cover. 3. Moving Care For power supply cord-connected dryers: 1. Locate the light bulb cover on some models) 1. Make sure leveling legs are secure in dryer base. 3. ...

Installation Instructions
Page 3
...or SRDT and be large enough to allow the dryer door to 1" (25 mm) or hex-head socket wrench Utility knife If using power supply cord, a grounded electrical outlet located within 2 ft. (610 mm) of either side of the dryer in ring terminals or spade terminals with...area where it will need: ■■ A location allowing for installing new exhaust vent) Parts supplied (all parts are using a power supply cord: Use a UL listed power supply cord kit marked for purchase from the dealer from whom you are included. See "Venting Requirements." ■■ A separate 30 amp ...
...or SRDT and be large enough to allow the dryer door to 1" (25 mm) or hex-head socket wrench Utility knife If using power supply cord, a grounded electrical outlet located within 2 ft. (610 mm) of either side of the dryer in ring terminals or spade terminals with...area where it will need: ■■ A location allowing for installing new exhaust vent) Parts supplied (all parts are using a power supply cord: Use a UL listed power supply cord kit marked for purchase from the dealer from whom you are included. See "Venting Requirements." ■■ A separate 30 amp ...

Installation Instructions
Page 4
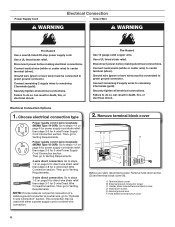
...the neutral conductors. 4 Do not have a fuse in the neutral or grounding circuit. ■■ Do not use an extension cord. ■■ If codes permit and a separate ground wire is used when the dryer is installed in mobile homes to the...vehicles, and (4) areas where local codes prohibit grounding through the neutral conductor is adequate. The National Electrical Code requires a 4-wire power supply connection for recessed area or closet installation The dimensions shown following are required. Additional installation requirements This dryer is recommended. Minimum ...
...the neutral conductors. 4 Do not have a fuse in the neutral or grounding circuit. ■■ Do not use an extension cord. ■■ If codes permit and a separate ground wire is used when the dryer is installed in mobile homes to the...vehicles, and (4) areas where local codes prohibit grounding through the neutral conductor is adequate. The National Electrical Code requires a 4-wire power supply connection for recessed area or closet installation The dimensions shown following are required. Additional installation requirements This dryer is recommended. Minimum ...
Installation Instructions
Page 5
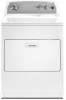
...nonmetallic sheathed copper cable (with ground wire), covered with flexible metallic conduit. If your outlet looks like this : Then choose a 4-wire power supply cord with clothes dryers. If connecting by a white cover. Prepare dryer for leveling legs To avoid damaging floor, use with ring or spade ... and to the dryer must have 3 10-gauge solid copper wires and match a 3-wire receptacle of dryer. If using a power supply cord: Use a UL listed power supply cord kit marked for use a large flat piece of cardboard from dryer carton; Now stand the dryer on cardboard. 2. The...
...nonmetallic sheathed copper cable (with ground wire), covered with flexible metallic conduit. If your outlet looks like this : Then choose a 4-wire power supply cord with clothes dryers. If connecting by a white cover. Prepare dryer for leveling legs To avoid damaging floor, use with ring or spade ... and to the dryer must have 3 10-gauge solid copper wires and match a 3-wire receptacle of dryer. If using a power supply cord: Use a UL listed power supply cord kit marked for use a large flat piece of cardboard from dryer carton; Now stand the dryer on cardboard. 2. The...
Installation Instructions
Page 6
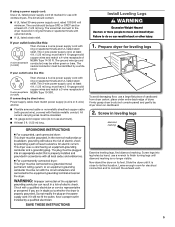
... Go to steps 1-2 on page 9 for direct wire strain relief: then steps 3-8 for 4-wire Power Supply Cord Connection section. Then go to steps 1-2 on page 6 for power supply cord strain relief: then steps 3-5 for 3-wire Direct Wire Connection section. A. use a new ul listed ...on page 9 for direct wire strain relief: then steps 3-7 for 3-wire Power Supply Cord Connection section. Power Supply Cord Electrical Connection Direct Wire WARNING WARNING Fire Hazard use a ul listed strain relief. Power supply cord 3-wire receptacle (NEMA Type 10-30R): Go to center terminal (silver). ...
... Go to steps 1-2 on page 9 for direct wire strain relief: then steps 3-8 for 4-wire Power Supply Cord Connection section. Then go to steps 1-2 on page 6 for power supply cord strain relief: then steps 3-5 for 3-wire Direct Wire Connection section. A. use a new ul listed ...on page 9 for direct wire strain relief: then steps 3-7 for 3-wire Power Supply Cord Connection section. Power Supply Cord Electrical Connection Direct Wire WARNING WARNING Fire Hazard use a ul listed strain relief. Power supply cord 3-wire receptacle (NEMA Type 10-30R): Go to center terminal (silver). ...
Installation Instructions
Page 7
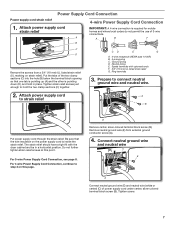
... wire and neutral wire. 2. For 4 wire Power Supply Cord Connection, continue to hold in a horizontal position. Power Supply Cord Connection Power supply cord strain relief 1. Ground prong D. Spade terminals with the dryer cabinet and be in place. For 3-wire Power Supply Cord Connection, see page 8. Attach power supply cord strain relief A B 4-wire Power Supply Cord Connection IMPORTANT: A 4-wire connection is pointing down...
... wire and neutral wire. 2. For 4 wire Power Supply Cord Connection, continue to hold in a horizontal position. Power Supply Cord Connection Power supply cord strain relief 1. Ground prong D. Spade terminals with the dryer cabinet and be in place. For 3-wire Power Supply Cord Connection, see page 8. Attach power supply cord strain relief A B 4-wire Power Supply Cord Connection IMPORTANT: A 4-wire connection is pointing down...
Installation Instructions
Page 8
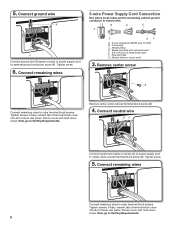
...wire receptacle (NEMA type 10-30R) B. 3-wire plug C. Finally, reinsert tab of terminal block cover into slot of power supply cord to external ground conductor screw (A). Remove center, silver-colored terminal block screw (B). 4. Finally, reinsert tab of terminal block cover into slot... of power supply cord to center, silver-colored terminal block screw (B). Tighten screws. 5. Connect remaining wires 3-wire Power Supply Cord Connection Use where local codes permit connecting cabinet-ground conductor to outer ...
...wire receptacle (NEMA type 10-30R) B. 3-wire plug C. Finally, reinsert tab of terminal block cover into slot of power supply cord to external ground conductor screw (A). Remove center, silver-colored terminal block screw (B). 4. Finally, reinsert tab of terminal block cover into slot... of power supply cord to center, silver-colored terminal block screw (B). Tighten screws. 5. Connect remaining wires 3-wire Power Supply Cord Connection Use where local codes permit connecting cabinet-ground conductor to outer ...
Installation Instructions
Page 11
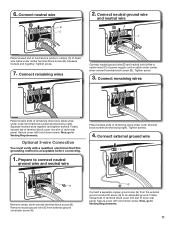
... outer terminal block screws (hooks facing right). Connect neutral wire B C 2. Squeeze hooked end together. Finally, reinsert tab of terminal block cover into slot of power supply cord or cable under outer terminal block screws (hooks facing right). Optional 3-wire Connection You must verify with hold -down screw. Tighten screw. 3. Squeeze hooked ends...
... outer terminal block screws (hooks facing right). Connect neutral wire B C 2. Squeeze hooked end together. Finally, reinsert tab of terminal block cover into slot of power supply cord or cable under outer terminal block screws (hooks facing right). Optional 3-wire Connection You must verify with hold -down screw. Tighten screw. 3. Squeeze hooked ends...
Installation Instructions
Page 15
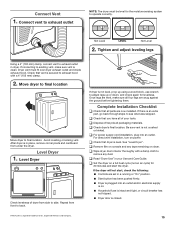
...that all parts are snug against the ground before tightening them. Level Dryer 1. If there is secured to see what was skipped. q For power supply cord installation, plug into an outlet and/or electrical supply is on. ■■ Household fuse is intact and tight, or circuit breaker has not... system to exhaust outlet in your tools. q Check that you have all of /recycle all four legs are now installed. q Set the dryer on power. Connect Vent 1. q Dispose of your Use and Care Guide. q Check dryer's final location. Dupont De Nemours and Company. 15 Once legs are ...
...that all parts are snug against the ground before tightening them. Level Dryer 1. If there is secured to see what was skipped. q For power supply cord installation, plug into an outlet and/or electrical supply is on. ■■ Household fuse is intact and tight, or circuit breaker has not... system to exhaust outlet in your tools. q Check that you have all of /recycle all four legs are now installed. q Set the dryer on power. Connect Vent 1. q Dispose of your Use and Care Guide. q Check dryer's final location. Dupont De Nemours and Company. 15 Once legs are ...


