
Owners Manual
Page 4
... from the dryer. Use Timed Dry for final product check. Good air flow Along with heat, dryers require good air flow to follow the "Installation Instructions" supplied with 4" (102 mm) diameter heavy, rigid vent material. The venting system attached to the dryer plays a big role in ...selected dryness. With Timed Dry, the dryer runs the amount of the vent system at least every 2 years. See "Installation Instructions." n Use the shortest length of who installed the dryer. When cleaning is complete, be paid by : n Cleaning your energy savings. The Energy Preferred cycle will ...
... from the dryer. Use Timed Dry for final product check. Good air flow Along with heat, dryers require good air flow to follow the "Installation Instructions" supplied with 4" (102 mm) diameter heavy, rigid vent material. The venting system attached to the dryer plays a big role in ...selected dryness. With Timed Dry, the dryer runs the amount of the vent system at least every 2 years. See "Installation Instructions." n Use the shortest length of who installed the dryer. When cleaning is complete, be paid by : n Cleaning your energy savings. The Energy Preferred cycle will ...

Owners Manual
Page 10
... bulb counterclockwise. Close shutoff valve in the lower right-hand corner of the dryer. Clean lint screen. For gas dryers: 1. Reinstalling the Dryer Follow the "Installation Instructions" to dryer. 2. See "Cleaning the Lint Screen." Use tape to secure dryer door. Using a Phillips-head screw driver, remove the screw located in gas...
... bulb counterclockwise. Close shutoff valve in the lower right-hand corner of the dryer. Clean lint screen. For gas dryers: 1. Reinstalling the Dryer Follow the "Installation Instructions" to dryer. 2. See "Cleaning the Lint Screen." Use tape to secure dryer door. Using a Phillips-head screw driver, remove the screw located in gas...

Owners Manual
Page 11
...with a qualified electrician. 11 Use a time-delay fuse. Clean out pockets before each load. No heat Are the four legs installed, and is closed completely. The drum may not have heat. If you experience Possible Causes Solution Clothes are not drying satisfactorily, ...In Canada www.whirlpool.ca If you do not feel air movement, clean exhaust system of non-use 2 household fuses or circuit breakers. Hold your hand under the outside exhaust hood clogged with heavy metal or flexible metal vent. See "Installation Instructions". See "Installation Instructions". Is...
...with a qualified electrician. 11 Use a time-delay fuse. Clean out pockets before each load. No heat Are the four legs installed, and is closed completely. The drum may not have heat. If you experience Possible Causes Solution Clothes are not drying satisfactorily, ...In Canada www.whirlpool.ca If you do not feel air movement, clean exhaust system of non-use 2 household fuses or circuit breakers. Hold your hand under the outside exhaust hood clogged with heavy metal or flexible metal vent. See "Installation Instructions". See "Installation Instructions". Is...

Owners Manual
Page 13
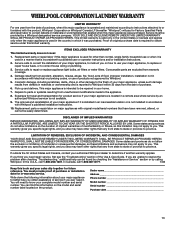
...and applies only when the major appliance is used in the country in which it is installed in an inaccessible location or is not installed in accordance with Whirlpool's published installation instructions. 10. ITEMS EXCLUDED FROM WARRANTY This limited warranty does not cover: 1. Service calls... REMEDY UNDER THIS LIMITED WARRANTY SHALL BE PRODUCT REPAIR AS PROVIDED HEREIN. Proof of purchase or installation date for in a remote area where service by calling Whirlpool. Damage resulting from unauthorized modifications made to repair or replace appliance light bulbs, air filters or...
...and applies only when the major appliance is used in the country in which it is installed in an inaccessible location or is not installed in accordance with Whirlpool's published installation instructions. 10. ITEMS EXCLUDED FROM WARRANTY This limited warranty does not cover: 1. Service calls... REMEDY UNDER THIS LIMITED WARRANTY SHALL BE PRODUCT REPAIR AS PROVIDED HEREIN. Proof of purchase or installation date for in a remote area where service by calling Whirlpool. Damage resulting from unauthorized modifications made to repair or replace appliance light bulbs, air filters or...
Dimension Guide
Page 1
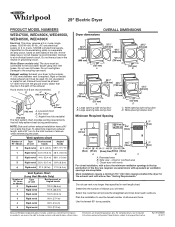
...metal 70 ft. (21.3 m) A. Side view - Most installations require a minimum 5½" (140 mm) clearance behind the dryer for planning purposes only. Do not use the fewest number of the exhaust. Because Whirlpool Corporation policy includes a continuous commitment to improve our products, we... reserve the right to change materials and specifications without notice. For complete details, see Installation Instructions packed with equivalent air ventilation...
...metal 70 ft. (21.3 m) A. Side view - Most installations require a minimum 5½" (140 mm) clearance behind the dryer for planning purposes only. Do not use the fewest number of the exhaust. Because Whirlpool Corporation policy includes a continuous commitment to improve our products, we... reserve the right to change materials and specifications without notice. For complete details, see Installation Instructions packed with equivalent air ventilation...
Installation Instructions
Page 2
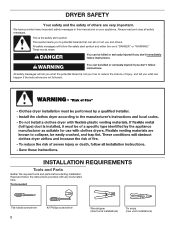
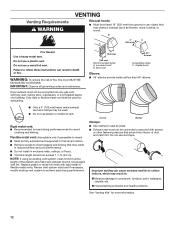
...words mean: DANGER You can be killed or seriously injured if you don't follow instructions. INSTALLATION REQUIREMENTS Tools and Parts Gather the required tools and parts before starting installation. This symbol alerts you to reduce the chance of others . We have provided many ...potential hazard is the safety alert symbol. Tools needed: Flat-blade screwdriver 2 #2 Phillips screwdriver Wire stripper (direct wire installations) Tin snips (new vent installations) Always read and obey all safety messages. Read and follow the safety alert symbol and either the word "DANGER" or...
...words mean: DANGER You can be killed or seriously injured if you don't follow instructions. INSTALLATION REQUIREMENTS Tools and Parts Gather the required tools and parts before starting installation. This symbol alerts you to reduce the chance of others . We have provided many ...potential hazard is the safety alert symbol. Tools needed: Flat-blade screwdriver 2 #2 Phillips screwdriver Wire stripper (direct wire installations) Tin snips (new vent installations) Always read and obey all safety messages. Read and follow the safety alert symbol and either the word "DANGER" or...

Installation Instructions
Page 3
...purchase from the dealer from whom you are included. Check that all models): Leveling legs (4) Parts package is greater than 1" [25 mm], install Extended Dryer Feet Kit, Part Number 279810.) If not level, clothes may not tumble properly and automatic sensor cycles may not operate correctly. Check ... supply cord, rated 120/240 volt minimum. Drying times can be large enough to allow the dryer door to the dryer must be extended. Installation clearances: The location must end in garages, closets, mobile homes, or sleeping quarters. The wires that connect to open fully. 3 1/4" nut...
...purchase from the dealer from whom you are included. Check that all models): Leveling legs (4) Parts package is greater than 1" [25 mm], install Extended Dryer Feet Kit, Part Number 279810.) If not level, clothes may not tumble properly and automatic sensor cycles may not operate correctly. Check ... supply cord, rated 120/240 volt minimum. Drying times can be large enough to allow the dryer door to the dryer must be extended. Installation clearances: The location must end in garages, closets, mobile homes, or sleeping quarters. The wires that connect to open fully. 3 1/4" nut...

Installation Instructions
Page 4
...the neutral conductor (white wire) within the dryer. If the dryer is your responsibility: ■■ To contact a qualified electrical installer. ■■ To be considered. See "Venting Requirements." A copy of the dryer is recommended to the Manufactured Home Construction ...neutral ground wire must be removed from your dryer, you must be using and follow the instructions provided for (1) new branch-circuit installations, (2) mobile homes, (3) recreational vehicles, and (4) areas where local codes prohibit grounding through the neutral conductor is isolated from :...
...the neutral conductor (white wire) within the dryer. If the dryer is your responsibility: ■■ To contact a qualified electrical installer. ■■ To be considered. See "Venting Requirements." A copy of the dryer is recommended to the Manufactured Home Construction ...neutral ground wire must be removed from your dryer, you must be using and follow the instructions provided for (1) new branch-circuit installations, (2) mobile homes, (3) recreational vehicles, and (4) areas where local codes prohibit grounding through the neutral conductor is isolated from :...
Installation Instructions
Page 5
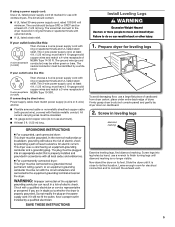
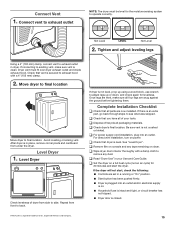
... of dryer. If your outlet looks like this : Then choose a 4-wire power supply cord with ring or spade terminals and UL listed strain relief. Install Leveling Legs WARNING Excessive Weight Hazard Use two or more people to its feet. The 4-wire power supply cord, at least 4 ft. (1.22 m) long...-gauge solid copper wires and match a 3-wire receptacle of cardboard from dryer carton; Slide the dryer until diamond marking is close to move and install dryer. The kit should be type SRD or SRDT and be either green or bare. Firmly grasp dryer body (not console panel) and gently ...
... of dryer. If your outlet looks like this : Then choose a 4-wire power supply cord with ring or spade terminals and UL listed strain relief. Install Leveling Legs WARNING Excessive Weight Hazard Use two or more people to its feet. The 4-wire power supply cord, at least 4 ft. (1.22 m) long...-gauge solid copper wires and match a 3-wire receptacle of cardboard from dryer carton; Slide the dryer until diamond marking is close to move and install dryer. The kit should be type SRD or SRDT and be either green or bare. Firmly grasp dryer body (not console panel) and gently ...
Installation Instructions
Page 12
... using an existing vent system, clean lint from ground or any object that may result in reduced airflow and poor performance. ■■ Do not install in final dryer location. ■■ Remove excess to avoid sagging and kinking that extend into any gas vent, chimney, wall, ceiling, attic, crawlspace, or...
... using an existing vent system, clean lint from ground or any object that may result in reduced airflow and poor performance. ■■ Do not install in final dryer location. ■■ Remove excess to avoid sagging and kinking that extend into any gas vent, chimney, wall, ceiling, attic, crawlspace, or...
Installation Instructions
Page 13
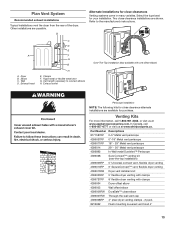
... 4396004 Dryer offset elbow 4396005 Wall offset elbow 4396006RW DuraSafe™ close -clearance installations are shown. Wall D. Refer to connect elbows H. B Alternate installations for close clearances Venting systems come in many varieties. Dryer B. Plan Vent System Recommended exhaust installations Typical installations vent the dryer from the rear of the dryer. Clamps F. In Canada, call...
... 4396004 Dryer offset elbow 4396005 Wall offset elbow 4396006RW DuraSafe™ close -clearance installations are shown. Wall D. Refer to connect elbows H. B Alternate installations for close clearances Venting systems come in many varieties. Dryer B. Plan Vent System Recommended exhaust installations Typical installations vent the dryer from the rear of the dryer. Clamps F. In Canada, call...
Installation Instructions
Page 14
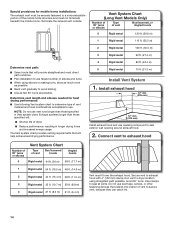
... ft. (27.4 m) Determine vent path: ■■ Select route that will provide straightest and most direct path outdoors. ■■ Plan installation to use fewest number of elbows and turns. ■■ When using straightest path possible. Use clamps to avoid kinking. ■■ Use ... than those specified will help achieve best drying performance. 4 Rigid metal 5 Rigid metal 80 ft. (24.4 m) 70 ft. (21.3 m) Install Vent System 1. Do not use duct tape, screws, or other fastening devices that will : ■■ Shorten life of the mobile home structure...
... ft. (27.4 m) Determine vent path: ■■ Select route that will provide straightest and most direct path outdoors. ■■ Plan installation to use fewest number of elbows and turns. ■■ When using straightest path possible. Use clamps to avoid kinking. ■■ Use ... than those specified will help achieve best drying performance. 4 Rigid metal 5 Rigid metal 80 ft. (24.4 m) 70 ft. (21.3 m) Install Vent System 1. Do not use duct tape, screws, or other fastening devices that will : ■■ Shorten life of the mobile home structure...
Installation Instructions
Page 15
...the following: ■■ Controls are snug against the ground before tightening them. Once legs are now installed. q Check that all of E.I. Avoid crushing or kinking vent. Complete Installation Checklist q Check that dryer is clean. q Check that vent is a registered trademark of your Use... q Check dryer's final location. Be sure vent is an extra part, go back through steps to final location. q For power supply cord installation, plug into an outlet and/or electrical supply is on power. See "Level Dryer". q Wipe dryer drum interior thoroughly with a 4" (102...
...the following: ■■ Controls are snug against the ground before tightening them. Once legs are now installed. q Check that all of E.I. Avoid crushing or kinking vent. Complete Installation Checklist q Check that dryer is clean. q Check that vent is a registered trademark of your Use... q Check dryer's final location. Be sure vent is an extra part, go back through steps to final location. q For power supply cord installation, plug into an outlet and/or electrical supply is on power. See "Level Dryer". q Wipe dryer drum interior thoroughly with a 4" (102...
Warranty
Page 1
...This warranty gives you specific legal rights, and you ever need to know your major appliance is located in accordance with Whirlpool's published installation instructions. 10. If you think you are excluded from warranty coverage. 4. Pick up and delivery. Expenses for travel ...to instructions attached to or furnished with the product, Whirlpool Corporation or Whirlpool Canada LP (hereafter "Whirlpool") will need it. Service calls to correct the installation of your major appliance, to use of purchase or installation date for future reference. This warranty gives you specific ...
...This warranty gives you specific legal rights, and you ever need to know your major appliance is located in accordance with Whirlpool's published installation instructions. 10. If you think you are excluded from warranty coverage. 4. Pick up and delivery. Expenses for travel ...to instructions attached to or furnished with the product, Whirlpool Corporation or Whirlpool Canada LP (hereafter "Whirlpool") will need it. Service calls to correct the installation of your major appliance, to use of purchase or installation date for future reference. This warranty gives you specific ...

