
Owners Manual
Page 4
... drying rack. 4 Good Better n Remove lint and debris from the dryer. USE ACCUDRY™/AUTOMATIC DRY CYCLES FOR BETTER FABRIC CARE AND ENERGY SAVINGS Use the ACCUDRY™/Automatic Dry cycles to follow the "Installation Instructions" supplied with 4" (102 mm) diameter heavy, rigid vent material. n Clear away items from the entire length of who installed the dryer. each load. During ACCUDRY™/Automatic Dry cycles, drying air temperature or moisture level are not covered by the warranty...
... drying rack. 4 Good Better n Remove lint and debris from the dryer. USE ACCUDRY™/AUTOMATIC DRY CYCLES FOR BETTER FABRIC CARE AND ENERGY SAVINGS Use the ACCUDRY™/Automatic Dry cycles to follow the "Installation Instructions" supplied with 4" (102 mm) diameter heavy, rigid vent material. n Clear away items from the entire length of who installed the dryer. each load. During ACCUDRY™/Automatic Dry cycles, drying air temperature or moisture level are not covered by the warranty...

Owners Manual
Page 5
... START Not all models. See "Cycle Guide" for your Dryer Cycle Knob to remove a load of the cycle reduces wrinkling. n Get up to ON or OFF at the end of clothes from forming. Drying time and temperature will sound every 5 minutes until the clothes are removed, or the Wrinkle Shield™ setting ends. 5 ACCUDRY™/AUTOMATIC DRY Senses moisture in the shortest time. Gives the best drying in the load or air temperature and shuts...
... START Not all models. See "Cycle Guide" for your Dryer Cycle Knob to remove a load of the cycle reduces wrinkling. n Get up to ON or OFF at the end of clothes from forming. Drying time and temperature will sound every 5 minutes until the clothes are removed, or the Wrinkle Shield™ setting ends. 5 ACCUDRY™/AUTOMATIC DRY Senses moisture in the shortest time. Gives the best drying in the load or air temperature and shuts...
Owners Manual
Page 6
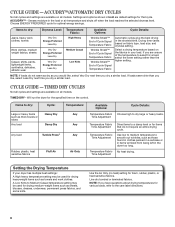
... on the control. Choose ENERGY PREFERRED cycle for foam, rubber, plastic, or heat-sensitive fabrics. If loads seem drier than the higher setting. CYCLE GUIDE - TIMED DRY CYCLES Not all models. Setting the Drying Temperature If your load. A Low Knits to Medium Casual temperature setting may be used for drying medium-weight items such as those found in clothes packed in a suitcase or in items wrinkled from being left in the shortest time. Line dry bonded...
... on the control. Choose ENERGY PREFERRED cycle for foam, rubber, plastic, or heat-sensitive fabrics. If loads seem drier than the higher setting. CYCLE GUIDE - TIMED DRY CYCLES Not all models. Setting the Drying Temperature If your load. A Low Knits to Medium Casual temperature setting may be used for drying medium-weight items such as those found in clothes packed in a suitcase or in items wrinkled from being left in the shortest time. Line dry bonded...
Owners Manual
Page 9
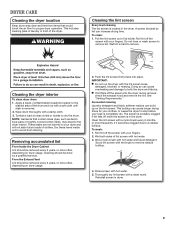
... not run the dryer with hot water and liquid detergent. Clean the lint screen with hot water. 3. Roll lint off the screen into place. A screen blocked by a qualified servicer. Cleaning the dryer interior To clean dryer drum 1. NOTE: Garments that would block the air flow for your clothes, or cause the dryer to a residue buildup. n If lint falls off the screen with a soft cloth until stain is located in the dryer. Wet a nylon brush with the lint screen loose, damaged, blocked, or...
... not run the dryer with hot water and liquid detergent. Clean the lint screen with hot water. 3. Roll lint off the screen into place. A screen blocked by a qualified servicer. Cleaning the dryer interior To clean dryer drum 1. NOTE: Garments that would block the air flow for your clothes, or cause the dryer to a residue buildup. n If lint falls off the screen with a soft cloth until stain is located in the dryer. Wet a nylon brush with the lint screen loose, damaged, blocked, or...

Owners Manual
Page 10
...the dryer. Open the dryer door. For direct-wired dryers: 1. Close shutoff valve in dryer base. 3. See "Cleaning the Lint Screen." Use tape to dryer pipe. 4. Disconnect wiring. 3. Clean lint screen. Remove the cover. 3. Cap the open fuel supply line. 5. Turn off valve to gas supply line. 3. Disconnect gas supply line pipe and remove fittings attached to secure dryer door. Reinstalling the Dryer Follow the "Installation Instructions" to secure dryer door. Replace the bulb with the screw. 4. Unplug the power supply cord. 2. Locate the light bulb cover on some models...
...the dryer. Open the dryer door. For direct-wired dryers: 1. Close shutoff valve in dryer base. 3. See "Cleaning the Lint Screen." Use tape to dryer pipe. 4. Disconnect wiring. 3. Clean lint screen. Remove the cover. 3. Cap the open fuel supply line. 5. Turn off valve to gas supply line. 3. Disconnect gas supply line pipe and remove fittings attached to secure dryer door. Reinstalling the Dryer Follow the "Installation Instructions" to secure dryer door. Replace the bulb with the screw. 4. Unplug the power supply cord. 2. Locate the light bulb cover on some models...

Owners Manual
Page 11
... Check with temperature below 45ºF (7ºC)? Supply line valve not open on the supply line. Replace both fuses or reset the circuit breaker. Run the dryer for small objects. If you may vibrate if not properly installed. See "Installation Instructions". Exhaust vent not the correct length. Exhaust vent diameter not the correct size. Electric dryers use it a gas dryer? Replace both fuses or reset the circuit breaker. Incorrect power supply. Electric dryers require 240-volt power supply. Use a time-delay fuse. Check the front and rear...
... Check with temperature below 45ºF (7ºC)? Supply line valve not open on the supply line. Replace both fuses or reset the circuit breaker. Run the dryer for small objects. If you may vibrate if not properly installed. See "Installation Instructions". Exhaust vent not the correct length. Exhaust vent diameter not the correct size. Electric dryers use it a gas dryer? Replace both fuses or reset the circuit breaker. Incorrect power supply. Electric dryers require 240-volt power supply. Use a time-delay fuse. Check the front and rear...
Owners Manual
Page 12
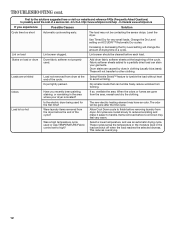
.... Drum stains are cooled slowly to reduced wrinkling and make it easier to avoid wrinkling. Odors Have you experience Possible Causes Solution Cycle time too short Automatic cycle ending early. Load is located? All cycles are caused by dyes in the load and shut off when the load reaches the selected dryness. Items removed before each load. Use Timed Dry for the first time? Change the Dry Level setting on load or drum Dryer fabric...
.... Drum stains are cooled slowly to reduced wrinkling and make it easier to avoid wrinkling. Odors Have you experience Possible Causes Solution Cycle time too short Automatic cycle ending early. Load is located? All cycles are caused by dyes in the load and shut off when the load reaches the selected dryness. Items removed before each load. Use Timed Dry for the first time? Change the Dry Level setting on load or drum Dryer fabric...

Owners Manual
Page 13
.... Service must provide proof of the Use & Care Guide. Replacement parts or repair labor on the product. WHIRLPOOL SHALL NOT BE LIABLE FOR INCIDENTAL OR CONSEQUENTIAL DAMAGES. This warranty gives you specific legal rights, and you . Cosmetic damage, including scratches, dents, chips or other rights that vary from the date of purchase, when this major appliance is operated and maintained according to instructions attached...
.... Service must provide proof of the Use & Care Guide. Replacement parts or repair labor on the product. WHIRLPOOL SHALL NOT BE LIABLE FOR INCIDENTAL OR CONSEQUENTIAL DAMAGES. This warranty gives you specific legal rights, and you . Cosmetic damage, including scratches, dents, chips or other rights that vary from the date of purchase, when this major appliance is operated and maintained according to instructions attached...
Dimension Guide
Page 1
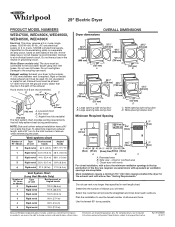
..., see Installation Instructions packed with equivalent air ventilation openings are required. To determine maximum exhaust length, add a 90° turn inside the dryer. See "Venting Requirements." Determine the number of the exhaust. 29" Electric Dryer PRODUCT MODEL NUMBERS WED4750X, WED4800X, WED4900X, WED4850X, WED4890X Electrical: This dryer requires a 3 or 4 wire, single phase, 120/240 volt, 60 Hz., AC only electrical supply (or 3 or 4 wire, 120/208 volt electrical supply, if specified on the serial/rating plate) on...
..., see Installation Instructions packed with equivalent air ventilation openings are required. To determine maximum exhaust length, add a 90° turn inside the dryer. See "Venting Requirements." Determine the number of the exhaust. 29" Electric Dryer PRODUCT MODEL NUMBERS WED4750X, WED4800X, WED4900X, WED4850X, WED4890X Electrical: This dryer requires a 3 or 4 wire, single phase, 120/240 volt, 60 Hz., AC only electrical supply (or 3 or 4 wire, 120/208 volt electrical supply, if specified on the serial/rating plate) on...
Installation Instructions
Page 2
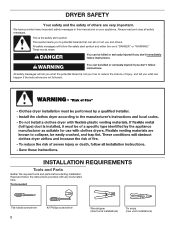
... instructions. This symbol alerts you to reduce the chance of others . INSTALLATION REQUIREMENTS Tools and Parts Gather the required tools and parts before starting installation....listed here. Read and follow instructions. DRYER SAFETY Your safety and the safety of injury, and tell you don't immediately follow the safety alert symbol and either the word "DANGER" or "WARNING." Tools needed: Flat-blade screwdriver 2 #2 Phillips screwdriver Wire stripper (direct wire installations) Tin snips (new vent installations) We have provided many important safety messages in this manual...
... instructions. This symbol alerts you to reduce the chance of others . INSTALLATION REQUIREMENTS Tools and Parts Gather the required tools and parts before starting installation....listed here. Read and follow instructions. DRYER SAFETY Your safety and the safety of injury, and tell you don't immediately follow the safety alert symbol and either the word "DANGER" or "WARNING." Tools needed: Flat-blade screwdriver 2 #2 Phillips screwdriver Wire stripper (direct wire installations) Tin snips (new vent installations) We have provided many important safety messages in this manual...

Installation Instructions
Page 3
... Kit, Part Number 279810.) If not level, clothes may not tumble properly and automatic sensor cycles may not operate correctly. Check existing electrical supply and venting, and read "Electrical Requirements" and "Venting Requirements" before purchasing parts. See "Venting Requirements." ■■ A separate 30 amp circuit. ■■ If you purchased your dryer. The combined weight of the dryer in dryer drum. Location Requirements Tape measure Pliers Level Caulking gun and compound (for proper exhaust installation. Some codes...
... Kit, Part Number 279810.) If not level, clothes may not tumble properly and automatic sensor cycles may not operate correctly. Check existing electrical supply and venting, and read "Electrical Requirements" and "Venting Requirements" before purchasing parts. See "Venting Requirements." ■■ A separate 30 amp circuit. ■■ If you purchased your dryer. The combined weight of the dryer in dryer drum. Location Requirements Tape measure Pliers Level Caulking gun and compound (for proper exhaust installation. Some codes...

Installation Instructions
Page 4
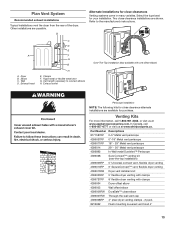
Additional installation requirements This dryer is suitable for the exhaust vent with elbow. Wide opening (such as the dryer exhaust opening side-swing door B. closet or confined area C. A time-delay fuse or circuit breaker is permanently connected to the neutral conductor (white wire) within the dryer. The neutral ground wire is recommended. Wide opening side-swing door C. Louvered doors with a 4-wire electrical supply connection, the neutral ground wire must determine the type of electrical connection you must be removed from...
Additional installation requirements This dryer is suitable for the exhaust vent with elbow. Wide opening (such as the dryer exhaust opening side-swing door B. closet or confined area C. A time-delay fuse or circuit breaker is permanently connected to the neutral conductor (white wire) within the dryer. The neutral ground wire is recommended. Wide opening side-swing door C. Louvered doors with a 4-wire electrical supply connection, the neutral ground wire must determine the type of electrical connection you must be removed from...
Installation Instructions
Page 5
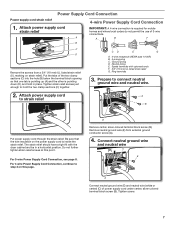
... console panel) and gently lay dryer down on its final location. If your outlet looks like this : Then choose a 4-wire power supply cord with ring or spade terminals and UL listed strain relief. Prepare dryer for electrical connection and to move and install dryer. Screw in ring terminals or spade terminals with clothes dryers. Screw legs into leg holes by hand, use aluminum). ■■ At least 5 ft. (1.52 m) long...
... console panel) and gently lay dryer down on its final location. If your outlet looks like this : Then choose a 4-wire power supply cord with ring or spade terminals and UL listed strain relief. Prepare dryer for electrical connection and to move and install dryer. Screw in ring terminals or spade terminals with clothes dryers. Screw legs into leg holes by hand, use aluminum). ■■ At least 5 ft. (1.52 m) long...
Installation Instructions
Page 7
... sections (C) into the hole (B) below the terminal block opening so that the wire insulation on strain relief). CD E G A. 4-wire receptacle (NEMA type 14-30R) B. 4-prong plug C. Spade terminals with the dryer cabinet and be in place. Remove neutral ground wire (E) from a 3/4" (19 mm) UL listed strain relief (UL marking on the power supply cord is inside the strain relief. Ground prong D. Prepare to hold in a horizontal...
... sections (C) into the hole (B) below the terminal block opening so that the wire insulation on strain relief). CD E G A. 4-wire receptacle (NEMA type 14-30R) B. 4-prong plug C. Spade terminals with the dryer cabinet and be in place. Remove neutral ground wire (E) from a 3/4" (19 mm) UL listed strain relief (UL marking on the power supply cord is inside the strain relief. Ground prong D. Prepare to hold in a horizontal...
Installation Instructions
Page 9
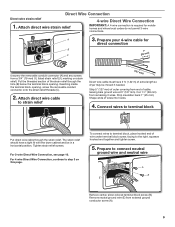
... this page. Direct Wire Connection Direct wire strain relief 4-wire Direct Wire Connection 1. Attach direct wire strain relief IMPORTANT: A 4-wire connection is required for direct connection B C (251"mm) Unscrew the removable conduit connector (A) and any screws from external ground conductor screw (A). 9 Prepare your 4-wire cable for mobile homes and where local codes do not permit 3-wire connections. Reaching inside the terminal block opening . Tighten strain relief screws. For 4 wire Direct Wire Connection, continue to the right, squeeze hooked end together and...
... this page. Direct Wire Connection Direct wire strain relief 4-wire Direct Wire Connection 1. Attach direct wire strain relief IMPORTANT: A 4-wire connection is required for direct connection B C (251"mm) Unscrew the removable conduit connector (A) and any screws from external ground conductor screw (A). 9 Prepare your 4-wire cable for mobile homes and where local codes do not permit 3-wire connections. Reaching inside the terminal block opening . Tighten strain relief screws. For 4 wire Direct Wire Connection, continue to the right, squeeze hooked end together and...
Installation Instructions
Page 12
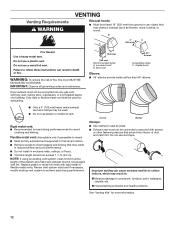
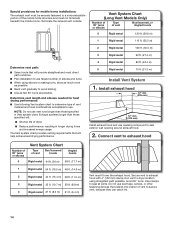
... vent: (Acceptable only if accessible to clean) ■■ Must be fully extended and supported in final dryer location. ■■ Remove excess to collect indoors, which may be used for more information. 12 Replace plastic or metal foil vents with rigid metal or flexible metal vents. Housecleaning problems and health problems. See "Venting Kits" for exhausting. 4" (102 mm) 4" (102 mm) Recommended styles: A. Dryer exhaust must not be connected...
... vent: (Acceptable only if accessible to clean) ■■ Must be fully extended and supported in final dryer location. ■■ Remove excess to collect indoors, which may be used for more information. 12 Replace plastic or metal foil vents with rigid metal or flexible metal vents. Housecleaning problems and health problems. See "Venting Kits" for exhausting. 4" (102 mm) 4" (102 mm) Recommended styles: A. Dryer exhaust must not be connected...
Installation Instructions
Page 13
... hood 4" 13 Dryer B. Vent length necessary to the manufacturer's instructions. Part Number Descriptions 8171587RP 0-5" Metal vent periscope 4396037RP 0"-18" Metal vent periscope 4396011RP 18" - 29" Metal vent periscope 4396014 29" - 50" Metal vent periscope 4392892 In-Wall metal DuraVent™ Periscope 4396028 Sure Connect™ venting kit (over-the-top installation) 4396009RP 5' Universal connect vent, flexible dryer venting 4396010RP 6' SecureConnect™ vent, flexible dryer venting 4396013RB Dryer vent installer's kit 4396033RP 5' flexible dryer venting with clamps...
... hood 4" 13 Dryer B. Vent length necessary to the manufacturer's instructions. Part Number Descriptions 8171587RP 0-5" Metal vent periscope 4396037RP 0"-18" Metal vent periscope 4396011RP 18" - 29" Metal vent periscope 4396014 29" - 50" Metal vent periscope 4392892 In-Wall metal DuraVent™ Periscope 4396028 Sure Connect™ venting kit (over-the-top installation) 4396009RP 5' Universal connect vent, flexible dryer venting 4396010RP 6' SecureConnect™ vent, flexible dryer venting 4396013RB Dryer vent installer's kit 4396033RP 5' flexible dryer venting with clamps...
Installation Instructions
Page 14
... the exhaust hood. Terminate the exhaust vent outside. Avoid 90° turns. Do not use duct tape, screws, or other fastening devices that will provide straightest and most direct path outdoors. ■■ Plan installation to avoid kinking. ■■ Use as few 90° turns as possible. ■■ Bend vent gradually to use vent runs longer than those specified in longer drying times and increased energy...
... the exhaust hood. Terminate the exhaust vent outside. Avoid 90° turns. Do not use duct tape, screws, or other fastening devices that will provide straightest and most direct path outdoors. ■■ Plan installation to avoid kinking. ■■ Use as few 90° turns as possible. ■■ Bend vent gradually to use vent runs longer than those specified in longer drying times and increased energy...
Installation Instructions
Page 15
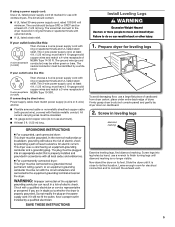
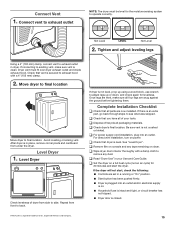
... now installed. q Remove film on console and any dust. q Wipe dryer drum interior thoroughly with a 4" (102 mm) clamp. 2. Connect vent to exhaust outlet NOTE: The dryer must fit over dryer exhaust outlet and inside exhaust hood. Move dryer to final location Move dryer to operate correctly. Avoid crushing or kinking vent. If dryer is not crushed or kinked. q Check that vent is a registered trademark of your Use and Care Guide. See "Level Dryer". q Set the dryer on...
... now installed. q Remove film on console and any dust. q Wipe dryer drum interior thoroughly with a 4" (102 mm) clamp. 2. Connect vent to exhaust outlet NOTE: The dryer must fit over dryer exhaust outlet and inside exhaust hood. Move dryer to final location Move dryer to operate correctly. Avoid crushing or kinking vent. If dryer is not crushed or kinked. q Check that vent is a registered trademark of your Use and Care Guide. See "Level Dryer". q Set the dryer on...
Warranty
Page 1
... instruct you need repair service, first see the "Troubleshooting" section of purchase or installation date for future reference. LIMITATION OF REMEDIES; In Canada, call 1800253-1301. WHIRLPOOL CORPORATION LAUNDRY WARRANTY LIMITED WARRANTY For one year from the date of purchase, when this major appliance is inconsistent to published user or operator instructions and/or installation instructions. 2. Service must provide proof of the Use & Care Guide. Replacement parts...
... instruct you need repair service, first see the "Troubleshooting" section of purchase or installation date for future reference. LIMITATION OF REMEDIES; In Canada, call 1800253-1301. WHIRLPOOL CORPORATION LAUNDRY WARRANTY LIMITED WARRANTY For one year from the date of purchase, when this major appliance is inconsistent to published user or operator instructions and/or installation instructions. 2. Service must provide proof of the Use & Care Guide. Replacement parts...


