Owners Manual
Page 2
DRYER SAFETY 2
DRYER SAFETY 2

Owners Manual
Page 4
...the entire length of time set and sometimes results in good air flow. Service calls caused by the warranty and will be sure to the dryer plays a big role in shrinkage, wrinkling, and static due to over-drying. When cleaning is complete, be paid by : n Cleaning... reduces air flow. Proper venting will provide optimal energy savings. See "Installation Instructions." Good Better n Remove lint and debris from the front the dryer. The venting system attached to follow the "Installation Instructions" supplied with 4" (102 mm) diameter heavy, rigid vent material. n Use the shortest...
...the entire length of time set and sometimes results in good air flow. Service calls caused by the warranty and will be sure to the dryer plays a big role in shrinkage, wrinkling, and static due to over-drying. When cleaning is complete, be paid by : n Cleaning... reduces air flow. Proper venting will provide optimal energy savings. See "Installation Instructions." Good Better n Remove lint and debris from the front the dryer. The venting system attached to follow the "Installation Instructions" supplied with 4" (102 mm) diameter heavy, rigid vent material. n Use the shortest...

Owners Manual
Page 5
... CONTROL PANEL & FEATURES 1 2 3 4 TIMED DRY 50 40 Damp Dry Tumble Press 20 60 70 Heavy Dry Cool Down OFF ACCUDRY sensor dryer Jeans Very Dry ENERGY PREFERRED OFF Delicate WP_WEGD4900XW Less Dry Cool Down OFF WRINKLE SHIELD Air n o On heat l y L ow knits Mcaseudalium TEMPERATURE... m w ts casual H hea i y gh v End O of Cycle SOignnal TEMPERATURE fabric PUSH TO START Not all models. See "Cycle Guide" for your dryer model. Turn the WRINKLE SHIELD™ knob to ON or OFF at the end of the cycle reduces wrinkling. Promptly removing clothes at any time...
... CONTROL PANEL & FEATURES 1 2 3 4 TIMED DRY 50 40 Damp Dry Tumble Press 20 60 70 Heavy Dry Cool Down OFF ACCUDRY sensor dryer Jeans Very Dry ENERGY PREFERRED OFF Delicate WP_WEGD4900XW Less Dry Cool Down OFF WRINKLE SHIELD Air n o On heat l y L ow knits Mcaseudalium TEMPERATURE... m w ts casual H hea i y gh v End O of Cycle SOignnal TEMPERATURE fabric PUSH TO START Not all models. See "Cycle Guide" for your dryer model. Turn the WRINKLE SHIELD™ knob to ON or OFF at the end of the cycle reduces wrinkling. Promptly removing clothes at any time...
Owners Manual
Page 6
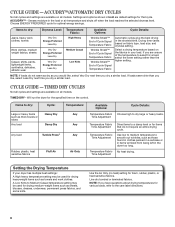
...ACCUDRY™/AUTOMATIC DRY CYCLES Not all models. Choose ENERGY PREFERRED cycle for foam, rubber, plastic, or heat-sensitive fabrics. Will run the dryer for items that cycle. Settings and options shown in bold are unsure of Cycle Signal Temperature Fabric Automatic cycles give the best drying in the... shortest time. Senses moisture in the dryer too long. A Low Knits to a damp level or for the specified time on all cycles and settings are available on the control....
...ACCUDRY™/AUTOMATIC DRY CYCLES Not all models. Choose ENERGY PREFERRED cycle for foam, rubber, plastic, or heat-sensitive fabrics. Will run the dryer for items that cycle. Settings and options shown in bold are unsure of Cycle Signal Temperature Fabric Automatic cycles give the best drying in the... shortest time. Senses moisture in the dryer too long. A Low Knits to a damp level or for the specified time on all cycles and settings are available on the control....
Owners Manual
Page 7
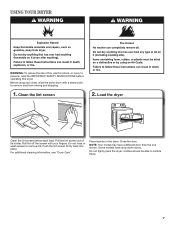
... with your fingers. Close the door. USING YOUR DRYER WARNING: To reduce the risk of its holder. Pull the lint screen out of fire, electric shock, or injury to persons, read the IMPORTANT SAFETY ... the lint screen 2. NOTE: Your model may have drop down doors. Do not tightly pack the dryer; Place laundry in the dryer. Do not rinse or wash screen to tumble freely. 7 For additional cleaning information, see "Dryer Care". clothes should be able to remove lint. Push the lint screen firmly back into place...
... with your fingers. Close the door. USING YOUR DRYER WARNING: To reduce the risk of its holder. Pull the lint screen out of fire, electric shock, or injury to persons, read the IMPORTANT SAFETY ... the lint screen 2. NOTE: Your model may have drop down doors. Do not tightly pack the dryer; Place laundry in the dryer. Do not rinse or wash screen to tumble freely. 7 For additional cleaning information, see "Dryer Care". clothes should be able to remove lint. Push the lint screen firmly back into place...
Owners Manual
Page 8
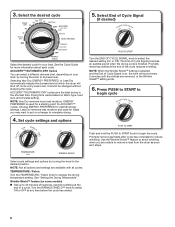
... DRY cycles give the best drying in the shortest time. Drying time varies based on some models) n Get up to remove a load from the dryer as soon as it cannot be changed without stopping the cycle. ENERGY PREFERRED is finished. NOTE: Not all cycles. Wrinkle Shield™ feature (on ...desired position. Select the desired cycle TIMED DRY 50 40 Damp Dry Tumble Press 20 60 70 Heavy Dry Cool Down OFF ACCUDRY sensor dryer Jeans Very Dry ENERGY PREFERRED OFF Delicate WP_WEGD4900XW Less Dry Cool Down OFF WRINKLE SHIELD Select the desired cycle for loads you are available with...
... DRY cycles give the best drying in the shortest time. Drying time varies based on some models) n Get up to remove a load from the dryer as soon as it cannot be changed without stopping the cycle. ENERGY PREFERRED is finished. NOTE: Not all cycles. Wrinkle Shield™ feature (on ...desired position. Select the desired cycle TIMED DRY 50 40 Damp Dry Tumble Press 20 60 70 Heavy Dry Cool Down OFF ACCUDRY sensor dryer Jeans Very Dry ENERGY PREFERRED OFF Delicate WP_WEGD4900XW Less Dry Cool Down OFF WRINKLE SHIELD Select the desired cycle for loads you are available with...
Owners Manual
Page 9
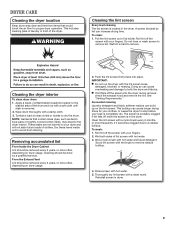
...damage to remove lint. Thoroughly dry lint screen with a soft cloth until stain is removed. 2. This includes clearing piles of laundry in the dryer. A screen blocked by a qualified servicer. Wet lint is completely dry. Apply a liquid, nonflammable household cleaner to dry the drum. Wet ... clean: 1. Wipe drum thoroughly with a nylon brush every 6 months, or more often, depending on the lint screen. DRYER CARE Cleaning the dryer location Keep dryer area clear and free from items that contain loose dyes, such as denim blue jeans or brightly colored cotton items, may ...
...damage to remove lint. Thoroughly dry lint screen with a soft cloth until stain is removed. 2. This includes clearing piles of laundry in the dryer. A screen blocked by a qualified servicer. Wet lint is completely dry. Apply a liquid, nonflammable household cleaner to dry the drum. Wet ... clean: 1. Wipe drum thoroughly with a nylon brush every 6 months, or more often, depending on the lint screen. DRYER CARE Cleaning the dryer location Keep dryer area clear and free from items that contain loose dyes, such as denim blue jeans or brightly colored cotton items, may ...

Owners Manual
Page 10
...models) 1. Plug into a grounded outlet or reconnect power. For direct-wired dryers: 1. Use tape to locate, level, and connect the dryer. 10 Reinstalling the Dryer Follow the "Installation Instructions" to secure dryer door. Turn bulb counterclockwise. Replace the bulb with the screw. 4. Make ... legs are at fuse or breaker box. 2. Use tape to dryer. 2. Open the dryer door. Remove the cover. 3. Close shutoff valve in dryer base. 4. If you will be on vacation or not using your dryer only when you should: 1. Using a Phillips-head screw driver,...
...models) 1. Plug into a grounded outlet or reconnect power. For direct-wired dryers: 1. Use tape to locate, level, and connect the dryer. 10 Reinstalling the Dryer Follow the "Installation Instructions" to secure dryer door. Turn bulb counterclockwise. Replace the bulb with the screw. 4. Make ... legs are at fuse or breaker box. 2. Use tape to dryer. 2. Open the dryer door. Remove the cover. 3. Close shutoff valve in dryer base. 4. If you will be on vacation or not using your dryer only when you should: 1. Using a Phillips-head screw driver,...

Owners Manual
Page 11
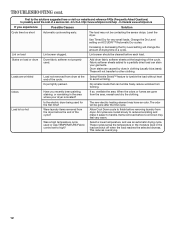
...the load to START knob not pressed firmly or held long enough. Use 4" (102 mm) diameter vent material. Electric dryers use it a gas dryer? http://www.whirlpool.com/help - Use only one fabric softener sheet, and use 2 household fuses or circuit breakers. Long venting will bounce... See "Installation Instructions". Fabric softener sheets blocking the grill. Dryer located in a closet without adequate opening. No heat Are the four legs installed, and is the valve open . In Canada www.whirlpool.ca If you do not feel air movement, clean exhaust ...
...the load to START knob not pressed firmly or held long enough. Use 4" (102 mm) diameter vent material. Electric dryers use it a gas dryer? http://www.whirlpool.com/help - Use only one fabric softener sheet, and use 2 household fuses or circuit breakers. Long venting will bounce... See "Installation Instructions". Fabric softener sheets blocking the grill. Dryer located in a closet without adequate opening. No heat Are the four legs installed, and is the valve open . In Canada www.whirlpool.ca If you do not feel air movement, clean exhaust ...
Owners Manual
Page 12
... Timed Dry for the first time? Lint screen should be gone after the first cycle. These will not transfer to handle. In Canada www.whirlpool.ca If you recently been painting, staining, or varnishing in clothing (usually blue jeans). The load may have an odor. Stains on load or... or the moisture level in a cycle. Select Wrinkle Shield™ feature to tumble the load without heat to finish before removing laundry from the dryer before the end of a service call...In U.S.A. Fabric softener sheets added to a partially dried load can tumble freely reduce wrinkles from the area,...
... Timed Dry for the first time? Lint screen should be gone after the first cycle. These will not transfer to handle. In Canada www.whirlpool.ca If you recently been painting, staining, or varnishing in clothing (usually blue jeans). The load may have an odor. Stains on load or... or the moisture level in a cycle. Select Wrinkle Shield™ feature to tumble the load without heat to finish before removing laundry from the dryer before the end of a service call...In U.S.A. Fabric softener sheets added to a partially dried load can tumble freely reduce wrinkles from the area,...
Dimension Guide
Page 1
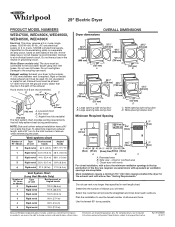
... fused on both sides of elbows and turns. To determine maximum exhaust length, add a 90° turn inside the dryer. Recessed area B. Because Whirlpool Corporation policy includes a continuous commitment to improve our products, we reserve the right to the total number of the door ...are acceptable. Do not use old hoses. B 4" C (102 mm) OVERALL DIMENSIONS Dryer dimensions A 2½" (64 mm) 4" (102 mm) A. Wide opening ...
... fused on both sides of elbows and turns. To determine maximum exhaust length, add a 90° turn inside the dryer. Recessed area B. Because Whirlpool Corporation policy includes a continuous commitment to improve our products, we reserve the right to the total number of the door ...are acceptable. Do not use old hoses. B 4" C (102 mm) OVERALL DIMENSIONS Dryer dimensions A 2½" (64 mm) 4" (102 mm) A. Wide opening ...
Installation Instructions
Page 2
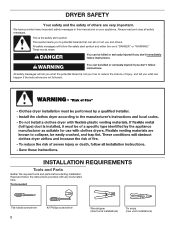
... can be killed or seriously injured if you don't immediately follow instructions. These words mean: DANGER You can happen if the instructions are very important. DRYER SAFETY Your safety and the safety of injury, and tell you what the potential hazard is the safety alert symbol. All safety messages will follow...
... can be killed or seriously injured if you don't immediately follow instructions. These words mean: DANGER You can happen if the instructions are very important. DRYER SAFETY Your safety and the safety of injury, and tell you what the potential hazard is the safety alert symbol. All safety messages will follow...

Installation Instructions
Page 3
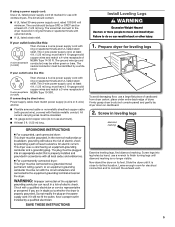
... wrench Utility knife If using power supply cord, a grounded electrical outlet located within 2 ft. (610 mm) of either side of dryer. Location Requirements Tape measure Pliers Level Caulking gun and compound (for installing new exhaust vent) Parts supplied (all parts are using a ... ■■ Level floor with upturned ends. ■■ A UL listed strain relief. Check code requirements. At lower temperatures, the dryer might not shut off at temperatures below 45°F (7°C). For further information, please reference the "Assistance or Service" section of a ...
... wrench Utility knife If using power supply cord, a grounded electrical outlet located within 2 ft. (610 mm) of either side of dryer. Location Requirements Tape measure Pliers Level Caulking gun and compound (for installing new exhaust vent) Parts supplied (all parts are using a ... ■■ Level floor with upturned ends. ■■ A UL listed strain relief. Check code requirements. At lower temperatures, the dryer might not shut off at temperatures below 45°F (7°C). For further information, please reference the "Assistance or Service" section of a ...

Installation Instructions
Page 4
... might be required for wall, door, and floor moldings. ■■ Additional spacing of 1" (25 mm) on both sides of the dryer is suitable for (1) new branch-circuit installations, (2) mobile homes, (3) recreational vehicles, and (4) areas where local codes prohibit grounding through the ...are required. Large opening . Wide opening hamper door *Most installations require a minimum 5½" (140 mm) clearance behind the dryer for it is recommended that a qualified electrician determine that the electrical connection is prohibited. Louvered doors with a 3-wire electrical supply ...
... might be required for wall, door, and floor moldings. ■■ Additional spacing of 1" (25 mm) on both sides of the dryer is suitable for (1) new branch-circuit installations, (2) mobile homes, (3) recreational vehicles, and (4) areas where local codes prohibit grounding through the ...are required. Large opening . Wide opening hamper door *Most installations require a minimum 5½" (140 mm) clearance behind the dryer for it is recommended that a qualified electrician determine that the electrical connection is prohibited. Louvered doors with a 3-wire electrical supply ...
Installation Instructions
Page 5
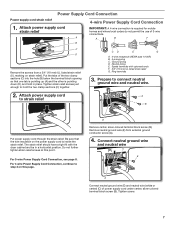
... cord, at least 4 ft. (1.22 m) long, must have 3 10-gauge solid copper wires and match a 3-wire receptacle of cardboard from dryer carton; The (14-30R) neutral conductor must be identified by direct wire: Power supply cable must end in leveling legs diamond marking Examine leveling legs... power supply cord: Use a UL listed power supply cord kit marked for use with flexible metallic conduit. The wires that connect to move and install dryer. The ground wire (ground 4-wire receptacle conductor) may be at least 4 ft. (1.22 m) long, must be : ■■ Flexible armored ...
... cord, at least 4 ft. (1.22 m) long, must have 3 10-gauge solid copper wires and match a 3-wire receptacle of cardboard from dryer carton; The (14-30R) neutral conductor must be identified by direct wire: Power supply cable must end in leveling legs diamond marking Examine leveling legs... power supply cord: Use a UL listed power supply cord kit marked for use with flexible metallic conduit. The wires that connect to move and install dryer. The ground wire (ground 4-wire receptacle conductor) may be at least 4 ft. (1.22 m) long, must be : ■■ Flexible armored ...
Installation Instructions
Page 7
... a 3/4" (19 mm) UL listed strain relief (UL marking on this point. A B F C D Remove the screws from external ground conductor screw (A). 4. Ground prong D. Spade terminals with the dryer cabinet and be in place. Connect neutral ground wire and neutral wire C B E Connect neutral ground wire (E) and neutral wire (white or center) (C) of 3-wire connections...
... a 3/4" (19 mm) UL listed strain relief (UL marking on this point. A B F C D Remove the screws from external ground conductor screw (A). 4. Ground prong D. Spade terminals with the dryer cabinet and be in place. Connect neutral ground wire and neutral wire C B E Connect neutral ground wire (E) and neutral wire (white or center) (C) of 3-wire connections...
Installation Instructions
Page 8
... wires to external ground conductor screw (A). Tighten screws. Finally, reinsert tab of terminal block cover into slot of dryer rear panel. Ring terminals G. Finally, reinsert tab of terminal block cover into slot of dryer rear panel. Neutral prong D. 5. Tighten screw. 6. B D E A C GF A. 3-wire receptacle (NEMA type 10-30R) B. 3-wire plug C. Remove center, silver...
... wires to external ground conductor screw (A). Tighten screws. Finally, reinsert tab of terminal block cover into slot of dryer rear panel. Ring terminals G. Finally, reinsert tab of terminal block cover into slot of dryer rear panel. Neutral prong D. 5. Tighten screw. 6. B D E A C GF A. 3-wire receptacle (NEMA type 10-30R) B. 3-wire plug C. Remove center, silver...
Installation Instructions
Page 9
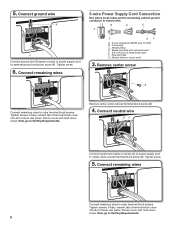
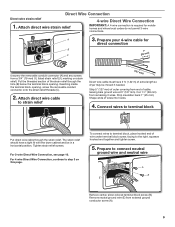
...from external ground conductor screw (A). 9 Strip insulation back 1" (25 mm). To connect wires to terminal block, place hooked end of extra length so dryer may be in a horizontal position. The strain relief should have 5 ft. (1.52 m) of wire under terminal block screw, facing to step 3 on... (E) from remaining 3 wires. Attach direct wire cable to strain relief (127 5" mm) Direct wire cable must have a tight fit with the dryer cabinet and be moved if needed. For 3-wire Direct Wire Connection, see page 10. For 4 wire Direct Wire Connection, continue to the right,...
...from external ground conductor screw (A). 9 Strip insulation back 1" (25 mm). To connect wires to terminal block, place hooked end of extra length so dryer may be in a horizontal position. The strain relief should have 5 ft. (1.52 m) of wire under terminal block screw, facing to step 3 on... (E) from remaining 3 wires. Attach direct wire cable to strain relief (127 5" mm) Direct wire cable must have a tight fit with the dryer cabinet and be moved if needed. For 3-wire Direct Wire Connection, see page 10. For 4 wire Direct Wire Connection, continue to the right,...
Installation Instructions
Page 10
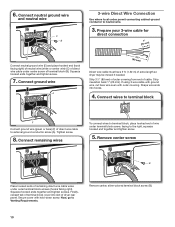
...mm) of outer covering from end of remaining direct wire cable wires under terminal block screw, facing to terminal block, place hooked end of dryer rear panel. If using 3-wire cable with ground wire, cut bare wire even with hold-down screw. Connect remaining wires To connect wires... tab of terminal block cover into hooks. 4. Connect ground wire A (893m½m" ) Direct wire cable must have 5 ft. (1.52 m) of extra length so dryer may be moved if needed. 6. Now, go to neutral wire. 3. Secure cover with outer covering. Connect neutral ground wire and neutral wire C B 3-wire Direct ...
...mm) of outer covering from end of remaining direct wire cable wires under terminal block screw, facing to terminal block, place hooked end of dryer rear panel. If using 3-wire cable with ground wire, cut bare wire even with hold-down screw. Connect remaining wires To connect wires... tab of terminal block cover into hooks. 4. Connect ground wire A (893m½m" ) Direct wire cable must have 5 ft. (1.52 m) of extra length so dryer may be moved if needed. 6. Now, go to neutral wire. 3. Secure cover with outer covering. Connect neutral ground wire and neutral wire C B 3-wire Direct ...
Installation Instructions
Page 11
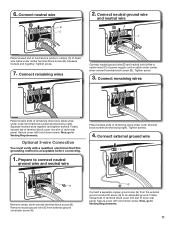
... 7. Squeeze hooked ends together and tighten screws. Now, go to connect neutral ground wire and neutral wire A Place hooked ends of dryer rear panel. Prepare to Venting Requirements. 11 Tighten screws. 4. Finally, reinsert tab of terminal block cover into slot of power supply cord... screw (A) to Venting Requirements. Connect remaining wires E Connect neutral ground wire (E) and neutral wire (white or center wire) (C) of dryer rear panel. Finally, reinsert tab of terminal block cover into slot of remaining wires under center terminal block screw (B). 6. Now, go ...
... 7. Squeeze hooked ends together and tighten screws. Now, go to connect neutral ground wire and neutral wire A Place hooked ends of dryer rear panel. Prepare to Venting Requirements. 11 Tighten screws. 4. Finally, reinsert tab of terminal block cover into slot of power supply cord... screw (A) to Venting Requirements. Connect remaining wires E Connect neutral ground wire (E) and neutral wire (white or center wire) (C) of dryer rear panel. Finally, reinsert tab of terminal block cover into slot of remaining wires under center terminal block screw (B). 6. Now, go ...


