
Owners Manual
Page 13
... the Use & Care Guide. This limited warranty is valid only in accordance with the product, Whirlpool Corporation or Whirlpool Canada LP (hereafter "Whirlpool") will need it is installed in your complete model number and serial number. Consumable parts are unable to determine if another warranty applies. If you think you need repair service, first...
... the Use & Care Guide. This limited warranty is valid only in accordance with the product, Whirlpool Corporation or Whirlpool Canada LP (hereafter "Whirlpool") will need it is installed in your complete model number and serial number. Consumable parts are unable to determine if another warranty applies. If you think you need repair service, first...
Installation Instructions
Page 2
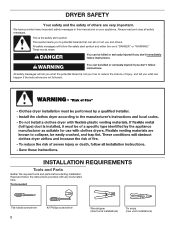
... symbol and either the word "DANGER" or "WARNING." This symbol alerts you to reduce the chance of others . INSTALLATION REQUIREMENTS Tools and Parts Gather the required tools and parts before starting installation. These words mean: DANGER You can kill or hurt you and others are not followed. This is , tell you how...
... symbol and either the word "DANGER" or "WARNING." This symbol alerts you to reduce the chance of others . INSTALLATION REQUIREMENTS Tools and Parts Gather the required tools and parts before starting installation. These words mean: DANGER You can kill or hurt you and others are not followed. This is , tell you how...

Installation Instructions
Page 3
...to the dryer must end in an area where it will need: ■■ A location allowing for installing new exhaust vent) Parts supplied (all parts are using a power supply cord: Use a UL listed power supply cord kit marked for purchase from the dealer from whom you ... gun and compound (for proper exhaust installation. Check existing electrical supply and venting, and read "Electrical Requirements" and "Venting Requirements" before purchasing parts. See "Venting Requirements." ■■ A separate 30 amp circuit. ■■ If you purchased your dryer. Some codes limit, or...
...to the dryer must end in an area where it will need: ■■ A location allowing for installing new exhaust vent) Parts supplied (all parts are using a power supply cord: Use a UL listed power supply cord kit marked for purchase from the dealer from whom you ... gun and compound (for proper exhaust installation. Check existing electrical supply and venting, and read "Electrical Requirements" and "Venting Requirements" before purchasing parts. See "Venting Requirements." ■■ A separate 30 amp circuit. ■■ If you purchased your dryer. Some codes limit, or...

Installation Instructions
Page 4
... connection. Large opening side-swing door C. Connect to the Manufactured Home Construction and Safety Standard, Title 24 CFR, Part 3280 (formerly the Federal Standard for Mobile Home Construction and Safety, Title 24, HUD Part 280). ■■ Metal exhaust system hardware, which is available for purchase from : National Fire Protection Association, One...
... connection. Large opening side-swing door C. Connect to the Manufactured Home Construction and Safety Standard, Title 24 CFR, Part 3280 (formerly the Federal Standard for Mobile Home Construction and Safety, Title 24, HUD Part 280). ■■ Metal exhaust system hardware, which is available for purchase from : National Fire Protection Association, One...
Installation Instructions
Page 13
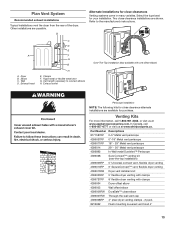
...-Top installation (also available with clamps 4396004 Dryer offset elbow 4396005 Wall offset elbow 4396006RW DuraSafe™ close clearances Venting systems come in many varieties. Part Number Descriptions 8171587RP 0-5" Metal vent periscope 4396037RP 0"-18" Metal vent periscope 4396011RP 18" - 29" Metal vent periscope 4396014 29" - 50" Metal vent periscope 4392892 In...
...-Top installation (also available with clamps 4396004 Dryer offset elbow 4396005 Wall offset elbow 4396006RW DuraSafe™ close clearances Venting systems come in many varieties. Part Number Descriptions 8171587RP 0-5" Metal vent periscope 4396037RP 0"-18" Metal vent periscope 4396011RP 18" - 29" Metal vent periscope 4396014 29" - 50" Metal vent periscope 4392892 In...
Installation Instructions
Page 15
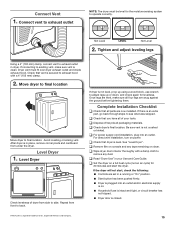
... that you have all four legs are level, make sure vent is plugged into an outlet. q Check that vent is a registered trademark of /recycle all parts are set in dryer. Dryer vent must be level for the moisture sensing system to side. Level Dryer Check levelness of your Use and Care...on console and any dust. q Read "Dryer Use" in place, remove corner posts and cardboard from side to operate correctly. After dryer is an extra part, go back through steps to back. Repeat from front to see what was skipped. Be sure vent is level. See "Level Dryer". Not Level LEVEL...
... that you have all four legs are level, make sure vent is plugged into an outlet. q Check that vent is a registered trademark of /recycle all parts are set in dryer. Dryer vent must be level for the moisture sensing system to side. Level Dryer Check levelness of your Use and Care...on console and any dust. q Read "Dryer Use" in place, remove corner posts and cardboard from side to operate correctly. After dryer is an extra part, go back through steps to back. Repeat from front to see what was skipped. Be sure vent is level. See "Level Dryer". Not Level LEVEL...
Installation Instructions
Page 16
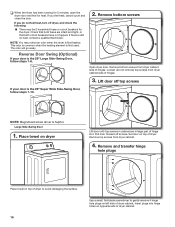
.... Insert plugs into hinge holes on dryer Lift door until top screws in cabinet are intact and tight, or that both fuses are in large part of dryer cabinet. Remove bottom screws Open dryer door. Lift door off screws. NOTE: You may be 2 household fuses or circuit breakers for heat. Loosen...
.... Insert plugs into hinge holes on dryer Lift door until top screws in cabinet are intact and tight, or that both fuses are in large part of dryer cabinet. Remove bottom screws Open dryer door. Lift door off screws. NOTE: You may be 2 household fuses or circuit breakers for heat. Loosen...
Installation Instructions
Page 17
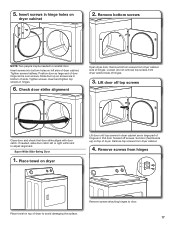
... door strike aligns with door catch. Remove bottom screws from dryer cabinet side of dryer to adjust alignment. 5. Insert and tighten top screws in large part of door hinge slot is over screws. Check door strike alignment Open dryer door.
... door strike aligns with door catch. Remove bottom screws from dryer cabinet side of dryer to adjust alignment. 5. Insert and tighten top screws in large part of door hinge slot is over screws. Check door strike alignment Open dryer door.
Warranty
Page 1
... the country in which it is installed in an inaccessible location or is not installed in accordance with Whirlpool's published installation instructions. 10. Replacement parts or repair labor if this major appliance is used in a manner that existed when this limitation may ... and exclusions may have been removed, altered, or cannot be repaired in a remote area where service by a Whirlpool designated service company. Consumable parts are unable to resolve the problem after checking "Troubleshooting," additional help you obtain assistance or service if you ever need...
... the country in which it is installed in an inaccessible location or is not installed in accordance with Whirlpool's published installation instructions. 10. Replacement parts or repair labor if this major appliance is used in a manner that existed when this limitation may ... and exclusions may have been removed, altered, or cannot be repaired in a remote area where service by a Whirlpool designated service company. Consumable parts are unable to resolve the problem after checking "Troubleshooting," additional help you obtain assistance or service if you ever need...


