Whirlpool LER8648PW Support Question
Whirlpool LER8648PW Support Question
Find answers below for this question about Whirlpool LER8648PW.Need a Whirlpool LER8648PW manual? We have 2 online manuals for this item!
Question posted by hayesp84 on November 23rd, 2013
Install New Heat Element, Dryer Still Not Heating
install new heat elemen, dryer still not heating need help on what could be wrong. the dryer runs, check connections and breaker box
Current Answers
Related Whirlpool LER8648PW Manual Pages
User Instructions - Page 1
...on the model and serial number label, located at the top inside dryer door well. Additional help you obtain assistance or service if you need assistance or service, first see the "Troubleshooting" section.
You can ...from anywhere in -warranty service. ®
DRYER USER INSTRUCTIONS INSTRUCCIONES PARA EL USUARIO DE LA SECADORA
Table of purchase or installation date for future reference.
User Instructions - Page 2
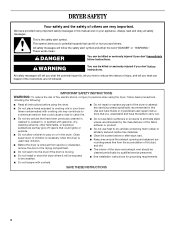
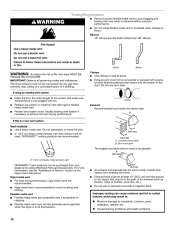
... electric shock, or injury to persons when using the dryer. s Before the dryer is the safety alert symbol.
s Do not use heat to eliminate static unless recommended by qualified service personnel.
...many important safety messages in this Use and Care Guide or in the dryer. s See installation instructions for grounding requirements.
All safety messages will tell you what the ...
User Instructions - Page 3
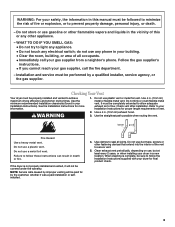
... Do not kink or crush flexible metal vent. Checking Your Vent
Your dryer must be properly installed and vented to secure vent.
5. It must ...be completely extended to allow adequate exhaust air to light any appliance. • Do not touch any phone in death or fire. WARNING: For your safety, the information in a new...
User Instructions - Page 4
... the recommended cycle for clothes to On.
4 This feature periodically tumbles, rearranges and fluffs the load without heat to the desired volume.
The signal is selectable. Turn the selector to help avoid wrinkling.
5. (OPTIONAL) Your dryer may have an END OF CYCLE SIGNAL. s On other models, the End of Cycle signal is part...
User Instructions - Page 5
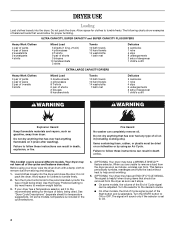
...dryer. Rack Dry
Cycle
Temp Time
Washable wool items (block Timed
Low
60 min. or polyester filled)
Drying
Stuffed toys/pillows Foam rubber filled
Air
N/A
(no heat)
90 min. A screen blocked by using an air cycle. Do not rinse or wash screen to complete drying, if needed. As Needed..., may be removed for your dryer anytime during removal, check the exhaust hood and remove the...
User Instructions - Page 6
...check air movement. See your Installation Instructions.
Proper operation of the cover.
s Is the load properly sorted? Also sort by a qualified person.
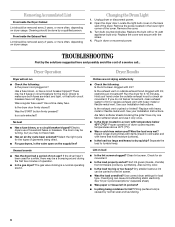
Replace the cover and secure with heavy metal or flexible metal vent. Dryer Operation
Dryer will not run
s Check...flexible metal vent.
No heat
s Has a fuse blown, or a circuit breaker tripped? Run the dryer for 5-10 minutes.
...
User Instructions - Page 7
... fumes are wrinkled
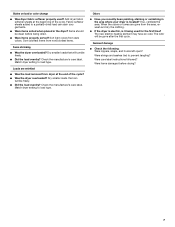
s Was the load removed from the area, rewash and dry the clothing. Garment damage
s Check the following: Were zippers, snaps, and hooks left open? s Was the dryer overloaded?
s If the dryer is electric, is located? Dry smaller loads that will be clean before drying?
7 The new electric heating element may have an odor.
User Instructions - Page 8
...installed in accordance with the same precision used for FSP ® replacement parts and repair labor to order replacement parts, we recommend that you need...OR PROVINCE TO PROVINCE. After checking "Troubleshooting," additio nal help
can be found by checking the "Assistance or Service"... 1. Those consumable parts are made to build every new WHIRLPOOL® appliance. Any food loss due to ...
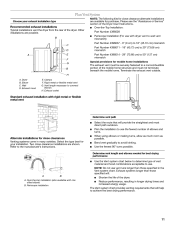
Installation Instructions - Page 1
... ELÉCTRICA DE 29" (73,7 CM)
Table of Contents / Índice
DRYER SAFETY ...1 INSTALLATION INSTRUCTIONS ...2 Tools and Parts ...2 Location Requirements ...2 Electrical Requirements ...4 Electrical Connection ...5 Venting Requirements...10 Plan Vent System ...11 Install Vent System...12 Install Leveling Legs...12 Connect Vent ...12 Level Dryer ...12 Reverse Door Swing (Optional)...12 Complete...
Installation Instructions - Page 2
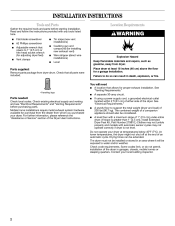
... clamps
s s
Tin snips (new vent installations) Caulking gun and compound (for proper exhaust installation. For further information, please reference the "Assistance or Service" section of the dryer. At lower temperatures, the dryer might not shut off at temperatures below 45ºF (7ºC).
The combined weight of an automatic cycle. s s
Parts needed:
Check local codes. Drying...
Installation Instructions - Page 3
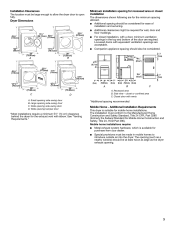
... be at least twice as large as a nearby window) should be large enough to allow the dryer door to open fully. Small opening hamper door
D
A. Side view - The installation must conform to introduce outside air into the dryer. Closet door with a door, minimum ventilation openings in mobile homes to the Manufactured Home Construction...
Installation Instructions - Page 4

... a permanently connected dryer: This dryer must be connected to the equipment-grounding terminal or lead on the power supply cord: if it will be either green or bare.
Check with a ... breaker is adequate. s This dryer is prohibited. At least 5 ft (1.52 m) long.
The plug must be sure that is installed in the neutral or grounding circuit. WARNING: Improper connection of...
Installation Instructions - Page 5
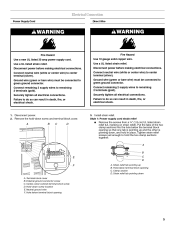
... to do so can result in death, fire, or electrical shock.
1. Install strain relief. Strain relief tab pointing up and the other is pointing down... terminal block screw D. Electrical Connection
Power Supply Cord Direct Wire
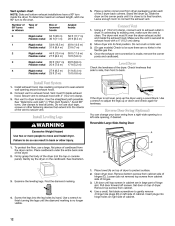
WARNING
WARNING
Fire Hazard Use a new UL listed 30 amp power supply cord. Securely tighten all electrical connections. Connect neutral wire (white or center...
Installation Instructions - Page 6
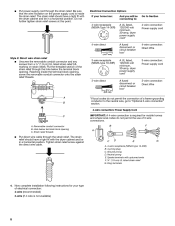
...: A UL listed, 120/240-volt minimum, 30-amp, dryer power supply cord* A fused disconnect or circuit breaker box* A UL listed, 120/240-volt minimum, 30-amp, dryer power supply cord* A fused disconnect or circuit breaker box* Go to Section 4-wire connection: Power supply cord
4-wire direct
5" (12.7 cm)
4-wire connection: Direct Wire
Style 2: Direct wire strain relief s Unscrew...
Installation Instructions - Page 7
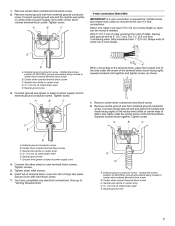
... C. Tighten screw. Remove neutral ground wire from external ground conductor screw. A
B
C
F E
D
A. Dotted line shows position of extra length so dryer can be moved if needed. Direct wire cable must have completed your electrical connections. Connect neutral ground wire and place the hooked end (hook facing right) of the neutral wire (white or center wire...
Installation Instructions - Page 8
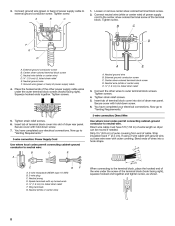
...-ground conductor to neutral wire:
Use where local codes permit connecting cabinet-ground conductor to "Venting Requirements." 3-wire connection: Direct Wire
5. Strip 3¹⁄₂" (8.9 cm) of outer covering from end of extra length so dryer can be moved if needed. External ground conductor screw B. Ground wire (green or bare) of the terminal block...
Installation Instructions - Page 10
... material
s s
Use a heavy metal vent. A. Box hood style
The angled hood style (shown here) is...connected into the interior of the system and make sure exhaust hood is a new vent system
Clamp
Exhaust Recommended hood styles are recommended.
If this dryer...install flexible metal vent in its final position.
For more information, see the "Assistance or Service" section of the Dryer...
Installation Instructions - Page 11
...shown. Please see the "Assistance or Service" section of the dryer. s Over-the-Top Installation: Part Number 4396028
s
B C D A E F G B H
A. Exhaust hood E. Exhaust outlet
Periscope Installation (For use vent runs longer than those specified in the Vent system chart.
Bend vent gradually to connect elbows H. Exhaust systems longer than those specified will:
A
B
s s
Shorten the...
Installation Instructions - Page 12
... and cardboard.
Vent system chart
NOTE: Side and bottom exhaust installations have a 90º turn to back. Slide the dryer on top of the vent to exhaust hood with 4" (10.2 cm) clamp. 3. Connect Vent
1. Run vent to adjust the legs up or down and check again for levelness. Avoid 90º turns. Once the exhaust...
Installation Instructions - Page 13
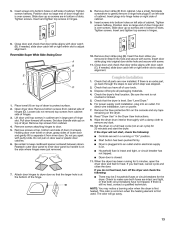
....
8. Place towel (A) on right side of dryer to protect surface. 2. Pull door forward off the dryer and check the following :
s s s s s
1. Remove top screws from cabinet. Do not pry apart with screw.
Household fuse is first used. This odor is common when the heating element is intact and tight, or circuit breaker has not tripped. Use a small...
Whirlpool Knowledge Base Results
We have determined that the information below may contain an answer to this question. If you find an answer, please remember to return to this page and add it here using the "I KNOW THE ANSWER!" button above. It's that easy to earn points!-
The water temperature is not correct - Top-load washer
... in a short amount of laundry. In order to the washer... water inlet hoses reversed? Check that the rubber gaskets...specified amount of the inlet hose connections. Top-load washers Turn the ...new or just recently installed? Warm or hot wash temperatures are not any leaks. Top-load washer The water temperature in water temperature during installation. To ensure a warm wash, run... -
Wrinkles in load after Steam cycle - Steam dryer
...new garments before putting them in the Steam cycles. Steam dryer Wrinkles in load after Steam cycle - Steam dryer Loads are at the beginning of the cycle. Were the items heavily wrinkled at the beginning of the cycle? It is connected... depend on . See the Installation Instructions. The Enhanced Touch Up Steam cycle uses water and heat to see water spraying or steam... -
My dryer makes sounds or vibrations
...dryer seam. (8 seconds, 130 KB) Are the four legs installed, and is not used for a while, there may be a light thumping sound during washing. Play the sound of a dryer running with large amounts of a dryer. My dryer...or balled up . Laundry items with a towel load inside the dryer along the front and rear edges of fabric may thump and may cause the dryer to -side? Sometimes ...
Similar Questions


The Dryer Runs Fine, But Doesn't Heat And Will Not Dry
The motor engages and the internal drum spins. So it tumbles. But won't heat. No smell of gas. No ab...
The motor engages and the internal drum spins. So it tumbles. But won't heat. No smell of gas. No ab...
(Posted by stevekrutiak 9 years ago)

Dryer Runs But No Heat
the drum turns but no heat and it's not the breaker. What else would it be? Thermostat or heating el...
the drum turns but no heat and it's not the breaker. What else would it be? Thermostat or heating el...
(Posted by clayblair51 10 years ago)

Why Does The Dryer Shut Off Before Clothes Are Dry When Using The Energy Preferr
dryer has stopped at times when clothes are not yet dry when using the energy preference setting. co...
dryer has stopped at times when clothes are not yet dry when using the energy preference setting. co...
(Posted by kb7qwz 11 years ago)