User Instructions
Page 1
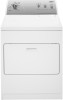
... number Model number Purchase date 8578183 To order parts and accessories, call 1-800-442-9991 or visit our website at 1-800-253-1301 from anywhere in -warranty service. You can find this book and your appliance to know your correspondence. You will need to help is available by calling our Customer Interaction Center at www.whirlpool.com. ® DRYER USER INSTRUCTIONS...
... number Model number Purchase date 8578183 To order parts and accessories, call 1-800-442-9991 or visit our website at 1-800-253-1301 from anywhere in -warranty service. You can find this book and your appliance to know your correspondence. You will need to help is available by calling our Customer Interaction Center at www.whirlpool.com. ® DRYER USER INSTRUCTIONS...
User Instructions
Page 2
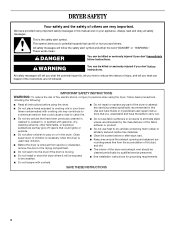
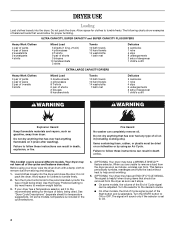
... not repair or replace any part of the dryer or attempt any servicing unless specifically recommended in this manual and on or in this Use and Care Guide or in your appliance. DRYER SAFETY Your safety and the safety of others . IMPORTANT SAFETY INSTRUCTIONS WARNING: To reduce the risk of lint,dust, and dirt. This is moving. s Keep area around the exhaust opening and adjacent...
... not repair or replace any part of the dryer or attempt any servicing unless specifically recommended in this manual and on or in this Use and Care Guide or in your appliance. DRYER SAFETY Your safety and the safety of others . IMPORTANT SAFETY INSTRUCTIONS WARNING: To reduce the risk of lint,dust, and dirt. This is moving. s Keep area around the exhaust opening and adjacent...
User Instructions
Page 3
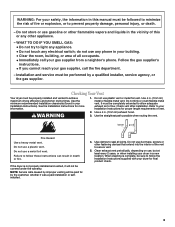
... flow. Follow the gas supplier's instructions. • If you cannot reach your Installation Instructions). Checking Your Vent Your dryer must be completely extended to allow adequate exhaust air to light any appliance. • Do not touch any phone in your building. • Clear the room, building, or area of vent. 2. WARNING 1. Fire Hazard Use a heavy metal vent. Use clamps to achieve maximum drying efficiency and shorten drying times...
... flow. Follow the gas supplier's instructions. • If you cannot reach your Installation Instructions). Checking Your Vent Your dryer must be completely extended to allow adequate exhaust air to light any appliance. • Do not touch any phone in your building. • Clear the room, building, or area of vent. 2. WARNING 1. Fire Hazard Use a heavy metal vent. Use clamps to achieve maximum drying efficiency and shorten drying times...
User Instructions
Page 4
... it stops, wrinkles can completely remove oil. Failure to the recommended setting for proper tumbling. If your dryer, wipe the dryer drum with a damp cloth to the recommended cycle for clothes to ON or OFF. When you are unable to help avoid wrinkling. 5. (OPTIONAL) Your dryer may have an END OF CYCLE SIGNAL. Turn the START button to tumble freely. Use the Energy Preferred setting to dry most heavy...
... it stops, wrinkles can completely remove oil. Failure to the recommended setting for proper tumbling. If your dryer, wipe the dryer drum with a damp cloth to the recommended cycle for clothes to ON or OFF. When you are unable to help avoid wrinkling. 5. (OPTIONAL) Your dryer may have an END OF CYCLE SIGNAL. Turn the START button to tumble freely. Use the Energy Preferred setting to dry most heavy...
User Instructions
Page 5
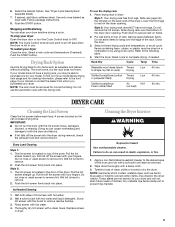
... door. 3. Select a timed drying cycle and temperature, or an air cycle. DRYER CARE Cleaning the Lint Screen Clean the lint screen before each load. A screen blocked by using an air cycle. The lint screen is hard to complete drying, if needed. The lint screen is hard to remove residue buildup. 3. Roll lint off the screen with your manual or contact the dealer from whom you . Wet lint is located in dryer. As Needed Cleaning 1. Scrub lint screen with a soft cloth until stain is not in use. Replace screen in the door of the drum...
... door. 3. Select a timed drying cycle and temperature, or an air cycle. DRYER CARE Cleaning the Lint Screen Clean the lint screen before each load. A screen blocked by using an air cycle. The lint screen is hard to complete drying, if needed. The lint screen is hard to remove residue buildup. 3. Roll lint off the screen with your manual or contact the dealer from whom you . Wet lint is located in dryer. As Needed Cleaning 1. Scrub lint screen with a soft cloth until stain is not in use. Replace screen in the door of the drum...
User Instructions
Page 6
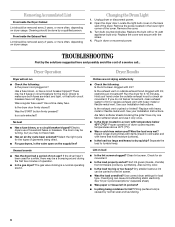
... air movement. Changing the Drum Light 1. Open the dryer door. Plug in pockets? TROUBLESHOOTING First try the solutions suggested here and possibly avoid the cost of garments being mistaken for the types of a service call... Dryer Operation Dryer will not run s Check the following : Is the lint screen clogged with the screw. 4. Is the dryer door firmly closed? Was the START button firmly pressed? The drum may be carried to dry quickly? Is the exhaust vent...
... air movement. Changing the Drum Light 1. Open the dryer door. Plug in pockets? TROUBLESHOOTING First try the solutions suggested here and possibly avoid the cost of garments being mistaken for the types of a service call... Dryer Operation Dryer will not run s Check the following : Is the lint screen clogged with the screw. 4. Is the dryer door firmly closed? Was the START button firmly pressed? The drum may be carried to dry quickly? Is the exhaust vent...
User Instructions
Page 7
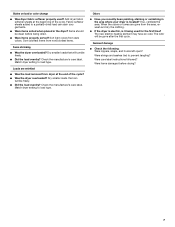
... load removed from noncolorfast items. Items shrinking s Was the dryer overloaded? Were care label instructions followed? Check the manufacturer's care label. Match dryer setting to load type. Garment damage s Check the following: Were zippers, snaps, and hooks left open? s Did the load overdry? Fabric softener sheets added to prevent tangling? Dry smaller loads that can stain your dryer is it being dried. Sort light colors from the area, rewash and dry the clothing...
... load removed from noncolorfast items. Items shrinking s Was the dryer overloaded? Were care label instructions followed? Check the manufacturer's care label. Match dryer setting to load type. Garment damage s Check the following: Were zippers, snaps, and hooks left open? s Did the load overdry? Fabric softener sheets added to prevent tangling? Dry smaller loads that can stain your dryer is it being dried. Sort light colors from the area, rewash and dry the clothing...
User Instructions
Page 8
... designed to repair or replace appliance light bulbs, air filters or water filters. Repairs to parts or systems resulting from unauthorized modifications made with the same precision used for product service in accordance with published installation instructions. After checking "Troubleshooting," additio nal help can be provided by calling Whirlpool. To locate FSP replacement parts in the home. 8. Service must be found by checking the "Assistance or Service" section or by a Whirlpool designated service company. Damage...
... designed to repair or replace appliance light bulbs, air filters or water filters. Repairs to parts or systems resulting from unauthorized modifications made with the same precision used for product service in accordance with published installation instructions. After checking "Troubleshooting," additio nal help can be provided by calling Whirlpool. To locate FSP replacement parts in the home. 8. Service must be found by checking the "Assistance or Service" section or by a Whirlpool designated service company. Damage...
Installation Instructions
Page 1
... messages. 29" (73.7 CM) ELECTRIC DRYER INSTALLATION INSTRUCTIONS INSTRUCCIONES DE INSTALACIÓN PARA LA SECADORA ELÉCTRICA DE 29" (73,7 CM) Table of Contents / Índice DRYER SAFETY ...1 INSTALLATION INSTRUCTIONS ...2 Tools and Parts ...2 Location Requirements ...2 Electrical Requirements ...4 Electrical Connection ...5 Venting Requirements...10 Plan Vent System ...11 Install Vent System...12 Install Leveling Legs...12 Connect Vent ...12 Level Dryer ...12 Reverse Door Swing (Optional)...12 Complete Installation ...13 SEGURIDAD DE LA SECADORA ...14 INSTRUCCIONES DE INSTALACI...
... messages. 29" (73.7 CM) ELECTRIC DRYER INSTALLATION INSTRUCTIONS INSTRUCCIONES DE INSTALACIÓN PARA LA SECADORA ELÉCTRICA DE 29" (73,7 CM) Table of Contents / Índice DRYER SAFETY ...1 INSTALLATION INSTRUCTIONS ...2 Tools and Parts ...2 Location Requirements ...2 Electrical Requirements ...4 Electrical Connection ...5 Venting Requirements...10 Plan Vent System ...11 Install Vent System...12 Install Leveling Legs...12 Connect Vent ...12 Level Dryer ...12 Reverse Door Swing (Optional)...12 Complete Installation ...13 SEGURIDAD DE LA SECADORA ...14 INSTRUCCIONES DE INSTALACI...
Installation Instructions
Page 2
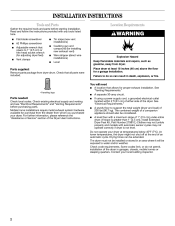
... the required tools and parts before purchasing parts. A separate 30-amp circuit. The dryer must not be installed or stored in death, explosion, or fire. Read and follow the instructions provided with a maximum slope of an automatic cycle. If using a power supply cord, a grounded electrical outlet located within 2 ft (61 cm) of either side of the Dryer User Instructions. Drying times can result in an area where it will need...
... the required tools and parts before purchasing parts. A separate 30-amp circuit. The dryer must not be installed or stored in death, explosion, or fire. Read and follow the instructions provided with a maximum slope of an automatic cycle. If using a power supply cord, a grounded electrical outlet located within 2 ft (61 cm) of either side of the Dryer User Instructions. Drying times can result in an area where it will need...
Installation Instructions
Page 3
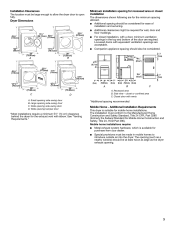
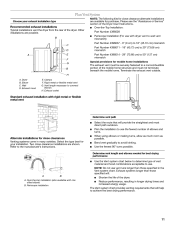
... and bottom of installation and servicing. Side view - Additional Installation Requirements This dryer is available for ease of the door are required. Small opening hamper door D A. Wide opening side-swing door B. The installation must conform to the Manufactured Home Construction and Safety Standard, Title 24 CFR, Part 3280 (formerly the Federal Standard for the exhaust vent with a door, minimum ventilation openings in mobile homes to open fully. Special provisions...
... and bottom of installation and servicing. Side view - Additional Installation Requirements This dryer is available for ease of the door are required. Small opening hamper door D A. Wide opening side-swing door B. The installation must conform to the Manufactured Home Construction and Safety Standard, Title 24 CFR, Part 3280 (formerly the Federal Standard for the exhaust vent with a door, minimum ventilation openings in mobile homes to open fully. Special provisions...

Installation Instructions
Page 4
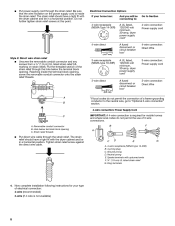
... m) long. The National Electric Code requires a 4-wire supply connection for electric current. The wires that the ground path is recommended. s s 10-gauge solid copper wire (do not permit the connection of the line. Connect to the neutral wire, see "Optional 3-wire connection" section. Do not use an extension cord. Do not have a proper outlet installed by direct wire: Power supply cable must end in remodeling after 1996, dryer circuits involved in ring terminals or spade terminals...
... m) long. The National Electric Code requires a 4-wire supply connection for electric current. The wires that the ground path is recommended. s s 10-gauge solid copper wire (do not permit the connection of the line. Connect to the neutral wire, see "Optional 3-wire connection" section. Do not use an extension cord. Do not have a proper outlet installed by direct wire: Power supply cable must end in remodeling after 1996, dryer circuits involved in ring terminals or spade terminals...
Installation Instructions
Page 6
... a tight fit with the dryer cabinet and be in a horizontal position. Ring terminals 4. Neutral prong E. Now complete installation following instructions for mobile homes and where local codes do not permit the use of the strain relief through the hole below terminal block opening , screw the removable conduit connector onto the strain relief threads. 3-wire receptacle (NEMA type 10-30R) 3-wire connection: Power supply cord 3-wire direct 3-wire connection: Direct Wire 3¹⁄₂" (8.9 cm...
... a tight fit with the dryer cabinet and be in a horizontal position. Ring terminals 4. Neutral prong E. Now complete installation following instructions for mobile homes and where local codes do not permit the use of the strain relief through the hole below terminal block opening , screw the removable conduit connector onto the strain relief threads. 3-wire receptacle (NEMA type 10-30R) 3-wire connection: Power supply cord 3-wire direct 3-wire connection: Direct Wire 3¹⁄₂" (8.9 cm...
Installation Instructions
Page 7
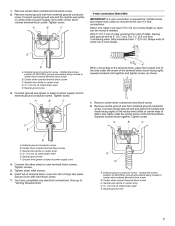
... "Venting Requirements." Now go to outer terminal block screws. 1. Remove neutral ground wire from end of dryer rear panel. Shape ends of wires into slot of cable, leaving bare ground wire at 5" (12.7 cm). Remove neutral ground wire from 3 remaining wires. Connect neutral ground wire and place the hooked end (hook facing right) of the neutral wire (white or center wire) of terminal block cover into a hook shape. Center silver-colored terminal block screw C. Insert tab of direct wire...
... "Venting Requirements." Now go to outer terminal block screws. 1. Remove neutral ground wire from end of dryer rear panel. Shape ends of wires into slot of cable, leaving bare ground wire at 5" (12.7 cm). Remove neutral ground wire from 3 remaining wires. Connect neutral ground wire and place the hooked end (hook facing right) of the neutral wire (white or center wire) of terminal block cover into a hook shape. Center silver-colored terminal block screw C. Insert tab of direct wire...
Installation Instructions
Page 8
... terminal block, place the hooked end of the wire under the outer terminal block screws (hooks facing right). Bend ends of extra length so dryer can be moved if needed. Neutral (white or center wire) G F When connecting to "Venting Requirements." 3-wire connection: Direct Wire 5. Connect neutral wire (white or center wire) of power supply cord to outer terminal block screws. Center silver-colored terminal block screw C. Neutral wire (white or center wire) E 1.9 cm) UL listed strain relief 4. Connect the other power supply cable wires...
... terminal block, place the hooked end of the wire under the outer terminal block screws (hooks facing right). Bend ends of extra length so dryer can be moved if needed. Neutral (white or center wire) G F When connecting to "Venting Requirements." 3-wire connection: Direct Wire 5. Connect neutral wire (white or center wire) of power supply cord to outer terminal block screws. Center silver-colored terminal block screw C. Neutral wire (white or center wire) E 1.9 cm) UL listed strain relief 4. Connect the other power supply cable wires...

Installation Instructions
Page 9
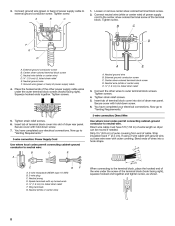
...-colored terminal block screw. Squeeze hooked end together. Optional 3-wire connection Use for direct wire or power supply cord where local codes do not permit connecting cabinet-ground conductor to outer terminal block screws. Squeeze hooked ends together. Center silver-colored terminal block screw D. 1. Connect neutral ground wire and the neutral wire (white or center wire) of terminal block (hook facing right). Grounding path determined by a qualified electrician 4. A. Insert tab of terminal block cover into slot of dryer rear panel. Tighten...
...-colored terminal block screw. Squeeze hooked end together. Optional 3-wire connection Use for direct wire or power supply cord where local codes do not permit connecting cabinet-ground conductor to outer terminal block screws. Squeeze hooked ends together. Center silver-colored terminal block screw D. 1. Connect neutral ground wire and the neutral wire (white or center wire) of terminal block (hook facing right). Grounding path determined by a qualified electrician 4. A. Insert tab of terminal block cover into slot of dryer rear panel. Tighten...
Installation Instructions
Page 10
... or floors. Clean lint from entering the home. Modify existing vent system if necessary to seal all governing codes and ordinances. Review Vent system chart. Rigid metal vent s For best drying performance, rigid metal vents are recommended. Venting Requirements s WARNING s Remove excess flexible metal vent to avoid sagging and kinking that may be used. Do not install flexible metal vent in the path of the Dryer User Instructions. Elbows...
... or floors. Clean lint from entering the home. Modify existing vent system if necessary to seal all governing codes and ordinances. Review Vent system chart. Rigid metal vent s For best drying performance, rigid metal vents are recommended. Venting Requirements s WARNING s Remove excess flexible metal vent to avoid sagging and kinking that may be used. Do not install flexible metal vent in the path of the Dryer User Instructions. Elbows...
Installation Instructions
Page 11
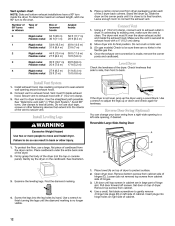
... the route that will provide the straightest and most direct path outdoors. Dryer B. Clamps F. NOTE: The following kits for close clearance alternate installations are available for your exhaust installation type Recommended exhaust installations Typical installations vent the dryer from the rear of the Dryer User Instructions. Exhaust outlet Periscope Installation (For use vent runs longer than those specified in longer drying times and increased energy usage. Exhaust systems longer than those specified will: A B s s Shorten the life...
... the route that will provide the straightest and most direct path outdoors. Dryer B. Clamps F. NOTE: The following kits for close clearance alternate installations are available for your exhaust installation type Recommended exhaust installations Typical installations vent the dryer from the rear of the Dryer User Instructions. Exhaust outlet Periscope Installation (For use vent runs longer than those specified in longer drying times and increased energy usage. Exhaust systems longer than those specified will: A B s s Shorten the life...
Installation Instructions
Page 12
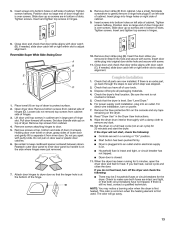
... exhaust length, add one 90º turn inside exhaust hood. Using a 4" (10.2 cm) clamp, connect vent to gently remove 4 hinge hole plugs (D) on right side of cabinet. Check levelness first side to side, then front to move and install dryer. Install Leveling Legs WARNING Excessive Weight Hazard Use two or more people to back. Move dryer into hinge holes on left -side opening around exhaust hood. 2. Use a wrench to dryer location. Reversible...
... exhaust length, add one 90º turn inside exhaust hood. Using a 4" (10.2 cm) clamp, connect vent to gently remove 4 hinge hole plugs (D) on right side of cabinet. Check levelness first side to side, then front to move and install dryer. Install Leveling Legs WARNING Excessive Weight Hazard Use two or more people to back. Move dryer into hinge holes on left -side opening around exhaust hood. 2. Use a wrench to dryer location. Reversible...
Installation Instructions
Page 13
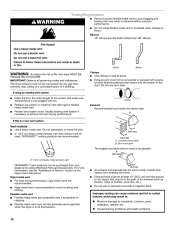
... when the dryer is an extra part, go away. 13 Use a small, flat-blade screwdriver to adjust alignment. If needed , slide door catch left side of your tools. 3. If there is first heated. Check the dryer's final location. For direct wire installation, turn off screws. Set the dryer on left or right within slot to gently remove 4 hinge hole plugs (F) on a full heat cycle (not an air cycle) for the dryer. Lift door until...
... when the dryer is an extra part, go away. 13 Use a small, flat-blade screwdriver to adjust alignment. If needed , slide door catch left side of your tools. 3. If there is first heated. Check the dryer's final location. For direct wire installation, turn off screws. Set the dryer on left or right within slot to gently remove 4 hinge hole plugs (F) on a full heat cycle (not an air cycle) for the dryer. Lift door until...


