Installation Guide
Page 2
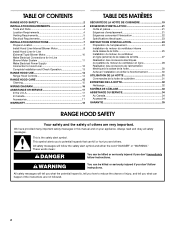
... alert symbol and either the word "DANGER" or "WARNING." All safety messages will follow instructions. TABLE OF CONTENTS RANGE HOOD SAFETY 2 INSTALLATION REQUIREMENTS 4 Tools and Parts 4 Location Requirements 4 Venting Requirements 5 Electrical Requirements 6 INSTALLATION INSTRUCTIONS 7 Prepare Location 7 Install Hood Liner Internal Blower Motor 8 Install Hood Liner In-Line (External Type) Blower Motor...
... alert symbol and either the word "DANGER" or "WARNING." All safety messages will follow instructions. TABLE OF CONTENTS RANGE HOOD SAFETY 2 INSTALLATION REQUIREMENTS 4 Tools and Parts 4 Location Requirements 4 Venting Requirements 5 Electrical Requirements 6 INSTALLATION INSTRUCTIONS 7 Prepare Location 7 Install Hood Liner Internal Blower Motor 8 Install Hood Liner In-Line (External Type) Blower Motor...
Installation Guide
Page 4
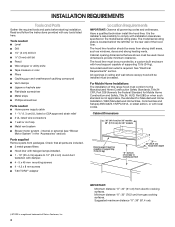
...and weatherproof caulking compound ■ Vent clamps ■ Jigsaw or keyhole saw ■ Flat-blade screwdriver ■ Metal snips ■ Phillips screwdriver Parts needed ■ Home power supply cable ■ 1 - ½" (1.3 cm) UL listed or CSA approved strain relief ■ 3 UL ...installed must be away from electric cooking surfaces. Given dimensions provide minimum clearance. INSTALLATION REQUIREMENTS Tools and Parts Gather the required tools and parts before starting installation. Have a qualified technician install the hood liner. The hood liner location should be...
...and weatherproof caulking compound ■ Vent clamps ■ Jigsaw or keyhole saw ■ Flat-blade screwdriver ■ Metal snips ■ Phillips screwdriver Parts needed ■ Home power supply cable ■ 1 - ½" (1.3 cm) UL listed or CSA approved strain relief ■ 3 UL ...installed must be away from electric cooking surfaces. Given dimensions provide minimum clearance. INSTALLATION REQUIREMENTS Tools and Parts Gather the required tools and parts before starting installation. Have a qualified technician install the hood liner. The hood liner location should be...
Installation Guide
Page 5
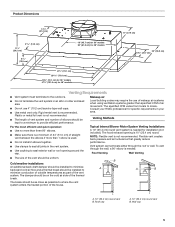
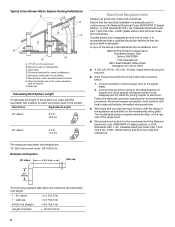
... to provide efficient performance. The hood exhaust opening around the cap. To vent through the roof or wall. The break should be as close as part of the thermal break. Makeup air Local building codes may require the use 4" (10.2 cm) laundry-type wall caps. ■ Use metal vent only. B A A B A. 10...
... to provide efficient performance. The hood exhaust opening around the cap. To vent through the roof or wall. The break should be as close as part of the thermal break. Makeup air Local building codes may require the use 4" (10.2 cm) laundry-type wall caps. ■ Use metal vent only. B A A B A. 10...
Installation Guide
Page 6
...ft (2.4 m) straight = 8.0 ft (2.4 m) Length of the National Electrical Code, ANSI/NFPA 70 (latest edition), or CSA Standards C22. 1-94, Canadian Electrical Code, Part 1 and C22.2 No. 0-M91 (latest edition) and all governing codes and ordinances. Mount on the model/serial rating plate. F. Mount from : National Fire Protection ...Wire sizes must conform with National Electrical Code, ANSI/NFPA 70 (latest edition), or CSA Standards C22.1-94, Canadian Electrical Code, Part 1 and C22.2 No. 0-M91 (latest edition) and all local codes and ordinances. The model/serial plate is adequate. C....
...ft (2.4 m) straight = 8.0 ft (2.4 m) Length of the National Electrical Code, ANSI/NFPA 70 (latest edition), or CSA Standards C22. 1-94, Canadian Electrical Code, Part 1 and C22.2 No. 0-M91 (latest edition) and all governing codes and ordinances. Mount on the model/serial rating plate. F. Mount from : National Fire Protection ...Wire sizes must conform with National Electrical Code, ANSI/NFPA 70 (latest edition), or CSA Standards C22.1-94, Canadian Electrical Code, Part 1 and C22.2 No. 0-M91 (latest edition) and all local codes and ordinances. The model/serial plate is adequate. C....
Installation Guide
Page 7
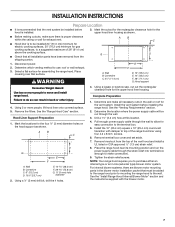
...Using 2 or more people to use: roof or wall exhaust. 3. See the "Range Hood Care" section. Determine and make all installation parts have been removed from the top of the range hood liner using four 4.2 x 8 mm screws. 6. Determine the location where the power...C D G E F A. Using a ¹⁄₈" (3 mm) drill bit, drill the 4 holes. 4. Wall B. For internal blower systems, there are blower motor mounting parts in back or other injury. 4. INSTALLATION INSTRUCTIONS Prepare Location ■ It is recommended that must be added to the range hood prior to mounting the...
...Using 2 or more people to use: roof or wall exhaust. 3. See the "Range Hood Care" section. Determine and make all installation parts have been removed from the top of the range hood liner using four 4.2 x 8 mm screws. 6. Determine the location where the power...C D G E F A. Using a ¹⁄₈" (3 mm) drill bit, drill the 4 holes. 4. Wall B. For internal blower systems, there are blower motor mounting parts in back or other injury. 4. INSTALLATION INSTRUCTIONS Prepare Location ■ It is recommended that must be added to the range hood prior to mounting the...

Installation Guide
Page 11
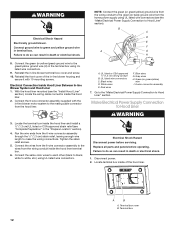
... and connect the black wires (C) together. 4. Motor electrical plug cable 3. Complete Preparation 1. Drill a 1¹⁄₄" (3.2 cm) hole at this location. 4. Failure to make all parts and panels before servicing. With the hood liner mounted (see the "Install Hood Liner" section), run the ¹⁄₂" (1.3 cm) wiring conduit between the...
... and connect the black wires (C) together. 4. Motor electrical plug cable 3. Complete Preparation 1. Drill a 1¹⁄₄" (3.2 cm) hole at this location. 4. Failure to make all parts and panels before servicing. With the hood liner mounted (see the "Install Hood Liner" section), run the ¹⁄₂" (1.3 cm) wiring conduit between the...
Installation Guide
Page 12
... to make the wiring connections. Terminal box cover B. Reinstall the front cover of the hood liner. I . 6-wire connector assembly 7. UL listed wire connectors C. Replace all parts and panels before servicing. Locate terminal box inside the hood liner. 2. Connect ground wire to Hood Liner WARNING 3. Black wires D. Disconnect power. 2. Connect the 6-wire...
... to make the wiring connections. Terminal box cover B. Reinstall the front cover of the hood liner. I . 6-wire connector assembly 7. UL listed wire connectors C. Replace all parts and panels before servicing. Locate terminal box inside the hood liner. 2. Connect ground wire to Hood Liner WARNING 3. Black wires D. Disconnect power. 2. Connect the 6-wire...
Installation Guide
Page 17
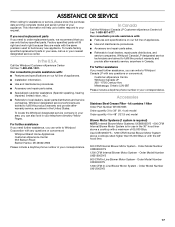
...fit right and work right because they are trained to local dealers, repair parts distributors, and service companies. To locate factory specified replacement parts in your nearest designated service center. Call the Whirlpool Customer eXperience Center toll free: 1-800-253-1301. Mississauga, Ontario L5N...807-6777. Order Model Number UXI0600DYS 1200 CFM In-Line Blower Motor System - Factory specified parts will help us or your correspondence. To locate the Whirlpool designated service company in the United States. Our consultants provide assistance with the same precision used...
...fit right and work right because they are trained to local dealers, repair parts distributors, and service companies. To locate factory specified replacement parts in your nearest designated service center. Call the Whirlpool Customer eXperience Center toll free: 1-800-253-1301. Mississauga, Ontario L5N...807-6777. Order Model Number UXI0600DYS 1200 CFM In-Line Blower Motor System - Factory specified parts will help us or your correspondence. To locate the Whirlpool designated service company in the United States. Our consultants provide assistance with the same precision used...

Installation Guide
Page 18
... 30 days from the date of purchase. 6. This limited warranty is valid only in a manner that have been removed, altered or cannot be borne by Whirlpool. 5. Consumable parts are excluded from accident, alteration, misuse, abuse, fire, flood, acts of God, improper installation, installation not in materials or workmanship. After checking "Troubleshooting," you...
... 30 days from the date of purchase. 6. This limited warranty is valid only in a manner that have been removed, altered or cannot be borne by Whirlpool. 5. Consumable parts are excluded from accident, alteration, misuse, abuse, fire, flood, acts of God, improper installation, installation not in materials or workmanship. After checking "Troubleshooting," you...

Warranty Information
Page 1
...down the following information about your major appliance is used for Factory Specified Parts and repair labor to correct defects in a remote area where service by calling Whirlpool. Repairs to parts or systems resulting from unauthorized modifications made to better help by checking the ..."Assistance or Service" section or by an authorized Whirlpool servicer is not available. 10. This warranty is...
...down the following information about your major appliance is used for Factory Specified Parts and repair labor to correct defects in a remote area where service by calling Whirlpool. Repairs to parts or systems resulting from unauthorized modifications made to better help by checking the ..."Assistance or Service" section or by an authorized Whirlpool servicer is not available. 10. This warranty is...

