Installation Guide
Page 2
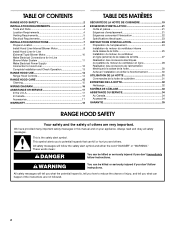
...messages will follow instructions. TABLE OF CONTENTS RANGE HOOD SAFETY 2 INSTALLATION REQUIREMENTS 4 Tools and Parts 4 Location Requirements 4 Venting Requirements 5 Electrical Requirements 6 INSTALLATION INSTRUCTIONS 7 Prepare Location 7 Install Hood Liner Internal Blower Motor 8 Install Hood Liner In-Line (External Type) Blower Motor 10 Make...reduce the chance of others . This is , tell you how to Hood Liner 12 Complete Installation and Check Operation 13 RANGE HOOD USE 14 Range Hood Controls 14 RANGE HOOD CARE 15 Cleaning 15 WIRING DIAGRAM 16 ASSISTANCE OR SERVICE 17 In ...
...messages will follow instructions. TABLE OF CONTENTS RANGE HOOD SAFETY 2 INSTALLATION REQUIREMENTS 4 Tools and Parts 4 Location Requirements 4 Venting Requirements 5 Electrical Requirements 6 INSTALLATION INSTRUCTIONS 7 Prepare Location 7 Install Hood Liner Internal Blower Motor 8 Install Hood Liner In-Line (External Type) Blower Motor 10 Make...reduce the chance of others . This is , tell you how to Hood Liner 12 Complete Installation and Check Operation 13 RANGE HOOD USE 14 Range Hood Controls 14 RANGE HOOD CARE 15 Cleaning 15 WIRING DIAGRAM 16 ASSISTANCE OR SERVICE 17 In ...
Installation Guide
Page 4
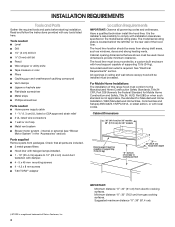
... plate. Given dimensions provide minimum clearance. Minimum distance "X": 30" (76.2 cm) from packages. Have a qualified technician install the hood liner. Read and follow the instructions provided with local codes. The model/serial rating plate is the installer's responsibility to cooking surface 22" (... be installed must conform to 10" (25.4 cm) round duct transition with installation clearances specified on the rear wall of the hood liner. Grounded electrical outlet is not applicable, the standard for Mobile Home Construction and Safety, Title 24, HUD, Part 280) or ...
... plate. Given dimensions provide minimum clearance. Minimum distance "X": 30" (76.2 cm) from packages. Have a qualified technician install the hood liner. Read and follow the instructions provided with local codes. The model/serial rating plate is the installer's responsibility to cooking surface 22" (... be installed must conform to 10" (25.4 cm) round duct transition with installation clearances specified on the rear wall of the hood liner. Grounded electrical outlet is not applicable, the standard for Mobile Home Construction and Safety, Title 24, HUD, Part 280) or ...
Installation Guide
Page 7
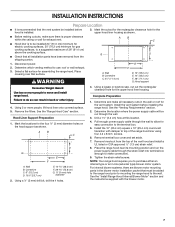
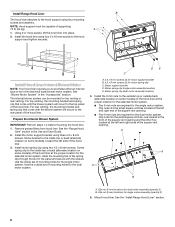
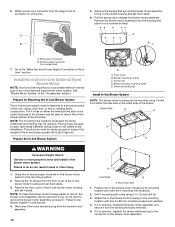
...blower systems, there are blower motor mounting parts in -line (external type) blower motor system. Hood support Excessive Weight Hazard Use two or more people, lift hood liner onto covered surface. 5. Failure to top of the range hood liner using four 4.2 x 8 mm screws. 6. Using a ¹⁄₈" (3 mm) drill... top of 36" (91.4 cm) above the cooking surface. ■ Check that surface. Select a flat surface for the upper hood liner housing. Remove the filters. Mark the cutout for the rectangular clearance hole for the vent system. Using 2 or more people to the...
...blower systems, there are blower motor mounting parts in -line (external type) blower motor system. Hood support Excessive Weight Hazard Use two or more people, lift hood liner onto covered surface. 5. Failure to top of the range hood liner using four 4.2 x 8 mm screws. 6. Using a ¹⁄₈" (3 mm) drill... top of 36" (91.4 cm) above the cooking surface. ■ Check that surface. Select a flat surface for the upper hood liner housing. Remove the filters. Mark the cutout for the rectangular clearance hole for the vent system. Using 2 or more people to the...
Installation Guide
Page 8
...or rear venting. Motor spring clip (single motor assembly location) E. Clip nuts into place. 2. Mount hood liner. Install Range Hood Liner B The hood liner attaches to the hood support using two 4.2 x 8 mm screws. Install motor spring clip using four mounting screws and washers... small square notches, one located in -line (external type) blower motor system. Install the hood liner using three 4.2 x 8 mm screws. Install Hood Liner Internal Blower Motor NOTE: Your hood liner requires you to the hood support and tighten securely. DE C A. 4.2 x 8 mm screws (3) for motor support ...
...or rear venting. Motor spring clip (single motor assembly location) E. Clip nuts into place. 2. Mount hood liner. Install Range Hood Liner B The hood liner attaches to the hood support using two 4.2 x 8 mm screws. Install motor spring clip using four mounting screws and washers... small square notches, one located in -line (external type) blower motor system. Install the hood liner using three 4.2 x 8 mm screws. Install Hood Liner Internal Blower Motor NOTE: Your hood liner requires you to the hood support and tighten securely. DE C A. 4.2 x 8 mm screws (3) for motor support ...
Installation Guide
Page 9
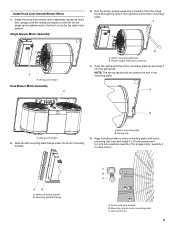
Install the hood liner blower motor assembly inside the hood liner canopy with the wiring connection to the left for the single motor system and to the front or top for dual motor). Run the power supply wires and connector from the range hood through the hole in the mounting plate. Power supply wires and connector... left mounting plate flange under the motor mounting bracket. quantity 5 for the dual motor system. Push the right end of the motor mounting plate. Install Hood Liner Internal Blower Motor 1.
Install the hood liner blower motor assembly inside the hood liner canopy with the wiring connection to the left for the single motor system and to the front or top for dual motor). Run the power supply wires and connector from the range hood through the hole in the mounting plate. Power supply wires and connector... left mounting plate flange under the motor mounting bracket. quantity 5 for the dual motor system. Push the right end of the motor mounting plate. Install Hood Liner Internal Blower Motor 1.
Installation Guide
Page 10
...2. Remove the front cover of the in -line blower motor housing and set them aside. 6. Mounting holes 1. Pull the spring clip to Hood Liner" section. Remove the blower motor assembly from the front cover of the in -line blower motor housing and set it on wiring box. See.... 3. Wiring box connector B. Power supply connector from the blower motor assembly. 10 A Inlet Side A A. Install Hood Liner In-Line (External Type) Blower Motor NOTE: Your hood liner requires you do so can result in -line blower motor housing to mount, the blower motor assembly can be strong ...
...2. Remove the front cover of the in -line blower motor housing and set them aside. 6. Mounting holes 1. Pull the spring clip to Hood Liner" section. Remove the blower motor assembly from the front cover of the in -line blower motor housing and set it on wiring box. See.... 3. Wiring box connector B. Power supply connector from the blower motor assembly. 10 A Inlet Side A A. Install Hood Liner In-Line (External Type) Blower Motor NOTE: Your hood liner requires you do so can result in -line blower motor housing to mount, the blower motor assembly can be strong ...

Installation Guide
Page 11
...Locate the electrical terminal boxes in the in death or electrical shock. Failure to prepare for easy connection to the hood liner and in -line blower housing and hood liner. 7. Electrical terminal box B. Pull enough ¹⁄₂" (1.3 cm) wiring conduit to allow for the ...11 Remove the terminal box covers and set the covers and screws aside. Make Electrical Connections for the vent system. With the hood liner mounted (see the "Install Hood Liner" section), run the ¹⁄₂" (1.3 cm) wiring conduit between the in -line blower housing terminal box. ....
...Locate the electrical terminal boxes in the in death or electrical shock. Failure to prepare for easy connection to the hood liner and in -line blower housing and hood liner. 7. Electrical terminal box B. Pull enough ¹⁄₂" (1.3 cm) wiring conduit to allow for the ...11 Remove the terminal box covers and set the covers and screws aside. Make Electrical Connections for the vent system. With the hood liner mounted (see the "Install Hood Liner" section), run the ¹⁄₂" (1.3 cm) wiring conduit between the in -line blower housing terminal box. ....
Installation Guide
Page 12
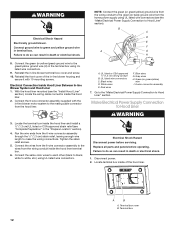
... B A. WARNING Electrical Shock Hazard Electrically ground blower. Reinstall the in terminal box. With the hood liner mounted (see the "Install Hood Liner" section), locate the wiring cable connector inside the hood liner and install a ¹⁄₂" (1.3 cm) UL listed or CSA approved strain relief (...the green (or yellow/green) ground wire to the green (or bare) ground wire from the hood liner. Electrical Connection Inside Hood Liner Between In-line Blower System and Hood Liner 1. Replace all parts and panels before servicing. Run the wire ends from the wiring conduit inside ...
... B A. WARNING Electrical Shock Hazard Electrically ground blower. Reinstall the in terminal box. With the hood liner mounted (see the "Install Hood Liner" section), locate the wiring cable connector inside the hood liner and install a ¹⁄₂" (1.3 cm) UL listed or CSA approved strain relief (...the green (or yellow/green) ground wire to the green (or bare) ground wire from the hood liner. Electrical Connection Inside Hood Liner Between In-line Blower System and Hood Liner 1. Replace all parts and panels before servicing. Run the wire ends from the wiring conduit inside ...
Installation Guide
Page 13
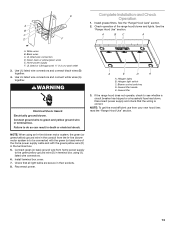
...and lights. E Complete Installation and Check Operation 1. Reconnect power. UL listed wire connectors D. Grease filter handle E. See the B "Range Hood Use" section. Green, bare or yellow/green wires E. Connect green (or bare) ground wire from home power supply to do so can...supply F. NOTE: When using an In-line blower motor system, the green (or green/yellow) ground wire in the conduit from your new hood liner, read the "Range Hood Use" section. 13 Check that the wiring is to see whether a circuit breaker has tripped or a household fuse has blown. Grease filter...
...and lights. E Complete Installation and Check Operation 1. Reconnect power. UL listed wire connectors D. Grease filter handle E. See the B "Range Hood Use" section. Green, bare or yellow/green wires E. Connect green (or bare) ground wire from home power supply to do so can...supply F. NOTE: When using an In-line blower motor system, the green (or green/yellow) ground wire in the conduit from your new hood liner, read the "Range Hood Use" section. 13 Check that the wiring is to see whether a circuit breaker has tripped or a household fuse has blown. Grease filter...
Installation Guide
Page 17
... right because they are made with the 48" hood liner. 600 CFM Internal Blower Motor System - Whirlpool designated service technicians are trained to fulfill the product warranty and provide after-warranty service, anywhere in the 36" hood liner above cooktops rated higher than 65,000 Btus or...to order replacement parts, we recommend that you can write to local dealers, repair parts distributors and service companies. To locate the Whirlpool designated service company in your area, you can also look in your correspondence. Mississauga, Ontario L5N 0B7 Please include a daytime ...
... right because they are made with the 48" hood liner. 600 CFM Internal Blower Motor System - Whirlpool designated service technicians are trained to fulfill the product warranty and provide after-warranty service, anywhere in the 36" hood liner above cooktops rated higher than 65,000 Btus or...to order replacement parts, we recommend that you can write to local dealers, repair parts distributors and service companies. To locate the Whirlpool designated service company in your area, you can also look in your correspondence. Mississauga, Ontario L5N 0B7 Please include a daytime ...
Dimension Guide
Page 1
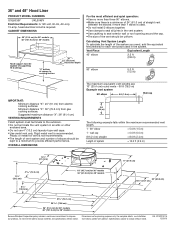
...27⁵⁄₈" (70.1 cm) 29 75.8 cm) 36" (91.4 cm) for 36" models 48" (121.9 cm) for 48" models Because Whirlpool Corporation policy includes a continuous commitment to provide efficient performance. Suggested maximum distance "X": 36" (91.4 cm). q Use metal vent only. q The length of vent... our products, we reserve the right to cooking surface 22" (55.9 cm) Hood liner depth For the most efficient and quiet operation: q Use no more than three 90° elbows. 36" and 48" Hood Liner PRODUCT MODEL NUMBERS UXL6036Y UXL6048Y Electrical Requirements: A 120-volt, 60-Hz, AC-...
...27⁵⁄₈" (70.1 cm) 29 75.8 cm) 36" (91.4 cm) for 36" models 48" (121.9 cm) for 48" models Because Whirlpool Corporation policy includes a continuous commitment to provide efficient performance. Suggested maximum distance "X": 36" (91.4 cm). q Use metal vent only. q The length of vent... our products, we reserve the right to cooking surface 22" (55.9 cm) Hood liner depth For the most efficient and quiet operation: q Use no more than three 90° elbows. 36" and 48" Hood Liner PRODUCT MODEL NUMBERS UXL6036Y UXL6048Y Electrical Requirements: A 120-volt, 60-Hz, AC-...


