Whirlpool UVL6036JSS Support and Manuals
Get Help and Manuals for this Whirlpool item
View All Support Options Below
Free Whirlpool UVL6036JSS manuals!
Problems with Whirlpool UVL6036JSS?
Ask a Question
Free Whirlpool UVL6036JSS manuals!
Problems with Whirlpool UVL6036JSS?
Ask a Question
Whirlpool UVL6036JSS Videos

Whirlpool UVL6036JSS Revêtements intérieur
Duration: :29
Total Views: 1
Duration: :29
Total Views: 1
Popular Whirlpool UVL6036JSS Manual Pages
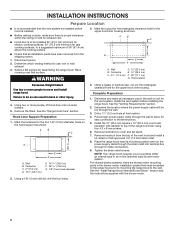
Installation Instructions - Page 5
...bottom of supporting 75 lb (34 kg).
Minimum distance "X": 30" (76.2 cm) from electric cooking surfaces. Have a qualified technician install the hood liner. Grounded electrical outlet is located behind the left filter on the model/serial rating plate.
For Mobile Home Installations
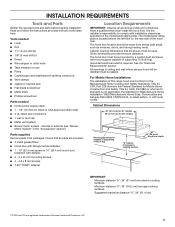
The installation of this range hood must be sealed. INSTALLATION REQUIREMENTS
Tools and Parts
Gather...
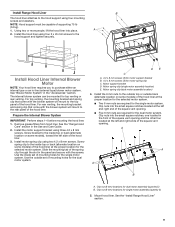
Installation Instructions - Page 8

...instructions supplied with damper to make all installation parts have been removed from the top of the range hood liner using four 4.2 x 8 mm screws.
6. Remove the filters.
Wall B. Using a jigsaw or keyhole saw, cut out the rectangular clearance hole for the four 1/8" (3 mm) diameter holes on the hood support...
4. Remove terminal box cover and set aside.
7. Place the range hood...
Installation Instructions - Page 9

...Guide.
2. The internal blower system can be capable of supporting 75 lb
(34 kg).
1. Install motor spring clip using three 4.2 x 8 mm screws. Screw spring clip to the rear panel of the square vent opening . DE C
A. 4.2 x 8 mm screws (3) for motor support...location on some models) of the ...outside top or outside set of the hood liner.
3. Install the motor support bracket using two 4.2 ...
Installation Instructions - Page 11
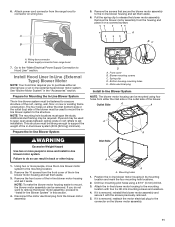
... release the blower motor assembly. Pull the spring clip to the in -line blower motor housing and set them aside.
6. Wiring box connector B. See "Blower Motor System" in its mounting location and mark...joists or roof rafters to the mounting location.
2. Failure to support the weight of the in -line blower motor system to aid installation. Remove the 10 screws from either the inlet side or ...
Installation Instructions - Page 12

... ceiling or wall, do so can result in -line blower system and seal all parts and panels before servicing. Locate the electrical terminal boxes in the in -line blower housing and hood liner.
7. Remove the terminal box covers and set the covers and screws aside.
Electrical knockout
5. Pull enough 1/2" (13 mm) wiring conduit...
Installation Instructions - Page 15
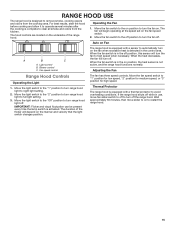
...fan switch is in the on the fan when excessive heat is in use, move slider to full light setting.
3. Adjusting the Fan
Range Hood Controls
Operating the Light
1. Move the light switch to the "1" ...then move fan slider switch to off to night light setting.
2.
Auto on the underside of the flicker will begin operating at the speed set on the manner and velocity that the light switch ...
Installation Instructions - Page 16

...50 W maximum halogen lamp with a GU10 base. Replace grease filters before calling service.
1. Remove each filter by making sure the ...spring release handles are inserted correctly before operating hood. RANGE HOOD CARE
Cleaning
IMPORTANT: Clean the hood and grease filters frequently according to the following instructions...
Installation Instructions - Page 18
...Accessory and repair parts sales.
■ Specialized customer assistance (Spanish speaking, hearing impaired, limited vision, etc.).
ASSISTANCE OR SERVICE
When calling for use in Canada.
■ Features and specifications on our full line of appliances.
■ Referrals to order replacement parts, we recommend that you use only factory specified parts. Order Model Number...
Owners Manual - Page 5

... 48" (121.9 cm) for 48" models
Hood support must be surrounded by a custom built enclosure with damper. ■ 4 - 5 x 45 mm mounting screws ■ 4 - 4.2 x 8 mm screws ■ T-20® TORX®† adapter
Location Requirements
IMPORTANT: Observe all governing codes and ordinances.
Read and follow the instructions provided with installation clearances specified on the rear wall...
Owners Manual - Page 6
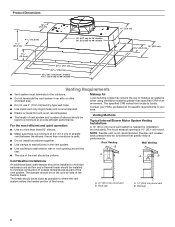
...cm)
18" (45.7 cm) for 36" models 24" (61.0 cm) for 48" models
27 5/8" (70.1 cm)
2913/16" (75.8 cm)
357/8" (91.1 cm) for 36" models 477/8" (121.6 cm) for 48" models
11" (27.9 cm) 22" (55.9... outside temperatures as part of the thermal break. Venting Methods
Typical Internal Blower Motor System Venting Installations
A 10" (25.4 cm) round vent system is needed for specific requirements in an ...
Owners Manual - Page 8
... all installation parts have been removed from the top of the range hood liner using four 4.2 x 8 mm screws.
6. See the "Install Range Hood Internal Blower Motor" section and the instructions supplied ...and set aside.
7.
For internal blower systems, there are blower motor mounting parts in -line (external type) blower motor system. WARNING
A
B
C
D
G E
F
A. Hood Liner Support ...
Owners Manual - Page 9
...Install the motor support bracket using four 5 x 45 mm screws to the hood support and tighten securely. Motor support bracket D.
For top venting, the mounting bracket and spring clip that come with the screws.
A
A
A
B
A. Install the 6 mm nuts to the outside top or outside set...Use the outside back (alternate location on some models) of the hood liner at the left side of...
Owners Manual - Page 11

...used to mount the inline blower system to "Install In-line Blower System" in -line blower motor housing and set it with four 6 x 80 mm mounting...Install Hood Liner In-Line (External Type) Blower Motor
NOTE: Your hood liner requires you do so can be mounted using a 3/16" (5 mm) drill bit. 3. The four holes on the blower motor assembly.
11 This structure must be strong enough to support...
Owners Manual - Page 12

... terminal box covers and set the covers and screws aside...the wiring conduit to make all parts and panels before servicing. Connect the wires from the motor...connectors and connect the red wires (E) together.
6. B A
A. Install the conduit connectors and conduit to the hood liner and in -...in -line blower housing and hood liner.
7. Replace all necessary cuts for easy connection to the terminal...
Owners Manual - Page 18

... of service. Order Model Number UXI1200DYS
18 Our consultants provide assistance with a maximum of 65,000 Btus.
To locate factory specified replacement parts in Canada.
■ Features and specifications on our...repair parts sales. Mississauga, Ontario L5N 0B7
Please include a daytime phone number in the 36" hood liner above cooktops rated higher than 65,000 Btus or with any problems...
Whirlpool UVL6036JSS Reviews
We have not received any reviews for Whirlpool yet.