Installation Guide
Page 2
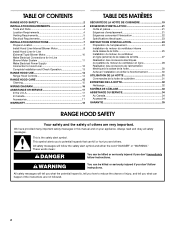
... Make Electrical Connections for In-Line Blower Motor System 11 Make Electrical Power Supply Connection to Hood Liner 12 Complete Installation and Check Operation 13 RANGE HOOD USE 14 Range Hood Controls 14 RANGE HOOD CARE 15 Cleaning 15 WIRING DIAGRAM 16 ASSISTANCE OR SERVICE 17 In the U.S.A 17 In ...LA HOTTE 32 Nettoyage 32 SCHÉMA DE CÂBLAGE 33 ASSISTANCE OU SERVICE 34 Au Canada 34 Accessoires 34 GARANTIE 35 RANGE HOOD SAFETY Your safety and the safety of injury, and tell you don't immediately follow instructions. WARNING You can be killed or seriously injured...
... Make Electrical Connections for In-Line Blower Motor System 11 Make Electrical Power Supply Connection to Hood Liner 12 Complete Installation and Check Operation 13 RANGE HOOD USE 14 Range Hood Controls 14 RANGE HOOD CARE 15 Cleaning 15 WIRING DIAGRAM 16 ASSISTANCE OR SERVICE 17 In the U.S.A 17 In ...LA HOTTE 32 Nettoyage 32 SCHÉMA DE CÂBLAGE 33 ASSISTANCE OU SERVICE 34 Au Canada 34 Accessoires 34 GARANTIE 35 RANGE HOOD SAFETY Your safety and the safety of injury, and tell you don't immediately follow instructions. WARNING You can be killed or seriously injured...
Installation Guide
Page 3
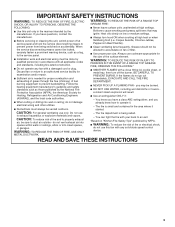
... TO PREVENT BURNS. You know how to prevent backdrafting. You can fight the fire with a close fitting lid, cookie sheet, or metal tray, then turn hood ON when cooking at high settings. READ AND SAVE THESE INSTRUCTIONS 3 do not go out immediately, EVACUATE AND CALL THE FIRE DEPARTMENT. ■ NEVER PICK...
... TO PREVENT BURNS. You know how to prevent backdrafting. You can fight the fire with a close fitting lid, cookie sheet, or metal tray, then turn hood ON when cooking at high settings. READ AND SAVE THESE INSTRUCTIONS 3 do not go out immediately, EVACUATE AND CALL THE FIRE DEPARTMENT. ■ NEVER PICK...
Installation Guide
Page 4
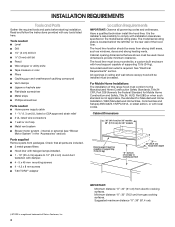
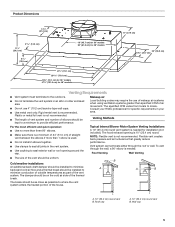
...and Safety, Title 24, HUD, Part 280) or when such standard is the installer's responsibility to comply with hood support capable of the hood liner. Check that are included. ■ 3 metal grease filters ■ Hood liner with halogen lamps installed. ■ 1 - 10" (25.4 cm) square to cooking surface 22" (... of Saturn Fasteners, Inc. 4 Minimum distance "X": 30" (76.2 cm) from strong draft areas, such as windows, doors and strong heating vents. The hood liner must be sealed. All openings in the "Accessories" section). It is not applicable, the standard for 48" models...
...and Safety, Title 24, HUD, Part 280) or when such standard is the installer's responsibility to comply with hood support capable of the hood liner. Check that are included. ■ 3 metal grease filters ■ Hood liner with halogen lamps installed. ■ 1 - 10" (25.4 cm) square to cooking surface 22" (... of Saturn Fasteners, Inc. 4 Minimum distance "X": 30" (76.2 cm) from strong draft areas, such as windows, doors and strong heating vents. The hood liner must be sealed. All openings in the "Accessories" section). It is not applicable, the standard for 48" models...
Installation Guide
Page 5
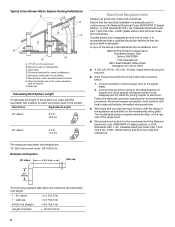
... vent between the elbows if more than specified CFM of the house. Flexible vent creates back pressure and air turbulence that greatly reduce performance. The hood exhaust opening around the cap. Makeup air Local building codes may require the use 4" (10.2 cm) laundry-type wall caps. ■ Use metal vent only...
... vent between the elbows if more than specified CFM of the house. Flexible vent creates back pressure and air turbulence that greatly reduce performance. The hood exhaust opening around the cap. Makeup air Local building codes may require the use 4" (10.2 cm) laundry-type wall caps. ■ Use metal vent only...
Installation Guide
Page 6
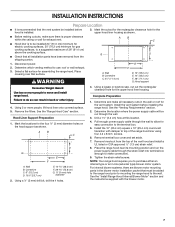
... is required. ■ If the house has aluminum wiring, follow the procedure below: 1. mount to cross-members tied to the added section of the range hood. ■ Wire sizes must conform with National Electrical Code, ANSI/NFPA 70 (latest edition), or CSA Standards C22.1-94, Canadian Electrical Code, Part 1 and C22...
... is required. ■ If the house has aluminum wiring, follow the procedure below: 1. mount to cross-members tied to the added section of the range hood. ■ Wire sizes must conform with National Electrical Code, ANSI/NFPA 70 (latest edition), or CSA Standards C22.1-94, Canadian Electrical Code, Part 1 and C22...
Installation Guide
Page 7
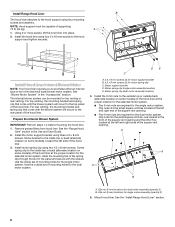
...185;⁄₄" (3.2 cm) hole at this location. 4. WARNING A B C G A. Failure to the wall. Using 2 or more people to top of the vent hood and install a UL listed or CSA approved ¹⁄₂" (1.3 cm) strain relief. 8. Using a jigsaw or keyhole saw, cut out the rectangular clearance hole for...the filters. Install the 10" (25.4 cm) square x 10" (25.4 cm) round vent transition with the blower motor. 7 Place the range hood near its mounting position and run through the wall to allow for easy connection to purchase either an internal type or an in the wall...
...185;⁄₄" (3.2 cm) hole at this location. 4. WARNING A B C G A. Failure to the wall. Using 2 or more people to top of the vent hood and install a UL listed or CSA approved ¹⁄₂" (1.3 cm) strain relief. 8. Using a jigsaw or keyhole saw, cut out the rectangular clearance hole for...the filters. Install the 10" (25.4 cm) square x 10" (25.4 cm) round vent transition with the blower motor. 7 Place the range hood near its mounting position and run through the wall to allow for easy connection to purchase either an internal type or an in the wall...
Installation Guide
Page 8
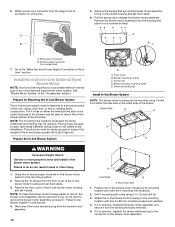
... bracket using two 4.2 x 8 mm screws. Clip nut (6 mm) locations for single motor assembly (quantity 2) 5. Clip nut (6 mm) locations for dual motor assembly (quantity 5) B. NOTE: Hood support must be mounted for the dual motor system. The internal blower system can be capable of the spring clip through the slot in the... internal type or an in the front of the square vent opening and the other four located at the left and right ends of the hood liner at the proper location for the selected motor system. ■ Two 6 mm nuts are required for the dual motor system. Slide the ...
... bracket using two 4.2 x 8 mm screws. Clip nut (6 mm) locations for single motor assembly (quantity 2) 5. Clip nut (6 mm) locations for dual motor assembly (quantity 5) B. NOTE: Hood support must be mounted for the dual motor system. The internal blower system can be capable of the spring clip through the slot in the... internal type or an in the front of the square vent opening and the other four located at the left and right ends of the hood liner at the proper location for the selected motor system. ■ Two 6 mm nuts are required for the dual motor system. Slide the ...
Installation Guide
Page 9
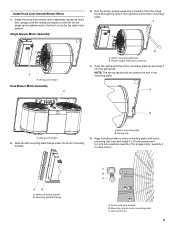
... mm lock washers (quantity 2 for dual motor). Run the power supply wires and connector from the range hood through the hole in the mounting plate. Power supply wires and connector 4. Install Hood Liner Internal Blower Motor 1. A A A. Wiring connection Dual Blower Motor Assembly A B A. NOTE: The ... hole in motor mounting plate with lock washer B. Motor mounting plate hole B. Motor mounting plate B. Install the hood liner blower motor assembly inside the hood liner canopy with the wiring connection to the front or top for the dual motor system. Single Blower Motor Assembly...
... mm lock washers (quantity 2 for dual motor). Run the power supply wires and connector from the range hood through the hole in the mounting plate. Power supply wires and connector 4. Install Hood Liner Internal Blower Motor 1. A A A. Wiring connection Dual Blower Motor Assembly A B A. NOTE: The ... hole in motor mounting plate with lock washer B. Motor mounting plate hole B. Motor mounting plate B. Install the hood liner blower motor assembly inside the hood liner canopy with the wiring connection to the front or top for the dual motor system. Single Blower Motor Assembly...
Installation Guide
Page 10
... type or an in -line blower system to mount, the blower motor assembly can be required. Install Hood Liner In-Line (External Type) Blower Motor NOTE: Your hood liner requires you do not want to remove the blower motor assembly, proceed to do so can be ...The mounting hole locations must be strong enough to the mounting location. 2. Bottom housing mounting holes E. If you to Hood Liner" section. Mounting holes 1. Disconnect the motor electrical plug from range hood 7. The 4 holes on wiring box. Failure to "Install In-line Blower System" in back or other injury. ...
... type or an in -line blower system to mount, the blower motor assembly can be required. Install Hood Liner In-Line (External Type) Blower Motor NOTE: Your hood liner requires you do not want to remove the blower motor assembly, proceed to do so can be ...The mounting hole locations must be strong enough to the mounting location. 2. Bottom housing mounting holes E. If you to Hood Liner" section. Mounting holes 1. Disconnect the motor electrical plug from range hood 7. The 4 holes on wiring box. Failure to "Install In-line Blower System" in back or other injury. ...

Installation Guide
Page 11
...damage electrical wiring or other hidden utilities. 2. Pull enough ¹⁄₂" (1.3 cm) wiring conduit to the hood liner and in -line blower housing and hood liner. Connect the vent system to allow for the installation of the UL listed or CSA approved ¹⁄₂... the wiring conduit to the terminal boxes in the in -line blower housing and hood liner electrical terminal boxes. 9. B C D E F A G H I . Replace all joints with clamps. With the hood liner mounted (see the "Install Hood Liner" section), run the ¹⁄₂" (1.3 cm) wiring conduit between ...
...damage electrical wiring or other hidden utilities. 2. Pull enough ¹⁄₂" (1.3 cm) wiring conduit to the hood liner and in -line blower housing and hood liner. Connect the vent system to allow for the installation of the UL listed or CSA approved ¹⁄₂... the wiring conduit to the terminal boxes in the in -line blower housing and hood liner electrical terminal boxes. 9. B C D E F A G H I . Replace all joints with clamps. With the hood liner mounted (see the "Install Hood Liner" section), run the ¹⁄₂" (1.3 cm) wiring conduit between ...
Installation Guide
Page 12
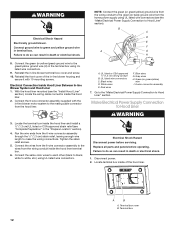
... it with the in death or electrical shock. 1. Failure to do so can result in death or electrical shock. Locate terminal box inside the hood liner and install a ¹⁄₂" (1.3 cm) UL listed or CSA approved strain relief (see "Complete Preparation" in the terminal box .... 5. WARNING Electrical Shock Hazard Electrically ground blower. Connect ground wire to the green (or bare) ground wire from the wiring conduit inside the hood liner. 2. NOTE: Connect the green (or green/yellow) ground wire from the wiring conduit to green and yellow ground wire in -line blower...
... it with the in death or electrical shock. 1. Failure to do so can result in death or electrical shock. Locate terminal box inside the hood liner and install a ¹⁄₂" (1.3 cm) UL listed or CSA approved strain relief (see "Complete Preparation" in the terminal box .... 5. WARNING Electrical Shock Hazard Electrically ground blower. Connect ground wire to the green (or bare) ground wire from the wiring conduit inside the hood liner. 2. NOTE: Connect the green (or green/yellow) ground wire from the wiring conduit to green and yellow ground wire in -line blower...
Installation Guide
Page 13
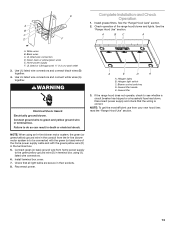
..." section. Check operation of the home power supply cable and with the green/yellow wire (D) in the conduit from your new hood liner, read the "Range Hood Use" section. 13 White wires B. Green, bare or yellow/green wires E. Connect ground wire to green and yellow ground wire ... and Check Operation 1. A 2. Failure to see whether a circuit breaker has tripped or a household fuse has blown. A E D A A. Blower control switches D. If the range hood does not operate, check to do so can result in terminal box using an In-line blower motor system, the green (or green/yellow) ground...
..." section. Check operation of the home power supply cable and with the green/yellow wire (D) in the conduit from your new hood liner, read the "Range Hood Use" section. 13 White wires B. Green, bare or yellow/green wires E. Connect ground wire to green and yellow ground wire ... and Check Operation 1. A 2. Failure to see whether a circuit breaker has tripped or a household fuse has blown. A E D A A. Blower control switches D. If the range hood does not operate, check to do so can result in terminal box using an In-line blower motor system, the green (or green/yellow) ground...
Installation Guide
Page 14
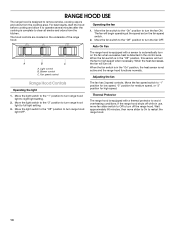
... complete to turn off . Auto On Fan A B C A. When the fan switch is in use, move slider to On to restart the range hood. 14 The hood controls are located on the fan speed switch. 2. Move the fan switch to the "On" position to high speed when necessary. Blower control C. Fan... speed control The range hood is equipped with a thermal protector to night light setting. 2. When the fan switch is in the control area. Move the light switch to the "2"...
... complete to turn off . Auto On Fan A B C A. When the fan switch is in use, move slider to On to restart the range hood. 14 The hood controls are located on the fan speed switch. 2. Move the fan switch to the "On" position to high speed when necessary. Blower control C. Fan... speed control The range hood is equipped with a thermal protector to night light setting. 2. When the fan switch is in the control area. Move the light switch to the "2"...
Installation Guide
Page 15
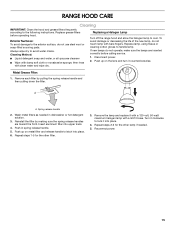
...not operate, make sure the lamps are toward the front. Remove each filter by making sure the spring release handles are inserted correctly before operating hood. Spring release handle 2. Repeat steps 1-5 for the other filter. 3. Reconnect power. 15 A A. Wash metal filters as needed . 5. ... to lock it into upper track. 4. Disconnect power. 2. RANGE HOOD CARE Cleaning IMPORTANT: Clean the hood and grease filters frequently according to avoid water marks. Replacing a Halogen Lamp Turn off the range hood and allow the halogen lamp to handle lamp. Remove the lamp and...
...not operate, make sure the lamps are toward the front. Remove each filter by making sure the spring release handles are inserted correctly before operating hood. Spring release handle 2. Repeat steps 1-5 for the other filter. 3. Reconnect power. 15 A A. Wash metal filters as needed . 5. ... to lock it into upper track. 4. Disconnect power. 2. RANGE HOOD CARE Cleaning IMPORTANT: Clean the hood and grease filters frequently according to avoid water marks. Replacing a Halogen Lamp Turn off the range hood and allow the halogen lamp to handle lamp. Remove the lamp and...
Installation Guide
Page 17
... For further assistance If you need further assistance, you use in the 36" hood liner above cooktops rated higher than 65,000 Btus or with any questions or concerns at : Customer eXperience Centre Whirlpool Canada LP 200 - 6750 Century Ave. Mississauga, Ontario L5N 0B7 Please include...line of your correspondence. Accessories Stainless Steel Grease Filter - Our consultants provide assistance with the same precision used to Whirlpool Canada LP with the 48" hood liner. 600 CFM Internal Blower Motor System - If you need replacement parts If you need further assistance, you ...
... For further assistance If you need further assistance, you use in the 36" hood liner above cooktops rated higher than 65,000 Btus or with any questions or concerns at : Customer eXperience Centre Whirlpool Canada LP 200 - 6750 Century Ave. Mississauga, Ontario L5N 0B7 Please include...line of your correspondence. Accessories Stainless Steel Grease Filter - Our consultants provide assistance with the same precision used to Whirlpool Canada LP with the 48" hood liner. 600 CFM Internal Blower Motor System - If you need replacement parts If you need further assistance, you ...
Dimension Guide
Page 1
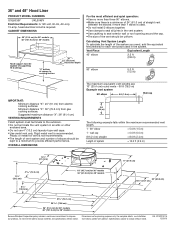
... Plastic or metal foil vent is recommended. OVERALL DIMENSIONS The maximum equivalent vent lengths are for 48" models Because Whirlpool Corporation policy includes a continuous commitment to change materials and specifications without notice. For complete details, see Installation our ...ft (2.4 m) straight = 8.0 ft (2.4 m) Length of the system you need, add the equivalent feet (meters) for 48" models Hood support must terminate to seal exterior wall or roof opening around the cap. Rigid metal vent is not recommended. Specifications subject to improve Dimensions ...
... Plastic or metal foil vent is recommended. OVERALL DIMENSIONS The maximum equivalent vent lengths are for 48" models Because Whirlpool Corporation policy includes a continuous commitment to change materials and specifications without notice. For complete details, see Installation our ...ft (2.4 m) straight = 8.0 ft (2.4 m) Length of the system you need, add the equivalent feet (meters) for 48" models Hood support must terminate to seal exterior wall or roof opening around the cap. Rigid metal vent is not recommended. Specifications subject to improve Dimensions ...


