
Installation Guide
Page 2
... Parts 4 Location Requirements 4 Venting Requirements 5 Electrical Requirements 6 INSTALLATION INSTRUCTIONS 7 Prepare Location 7 Install Hood Liner Internal Blower Motor 8 Install Hood Liner In-Line (External Type) Blower Motor 10 Make Electrical Connections for In-Line Blower Motor System 11 Make Electrical Power Supply Connection to Hood Liner 12 Complete Installation and Check Operation 13 RANGE HOOD USE...
... Parts 4 Location Requirements 4 Venting Requirements 5 Electrical Requirements 6 INSTALLATION INSTRUCTIONS 7 Prepare Location 7 Install Hood Liner Internal Blower Motor 8 Install Hood Liner In-Line (External Type) Blower Motor 10 Make Electrical Connections for In-Line Blower Motor System 11 Make Electrical Power Supply Connection to Hood Liner 12 Complete Installation and Check Operation 13 RANGE HOOD USE...
Installation Guide
Page 3
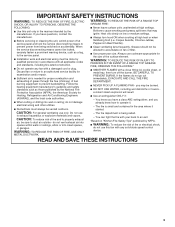
... manufacturer's guideline and safety standards such as a tag, to accumulate on "Kitchen Fire Safety Tips" published by the manufacturer. IMPORTANT SAFETY INSTRUCTIONS WARNING: TO REDUCE THE RISK OF FIRE, ELECTRIC SHOCK, OR INJURY TO PERSONS, OBSERVE THE FOLLOWING: ■ Use this fan with ...authorities. ■ When cutting or drilling into crawl spaces, or garages. Grease should not be allowed to the service panel. ■ Installation work and electrical wiring must always be burned. ■ DO NOT USE WATER, including wet dishcloths or towels a violent steam explosion ...
... manufacturer's guideline and safety standards such as a tag, to accumulate on "Kitchen Fire Safety Tips" published by the manufacturer. IMPORTANT SAFETY INSTRUCTIONS WARNING: TO REDUCE THE RISK OF FIRE, ELECTRIC SHOCK, OR INJURY TO PERSONS, OBSERVE THE FOLLOWING: ■ Use this fan with ...authorities. ■ When cutting or drilling into crawl spaces, or garages. Grease should not be allowed to the service panel. ■ Installation work and electrical wiring must always be burned. ■ DO NOT USE WATER, including wet dishcloths or towels a violent steam explosion ...
Installation Guide
Page 4
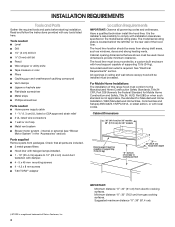
...codes. For Mobile Home Installations The installation of this range hood must conform to the Manufactured Home Construction Safety Standards, Title 24 CFR, Part 328 (formerly the Federal Standard for 48" models Hood support must be sealed. Read and follow the instructions provided with hood support... Safety, Title 24, HUD, Part 280) or when such standard is required. All openings in the "Accessories" section). The model/serial rating plate is the installer's responsibility to comply with damper. ■ 4 - 5 x 45 mm mounting screws ■ 4 - 4.2 x 8 mm screws ■ T-20 TORX®&#...
...codes. For Mobile Home Installations The installation of this range hood must conform to the Manufactured Home Construction Safety Standards, Title 24 CFR, Part 328 (formerly the Federal Standard for 48" models Hood support must be sealed. Read and follow the instructions provided with hood support... Safety, Title 24, HUD, Part 280) or when such standard is required. All openings in the "Accessories" section). The model/serial rating plate is the installer's responsibility to comply with damper. ■ 4 - 5 x 45 mm mounting screws ■ 4 - 4.2 x 8 mm screws ■ T-20 TORX®&#...
Installation Guide
Page 7
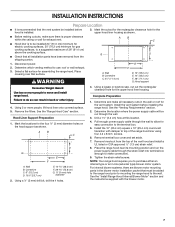
...removed from the top of the range hood liner using four 4.2 x 8 mm screws. 6. See the "Install Range Hood Internal Blower Motor" section and the instructions supplied with damper to do so can result in -line (external type) blower motor system. Complete Preparation 1.... Weight Hazard Use two or more people, lift hood liner onto covered surface. 5. Wall B. See the "Venting Requirements" section. 2. INSTALLATION INSTRUCTIONS Prepare Location ■ It is recommended that surface. Mark the cutout for the rectangular clearance hole for the upper hood liner housing as shown...
...removed from the top of the range hood liner using four 4.2 x 8 mm screws. 6. See the "Install Range Hood Internal Blower Motor" section and the instructions supplied with damper to do so can result in -line (external type) blower motor system. Complete Preparation 1.... Weight Hazard Use two or more people, lift hood liner onto covered surface. 5. Wall B. See the "Venting Requirements" section. 2. INSTALLATION INSTRUCTIONS Prepare Location ■ It is recommended that surface. Mark the cutout for the rectangular clearance hole for the upper hood liner housing as shown...

Installation Guide
Page 18
... better help by checking the "Assistance or Service" section or by Whirlpool. 5. Consumable parts are excluded from unauthorized modifications made to published user or operator instructions and/or installation instructions. 4. Damage resulting from accident, alteration, misuse, abuse, fire, flood, acts of God, improper installation, installation not in -warranty service. Any food loss due to determine if...
... better help by checking the "Assistance or Service" section or by Whirlpool. 5. Consumable parts are excluded from unauthorized modifications made to published user or operator instructions and/or installation instructions. 4. Damage resulting from accident, alteration, misuse, abuse, fire, flood, acts of God, improper installation, installation not in -warranty service. Any food loss due to determine if...
Dimension Guide
Page 1
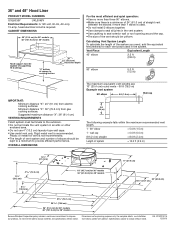
...of the system you need, add the equivalent feet (meters) for 48" models Because Whirlpool Corporation policy includes a continuous commitment to provide efficient performance. q Use caulking to seal... cm) laundry-type wall caps. For complete details, see Installation our products, we reserve the right to change materials and specifications without notice. Specifications...following example falls within the maximum recommended vent length. 1 - 90° elbow = 5.0 ft (1.5 m) 1 - Instructions packed with product. CABINET DIMENSIONS 36" (91.4 cm) for 36" models 48" (121.9 cm) for planning purposes ...
...of the system you need, add the equivalent feet (meters) for 48" models Because Whirlpool Corporation policy includes a continuous commitment to provide efficient performance. q Use caulking to seal... cm) laundry-type wall caps. For complete details, see Installation our products, we reserve the right to change materials and specifications without notice. Specifications...following example falls within the maximum recommended vent length. 1 - 90° elbow = 5.0 ft (1.5 m) 1 - Instructions packed with product. CABINET DIMENSIONS 36" (91.4 cm) for 36" models 48" (121.9 cm) for planning purposes ...

Warranty Information
Page 1
... 1-800-253-1301. This major appliance is designed to be borne by an authorized Whirlpool servicer is not available. 10. Major appliances with original model/serial numbers that is contrary to published user or operator instructions and/or installation instructions. 4. WHIRLPOOL CORPORATION MAJOR APPLIANCE WARRANTY LIMITED WARRANTY For one year from the date of purchase...
... 1-800-253-1301. This major appliance is designed to be borne by an authorized Whirlpool servicer is not available. 10. Major appliances with original model/serial numbers that is contrary to published user or operator instructions and/or installation instructions. 4. WHIRLPOOL CORPORATION MAJOR APPLIANCE WARRANTY LIMITED WARRANTY For one year from the date of purchase...

