Use and Care Guide
Page 5
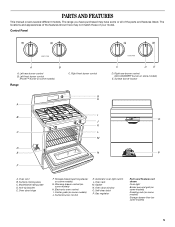
... rear burner control (ACCUSIMMER® burner on some models) E. Warming drawer control (on some models) H. Oven door window O. Surface burner control K. Gas regulator Parts and Features not shown Oven light Broiler pan and grid (on some models) Roasting rack (on some models) Storage drawer liner (on some models) 5 Model/serial rating plate D. PARTS AND FEATURES This manual covers...
... rear burner control (ACCUSIMMER® burner on some models) E. Warming drawer control (on some models) H. Oven door window O. Surface burner control K. Gas regulator Parts and Features not shown Oven light Broiler pan and grid (on some models) Roasting rack (on some models) Storage drawer liner (on some models) 5 Model/serial rating plate D. PARTS AND FEATURES This manual covers...
Use and Care Guide
Page 6
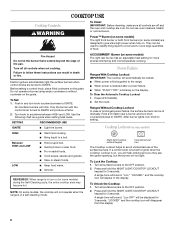
... (on . Electric igniters automatically light the surface burners when control knobs are designed to give ultra-high power when fully on some models) The right rear burner has an adjustable heat setting for 3 seconds. Power Failure Ranges With Cooktop Lockout IMPORTANT: The cooktop will .... s Bring liquid to IGNITE. To Lock the Cooktop: 1. Press and hold the NIGHT LIGHT/COOKTOP LOCKOUT keypad for 3 seconds. Do not use oven cleaners, bleach or rust removers. Turn knob to setting. Press OFF/CANCEL 2. Hold a lit match near a burner and turn knob counterclockwise to avoid...
... (on . Electric igniters automatically light the surface burners when control knobs are designed to give ultra-high power when fully on some models) The right rear burner has an adjustable heat setting for 3 seconds. Power Failure Ranges With Cooktop Lockout IMPORTANT: The cooktop will .... s Bring liquid to IGNITE. To Lock the Cooktop: 1. Press and hold the NIGHT LIGHT/COOKTOP LOCKOUT keypad for 3 seconds. Do not use oven cleaners, bleach or rust removers. Turn knob to setting. Press OFF/CANCEL 2. Hold a lit match near a burner and turn knob counterclockwise to avoid...
Use and Care Guide
Page 8
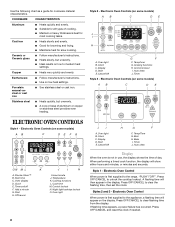
... the following chart as a guide for slow cooking. Cast iron s Heats slowly and evenly. s Use on some models) AB C DE ELECTRONIC OVEN CONTROLS Style 1 - Electronic Oven Controls (on some models) AB C DE FG ON M L K J I H A. Temperature K. Night light/cooktop lockout O. When performing...flashing time, then set /off F. Press OFF/CANCEL to the appliance, a flashing time will appear on some models) AB C DE J I H A. s Maintains heat for cookware material characteristics. Porcelain enamel-onsteel or cast iron s See ...
... the following chart as a guide for slow cooking. Cast iron s Heats slowly and evenly. s Use on some models) AB C DE ELECTRONIC OVEN CONTROLS Style 1 - Electronic Oven Controls (on some models) AB C DE FG ON M L K J I H A. Temperature K. Night light/cooktop lockout O. When performing...flashing time, then set /off F. Press OFF/CANCEL to the appliance, a flashing time will appear on some models) AB C DE J I H A. s Maintains heat for cookware material characteristics. Porcelain enamel-onsteel or cast iron s See ...
Use and Care Guide
Page 9
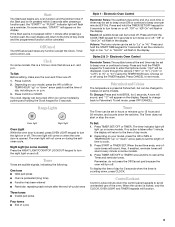
... when the timer is a 12-hour clock that shows a.m. Styles 2 & 3 - The Timer does not start or stop the oven. Depending on your model, press the HR or MIN or TEMP/HOUR "up on some models) by pushing and holding the Clock keypad for 5 seconds to turn tones on or off . To Set: Before... will sound, and "°C" will return to Celsius on and off . If no action is opened. "Lo" or "Snd HI" will turn tones on some models. Electronic Oven Control Reminder Tones: The audible tones at Fahrenheit, but can be canceled. or "PUSH?" Depending on when the...
... when the timer is a 12-hour clock that shows a.m. Styles 2 & 3 - The Timer does not start or stop the oven. Depending on your model, press the HR or MIN or TEMP/HOUR "up on some models) by pushing and holding the Clock keypad for 5 seconds to turn tones on or off . To Set: Before... will sound, and "°C" will return to Celsius on and off . If no action is opened. "Lo" or "Snd HI" will turn tones on some models. Electronic Oven Control Reminder Tones: The audible tones at Fahrenheit, but can be canceled. or "PUSH?" Depending on when the...
Use and Care Guide
Page 10
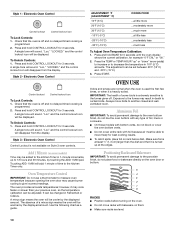
...Press and hold CONTROL LOCKOUT for 3 seconds. IMPORTANT: The health of foil, liners or cookware. s On those models with bottom vents, do not line the oven bottom with any type of some birds is extremely sensitive to another closed and wellventilated room. s Do not move ...-30°F (-15°C) COOKS FOOD ...a little more ...moderately more ...much more ...a little less ...moderately less ...much less To Adjust Oven Temperature Calibration: 1. Exposure to the fumes may cause burner cycling to move birds to the fumes given off and no delayed timed cooking is ...
...Press and hold CONTROL LOCKOUT for 3 seconds. IMPORTANT: The health of foil, liners or cookware. s On those models with bottom vents, do not line the oven bottom with any type of some birds is extremely sensitive to another closed and wellventilated room. s Do not move ...-30°F (-15°C) COOKS FOOD ...a little more ...moderately more ...much more ...a little less ...moderately less ...much less To Adjust Oven Temperature Calibration: 1. Exposure to the fumes may cause burner cycling to move birds to the fumes given off and no delayed timed cooking is ...
Use and Care Guide
Page 11
... "Assistance or Service" section to purchase a split-oven rack, one may be able to the stop position, raise the front edge, then lift out. Place large items on some models) Split-Rack with Removable Insert The split-rack with dark, dull and/or nonstick finish s Brown, crisp crusts s... crusts s Even browning Use temperature and time recommended in the bottom third of the full rack. 4. s Place rack in center of space around bakeware and oven walls. s May need to reduce baking temperatures 25°F (15°C). When finished cooking, slowly remove items. A B A. To move a rack, ...
... "Assistance or Service" section to purchase a split-oven rack, one may be able to the stop position, raise the front edge, then lift out. Place large items on some models) Split-Rack with Removable Insert The split-rack with dark, dull and/or nonstick finish s Brown, crisp crusts s... crusts s Even browning Use temperature and time recommended in the bottom third of the full rack. 4. s Place rack in center of space around bakeware and oven walls. s May need to reduce baking temperatures 25°F (15°C). When finished cooking, slowly remove items. A B A. To move a rack, ...
Use and Care Guide
Page 12
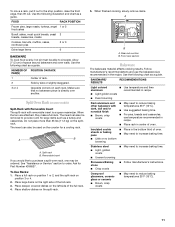
... can be seen for easier cleaning. Baking and Roasting ACCUBAKE® Temperature Management (on some models) The ACCUBAKE® system electronically regulates the oven heat levels during preheat and bake to maintain a precise temperature range for the oven preheat conditioning time to be ordered. It is suggested when baking foods with foil. s For...
... can be seen for easier cleaning. Baking and Roasting ACCUBAKE® Temperature Management (on some models) The ACCUBAKE® system electronically regulates the oven heat levels during preheat and bake to maintain a precise temperature range for the oven preheat conditioning time to be ordered. It is suggested when baking foods with foil. s For...
Use and Care Guide
Page 15
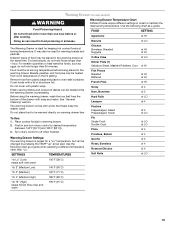
...results, do not hold foods longer than "Lo." See "General Cleaning" section. Warming Drawer Temperature Chart Different foods require different settings in oven-safe container. Warming Drawer Settings: The warming drawer is ideal for more than 30 minutes. For smaller quantities or heat-sensitive foods, such ... must be heated while the warming drawer is preheating. Remove food from room temperature on the HI setting. Warming Drawer(on some models) WARNING Food Poisoning Hazard Do not let food sit for keeping hot cooked foods at serving temperature. It may be heated from plastic...
...results, do not hold foods longer than "Lo." See "General Cleaning" section. Warming Drawer Temperature Chart Different foods require different settings in oven-safe container. Warming Drawer Settings: The warming drawer is ideal for more than 30 minutes. For smaller quantities or heat-sensitive foods, such ... must be heated while the warming drawer is preheating. Remove food from room temperature on the HI setting. Warming Drawer(on some models) WARNING Food Poisoning Hazard Do not let food sit for keeping hot cooked foods at serving temperature. It may be heated from plastic...
Use and Care Guide
Page 16
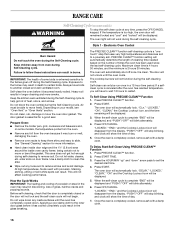
...shut off during the Self-Cleaning cycle to remove soil. Press START. Always move or bend the gasket. enter slots on your model, see "Oven Vent" or "Oven Vents" section. Staining, etching, pitting or faint white spots can only be displayed and "PUSH"/"OFF" will automatically lock. ...and clock will automatically determine the length of cleaning time needed based on the number of some models, the temperature probe from the oven. Exposure to the fumes may burn or melt, damaging the oven. Press PRECISE CLEAN™ function. 2. s Wipe out any foil from the display. Press...
...shut off during the Self-Cleaning cycle to remove soil. Press START. Always move or bend the gasket. enter slots on your model, see "Oven Vent" or "Oven Vents" section. Staining, etching, pitting or faint white spots can only be displayed and "PUSH"/"OFF" will automatically lock. ...and clock will automatically determine the length of cleaning time needed based on the number of some models, the temperature probe from the oven. Exposure to the fumes may burn or melt, damaging the oven. Press PRECISE CLEAN™ function. 2. s Wipe out any foil from the display. Press...
Use and Care Guide
Page 17
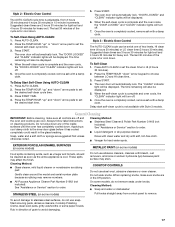
... in direction of grain to set at one of the inside surfaces until the oven has completely cooled down . When the self-clean cycle is completely cooled, remove ash with Style 3 models. Do not wipe down any of two levels, HI clean time (4 hours ..."DOOR LOCKED" and "CLEAN" indicator lights will be displayed. Press START. 4. EXTERIOR PORCELAIN ENAMEL SURFACES (on some models) METALLIC PAINT (on some models) Do not use steel wool, abrasive cleansers or oven cleaner. Cleaning Method: s Glass cleaner, mild liquid cleaner or nonabrasive scrubbing pad: Gently clean around the...
... in direction of grain to set at one of the inside surfaces until the oven has completely cooled down . When the self-clean cycle is completely cooled, remove ash with Style 3 models. Do not wipe down any of two levels, HI clean time (4 hours ..."DOOR LOCKED" and "CLEAN" indicator lights will be displayed. Press START. 4. EXTERIOR PORCELAIN ENAMEL SURFACES (on some models) METALLIC PAINT (on some models) Do not use steel wool, abrasive cleansers or oven cleaner. Cleaning Method: s Glass cleaner, mild liquid cleaner or nonabrasive scrubbing pad: Gently clean around the...
Use and Care Guide
Page 18
...31662 (not included): See "Assistance or Service" section to order. Cooked-on some paper towels. OVEN CAVITY Do not use abrasive cleaners, steel-wool pads, gritty washcloths or some models) Remove all stored items from drawer and lift out drawer liner. s All-Purpose Appliance Cleaner Part ...Assistance or Service" section to order. WARMING DRAWER and TRAY (on some models) Make sure drawer is cool and remove tray. CONTROL PANEL Do not use oven cleaners. s Steel-wool pad BROILER PAN AND GRID (on some models) Make sure drawer is cool and empty before going into a dishwasher....
...31662 (not included): See "Assistance or Service" section to order. Cooked-on some paper towels. OVEN CAVITY Do not use abrasive cleaners, steel-wool pads, gritty washcloths or some models) Remove all stored items from drawer and lift out drawer liner. s All-Purpose Appliance Cleaner Part ...Assistance or Service" section to order. WARMING DRAWER and TRAY (on some models) Make sure drawer is cool and remove tray. CONTROL PANEL Do not use oven cleaners. s Steel-wool pad BROILER PAN AND GRID (on some models) Make sure drawer is cool and empty before going into a dishwasher....
Use and Care Guide
Page 20
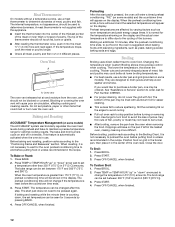
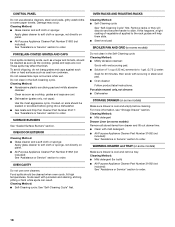
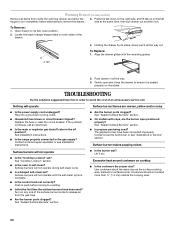
...surface burner. To Remove: 1. A A. Gently open position. 2. If the problem continues, call . The appliance may have been used ? s Is the oven in the off position? Cookware should not extend more than ½" (1.3 cm) outside the cooking area. 20 s Are the burner ports clogged? s On...the drawer. Tab 4. Push drawer in knob before attempting to its sides, slowly pull it all the way. 3. Warming Drawer (on some models) Remove all items from the gas lines. See "Sealed Surface Burners" section. Locate the black triangle-shaped tabs on cooktop s Is the ...
...surface burner. To Remove: 1. A A. Gently open position. 2. If the problem continues, call . The appliance may have been used ? s Is the oven in the off position? Cookware should not extend more than ½" (1.3 cm) outside the cooking area. 20 s Are the burner ports clogged? s On...the drawer. Tab 4. Push drawer in knob before attempting to its sides, slowly pull it all the way. 3. Warming Drawer (on some models) Remove all items from the gas lines. See "Sealed Surface Burners" section. Locate the black triangle-shaped tabs on cooktop s Is the ...
Use and Care Guide
Page 21
... Bakeware" section. There has been a power failure. If it reappears, call for the fan to cool the electronic control. s On some models, has a delay start been set to restart. See "Oven Temperature Control" section. s Is the batter evenly distributed in longer cooking times. See "Display(s)" section. See "Baking and Roasting" section. s Is...
... Bakeware" section. There has been a power failure. If it reappears, call for the fan to cool the electronic control. s On some models, has a delay start been set to restart. See "Oven Temperature Control" section. s Is the batter evenly distributed in longer cooking times. See "Display(s)" section. See "Baking and Roasting" section. s Is...


