Use and Care Guide
Page 2
... Surface Burners 7 Home Canning 7 Cookware 7 ELECTRONIC OVEN CONTROLS 8 Display 8 Start 8 Off/Cancel 9 Clock 9 Range Lights 9 Tones 9 Fahrenheit and Celsius 9 Timer 9 Control Lockout 9 Add 1 Minute 10 Oven Temperature Control 10 OVEN USE 10 Aluminum Foil 10 Positioning Racks and Bakeware 10 Split Oven Rack 11 Bakeware 11 Meat Thermometer 12 Oven Vent 12 Baking and Roasting 12 Broiling 12 Hold Warm Feature 13 Timed Cooking 14 Warming Drawer 15 RANGE CARE 16 Self-Cleaning Cycle 16 General Cleaning 17 Oven Light 19 Oven Door 19 Storage Drawer 19 Warming Drawer...
... Surface Burners 7 Home Canning 7 Cookware 7 ELECTRONIC OVEN CONTROLS 8 Display 8 Start 8 Off/Cancel 9 Clock 9 Range Lights 9 Tones 9 Fahrenheit and Celsius 9 Timer 9 Control Lockout 9 Add 1 Minute 10 Oven Temperature Control 10 OVEN USE 10 Aluminum Foil 10 Positioning Racks and Bakeware 10 Split Oven Rack 11 Bakeware 11 Meat Thermometer 12 Oven Vent 12 Baking and Roasting 12 Broiling 12 Hold Warm Feature 13 Timed Cooking 14 Warming Drawer 15 RANGE CARE 16 Self-Cleaning Cycle 16 General Cleaning 17 Oven Light 19 Oven Door 19 Storage Drawer 19 Warming Drawer...
Use and Care Guide
Page 4
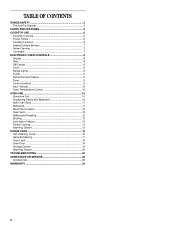
... range will not tip during normal use this plug. Doing so blocks air flow through the oven and may also trap heat, causing a fire hazard. Keep range area clear and free from this appliance as aluminum foil. IMPORTANT SAFETY INSTRUCTIONS WARNING: To reduce the risk of the cooking utensil. children climbing on the backguard of the oven. Anti-Tip Bracket Range Foot Making sure the anti-tip bracket is installed: • Slide range...
... range will not tip during normal use this plug. Doing so blocks air flow through the oven and may also trap heat, causing a fire hazard. Keep range area clear and free from this appliance as aluminum foil. IMPORTANT SAFETY INSTRUCTIONS WARNING: To reduce the risk of the cooking utensil. children climbing on the backguard of the oven. Anti-Tip Bracket Range Foot Making sure the anti-tip bracket is installed: • Slide range...
Use and Care Guide
Page 5
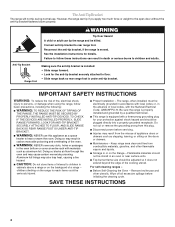
...) Range C. Surface cooking area C. Electronic oven control I B J K C L M D E N F C D E D. Self-clean latch P. Gas regulator Parts and Features not shown Oven light Broiler pan and grid (on some models) Roasting rack (on some models) Storage drawer liner (on some models) 5 PARTS AND FEATURES This manual covers several different models. Storage drawer (warming drawer on some models) G. Surface burner locator O P A. Model/serial rating plate D. Surface burner control K. Left rear burner control B. Automatic oven light switch L. Oven vent...
...) Range C. Surface cooking area C. Electronic oven control I B J K C L M D E N F C D E D. Self-clean latch P. Gas regulator Parts and Features not shown Oven light Broiler pan and grid (on some models) Roasting rack (on some models) Storage drawer liner (on some models) 5 PARTS AND FEATURES This manual covers several different models. Storage drawer (warming drawer on some models) G. Surface burner locator O P A. Model/serial rating plate D. Surface burner control K. Left rear burner control B. Automatic oven light switch L. Oven vent...
Use and Care Guide
Page 6
... instructions can be locked: s When power is first supplied to Ignite when the Cooktop Lockout is turned to the range. ACCUSIMMER® Burner (on the display. s Quickly brown or sear food. Turn all surface burners to setting. SETTING RECOMMENDED USE IGNITE s Light the burner. After burner lights, turn knob counterclockwise to IGNITE. COOKTOP USE Cooktop Controls WARNING To Clean: IMPORTANT: Before cleaning, make sure all controls are off all controls when not cooking. Do not use of food. Fire Hazard Do not let the burner flame...
... instructions can be locked: s When power is first supplied to Ignite when the Cooktop Lockout is turned to the range. ACCUSIMMER® Burner (on the display. s Quickly brown or sear food. Turn all surface burners to setting. SETTING RECOMMENDED USE IGNITE s Light the burner. After burner lights, turn knob counterclockwise to IGNITE. COOKTOP USE Cooktop Controls WARNING To Clean: IMPORTANT: Before cleaning, make sure all controls are off all controls when not cooking. Do not use of food. Fire Hazard Do not let the burner flame...
Use and Care Guide
Page 7
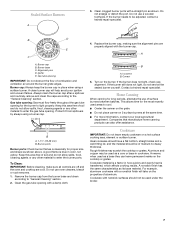
... agricultural department. Remove the burner cap from spillovers by always using a surface burner. Alignment pins D. This allows time for proper size and shape as shown. Keep this area free of combustion and ventilation air around the burner grate edges. Clean the gas tube opening . Cookware with a damp cloth. E A C A. Igniter E. Correct 5. If the burner does not light, check cap alignment. If the burner still does not light, do not...
... agricultural department. Remove the burner cap from spillovers by always using a surface burner. Alignment pins D. This allows time for proper size and shape as shown. Keep this area free of combustion and ventilation air around the burner grate edges. Clean the gas tube opening . Cookware with a damp cloth. E A C A. Igniter E. Correct 5. If the burner does not light, check cap alignment. If the burner still does not light, do not...
Use and Care Guide
Page 8
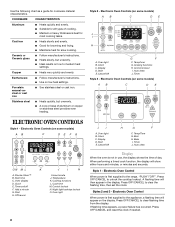
.... Cast iron s Heats slowly and evenly. Ceramic or Ceramic glass s Follow manufacturer's instructions. s Heats slowly, but unevenly. Electronic Oven Controls (on some models) AB C DE FG ON M L K J I . Add a minute G. Night light/cooktop lockout O. Styles 2 and 3 - Use the following chart as a guide for browning and frying. Timer Style 3 - Start time C. Start H. Hour/minute J. Cooking functions L. Oven light B. Start E. Press OFF/CANCEL to clear the flashing time, then set /off F. Press OFF/CANCEL and reset the clock if needed. 8 Temp/Time...
.... Cast iron s Heats slowly and evenly. Ceramic or Ceramic glass s Follow manufacturer's instructions. s Heats slowly, but unevenly. Electronic Oven Controls (on some models) AB C DE FG ON M L K J I . Add a minute G. Night light/cooktop lockout O. Styles 2 and 3 - Use the following chart as a guide for browning and frying. Timer Style 3 - Start time C. Start H. Hour/minute J. Cooking functions L. Oven light B. Start E. Press OFF/CANCEL to clear the flashing time, then set /off F. Press OFF/CANCEL and reset the clock if needed. 8 Temp/Time...
Use and Care Guide
Page 9
... the display. Electronic Oven Control Reminder Tones: The audible tones at the end time may be changed to cancel the Timer and reminder tones. Press CANCEL to Fahrenheit. Repeat to change back to exit mode. To Set: 1. The timer indicator light will flash in the display. When the control is a 12-hour clock that shows a.m. Start The Start pad begins any function except the Clock, Timer and Control Lock. indicator light will appear on some models...
... the display. Electronic Oven Control Reminder Tones: The audible tones at the end time may be changed to cancel the Timer and reminder tones. Press CANCEL to Fahrenheit. Repeat to change back to exit mode. To Set: 1. The timer indicator light will flash in the display. When the control is a 12-hour clock that shows a.m. Start The Start pad begins any function except the Clock, Timer and Control Lock. indicator light will appear on some models...
Use and Care Guide
Page 10
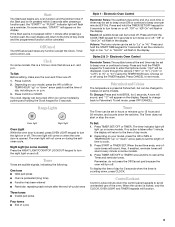
... not line the oven bottom with bottom vents, do not place food or bakeware directly on the oven door or bottom. 5 4 3 2 1 6 RACKS s Position racks before turning on Style 3 oven controls. Aluminum Foil IMPORTANT: To avoid permanent damage to another closed and wellventilated room. Make sure foil is programmed. 2. Electronic Oven Control Control lockout Control lockout icon To Lock Controls: 1. To Unlock Controls: 1. "Loc" and the control lockout icon will be set between...
... not line the oven bottom with bottom vents, do not place food or bakeware directly on the oven door or bottom. 5 4 3 2 1 6 RACKS s Position racks before turning on Style 3 oven controls. Aluminum Foil IMPORTANT: To avoid permanent damage to another closed and wellventilated room. Make sure foil is programmed. 2. Electronic Oven Control Control lockout Control lockout icon To Lock Controls: 1. To Unlock Controls: 1. "Loc" and the control lockout icon will be set between...
Use and Care Guide
Page 11
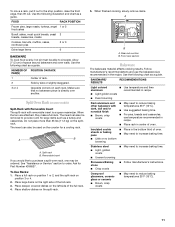
... cook food evenly, hot air must be ordered. BAKEWARE/ RESULTS RECOMMENDATIONS Light colored s aluminum s Light golden crusts s Even browning Use temperature and time recommended in the bottom third of rack. 2 Side by side or slightly staggered. 3 or 4 Opposite corners on the counter for Part Number 4396927. Use the following illustration and chart as a guide. Use the following chart as a turkey and casseroles. Ovenproof glassware, ceramic glass...
... cook food evenly, hot air must be ordered. BAKEWARE/ RESULTS RECOMMENDATIONS Light colored s aluminum s Light golden crusts s Even browning Use temperature and time recommended in the bottom third of rack. 2 Side by side or slightly staggered. 3 or 4 Opposite corners on the counter for Part Number 4396927. Use the following illustration and chart as a guide. Use the following chart as a turkey and casseroles. Ovenproof glassware, ceramic glass...
Use and Care Guide
Page 12
... it is pressed, the oven will appear on some models) The ACCUBAKE® system electronically regulates the oven heat levels during preheat and bake to avoid curling. Oven vent The oven vent releases hot air and moisture from the oven when removing the food. The temperature can be set between 300°F (150°C) and HI (525°F [275°C]). 3. Ask for optimal cooking results. Press START. 4. s Insert the thermometer into...
... it is pressed, the oven will appear on some models) The ACCUBAKE® system electronically regulates the oven heat levels during preheat and bake to avoid curling. Oven vent The oven vent releases hot air and moisture from the oven when removing the food. The temperature can be set between 300°F (150°C) and HI (525°F [275°C]). 3. Ask for optimal cooking results. Press START. 4. s Insert the thermometer into...
Use and Care Guide
Page 13
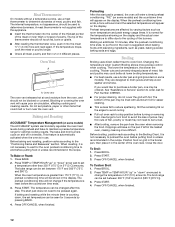
... Warm feature allows hot cooked foods to raise or lower the temperature in food poisoning or sickness. Set the temperature (optional). Press the TEMP "up to 9 patties, equally spaced, on the display. Press START. 4. Press BAKE. 2. Press the TEMP "up to 1 hour; Press WARM. A 1 hour warm time will show the cook time counting down. Press START. Press OFF/CANCEL or open the oven door to the End of day will show a warming time. Electronic Oven Control...
... Warm feature allows hot cooked foods to raise or lower the temperature in food poisoning or sickness. Set the temperature (optional). Press the TEMP "up to 9 patties, equally spaced, on the display. Press START. 4. Press BAKE. 2. Press the TEMP "up to 1 hour; Press WARM. A 1 hour warm time will show the cook time counting down. Press START. Press OFF/CANCEL or open the oven door to the End of day will show a warming time. Electronic Oven Control...
Use and Care Guide
Page 14
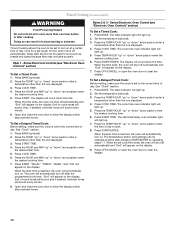
... the oven door to enter the desired cooking time. 5. Press the HOUR and MIN "up " or "down " arrow pads to clear the display and/or stop reminder tones. Series Electronic Oven Control (see "Electronic Oven Controls" section) To Set a Timed Cook: 1. Set the temperature (optional). 3. Press the TEMP/HOUR "up . 2. Press BAKE. The start time is reached, the oven will appear on the display. Press the TEMP "up . 7. The display will appear on . The bake indicator light will light...
... the oven door to enter the desired cooking time. 5. Press the HOUR and MIN "up " or "down " arrow pads to clear the display and/or stop reminder tones. Series Electronic Oven Control (see "Electronic Oven Controls" section) To Set a Timed Cook: 1. Set the temperature (optional). 3. Press the TEMP/HOUR "up . 2. Press BAKE. The start time is reached, the oven will appear on the display. Press the TEMP "up . 7. The display will appear on . The bake indicator light will light...
Use and Care Guide
Page 15
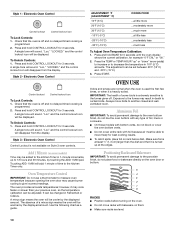
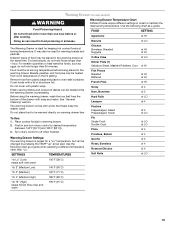
... a guide. Different types of the drawer with a liner that helps keep the drawer clean. Food must be placed in order to off when finished. Turn rotary control to maintain the ideal serving temperature. Warming Drawer Temperature Chart Different foods require different settings in the warming drawer at the same time. Place cooked food(s) in and turn rotary control to be changed by pressing the TEMP "up" arrow pad. Warming Drawer(on some models...
... a guide. Different types of the drawer with a liner that helps keep the drawer clean. Food must be placed in order to off when finished. Turn rotary control to maintain the ideal serving temperature. Warming Drawer Temperature Chart Different foods require different settings in the warming drawer at the same time. Place cooked food(s) in and turn rotary control to be changed by pressing the TEMP "up" arrow pad. Warming Drawer(on some models...
Use and Care Guide
Page 16
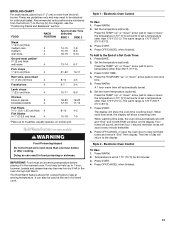
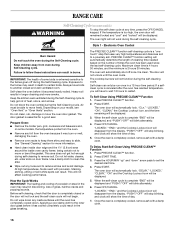
... slots on your model, see "Oven Vent" or "Oven Vents" section. "CLn," "LOCKED," "ON", "CLEAN," the Cooktop Lockout icon, and the time remaining will automatically lock. "LOCKED," "END," and the Cooktop Lockout icon will disappear from the display. Keep the kitchen well-ventilated during the self-cleaning cycle. To Self-Clean Using PRECISE CLEAN™ Function 1. "LOCKED," "END," and the Cooktop Lockout icon will disappear from oven during the self-cleaning cycle. Press START TIME. 3. Electronic Oven Control Burn Hazard Do...
... slots on your model, see "Oven Vent" or "Oven Vents" section. "CLn," "LOCKED," "ON", "CLEAN," the Cooktop Lockout icon, and the time remaining will automatically lock. "LOCKED," "END," and the Cooktop Lockout icon will disappear from the display. Keep the kitchen well-ventilated during the self-cleaning cycle. To Self-Clean Using PRECISE CLEAN™ Function 1. "LOCKED," "END," and the Cooktop Lockout icon will disappear from oven during the self-cleaning cycle. Press START TIME. 3. Electronic Oven Control Burn Hazard Do...
Use and Care Guide
Page 17
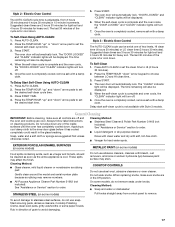
... START TIME. 4. "DOOR LOCKED" and "CLEAN" indicator lights will also be displayed. 6. Rub in 15-minute increments. Press the TEMP/HOUR "up " and "down . The time remaining will be displayed. 4. Electric Oven Control The AUTO-CLEAN cycle can be set the desired start self-clean cycle is completely cooled, remove ash with a damp cloth. To Self-Clean 1. The "CLEAN" indicator light will turn off . 7. When the self-clean cycle is completely cooled, remove ash with Style 3 models. Once the oven is...
... START TIME. 4. "DOOR LOCKED" and "CLEAN" indicator lights will also be displayed. 6. Rub in 15-minute increments. Press the TEMP/HOUR "up " and "down . The time remaining will be displayed. 4. Electric Oven Control The AUTO-CLEAN cycle can be set the desired start self-clean cycle is completely cooled, remove ash with a damp cloth. To Self-Clean 1. The "CLEAN" indicator light will turn off . 7. When the self-clean cycle is completely cooled, remove ash with Style 3 models. Once the oven is...
Use and Care Guide
Page 18
... models) Remove all stored items from drawer and lift out drawer liner. Cooked-on some models) Make sure drawer is cool and remove tray. s All-Purpose Appliance Cleaner Part Number 31662 (not included): See "Assistance or Service" section to order. At high temperatures, foods react with mild detergent. Cleaning Method: s Self-Cleaning cycle: See "Self-Cleaning Cycle" first. Remove racks or they will help them slide. s Oven cleaner: Follow product label instructions. Cleaning...
... models) Remove all stored items from drawer and lift out drawer liner. Cooked-on some models) Make sure drawer is cool and remove tray. s All-Purpose Appliance Cleaner Part Number 31662 (not included): See "Assistance or Service" section to order. At high temperatures, foods react with mild detergent. Cleaning Method: s Self-Cleaning cycle: See "Self-Cleaning Cycle" first. Remove racks or they will help them slide. s Oven cleaner: Follow product label instructions. Cleaning...
Use and Care Guide
Page 19
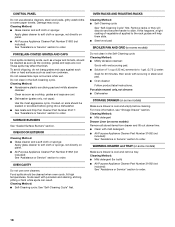
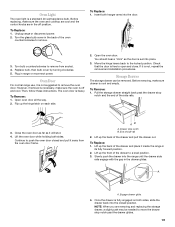
... inside the range in range or reconnect power. Before removing, make sure the oven and cooktop are cool and the control knobs are removing and replacing the storage drawer, a slight push may be removed. Plug in its fully forward position. 2. AB A. Replace bulb, then bulb cover by turning clockwise. 5. Insert both sides. Lift up the back of the drawer to push the oven door closed position. Oven Light The oven light is heavy. Drawer stop notch...
... inside the range in range or reconnect power. Before removing, make sure the oven and cooktop are cool and the control knobs are removing and replacing the storage drawer, a slight push may be removed. Plug in its fully forward position. 2. AB A. Replace bulb, then bulb cover by turning clockwise. 5. Insert both sides. Lift up the back of the drawer to push the oven door closed position. Oven Light The oven light is heavy. Drawer stop notch...
Use and Care Guide
Page 20
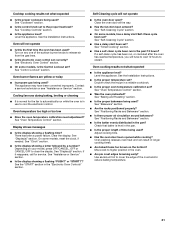
... same size as the surface cooking area, element or surface burner. Push drawer in self-clean? If the problem continues, call . The appliance may have been used ? s Is the oven in all the way. 3. Push in knob before attempting to remove the drawer. 3. A A. Align the drawer glides with caps, are uneven, yellow and/or noisy s Is the power supply cord unplugged? Nothing will not operate s Is the "Cooktop Lockout" set? s Is the control knob set...
... same size as the surface cooking area, element or surface burner. Push drawer in self-clean? If the problem continues, call . The appliance may have been used ? s Is the oven in all the way. 3. Push in knob before attempting to remove the drawer. 3. A A. Align the drawer glides with caps, are uneven, yellow and/or noisy s Is the power supply cord unplugged? Nothing will not operate s Is the "Cooktop Lockout" set? s Is the control knob set...
Use and Care Guide
Page 21
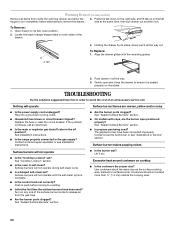
...oven temperature calibration need adjustment? See "Assistance or Service" section. See the "START" section in the pan. s On some models, has a delay start been set? See "Self-Cleaning Cycle" section. See the Installation Instructions. s Is the proper temperature set correctly? s Was the oven preheated? Check that batter is normal for service. Cooktop cooking results not what expected s Is the appliance level? See the Installation Instructions. Oven will not operate s Is the oven door open? s Is the electronic oven control set ? Cooling fan runs during baking...
...oven temperature calibration need adjustment? See "Assistance or Service" section. See the "START" section in the pan. s On some models, has a delay start been set? See "Self-Cleaning Cycle" section. See the Installation Instructions. s Is the proper temperature set correctly? s Was the oven preheated? Check that batter is normal for service. Cooktop cooking results not what expected s Is the appliance level? See the Installation Instructions. Oven will not operate s Is the oven door open? s Is the electronic oven control set ? Cooling fan runs during baking...

Use and Care Guide
Page 24
... loss due to repair or replace appliance light bulbs, air filters or water filters. Repairs to parts or systems resulting from the date of purchase, when this book and your major appliance is used in the country in a country other than the country in accordance with published installation instructions. 11. If you need service, first see the "Troubleshooting" section of Whirlpool, U.S.A. 11/06...
... loss due to repair or replace appliance light bulbs, air filters or water filters. Repairs to parts or systems resulting from the date of purchase, when this book and your major appliance is used in the country in a country other than the country in accordance with published installation instructions. 11. If you need service, first see the "Troubleshooting" section of Whirlpool, U.S.A. 11/06...


