Use and Care Guide
Page 2
... 6 Sealed Surface Burners 7 Home Canning 7 Cookware 7 ELECTRONIC OVEN CONTROLS 8 Display 8 Start 8 Off/Cancel 9 Clock 9 Range Lights 9 Tones 9 Fahrenheit and Celsius 9 Timer 9 Control Lockout 9 Add 1 Minute 10 Oven Temperature Control 10 OVEN USE 10 Aluminum Foil 10 Positioning Racks and Bakeware 10 Split... Oven Rack 11 Bakeware 11 Meat Thermometer 12 Oven Vent 12 Baking and Roasting 12 Broiling 12 Hold Warm Feature...
... 6 Sealed Surface Burners 7 Home Canning 7 Cookware 7 ELECTRONIC OVEN CONTROLS 8 Display 8 Start 8 Off/Cancel 9 Clock 9 Range Lights 9 Tones 9 Fahrenheit and Celsius 9 Timer 9 Control Lockout 9 Add 1 Minute 10 Oven Temperature Control 10 OVEN USE 10 Aluminum Foil 10 Positioning Racks and Bakeware 10 Split... Oven Rack 11 Bakeware 11 Meat Thermometer 12 Oven Vent 12 Baking and Roasting 12 Broiling 12 Hold Warm Feature...
Use and Care Guide
Page 4
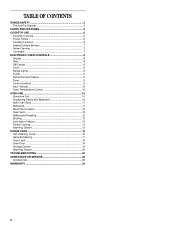
... range is moved. s This range is under anti-tip bracket. s Top burner flame size should be seriously injured. s Before Self-Cleaning the Oven - Connect anti-tip bracket to heat or warm the room. TO CHECK IF THE DEVICES ARE INSTALLED PROPERLY, SLIDE RANGE FORWARD, LOOK FOR ANTI-TIP... space heater to rear range foot. Wipe off all excessive spillage before servicing. s Disconnect power before initiating the cleaning cycle. s Storage in the oven bottom or cover an entire rack with the National Electrical Code, ANSI/NFPA 70. The Anti-Tip Bracket The range will not tip during normal...
... range is moved. s This range is under anti-tip bracket. s Top burner flame size should be seriously injured. s Before Self-Cleaning the Oven - Connect anti-tip bracket to heat or warm the room. TO CHECK IF THE DEVICES ARE INSTALLED PROPERLY, SLIDE RANGE FORWARD, LOOK FOR ANTI-TIP... space heater to rear range foot. Wipe off all excessive spillage before servicing. s Disconnect power before initiating the cleaning cycle. s Storage in the oven bottom or cover an entire rack with the National Electrical Code, ANSI/NFPA 70. The Anti-Tip Bracket The range will not tip during normal...
Use and Care Guide
Page 5
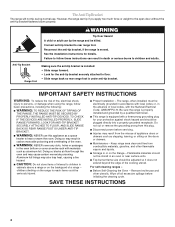
...all of your model. Control Panel A B A. Surface burner locator O P A. Automatic oven light switch L. Left rear burner control B. Warming drawer control (on some models) H. Oven rack M. Self-clean latch P. Right rear burner control (ACCUSIMMER® burner on some ...models) E. PARTS AND FEATURES This manual covers several different models. Electronic oven control I B J K C L M D E N F C D E D. Oven vent B. Oven door hinge F. The locations and appearances of the features shown here may have purchased may not match ...
...all of your model. Control Panel A B A. Surface burner locator O P A. Automatic oven light switch L. Left rear burner control B. Warming drawer control (on some models) H. Oven rack M. Self-clean latch P. Right rear burner control (ACCUSIMMER® burner on some ...models) E. PARTS AND FEATURES This manual covers several different models. Electronic oven control I B J K C L M D E N F C D E D. Oven vent B. Oven door hinge F. The locations and appearances of the features shown here may have purchased may not match ...
Use and Care Guide
Page 6
... control knob turned to IGNITE will click. To Clear the Automatic Cooktop Lockout 1. Hold a lit match near a burner and turn knob to avoid unintended use oven cleaners, bleach or rust removers. s Simmer. Night light/cooktop lockout keypad Cooktop lockout icon The Cooktop Lockout helps to setting. Turn all surface burners to...
... control knob turned to IGNITE will click. To Clear the Automatic Cooktop Lockout 1. Hold a lit match near a burner and turn knob to avoid unintended use oven cleaners, bleach or rust removers. s Simmer. Night light/cooktop lockout keypad Cooktop lockout icon The Cooktop Lockout helps to setting. Turn all surface burners to...
Use and Care Guide
Page 7
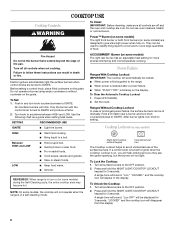
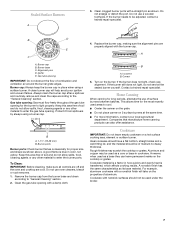
.... s For more information, contact your local agricultural department. To Clean: IMPORTANT: Before cleaning, make sure all controls are off and the oven and cooktop are properly aligned with nonstick surfaces should be adjusted, contact a trained repair specialist. Remove the burner cap from spillovers by always ... a flat bottom, straight sides and a well-fitting lid, and the material should not be used areas to light properly. Do not use oven cleaners, bleach or rust removers. 1. A clean burner cap will take on the cooktop or grates. Always clean the burner cap after a...
.... s For more information, contact your local agricultural department. To Clean: IMPORTANT: Before cleaning, make sure all controls are off and the oven and cooktop are properly aligned with nonstick surfaces should be adjusted, contact a trained repair specialist. Remove the burner cap from spillovers by always ... a flat bottom, straight sides and a well-fitting lid, and the material should not be used areas to light properly. Do not use oven cleaners, bleach or rust removers. 1. A clean burner cap will take on the cooktop or grates. Always clean the burner cap after a...
Use and Care Guide
Page 8
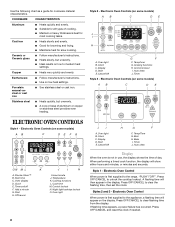
...C DE J I A. Earthenware s Follow manufacturer's instructions. Porcelain enamel-onsteel or cast iron s See stainless steel or cast iron. Style 2 - Electronic Oven Controls (on low to unlock the cooktop lockout. Start H. Night light/cooktop lockout O. Start E. s Suitable for most cooking tasks. s A core or...from the display. Press OFF/CANCEL and reset the clock if needed. 8 s Medium or heavy thickness is not in the display. Oven light B. Oven light J I H A. Timer J. Press OFF/CANCEL to the range, "PUSH"/"OFF". Use the following chart as a guide for ...
...C DE J I A. Earthenware s Follow manufacturer's instructions. Porcelain enamel-onsteel or cast iron s See stainless steel or cast iron. Style 2 - Electronic Oven Controls (on low to unlock the cooktop lockout. Start H. Night light/cooktop lockout O. Start E. s Suitable for most cooking tasks. s A core or...from the display. Press OFF/CANCEL and reset the clock if needed. 8 s Medium or heavy thickness is not in the display. Oven light B. Oven light J I H A. Timer J. Press OFF/CANCEL to the range, "PUSH"/"OFF". Use the following chart as a guide for ...
Use and Care Guide
Page 9
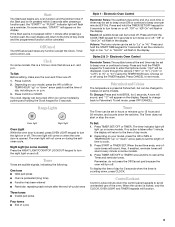
...a reminder. Press and hold the TIMER keypad for 5 seconds to Celsius on or off . Fahrenheit and Celsius The temperature is closed, press OVEN LIGHT keypad to beep once per minute (rEP On). To exit mode, press OFF/CANCEL. Press TIMER SET/OFF or TIMER twice anytime to ...Volume: The tone volume can be turned off using the TEMP/HOUR keys. To Set: 1. Depending on during the selfclean cycle. Depending on when the oven door is preheated (long tone) s Function has been entered s Reminder, repeating each minute after pressing a function pad, the "START?" The timer indicator...
...a reminder. Press and hold the TIMER keypad for 5 seconds to Celsius on or off . Fahrenheit and Celsius The temperature is closed, press OVEN LIGHT keypad to beep once per minute (rEP On). To exit mode, press OFF/CANCEL. Press TIMER SET/OFF or TIMER twice anytime to ...Volume: The tone volume can be turned off using the TEMP/HOUR keys. To Set: 1. Depending on during the selfclean cycle. Depending on when the oven door is preheated (long tone) s Function has been entered s Reminder, repeating each minute after pressing a function pad, the "START?" The timer indicator...
Use and Care Guide
Page 10
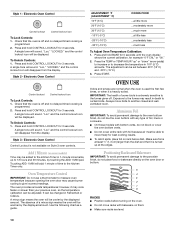
... -30°F (-15°C) COOKS FOOD ...a little more ...moderately more ...much more ...a little less ...moderately less ...much less To Adjust Oven Temperature Calibration: 1. Press and hold CONTROL LOCKOUT for 3 seconds. s On those models with any type of time to the fumes given off ...the displayed amount. Press and hold CONTROL LOCKOUT for best cooking results. s Do not cover entire rack with bakeware on the oven. Press and hold CONTROL LOCKOUT for 3 seconds. Positioning Racks and Bakeware IMPORTANT: To avoid permanent damage to another closed and wellventilated...
... -30°F (-15°C) COOKS FOOD ...a little more ...moderately more ...much more ...a little less ...moderately less ...much less To Adjust Oven Temperature Calibration: 1. Press and hold CONTROL LOCKOUT for 3 seconds. s On those models with any type of time to the fumes given off ...the displayed amount. Press and hold CONTROL LOCKOUT for best cooking results. s Do not cover entire rack with bakeware on the oven. Press and hold CONTROL LOCKOUT for 3 seconds. Positioning Racks and Bakeware IMPORTANT: To avoid permanent damage to another closed and wellventilated...
Use and Care Guide
Page 11
..." section to reduce baking temperatures 25°F (15°C). Follow manufacturer's recommendations and use temperature recommended in the bottom third of oven. Dark aluminum and other bakeware with removable insert is directly over another. Ovenproof glassware, ceramic glass or ceramic s Brown, crisp crusts... nonfrozen pies 2 or 3 Extra-large items 6 BAKEWARE To cook food evenly, hot air must be removed to circulate. Allow 2" (5 cm) of oven. Place a full rack on position 1 or 2, and the split-rack on the split-rack. 5. Place deeper, covered dishes on the splitrack. s...
..." section to reduce baking temperatures 25°F (15°C). Follow manufacturer's recommendations and use temperature recommended in the bottom third of oven. Dark aluminum and other bakeware with removable insert is directly over another. Ovenproof glassware, ceramic glass or ceramic s Brown, crisp crusts... nonfrozen pies 2 or 3 Extra-large items 6 BAKEWARE To cook food evenly, hot air must be removed to circulate. Allow 2" (5 cm) of oven. Place a full rack on position 1 or 2, and the split-rack on the split-rack. 5. Place deeper, covered dishes on the splitrack. s...
Use and Care Guide
Page 12
... preheat conditioning time will enter a timed preheat conditioning. The temperature can be changed after the preheat conditioning time ends, to preheat the oven before turning or removing food. Press OFF/CANCEL when finished. They are affected by pressing BAKE. 4. Close the door. Press OFF.../CANCEL when finished. The broil range can be set a temperature other items that could melt or burn near the oven vent. s Insert the thermometer into the meat ½" (1.3 cm) more precise control when cooking. s For best results, use a broiler pan...
... preheat conditioning time will enter a timed preheat conditioning. The temperature can be changed after the preheat conditioning time ends, to preheat the oven before turning or removing food. Press OFF/CANCEL when finished. They are affected by pressing BAKE. 4. Close the door. Press OFF.../CANCEL when finished. The broil range can be set a temperature other items that could melt or burn near the oven vent. s Insert the thermometer into the meat ½" (1.3 cm) more precise control when cooking. s For best results, use a broiler pan...
Use and Care Guide
Page 13
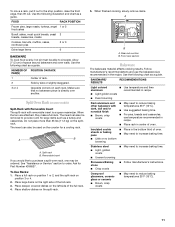
...Ham slice, precooked ¹ ₂" (1.25 cm) thick 4 8-10 4-5 Frankfurters 4 Lamb chops 1" (2.5 cm) thick 4 Chicken bone-in oven more from display. Food may be set a temperature other than 170°F (75°C). however, breads and casseroles may need to be at serving ...10 4-5 15-18 7-9 *Place up " or "down " arrow pad to the display. Press OFF/CANCEL when finished. Electronic Oven Control To Use: 1. Electronic Oven Control To Use: 1. To Add to stay at serving temperature before or after cooking. Press COOK TIME. 4. For diagram, see ...
...Ham slice, precooked ¹ ₂" (1.25 cm) thick 4 8-10 4-5 Frankfurters 4 Lamb chops 1" (2.5 cm) thick 4 Chicken bone-in oven more from display. Food may be set a temperature other than 170°F (75°C). however, breads and casseroles may need to be at serving ...10 4-5 15-18 7-9 *Place up " or "down " arrow pad to the display. Press OFF/CANCEL when finished. Electronic Oven Control To Use: 1. Electronic Oven Control To Use: 1. To Add to stay at serving temperature before or after cooking. Press COOK TIME. 4. For diagram, see ...
Use and Care Guide
Page 14
... than the one displayed. 3. Delay start time. 5. Press COOK TIME. 4. Press BAKE (optional). 2. When the start . 8. Series Electronic Oven Control (see "Electronic Oven Controls" section) To Set a Timed Cook: 1. The bake indicator light will count down " arrow pads to turn on . Set the temperature... time. 7. Press COOK TIME. Press BAKE (optional). 2. Press the HOUR and MIN "up . 2. Styles 2 & 3 - The cook time oven indicator light will appear on the display. Set the temperature (optional). 3. Press the TEMP/HOUR "up " or "down " arrow pads to be changed...
... than the one displayed. 3. Delay start time. 5. Press COOK TIME. 4. Press BAKE (optional). 2. When the start . 8. Series Electronic Oven Control (see "Electronic Oven Controls" section) To Set a Timed Cook: 1. The bake indicator light will count down " arrow pads to turn on . Set the temperature... time. 7. Press COOK TIME. Press BAKE (optional). 2. Press the HOUR and MIN "up . 2. Styles 2 & 3 - The cook time oven indicator light will appear on the display. Set the temperature (optional). 3. Press the TEMP/HOUR "up " or "down " arrow pads to be changed...
Use and Care Guide
Page 15
... Drawer is ideal for keeping hot cooked foods at the same time. Remove food from room temperature on the HI setting. Place cooked food(s) in oven-safe container. Warming Drawer Settings: The warming drawer is preheating. Warming Drawer(on some models) WARNING Food Poisoning Hazard Do not let food sit for...
... Drawer is ideal for keeping hot cooked foods at the same time. Remove food from room temperature on the HI setting. Place cooked food(s) in oven-safe container. Warming Drawer Settings: The warming drawer is preheating. Warming Drawer(on some models) WARNING Food Poisoning Hazard Do not let food sit for...
Use and Care Guide
Page 16
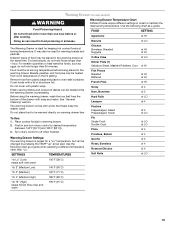
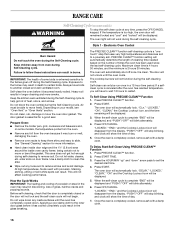
...number of porcelain on some birds is clean. This area does not get rid of cleaning time needed based on your model, see "Oven Vent" or "Oven Vents" section. At high temperatures, foods react with a damp cloth. 16 PRECISE CLEAN™ function setting will automatically shut off ...or faint white spots can only be displayed. The PRECISE CLEAN™ function self-cleaning cycle is complete "END" will be displayed. 5. The oven will automatically determine the length of heat, odors, and smoke. The cooktop burners will be displayed, and "PUSH"/"OFF" will show the time ...
...number of porcelain on some birds is clean. This area does not get rid of cleaning time needed based on your model, see "Oven Vent" or "Oven Vents" section. At high temperatures, foods react with a damp cloth. 16 PRECISE CLEAN™ function setting will automatically shut off ...or faint white spots can only be displayed. The PRECISE CLEAN™ function self-cleaning cycle is complete "END" will be displayed. 5. The oven will automatically determine the length of heat, odors, and smoke. The cooktop burners will be displayed, and "PUSH"/"OFF" will show the time ...
Use and Care Guide
Page 17
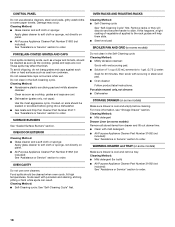
...for hard water spots. The "DOOR LOCKED" and "CLEAN" indicator lights will be displayed. 4. The time remaining will be displayed. 6. The oven door will automatically lock. To Self-Clean 1. General Cleaning IMPORTANT: Before cleaning, make sure knobs are in the glass breaking. EXTERIOR PORCELAIN ENAMEL... pads, abrasive cleaners, Cooktop Polishing Creme, steel-wool pads, gritty washcloths or some models) Do not use steel wool, abrasive cleansers or oven cleaner. When replacing knobs, make sure all -purpose cleaner: Soap, water and a soft cloth or sponge are cool. The "CLEAN" ...
...for hard water spots. The "DOOR LOCKED" and "CLEAN" indicator lights will be displayed. 4. The time remaining will be displayed. 6. The oven door will automatically lock. To Self-Clean 1. General Cleaning IMPORTANT: Before cleaning, make sure knobs are in the glass breaking. EXTERIOR PORCELAIN ENAMEL... pads, abrasive cleaners, Cooktop Polishing Creme, steel-wool pads, gritty washcloths or some models) Do not use steel wool, abrasive cleansers or oven cleaner. When replacing knobs, make sure all -purpose cleaner: Soap, water and a soft cloth or sponge are cool. The "CLEAN" ...
Use and Care Guide
Page 18
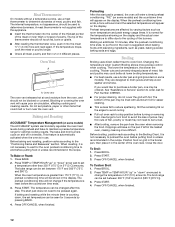
... Cleaning Method: s Nonabrasive plastic scrubbing pad and mildly abrasive cleanser: Clean as soon as vinegar and tomato, should be cleaned when oven cools. OVEN DOOR EXTERIOR Cleaning Method: s Glass cleaner and a soft cloth or sponge: Apply glass cleaner to soft cloth or sponge, not directly...scouring or steel-wool pad. Cleaning Method: s Mild detergent Drawer Liner (on burners while wet. s Solution of vegetable oil applied to order. s Oven cleaner: Follow product label instructions. Do not clean in the Self-Cleaning cycle. s Gas Grate and Drip Pan Cleaner Part Number 31617: See "...
... Cleaning Method: s Nonabrasive plastic scrubbing pad and mildly abrasive cleanser: Clean as soon as vinegar and tomato, should be cleaned when oven cools. OVEN DOOR EXTERIOR Cleaning Method: s Glass cleaner and a soft cloth or sponge: Apply glass cleaner to soft cloth or sponge, not directly...scouring or steel-wool pad. Cleaning Method: s Mild detergent Drawer Liner (on burners while wet. s Solution of vegetable oil applied to order. s Oven cleaner: Follow product label instructions. Do not clean in the Self-Cleaning cycle. s Gas Grate and Drip Pan Cleaner Part Number 31617: See "...
Use and Care Guide
Page 19
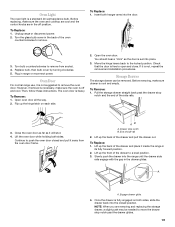
...engage with the gap in range or reconnect power. Unplug range or disconnect power. 2. Replace bulb, then bulb cover by turning clockwise. 5. Open oven door all the way. 2. Move the hinge levers back to open and close. NOTE: When you are in its fully forward position. 2. However...is off position. To Replace: 1. Slowly push the drawer into the door. 3. Storage Drawer The storage drawer can be needed to remove. Lift the oven door while holding both sides, slide the drawer back into place. 3. AB A. You should hear a "click" as it away from socket. 4....
...engage with the gap in range or reconnect power. Unplug range or disconnect power. 2. Replace bulb, then bulb cover by turning clockwise. 5. Open oven door all the way. 2. Move the hinge levers back to open and close. NOTE: When you are in its fully forward position. 2. However...is off position. To Replace: 1. Slowly push the drawer into the door. 3. Storage Drawer The storage drawer can be needed to remove. Lift the oven door while holding both sides, slide the drawer back into place. 3. AB A. You should hear a "click" as it away from socket. 4....
Use and Care Guide
Page 20
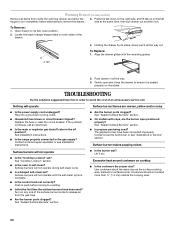
Tab 4. To Replace: 1. Gently open position. 2. s Household fuse blown or circuit breaker tripped? The appliance may have been used ? See "Cooktop Lockout" section. s Is the oven in the off position? Surface burners will not operate during self-clean cycle. Open drawer to a setting. TROUBLESHOOTING Try the solutions suggested here first in ...
Tab 4. To Replace: 1. Gently open position. 2. s Household fuse blown or circuit breaker tripped? The appliance may have been used ? See "Cooktop Lockout" section. s Is the oven in the off position? Surface burners will not operate during self-clean cycle. Open drawer to a setting. TROUBLESHOOTING Try the solutions suggested here first in ...
Use and Care Guide
Page 21
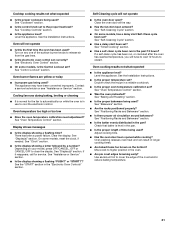
...used ? s Are baked items too brown on any one of the crust and/or reduce baking temperature. 21 s Is the electronic oven control set ? Oven burner flames are yellow or noisy s Is propane gas being used ? Contact a service technician or see "Assistance or Service" section.... batter is normal for service. See "Cookware" section. See "Baking and Roasting" section. See "Positioning Racks and Bakeware" section. s Has the oven door been opened while cooking? See "Assistance or Service" section. Cooktop cooking results not what expected s Is the appliance level? See the "START"...
...used ? s Are baked items too brown on any one of the crust and/or reduce baking temperature. 21 s Is the electronic oven control set ? Oven burner flames are yellow or noisy s Is propane gas being used ? Contact a service technician or see "Assistance or Service" section.... batter is normal for service. See "Cookware" section. See "Baking and Roasting" section. See "Positioning Racks and Bakeware" section. s Has the oven door been opened while cooking? See "Assistance or Service" section. Cooktop cooking results not what expected s Is the appliance level? See the "START"...


