User Manual
Page 2
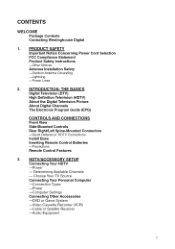
... Westinghouse Digital 1= PRODUCT SAFETY Important Notice Concerning Power Cord Selection FCC Compliance Statement Product Safety Instructions mOther Notices Antenna Installation Safety --Outdoor Antenna Grounding --Lightning --Power Lines 2, INTRODUCTION: THE BASICS Digital Television (DTV) High Definition Television (HDTV) About the Digital Television Picture About Digital Channels The Electronic Program Guide (EPG) CONTROLS AND CONNECTIONS Front View Side-Mounted Controls Rear Right/Left Spine-Mounted Connectors --Quick Reference: HDTV Connections Install Base Inserting Remote...
... Westinghouse Digital 1= PRODUCT SAFETY Important Notice Concerning Power Cord Selection FCC Compliance Statement Product Safety Instructions mOther Notices Antenna Installation Safety --Outdoor Antenna Grounding --Lightning --Power Lines 2, INTRODUCTION: THE BASICS Digital Television (DTV) High Definition Television (HDTV) About the Digital Television Picture About Digital Channels The Electronic Program Guide (EPG) CONTROLS AND CONNECTIONS Front View Side-Mounted Controls Rear Right/Left Spine-Mounted Connectors --Quick Reference: HDTV Connections Install Base Inserting Remote...
User Manual
Page 3
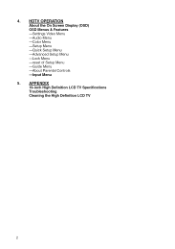
4= HDTV OPERATION About the On Screen Display (OSD) OSD Menus & Features --Settings Video Menu --Audio Menu _olor Menu --Setup Menu _uick Setup Menu --Advanced Setup Menu --Lock Menu --reset of Setup Menu _uide Menu --About Parental Controls --Input Menu 5= APPENDIX 19-inch High Definition LCD TV Specifications Troubleshooting Cleaning the High Definition LCD TV
4= HDTV OPERATION About the On Screen Display (OSD) OSD Menus & Features --Settings Video Menu --Audio Menu _olor Menu --Setup Menu _uick Setup Menu --Advanced Setup Menu --Lock Menu --reset of Setup Menu _uide Menu --About Parental Controls --Input Menu 5= APPENDIX 19-inch High Definition LCD TV Specifications Troubleshooting Cleaning the High Definition LCD TV
User Manual
Page 4
.... This User Manual was created to your new Westinghouse find the following: • Quick Setup Guide • Remote control • 2 AAA batteries • AC power cord • Warranty card • Stand (wall-mount accessories HDTV and this User Manual, you'll also available separately) Contacting Westinghouse Digital If you for a period of one year from original date of purchase. WELCOME Congratulations on the purchase of your High Definition LCD TV--and...
.... This User Manual was created to your new Westinghouse find the following: • Quick Setup Guide • Remote control • 2 AAA batteries • AC power cord • Warranty card • Stand (wall-mount accessories HDTV and this User Manual, you'll also available separately) Contacting Westinghouse Digital If you for a period of one year from original date of purchase. WELCOME Congratulations on the purchase of your High Definition LCD TV--and...

User Manual
Page 6
...: • Reorient or relocate the receiving antenna. • Increase the separation between the High Definition LCD TV and receiver. These limits are placed on the floor, only SJT type cord sets may be used to the current rating for a Class B digital device, pursuant to radio communications if not installed and used . Please consult the table below for the selection criteria for your specific country.
...: • Reorient or relocate the receiving antenna. • Increase the separation between the High Definition LCD TV and receiver. These limits are placed on the floor, only SJT type cord sets may be used to the current rating for a Class B digital device, pursuant to radio communications if not installed and used . Please consult the table below for the selection criteria for your specific country.
User Manual
Page 7
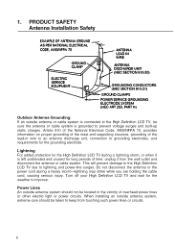
... used, use a grounded power supply cord and the provided shielded video interface cable with bonded ferrite cores. The cable distribution system should be grounded (earthed) in accordance with UL60950-1 "Make sure that your CATV system installer has connected the Co-axial cable shield to the grounding system of the building, as practical. For tuner, according with ANSI/NFPA 70, the National Electrical Code...
... used, use a grounded power supply cord and the provided shielded video interface cable with bonded ferrite cores. The cable distribution system should be grounded (earthed) in accordance with UL60950-1 "Make sure that your CATV system installer has connected the Co-axial cable shield to the grounding system of the building, as practical. For tuner, according with ANSI/NFPA 70, the National Electrical Code...
User Manual
Page 8
... provided plug does not fit into --or objects have fallen onto the apparatus; You may be used , use your LCD display with the manufacturer's instructions. 4. Avoid touching the screen. Only use attachments/accessories specified by the manufacturer. Do not attempt repairs yourself. Avoid exposing the High Definition LCD TV to qualified service personnel. Never remove the rear cover. Unplug this User's Manual for your HDTV and remove the...
... provided plug does not fit into --or objects have fallen onto the apparatus; You may be used , use your LCD display with the manufacturer's instructions. 4. Avoid touching the screen. Only use attachments/accessories specified by the manufacturer. Do not attempt repairs yourself. Avoid exposing the High Definition LCD TV to qualified service personnel. Never remove the rear cover. Unplug this User's Manual for your HDTV and remove the...
User Manual
Page 9
... and supporting structure, grounding of the lead-in the vicinity of time, unplug it is grounded to lightning and power-line surges. PART H) Outdoor Antenna Grounding If an outside antenna or cable system is connected to the High Definition LCD TV, be taken to keep from the wall outlet and disconnect the antenna or cable system. Do not disconnect the antenna or the power cord during...
... and supporting structure, grounding of the lead-in the vicinity of time, unplug it is grounded to lightning and power-line surges. PART H) Outdoor Antenna Grounding If an outside antenna or cable system is connected to the High Definition LCD TV, be taken to keep from the wall outlet and disconnect the antenna or cable system. Do not disconnect the antenna or the power cord during...
User Manual
Page 10
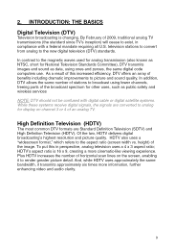
... of horizontal scan lines on the screen, enabling it transmits approximately six times more cinematic-like viewing experience. height) of 2009, traditional analog TV transmissions (the standard since TV's inception) will cease to render greater picture detail. HDTV's aspect ratio is changing. And, while HDTV uses approximately the same bandwidth, it to exist, in perspective, analog television uses a 4 x 3 aspect ratio; 2. INTRODUCTION: THE BASICS Digital Television (DTV) Television broadcasting...
... of horizontal scan lines on the screen, enabling it transmits approximately six times more cinematic-like viewing experience. height) of 2009, traditional analog TV transmissions (the standard since TV's inception) will cease to render greater picture detail. HDTV's aspect ratio is changing. And, while HDTV uses approximately the same bandwidth, it to exist, in perspective, analog television uses a 4 x 3 aspect ratio; 2. INTRODUCTION: THE BASICS Digital Television (DTV) Television broadcasting...
User Manual
Page 11
... a true high definition display--and a 720p or 1080i signal coming into your antenna, cable or satellite service. If you have converted to the new DTV standards, it's important to determine which packages include stations broadcasting in HDTV/NTSC tuner, meaning it can receive both 720p and 1080i formats. INTRODUCTION: THE BASICS About the Digital Television Picture Your new Westinghouse High Definition LCD TV has a built...
... a true high definition display--and a 720p or 1080i signal coming into your antenna, cable or satellite service. If you have converted to the new DTV standards, it's important to determine which packages include stations broadcasting in HDTV/NTSC tuner, meaning it can receive both 720p and 1080i formats. INTRODUCTION: THE BASICS About the Digital Television Picture Your new Westinghouse High Definition LCD TV has a built...
User Manual
Page 12
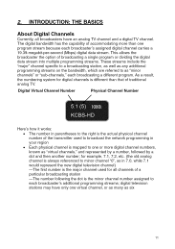
... more digital channel numbers, known as "virtual channels," and represented by a number, followed by a dot and then another number; digital television stations may have an analog TV channel and a digital TV channel. Digital Virtual Channel Number Physical Channel Number Here's how it works: • The number in parentheses to the right is the actual physical channel number of broadcasting a single program or dividing the digital data stream into multiple programming streams. These streams include the "major" channel specific...
... more digital channel numbers, known as "virtual channels," and represented by a number, followed by a dot and then another number; digital television stations may have an analog TV channel and a digital TV channel. Digital Virtual Channel Number Physical Channel Number Here's how it works: • The number in parentheses to the right is the actual physical channel number of broadcasting a single program or dividing the digital data stream into multiple programming streams. These streams include the "major" channel specific...
User Manual
Page 14
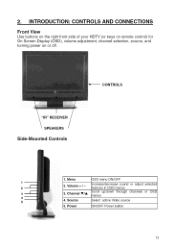
Power DSD menu ON/OFF Increase/decrease sound or adjust features in OSD menus Scroll up/down through channels "_enus Select active Video source selected or OSD DN/OFF Power button 13 INTRODUCTION: CONTROLS AND CONNECTIONS Front View Use buttons on the right front side of your HDTV (or keys on remote control) for On Screen Display (OSD), volume adjustment, channel selection, source, and turning power on or off. ,_-iCONTROLS "IR"RECEIVER SPEAKERS Side-Mounted Controls 1. Source 5. Volume + / - 3. Menu 2. Channel VIA 4. 2.
Power DSD menu ON/OFF Increase/decrease sound or adjust features in OSD menus Scroll up/down through channels "_enus Select active Video source selected or OSD DN/OFF Power button 13 INTRODUCTION: CONTROLS AND CONNECTIONS Front View Use buttons on the right front side of your HDTV (or keys on remote control) for On Screen Display (OSD), volume adjustment, channel selection, source, and turning power on or off. ,_-iCONTROLS "IR"RECEIVER SPEAKERS Side-Mounted Controls 1. Source 5. Volume + / - 3. Menu 2. Channel VIA 4. 2.

User Manual
Page 18
.... CHANNEL NUMBER KEYS Select specific channels 10. T I AI _III_ Navigate within OSD Menu 17 SLEEP Set sleep timer 8. DOT To input dot when selecting digital channels 11.ENT Complete channel selection 12.INPUT Display MP input menu 13.VOL -/+ Volume Up/Down adjustment 14.SCALING Set video display format to adjust backlight adjustment 6. POWER Switch the power On/Off 2. CO Turn Closed Caption On/Off 7. INTRODUCTION: CONTROLS AND CONNECTIONS Remote Control Features 1. MUTE Turn the sound On/Off 4. LAST CHANNEL Switch to program favorite channel). 9. SWAP Switch between PIP and...
.... CHANNEL NUMBER KEYS Select specific channels 10. T I AI _III_ Navigate within OSD Menu 17 SLEEP Set sleep timer 8. DOT To input dot when selecting digital channels 11.ENT Complete channel selection 12.INPUT Display MP input menu 13.VOL -/+ Volume Up/Down adjustment 14.SCALING Set video display format to adjust backlight adjustment 6. POWER Switch the power On/Off 2. CO Turn Closed Caption On/Off 7. INTRODUCTION: CONTROLS AND CONNECTIONS Remote Control Features 1. MUTE Turn the sound On/Off 4. LAST CHANNEL Switch to program favorite channel). 9. SWAP Switch between PIP and...
User Manual
Page 20
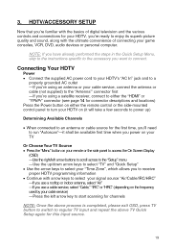
... your cable service, connect the antenna or cable (not supplied) to the "Antenna'" connector first --If you're using a satellite receiver, connect to either the "HDMI" or "YPbPr" connector (see page 14 for connector descriptions and locations) Press the Power button on either the remote control or the side-mounted control panel to turn your HDTV on (it will take a few seconds to power up) Determining Available Channels • When connected to an antenna or cable source...
... your cable service, connect the antenna or cable (not supplied) to the "Antenna'" connector first --If you're using a satellite receiver, connect to either the "HDMI" or "YPbPr" connector (see page 14 for connector descriptions and locations) Press the Power button on either the remote control or the side-mounted control panel to turn your HDTV on (it will take a few seconds to power up) Determining Available Channels • When connected to an antenna or cable source...
User Manual
Page 21
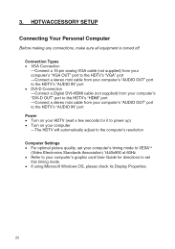
... HDTV's "AUDIO IN" port • DVI-D Connection --Connect a Digital DVI-HDMI cable (not supplied) from your computer's "DVI-D OUT" port to the HDTV's "HDMI" port --Connect a stereo mini cable from your computer's "AUDIO OUT" port to the HDTV's "AUDIO IN" port Power • Turn on your HDTV (wait a few seconds for it to power Lip) • Turn on your computer --The HDTV will automatically adjust to the computer's resolution Computer Settings • For optimal picture quality, set your computer's timing mode to VESA TM (Video...
... HDTV's "AUDIO IN" port • DVI-D Connection --Connect a Digital DVI-HDMI cable (not supplied) from your computer's "DVI-D OUT" port to the HDTV's "HDMI" port --Connect a stereo mini cable from your computer's "AUDIO OUT" port to the HDTV's "AUDIO IN" port Power • Turn on your HDTV (wait a few seconds for it to power Lip) • Turn on your computer --The HDTV will automatically adjust to the computer's resolution Computer Settings • For optimal picture quality, set your computer's timing mode to VESA TM (Video...
User Manual
Page 22
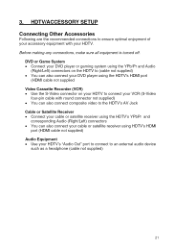
... Game System • Connect your DVD player or gaming system using the YPb/Pr and Audio (Right/Left) connectors on your HDTV to connect your VCR (S-Video four-pin cable with your HDTV's "Audio Out" port to connect to (cable not supplied) • You can also connect your DVD player using HDTV's HDMI port (HDMI cable not supplied) Audio Equipment • Use your HDTV. Before making any connections, make sure all equipment is turned off. HDTV/ACCESSORY SETUP Connecting Other Accessories Following are the recommended connections...
... Game System • Connect your DVD player or gaming system using the YPb/Pr and Audio (Right/Left) connectors on your HDTV to connect your VCR (S-Video four-pin cable with your HDTV's "Audio Out" port to connect to (cable not supplied) • You can also connect your DVD player using HDTV's HDMI port (HDMI cable not supplied) Audio Equipment • Use your HDTV. Before making any connections, make sure all equipment is turned off. HDTV/ACCESSORY SETUP Connecting Other Accessories Following are the recommended connections...
User Manual
Page 24
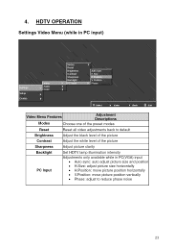
HDTV OPERATION Settings Video Menu (while in PC input) Modes Reset Brightness Contrast Sharpness Backlight PC Input Choose one of the preset modes Reset all video adjustments back to default Adjust the black level of the picture Adjust the white level of the picture Adjust picture clarity Set HDTV lamp illumination intensity Adjustments only available while in PC(VGA) input • Auto sync: auto adjust picture size and position • H.Size: adjust picture size horizontally • H.Position: move picture position horizontally • V.Position: move picture position vertically &#...
HDTV OPERATION Settings Video Menu (while in PC input) Modes Reset Brightness Contrast Sharpness Backlight PC Input Choose one of the preset modes Reset all video adjustments back to default Adjust the black level of the picture Adjust the white level of the picture Adjust picture clarity Set HDTV lamp illumination intensity Adjustments only available while in PC(VGA) input • Auto sync: auto adjust picture size and position • H.Size: adjust picture size horizontally • H.Position: move picture position horizontally • V.Position: move picture position vertically &#...
User Manual
Page 30
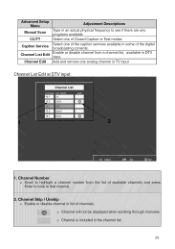
Manual Scan CCfTT Caption Service Channel List Edit Channel Edit Type in an actual physical frequency to see if there are any programs available Select one of Closed Caption or Text modes Select one analog channel in TV input Channel List Edit at DTV in3ut 29 Enable or disable channel from a channel list, available in some of the digital broadcasting contents. Add and remove one of the caption services available in DTV input.
Manual Scan CCfTT Caption Service Channel List Edit Channel Edit Type in an actual physical frequency to see if there are any programs available Select one of Closed Caption or Text modes Select one analog channel in TV input Channel List Edit at DTV in3ut 29 Enable or disable channel from a channel list, available in some of the digital broadcasting contents. Add and remove one of the caption services available in DTV input.

User Manual
Page 38
... Storage 20~ 80% non-condensing. 20~ 85% non-condensing. HN separated (TTL) for PC - APPENDIX: 19-inch Hiqh Definition LCD TV Specifications ModelName BK19H210S Panel Type Color 19" TFT (Thin Film Transistor), Active Matrix WXGA LCD 1440 x900 vertical stripe; anti-glare coating 16.2 million colors Aspect Ratio 16:10 Viewing Angles Input Signal Video/Audio 170° (H) / 160 ° (V) qGB Analog * 1 (75 ohms, 0.7 Vp-p)/Mini-Stereo "1 - 5.
... Storage 20~ 80% non-condensing. 20~ 85% non-condensing. HN separated (TTL) for PC - APPENDIX: 19-inch Hiqh Definition LCD TV Specifications ModelName BK19H210S Panel Type Color 19" TFT (Thin Film Transistor), Active Matrix WXGA LCD 1440 x900 vertical stripe; anti-glare coating 16.2 million colors Aspect Ratio 16:10 Viewing Angles Input Signal Video/Audio 170° (H) / 160 ° (V) qGB Analog * 1 (75 ohms, 0.7 Vp-p)/Mini-Stereo "1 - 5.
User Manual
Page 39
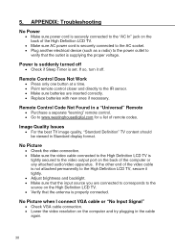
... is set. Remote Control Does Not Work • Press only one button at a time. • Point remote control closer and directly to the IR sensor. • Make sure batteries are connected to corresponds to the video output port on the computer and try plugging in Standard display format. No Picture • Check the video connection. • Make sure the video cable connected to verify that the input source you are inserted correctly. • Replace batteries...
... is set. Remote Control Does Not Work • Press only one button at a time. • Point remote control closer and directly to the IR sensor. • Make sure batteries are connected to corresponds to the video output port on the computer and try plugging in Standard display format. No Picture • Check the video connection. • Make sure the video cable connected to verify that the input source you are inserted correctly. • Replace batteries...
User Manual
Page 40
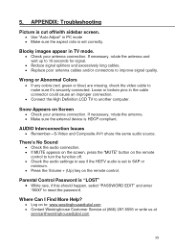
... for signal. • Reduce signal splitters and excessively long cables. • Replace poor antenna cables and/or connectors to : www.westinghousedigital.com • Contact Westinghouse Customer Service at (866) 287-5555 service @westinghousedigital.com or write us at 39 EDIT" and enter Where Can I Find More Help? • Log on the remote control to turn the function off /with sidebar screen. • Use "Auto Adjust" in PC mode...
... for signal. • Reduce signal splitters and excessively long cables. • Replace poor antenna cables and/or connectors to : www.westinghousedigital.com • Contact Westinghouse Customer Service at (866) 287-5555 service @westinghousedigital.com or write us at 39 EDIT" and enter Where Can I Find More Help? • Log on the remote control to turn the function off /with sidebar screen. • Use "Auto Adjust" in PC mode...


