User Manual
Page 2
Choose Your TV Source Connecting Your Personal Computer _onnection --Power Types _omputer Settings Connecting Other Accessories --DVD or Game System --Video Cassette Recorder (VCR) _able or Satellite Receiver --Audio Equipment CONTENTS WELCOME Package Contents Contacting Westinghouse Digital 1= PRODUCT SAFETY Important ... Rear Right/Left Spine-Mounted Connectors --Quick Reference: HDTV Connections Install Base Inserting Remote Control Batteries --Precautions Remote Control Features 3= HDTV/ACCESSORY SETUP Connecting Your HDTV --Power -- Determining Available Channels --
Choose Your TV Source Connecting Your Personal Computer _onnection --Power Types _omputer Settings Connecting Other Accessories --DVD or Game System --Video Cassette Recorder (VCR) _able or Satellite Receiver --Audio Equipment CONTENTS WELCOME Package Contents Contacting Westinghouse Digital 1= PRODUCT SAFETY Important ... Rear Right/Left Spine-Mounted Connectors --Quick Reference: HDTV Connections Install Base Inserting Remote Control Batteries --Precautions Remote Control Features 3= HDTV/ACCESSORY SETUP Connecting Your HDTV --Power -- Determining Available Channels --
User Manual
Page 4
... on the purchase of your High Definition LCD TV--and thank you still have questions or require assistance after reading the Quick Setup Guide and the instructions in materials or workmanship for choosing Westinghouse. Don't forget to your new Westinghouse find the following: • Quick Setup Guide • Remote control • 2 AAA batteries • AC...
... on the purchase of your High Definition LCD TV--and thank you still have questions or require assistance after reading the Quick Setup Guide and the instructions in materials or workmanship for choosing Westinghouse. Don't forget to your new Westinghouse find the following: • Quick Setup Guide • Remote control • 2 AAA batteries • AC...
User Manual
Page 8
...authorized by the manufacturer. 8. Avoid touching the screen. Your High Definition LCD TV contains high-voltage parts. If the High Definition LCD TV emits smoke, abnormal noise, or a strange odor, immediately turn it..., particularly at plugs, convenience receptacles and the point where they exit from the remote control. the apparatus has been exposed to remove. The wide blade or the third...difficult to rain or moisture and does not operate normally, or it off and contact the Westinghouse Service Center. When a cart is required when the apparatus has been damaged in accordance with...
...authorized by the manufacturer. 8. Avoid touching the screen. Your High Definition LCD TV contains high-voltage parts. If the High Definition LCD TV emits smoke, abnormal noise, or a strange odor, immediately turn it..., particularly at plugs, convenience receptacles and the point where they exit from the remote control. the apparatus has been exposed to remove. The wide blade or the third...difficult to rain or moisture and does not operate normally, or it off and contact the Westinghouse Service Center. When a cart is required when the apparatus has been damaged in accordance with...
User Manual
Page 13
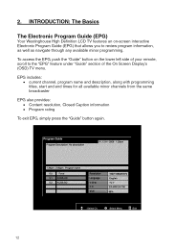
INTRODUCTION: The Basics The Electronic Program Guide (EPG) Your Westinghouse High Definition LCD TV features an on the lower left side of your remote, scroll to review program information, as well as navigate through any available minor programming. To access the EPG, push the "Guide" button on -screen interactive ...
INTRODUCTION: The Basics The Electronic Program Guide (EPG) Your Westinghouse High Definition LCD TV features an on the lower left side of your remote, scroll to review program information, as well as navigate through any available minor programming. To access the EPG, push the "Guide" button on -screen interactive ...
User Manual
Page 14
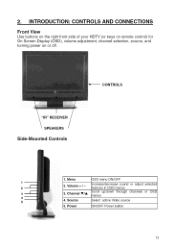
2. Power DSD menu ON/OFF Increase/decrease sound or adjust features in OSD menus Scroll up/down through channels "_enus Select active Video source selected or OSD DN/OFF Power button 13 Source 5. INTRODUCTION: CONTROLS AND CONNECTIONS Front View Use buttons on the right front side of your HDTV (or keys on remote control) for On Screen Display (OSD), volume adjustment, channel selection, source, and turning power on or off. ,_-iCONTROLS "IR"RECEIVER SPEAKERS Side-Mounted Controls 1. Channel VIA 4. Menu 2. Volume + / - 3.
2. Power DSD menu ON/OFF Increase/decrease sound or adjust features in OSD menus Scroll up/down through channels "_enus Select active Video source selected or OSD DN/OFF Power button 13 Source 5. INTRODUCTION: CONTROLS AND CONNECTIONS Front View Use buttons on the right front side of your HDTV (or keys on remote control) for On Screen Display (OSD), volume adjustment, channel selection, source, and turning power on or off. ,_-iCONTROLS "IR"RECEIVER SPEAKERS Side-Mounted Controls 1. Channel VIA 4. Menu 2. Volume + / - 3.

User Manual
Page 17
Remove the battery compartment cover 2. INTRODUCTION: CONTROLS AND CONNECTIONS Inserting Remote Control Batteries 1. Insert the batteries corresponding to the (+) and (-) marks inside the battery compartment 3. 2. Reattach cover iiii_N 16
Remove the battery compartment cover 2. INTRODUCTION: CONTROLS AND CONNECTIONS Inserting Remote Control Batteries 1. Insert the batteries corresponding to the (+) and (-) marks inside the battery compartment 3. 2. Reattach cover iiii_N 16

User Manual
Page 18
... C Jump to favorite channels (Hold button for 3 seconds to "STANDARD", "FILL" 15.0H VIA TV Channel Up/Down adjustment 16.MENU Turn OSD Menu On/Off 17. LAST CHANNEL Switch to adjust backlight adjustment 6. INTRODUCTION...: CONTROLS AND CONNECTIONS Remote Control Features 1. CHANNEL NUMBER KEYS Select specific channels 10. SLEEP Set sleep timer 8. BACKLIGHT Shortcut...: This feature is not available on this 19" HDTV. 3. T I AI _III_ Navigate within OSD Menu 17 POWER Switch the power On/Off 2.
... C Jump to favorite channels (Hold button for 3 seconds to "STANDARD", "FILL" 15.0H VIA TV Channel Up/Down adjustment 16.MENU Turn OSD Menu On/Off 17. LAST CHANNEL Switch to adjust backlight adjustment 6. INTRODUCTION...: CONTROLS AND CONNECTIONS Remote Control Features 1. CHANNEL NUMBER KEYS Select specific channels 10. SLEEP Set sleep timer 8. BACKLIGHT Shortcut...: This feature is not available on this 19" HDTV. 3. T I AI _III_ Navigate within OSD Menu 17 POWER Switch the power On/Off 2.
User Manual
Page 20
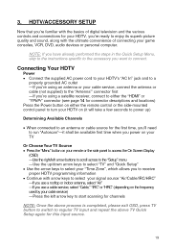
... you'll need to run "Autoscan"--it shall be available first time when you power on your TV Or ChooseYourTV Source • Pressthe"lVbr_' bL_on on your remoteor the side panelto access the On ...abov_, process is comple_od, pMaee _x]_ OSD, press_ TV bu_ton _o e_/iMh _o _guM_ TV h_}uf and _l_eat the above TV Ou_ek S_tup agMn [ythis #}put source 19 NOTE: ff yeu hp,erMtmed _he steps k_ the... "YPbPr" connector (see page 14 for connector descriptions and locations) Press the Power button on either the remote control or the side-mounted control panel to turn your HDTV on (it will take a few seconds to...
... you'll need to run "Autoscan"--it shall be available first time when you power on your TV Or ChooseYourTV Source • Pressthe"lVbr_' bL_on on your remoteor the side panelto access the On ...abov_, process is comple_od, pMaee _x]_ OSD, press_ TV bu_ton _o e_/iMh _o _guM_ TV h_}uf and _l_eat the above TV Ou_ek S_tup agMn [ythis #}put source 19 NOTE: ff yeu hp,erMtmed _he steps k_ the... "YPbPr" connector (see page 14 for connector descriptions and locations) Press the Power button on either the remote control or the side-mounted control panel to turn your HDTV on (it will take a few seconds to...

User Manual
Page 23
...proper adjustment. OSD Menus and Features Settings Video Menu The "Settings Video" menu allows you can access the OSD--either by pressing the remote control's "Menu" button (located just below the volume controls on the HDTVs ri_t-side control panel.You can also adjust the backlight's ...individually. Similarly, each of the menus inclLicie_sub-_us, wlichcan beselected by pressing the "Iv#rid' button on the left side of the remote), or by usJngthe remote's VIA and • buttons. HDTV OPERATION About the On Screen Display (OSD) Your HDTV's On Screen Display (OSD) conveniently integrates...
...proper adjustment. OSD Menus and Features Settings Video Menu The "Settings Video" menu allows you can access the OSD--either by pressing the remote control's "Menu" button (located just below the volume controls on the HDTVs ri_t-side control panel.You can also adjust the backlight's ...individually. Similarly, each of the menus inclLicie_sub-_us, wlichcan beselected by pressing the "Iv#rid' button on the left side of the remote), or by usJngthe remote's VIA and • buttons. HDTV OPERATION About the On Screen Display (OSD) Your HDTV's On Screen Display (OSD) conveniently integrates...

User Manual
Page 37
HDTV OPERATION Input Menu To change the Main Picture source, press the Input button on , use the up/down arrows to scroll through all inputs and the press enter to switch to display the Main Picture (MP) input menu. When the input menu is on the remote to the highlighted one. 38 4.
HDTV OPERATION Input Menu To change the Main Picture source, press the Input button on , use the up/down arrows to scroll through all inputs and the press enter to switch to display the Main Picture (MP) input menu. When the input menu is on the remote to the highlighted one. 38 4.
User Manual
Page 39
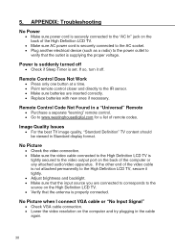
... securely connected to verify that the outlet is properly connected. Remote Control Code Not Found in a "Universal" Remote • Purchase a separate "learning" remote control. • Go to www.westinqhousediqital.com for a list of the High Definition LCD TV. • Make sure AC power cord is securely connected ...outlet to the "AC In" jack on the back of remote codes. No Picture when I connect VGA cable or "No Input Signal" • Check VGA cable connection. • Lower the video resolution on the High Definition LCD TV. • Verify that the input source you are inserted ...
... securely connected to verify that the outlet is properly connected. Remote Control Code Not Found in a "Universal" Remote • Purchase a separate "learning" remote control. • Go to www.westinqhousediqital.com for a list of the High Definition LCD TV. • Make sure AC power cord is securely connected ...outlet to the "AC In" jack on the back of remote codes. No Picture when I connect VGA cable or "No Input Signal" • Check VGA cable connection. • Lower the video resolution on the High Definition LCD TV. • Verify that the input source you are inserted ...
User Manual
Page 40
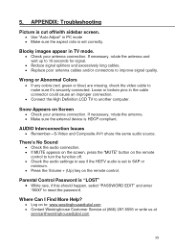
...or connectors to : www.westinghousedigital.com • Contact Westinghouse Customer Service at (866) 287-5555 service @westinghousedigital.com or write us at 39 Snow Appears on the remote control to turn the function off /with sidebar screen. ...red, green or blue) are missing, check the video cable to another computer. Loose or broken pins in TV mode. • Check your antenna connection. Parental Control Password is set to reset the password. APPENDIX: Troubleshootinq ... improper connection. • Connect the High Definition LCD TV to make sure it's securely connected.
...or connectors to : www.westinghousedigital.com • Contact Westinghouse Customer Service at (866) 287-5555 service @westinghousedigital.com or write us at 39 Snow Appears on the remote control to turn the function off /with sidebar screen. ...red, green or blue) are missing, check the video cable to another computer. Loose or broken pins in TV mode. • Check your antenna connection. Parental Control Password is set to reset the password. APPENDIX: Troubleshootinq ... improper connection. • Connect the High Definition LCD TV to make sure it's securely connected.


