User Manual
Page 2
Determining Available Channels -- Choose Your TV Source Connecting Your Personal Computer _onnection --Power Types _omputer Settings Connecting Other Accessories --DVD or Game System --Video Cassette Recorder (VCR) _able or Satellite Receiver --Audio Equipment CONTENTS WELCOME Package Contents Contacting Westinghouse Digital 1= PRODUCT SAFETY Important Notice Concerning Power Cord Selection FCC Compliance Statement Product Safety Instructions mOther...
Determining Available Channels -- Choose Your TV Source Connecting Your Personal Computer _onnection --Power Types _omputer Settings Connecting Other Accessories --DVD or Game System --Video Cassette Recorder (VCR) _able or Satellite Receiver --Audio Equipment CONTENTS WELCOME Package Contents Contacting Westinghouse Digital 1= PRODUCT SAFETY Important Notice Concerning Power Cord Selection FCC Compliance Statement Product Safety Instructions mOther...

User Manual
Page 4
...; Quick Setup Guide • Remote control • 2 AAA batteries • AC power cord • Warranty card • Stand (wall-mount accessories HDTV and this User Manual, you'll also available separately) Contacting Westinghouse Digital If you for a period of one year from original date of your new HDTV...or use of all the features offered by your High Definition LCD TV--and thank you still have questions or require assistance after reading the Quick Setup Guide and the instructions in this User Manual, please contact Westinghouse Customer Service at 1-866-287-5555, or visit our Web...
...; Quick Setup Guide • Remote control • 2 AAA batteries • AC power cord • Warranty card • Stand (wall-mount accessories HDTV and this User Manual, you'll also available separately) Contacting Westinghouse Digital If you for a period of one year from original date of your new HDTV...or use of all the features offered by your High Definition LCD TV--and thank you still have questions or require assistance after reading the Quick Setup Guide and the instructions in this User Manual, please contact Westinghouse Customer Service at 1-866-287-5555, or visit our Web...

User Manual
Page 6
... AWG 18 AWG 17 AWG in a residential installation. If this High Definition LCD TV is certified for a Class B digital device, pursuant to radio communications if not installed and used . CAUTION: The power supply outlet should be determined by one or more of the FCC Rules. ... to part 15 of the following guidelines if it is necessary to the current rating for power cords used . These limits are listed below for the selection criteria for the High Definition LCD TV. Please consult the table below : USA UL Switzerland ..... PLEASE READ FIRST: 1. Use the...
... AWG 18 AWG 17 AWG in a residential installation. If this High Definition LCD TV is certified for a Class B digital device, pursuant to radio communications if not installed and used . CAUTION: The power supply outlet should be determined by one or more of the FCC Rules. ... to part 15 of the following guidelines if it is necessary to the current rating for power cords used . These limits are listed below for the selection criteria for the High Definition LCD TV. Please consult the table below : USA UL Switzerland ..... PLEASE READ FIRST: 1. Use the...
User Manual
Page 7
The common or earthed side of the connected (SELV) circuits and any unauthorized changes or modifications not expressly approved by Westinghouse Digital will void the user's authority to the screen of coaxial cable." The cable distribution system should be grounded (earthed) in ...parts should be connected to operate this device. For tuner, according with bonded ferrite cores. If a BNC cable is used, use a grounded power supply cord and the provided shielded video interface cable with UL60950-1 "Make sure that your CATV system installer has connected the Co-axial cable shield...
The common or earthed side of the connected (SELV) circuits and any unauthorized changes or modifications not expressly approved by Westinghouse Digital will void the user's authority to the screen of coaxial cable." The cable distribution system should be grounded (earthed) in ...parts should be connected to operate this device. For tuner, according with bonded ferrite cores. If a BNC cable is used, use a grounded power supply cord and the provided shielded video interface cable with UL60950-1 "Make sure that your CATV system installer has connected the Co-axial cable shield...
User Manual
Page 8
... HDTV and remove the batteries from the apparatus. 7. Avoid exposing the High Definition LCD TV to the power supply cord or plug; If your LCD display with the cart, stand, tripod, bracket, or table specified by the manufacturer.... Use only with care when moving the cart/apparatus combination to remove. If the High Definition LCD TV emits smoke, abnormal noise, or a strange odor, immediately turn it off and contact the Westinghouse...
... HDTV and remove the batteries from the apparatus. 7. Avoid exposing the High Definition LCD TV to the power supply cord or plug; If your LCD display with the cart, stand, tripod, bracket, or table specified by the manufacturer.... Use only with care when moving the cart/apparatus combination to remove. If the High Definition LCD TV emits smoke, abnormal noise, or a strange odor, immediately turn it off and contact the Westinghouse...
User Manual
Page 9
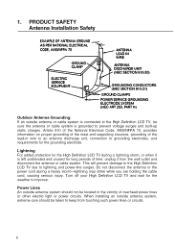
...cord, causing serious injury. Power Lines An outside antenna system should be taken to grounding electrodes, and requirements for long periods of overhead power lines or other electric light or power circuits. This will prevent damage to the High Definition LCD TV due to improve. Lightning ...For added protection for the weather to lightning and power-line surges. When installing an outside antenna...
...cord, causing serious injury. Power Lines An outside antenna system should be taken to grounding electrodes, and requirements for long periods of overhead power lines or other electric light or power circuits. This will prevent damage to the High Definition LCD TV due to improve. Lightning ...For added protection for the weather to lightning and power-line surges. When installing an outside antenna...
User Manual
Page 14
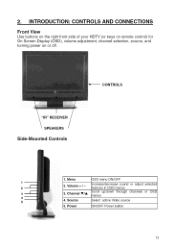
Source 5. INTRODUCTION: CONTROLS AND CONNECTIONS Front View Use buttons on the right front side of your HDTV (or keys on remote control) for On Screen Display (OSD), volume adjustment, channel selection, source, and turning power on or off. ,_-iCONTROLS "IR"RECEIVER SPEAKERS Side-Mounted Controls 1. Channel VIA 4. Menu 2. Power DSD menu ON/OFF Increase/decrease sound or adjust features in OSD menus Scroll up/down through channels "_enus Select active Video source selected or OSD DN/OFF Power button 13 Volume + / - 3. 2.
Source 5. INTRODUCTION: CONTROLS AND CONNECTIONS Front View Use buttons on the right front side of your HDTV (or keys on remote control) for On Screen Display (OSD), volume adjustment, channel selection, source, and turning power on or off. ,_-iCONTROLS "IR"RECEIVER SPEAKERS Side-Mounted Controls 1. Channel VIA 4. Menu 2. Power DSD menu ON/OFF Increase/decrease sound or adjust features in OSD menus Scroll up/down through channels "_enus Select active Video source selected or OSD DN/OFF Power button 13 Volume + / - 3. 2.
User Manual
Page 15
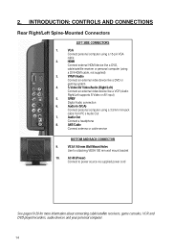
... DVD, cable/satellitereceiveror personalcomputer(using a DVI-HDMIcable,notsupplied) 3, YPbPr/Audio Connectan externalvideodevicelikea DVDor gamingsystem 4. AudioIn (VGA) Connectpersonalcomputerusinga 3.5rammini-jack cablefromPC sAudioOut 7. AC-IN(Power) Connectto powersourcevia suppliedpowercord .Seepages19-20formoreinformationaboutconnectingcable/satellitereceiversg, ameconsoles,VCRand DVDplayer/recordersa,udiodevicesandyourpersonalcomputer. 14 2. ANT/Cable Connectantennaor cableservice BOTTOMAND BACKCONNECTOR 9. S-VideofAVVideo/Audio(Right/Left) Connectan externalvideo...
... DVD, cable/satellitereceiveror personalcomputer(using a DVI-HDMIcable,notsupplied) 3, YPbPr/Audio Connectan externalvideodevicelikea DVDor gamingsystem 4. AudioIn (VGA) Connectpersonalcomputerusinga 3.5rammini-jack cablefromPC sAudioOut 7. AC-IN(Power) Connectto powersourcevia suppliedpowercord .Seepages19-20formoreinformationaboutconnectingcable/satellitereceiversg, ameconsoles,VCRand DVDplayer/recordersa,udiodevicesandyourpersonalcomputer. 14 2. ANT/Cable Connectantennaor cableservice BOTTOMAND BACKCONNECTOR 9. S-VideofAVVideo/Audio(Right/Left) Connectan externalvideo...

User Manual
Page 18
...This feature is not available on this 19" HDTV. 5. BACKLIGHT Shortcut to program favorite channel). 9. FAVORITE CHANNEL A / B / C Jump to favorite channels (Hold button for 3 seconds to adjust backlight adjustment 6. LAST CHANNEL Switch to "STANDARD", "FILL" 15.0H VIA TV Channel Up/Down adjustment 16.MENU Turn...MUTE Turn the sound On/Off 4. CHANNEL NUMBER KEYS Select specific channels 10. POWER Switch the power On/Off 2. SWAP Switch between PIP and Main Picture Note: This feature is not available on this 19" HDTV. 3. SLEEP Set sleep timer 8. DOT To input dot when selecting ...
...This feature is not available on this 19" HDTV. 5. BACKLIGHT Shortcut to program favorite channel). 9. FAVORITE CHANNEL A / B / C Jump to favorite channels (Hold button for 3 seconds to adjust backlight adjustment 6. LAST CHANNEL Switch to "STANDARD", "FILL" 15.0H VIA TV Channel Up/Down adjustment 16.MENU Turn...MUTE Turn the sound On/Off 4. CHANNEL NUMBER KEYS Select specific channels 10. POWER Switch the power On/Off 2. SWAP Switch between PIP and Main Picture Note: This feature is not available on this 19" HDTV. 3. SLEEP Set sleep timer 8. DOT To input dot when selecting ...
User Manual
Page 20
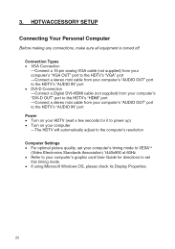
... left arrow key to start scanning for the first time, you'll need to run "Autoscan"--it shall be available first time when you power on your TV Or ChooseYourTV Source • Pressthe"lVbr_' bL_on on your remoteor the side panelto access the On Screen Display (CSD) the right/leftarrow bLltons...Once the abov_, process is comple_od, pMaee _x]_ OSD, press_ TV bu_ton _o e_/iMh _o _guM_ TV h_}uf and _l_eat the above TV Ou_ek S_tup agMn [ythis #}put source 19 ynu went to c >nnecL Connecting Your HDTV Power • Connect the supplied AC power cord to your HDTV's "AC In" jack and to a properly...
... left arrow key to start scanning for the first time, you'll need to run "Autoscan"--it shall be available first time when you power on your TV Or ChooseYourTV Source • Pressthe"lVbr_' bL_on on your remoteor the side panelto access the On Screen Display (CSD) the right/leftarrow bLltons...Once the abov_, process is comple_od, pMaee _x]_ OSD, press_ TV bu_ton _o e_/iMh _o _guM_ TV h_}uf and _l_eat the above TV Ou_ek S_tup agMn [ythis #}put source 19 ynu went to c >nnecL Connecting Your HDTV Power • Connect the supplied AC power cord to your HDTV's "AC In" jack and to a properly...
User Manual
Page 21
... HDTV's "HDMI" port --Connect a stereo mini cable from your computer's "AUDIO OUT" port to the HDTV's "AUDIO IN" port Power • Turn on your HDTV (wait a few seconds for it to power Lip) • Turn on your computer --The HDTV will automatically adjust to the computer's resolution Computer Settings • For optimal...
... HDTV's "HDMI" port --Connect a stereo mini cable from your computer's "AUDIO OUT" port to the HDTV's "AUDIO IN" port Power • Turn on your HDTV (wait a few seconds for it to power Lip) • Turn on your computer --The HDTV will automatically adjust to the computer's resolution Computer Settings • For optimal...
User Manual
Page 27
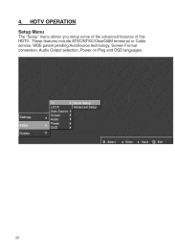
These features include ATSC/NTSC/ClearQAM terrestrial or Cable service, WDE patent pending AutoSource technology, Screen Format conversion, Audio Output selection, Power on Plug and OSD languages. 26 HDTV OPERATION Setup Menu The "Setup" menu allows you setup some of the advanced features of this HDTV. 4.
These features include ATSC/NTSC/ClearQAM terrestrial or Cable service, WDE patent pending AutoSource technology, Screen Format conversion, Audio Output selection, Power on Plug and OSD languages. 26 HDTV OPERATION Setup Menu The "Setup" menu allows you setup some of the advanced features of this HDTV. 4.
User Manual
Page 32
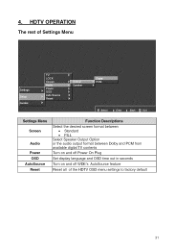
4. HDTV OPERATION The rest of Settings Menu Screen Audio Power OSD AutoSource Reset Select the desired screen format between • Standard • FILL Select Speaker Output Option or the audio output format between Dolby and PCM from available digital TV contents Turn on and off Power On Plug Set display language and OSD time out in seconds Turn on and off WDE's AutoSource feature Reset all of the HDTV OSD menu settings to factory default 31
4. HDTV OPERATION The rest of Settings Menu Screen Audio Power OSD AutoSource Reset Select the desired screen format between • Standard • FILL Select Speaker Output Option or the audio output format between Dolby and PCM from available digital TV contents Turn on and off Power On Plug Set display language and OSD time out in seconds Turn on and off WDE's AutoSource feature Reset all of the HDTV OSD menu settings to factory default 31

User Manual
Page 38
... Output 3.5W (x2 Channels) Power Voltage 100~240AC, 50~60Hz, 1.6A Temperature Dperating Storage _-5C ~ +35C(Hum 20~80%) -20 ~ +55C (Hum 20~ 85%) Humidity (Relative) Dperating Storage 20~ 80% non-condensing. 20~ 85% non-condensing. APPENDIX: 19-inch Hiqh Definition LCD TV Specifications ModelName BK19H210S Panel Type Color 19" TFT (Thin Film Transistor), Active...
... Output 3.5W (x2 Channels) Power Voltage 100~240AC, 50~60Hz, 1.6A Temperature Dperating Storage _-5C ~ +35C(Hum 20~80%) -20 ~ +55C (Hum 20~ 85%) Humidity (Relative) Dperating Storage 20~ 80% non-condensing. 20~ 85% non-condensing. APPENDIX: 19-inch Hiqh Definition LCD TV Specifications ModelName BK19H210S Panel Type Color 19" TFT (Thin Film Transistor), Active...
User Manual
Page 39
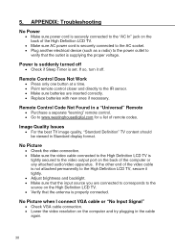
...Check the video connection. • Make sure the video cable connected to the High Definition LCD TV is supplying the proper voltage. Power is set. If the other end of the High Definition LCD TV. • Make sure AC power cord is securely connected to the AC socket. • Plug another electrical device (such... as a radio) to the power outlet to the High Definition LCD TV, secure it off • Check if Sleep Timer is suddenly turned off . No Picture when I connect VGA cable or "No Input Signal" &#...
...Check the video connection. • Make sure the video cable connected to the High Definition LCD TV is supplying the proper voltage. Power is set. If the other end of the High Definition LCD TV. • Make sure AC power cord is securely connected to the AC socket. • Plug another electrical device (such... as a radio) to the power outlet to the High Definition LCD TV, secure it off • Check if Sleep Timer is suddenly turned off . No Picture when I connect VGA cable or "No Input Signal" &#...

