User Manual
Page 4
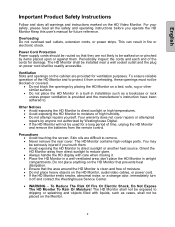
... Monitor to direct sunlight or high temperatures. • Avoid exposing the HD Monitor to reduce glare. • Always handle the HD display with liquids, such as a bookcase or rack unless proper ventilation is clean and free of time, unplug the HD Monitor and remove the...'s instruction have been adhered to direct sunlight or another heat source. Power Cord Protection Power supply cords should be exposed to dripping or splashing and objects filled with care when moving it off and contact the Westinghouse Service Center. • WARNING - This can result in airtight compartments...
... Monitor to direct sunlight or high temperatures. • Avoid exposing the HD Monitor to reduce glare. • Always handle the HD display with liquids, such as a bookcase or rack unless proper ventilation is clean and free of time, unplug the HD Monitor and remove the...'s instruction have been adhered to direct sunlight or another heat source. Power Cord Protection Power supply cords should be exposed to dripping or splashing and objects filled with care when moving it off and contact the Westinghouse Service Center. • WARNING - This can result in airtight compartments...
User Manual
Page 5
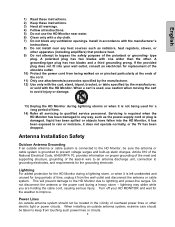
.... 12) Use only with the cart, stand, tripod, bracket, or table specified by the manufacturer, or sold with the HD Monitor. Power Lines An outside antenna system, extreme care should not be sure the antenna or cable system is not being walked on proper grounding of the... to keep from the wall outlet and disconnect the antenna or cable system. Install in wire to an antenna discharge unit, connection to lightning and power-line surges. A polarized plug has two blades with the manufacturer's instructions. 8) Do not install near water. 6) Clean only with a dry cloth. 7) ...
.... 12) Use only with the cart, stand, tripod, bracket, or table specified by the manufacturer, or sold with the HD Monitor. Power Lines An outside antenna system, extreme care should not be sure the antenna or cable system is not being walked on proper grounding of the... to keep from the wall outlet and disconnect the antenna or cable system. Install in wire to an antenna discharge unit, connection to lightning and power-line surges. A polarized plug has two blades with the manufacturer's instructions. 8) Do not install near water. 6) Clean only with a dry cloth. 7) ...
User Manual
Page 6
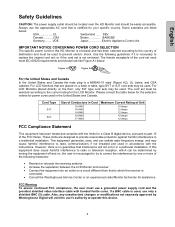
... SVT Size of the FCC Rules. However, there is enclosed and has been selected according to the country of destination and must be determined by Westinghouse Digital will void the user's authority to replace the original cord set, or if the cord set must use only a shielded BNC (5) cable. ... the HD Monitor and should look like Figure A1 below : USA UL Switzerland ..... These limits are designed to the current rating for power cords used . For LCD Monitors that are listed below : Figure A1 Figure A2 For the United States and Canada In the United States and Canada the male ...
... SVT Size of the FCC Rules. However, there is enclosed and has been selected according to the country of destination and must be determined by Westinghouse Digital will void the user's authority to replace the original cord set, or if the cord set must use only a shielded BNC (5) cable. ... the HD Monitor and should look like Figure A1 below : USA UL Switzerland ..... These limits are designed to the current rating for power cords used . For LCD Monitors that are listed below : Figure A1 Figure A2 For the United States and Canada In the United States and Canada the male ...
User Manual
Page 8
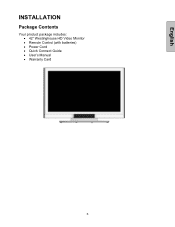
English INSTALLATION Package Contents Your product package includes: • 42" Westinghouse HD Video Monitor • Remote Control (with batteries) • Power Cord • Quick Connect Guide • User's Manual • Warranty Card 6
English INSTALLATION Package Contents Your product package includes: • 42" Westinghouse HD Video Monitor • Remote Control (with batteries) • Power Cord • Quick Connect Guide • User's Manual • Warranty Card 6

User Manual
Page 10
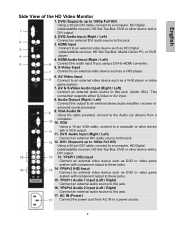
OSD Selection T/S Highlight Menu. Increase/Decrease sound volume or adjust a highlighted control while in the OSD 4. Power Button Turn Power ON/OFF 8 Volume + / - a control while in the OSD Menu. 3. Side View of the HD Video Monitor English 1. Input Select Active Video Input or choose a selection while in the OSD MENU. 5. Menu Turn OSD Menu ON/OFF 2.
OSD Selection T/S Highlight Menu. Increase/Decrease sound volume or adjust a highlighted control while in the OSD 4. Power Button Turn Power ON/OFF 8 Volume + / - a control while in the OSD Menu. 3. Side View of the HD Video Monitor English 1. Input Select Active Video Input or choose a selection while in the OSD MENU. 5. Menu Turn OSD Menu ON/OFF 2.
User Manual
Page 11
...the Audio out (Green) from AC IN to a computer or other device with a DVI output. 13. VGA Using a 15-pin VGA cable, connect to a power source. 9 DVI1 (Supports up to 1080p Full HD) Using a 20-pin DVI cable, connect to these jacks. 14. DVI2 (Supports up to 1080p Full HD... external video device such as DVD or video game system with component output to an external video device such as a VHS player. 6. AC IN (Power) Connect the power cord from a computer. 10. YPbPr2 Audio 2 Input (Left / Right) Connect an external audio source to this jack; (Audio (R/L). S-Video Input Connect to this...
...the Audio out (Green) from AC IN to a computer or other device with a DVI output. 13. VGA Using a 15-pin VGA cable, connect to a power source. 9 DVI1 (Supports up to 1080p Full HD) Using a 20-pin DVI cable, connect to these jacks. 14. DVI2 (Supports up to 1080p Full HD... external video device such as DVD or video game system with component output to an external video device such as a VHS player. 6. AC IN (Power) Connect the power cord from a computer. 10. YPbPr2 Audio 2 Input (Left / Right) Connect an external audio source to this jack; (Audio (R/L). S-Video Input Connect to this...
User Manual
Page 12
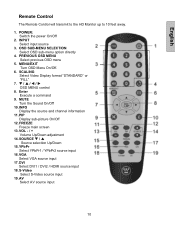
...command 9. VGA Select VGA source input 17. DVI Select DVI1 / DVI2 / HDMI source input 18. SCALING Select Video Display format "STANDARD" or "FILL" 7. MUTE Turn the Sound On/Off 10. VOL - / + Volume Up/Down...OSD MENU Select previous OSD menu 5. INPUT Select input source 3. SOURCE T / S Source selection Up/Down 15. PIP Display sub-picture On/Off 12. English Remote Control The Remote Control will transmit to the HD Monitor up to 10 feet away... directly 4. FREEZE Freeze main screen 13. INFO Display the source and channel information 11. POWER: Switch the power On/Off 2.
...command 9. VGA Select VGA source input 17. DVI Select DVI1 / DVI2 / HDMI source input 18. SCALING Select Video Display format "STANDARD" or "FILL" 7. MUTE Turn the Sound On/Off 10. VOL - / + Volume Up/Down...OSD MENU Select previous OSD menu 5. INPUT Select input source 3. SOURCE T / S Source selection Up/Down 15. PIP Display sub-picture On/Off 12. English Remote Control The Remote Control will transmit to the HD Monitor up to 10 feet away... directly 4. FREEZE Freeze main screen 13. INFO Display the source and channel information 11. POWER: Switch the power On/Off 2.
User Manual
Page 15
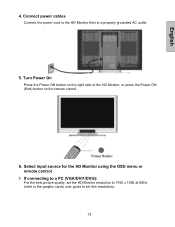
Connect power cables Connect the power cord to the HD Monitor then to set this resolution). 13 Turn Power On Press the Power ON button on the right side of the HD Monitor, or press the Power ON (Red) button on the remote control. 6. Select input source for the HD Monitor using the OSD menu or remote control 7. If connecting to a PC (VGA/DVI1/DVI2): For the best picture quality, set the HD Monitor resolution to 1920 x 1080 at 60Hz (refer to the graphic card's user guide to a properly grounded AC outlet. 5. English 4.
Connect power cables Connect the power cord to the HD Monitor then to set this resolution). 13 Turn Power On Press the Power ON button on the right side of the HD Monitor, or press the Power ON (Red) button on the remote control. 6. Select input source for the HD Monitor using the OSD menu or remote control 7. If connecting to a PC (VGA/DVI1/DVI2): For the best picture quality, set the HD Monitor resolution to 1920 x 1080 at 60Hz (refer to the graphic card's user guide to a properly grounded AC outlet. 5. English 4.

User Manual
Page 21
GENERAL SETTINGS: English Function Name Function Menu Position OSD horizontal/vertical position adjustment Menu Timeout Set the time to turn off the OSD automatically Language OSD language selection Sleep Timer Set sleep timer to turn off the power automatically Transparency Set OSD transparency level DPMS Select DPMS On/Off LED Turn the LED ON or OFF System Info Display Input source, type and signal Factory Reset Restore factory default settings 19
GENERAL SETTINGS: English Function Name Function Menu Position OSD horizontal/vertical position adjustment Menu Timeout Set the time to turn off the OSD automatically Language OSD language selection Sleep Timer Set sleep timer to turn off the power automatically Transparency Set OSD transparency level DPMS Select DPMS On/Off LED Turn the LED ON or OFF System Info Display Input source, type and signal Factory Reset Restore factory default settings 19
User Manual
Page 22
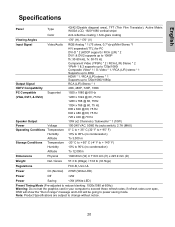
English Specifications Panel Type 42(42.02wable diagonal area), TFT (Thin Film Transistor), Active Matrix WXGA LCD, 1920*1080 vertical stripe Color Anti-reflective coating + Anti-glare coating Viewing Angles 176° (H) / 176° (V) Input Signal Output Signal... / RCA (L/R) stereo * 1 Supports up to 720p/1080i/1080p RCA (L/R) Stereo * 1 480i, 480P, 720P, 1080i PC Compatible Supported (VGA, DVI1, & DVI2) Speaker Output Power Voltage Operating Conditions Temperature Humidity Altitude 1920 x 1080 @ 60 Hz 1280 x 1024 @ 60, 75 Hz 1280 x 768 @ 60, 75Hz 1024 x 768 @ 60, 75 Hz 800...
English Specifications Panel Type 42(42.02wable diagonal area), TFT (Thin Film Transistor), Active Matrix WXGA LCD, 1920*1080 vertical stripe Color Anti-reflective coating + Anti-glare coating Viewing Angles 176° (H) / 176° (V) Input Signal Output Signal... / RCA (L/R) stereo * 1 Supports up to 720p/1080i/1080p RCA (L/R) Stereo * 1 480i, 480P, 720P, 1080i PC Compatible Supported (VGA, DVI1, & DVI2) Speaker Output Power Voltage Operating Conditions Temperature Humidity Altitude 1920 x 1080 @ 60 Hz 1280 x 1024 @ 60, 75 Hz 1280 x 768 @ 60, 75Hz 1024 x 768 @ 60, 75 Hz 800...
User Manual
Page 23
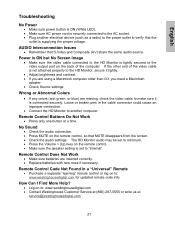
...broken pins in a "Universal" Remote • Purchase a separate "learning" remote control or log on to: www.westinghousedigital.com • Contact Westinghouse Customer Service at (866) 287-5555 or write us at a time. Remote Control Buttons Do Not Work • Press only one button at...Interconnection Issues • Remember that the outlet is supplying the proper voltage. English Troubleshooting No Power • Make sure power button is ON (White LED). • Make sure AC power cord is securely connected to the AC socket. • Plug another computer. The HD ...
...broken pins in a "Universal" Remote • Purchase a separate "learning" remote control or log on to: www.westinghousedigital.com • Contact Westinghouse Customer Service at (866) 287-5555 or write us at a time. Remote Control Buttons Do Not Work • Press only one button at...Interconnection Issues • Remember that the outlet is supplying the proper voltage. English Troubleshooting No Power • Make sure power button is ON (White LED). • Make sure AC power cord is securely connected to the AC socket. • Plug another computer. The HD ...


