User Manual
Page 2
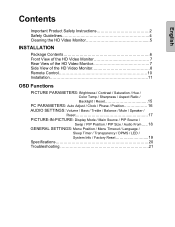
... Ratio / Backlight / Reset 15 PC PARAMETERS: Auto Adjust / Clock / Phase / Position 16 AUDIO SETTINGS: Volume / Bass / Treble / Balance / Mute / Speaker / Reset 17 PICTURE-IN-PICTURE: Display Mode / Main Source / PIP Source / Swap / PIP Position / PIP Size / Audio From..... 18 GENERAL SETTINGS: Menu Position / Menu Timeout / Language / Sleep Timer / Transparency / DPMS / LED...
... Ratio / Backlight / Reset 15 PC PARAMETERS: Auto Adjust / Clock / Phase / Position 16 AUDIO SETTINGS: Volume / Bass / Treble / Balance / Mute / Speaker / Reset 17 PICTURE-IN-PICTURE: Display Mode / Main Source / PIP Source / Swap / PIP Position / PIP Size / Audio From..... 18 GENERAL SETTINGS: Menu Position / Menu Timeout / Language / Sleep Timer / Transparency / DPMS / LED...
User Manual
Page 4
...Skin oils are provided for ventilation purposes. Orient the HD Monitor away from direct sunlight to reduce glare. • Always handle the HD display with liquids, such as a bookcase or rack unless proper ventilation is clean and free of the HD Monitor and to dripping or splashing... Overloading Do not overload wall outlets, extension cords, or power strips. The HD Monitor shall be exposed to protect it off and contact the Westinghouse Service Center. • WARNING - Other Notices • Avoid exposing the HD Monitor to direct sunlight or high temperatures. • Avoid exposing...
...Skin oils are provided for ventilation purposes. Orient the HD Monitor away from direct sunlight to reduce glare. • Always handle the HD display with liquids, such as a bookcase or rack unless proper ventilation is clean and free of the HD Monitor and to dripping or splashing... Overloading Do not overload wall outlets, extension cords, or power strips. The HD Monitor shall be exposed to protect it off and contact the Westinghouse Service Center. • WARNING - Other Notices • Avoid exposing the HD Monitor to direct sunlight or high temperatures. • Avoid exposing...
User Manual
Page 5
English 1) Read these instructions. 2) Keep these instructions. 3) Heed all warnings. 4) Follow all servicing to the HD Monitor, be located in the vicinity of the lead-in any ventilation openings. Install in accordance with the manufacturer's instructions. 8) Do not install near water. 6) Clean only with a dry cloth. 7) Do not block any way, such as radiators, heat registers, stoves, or other apparatus (including amplifiers) that produce heat. 9) Do not attempt to bypass the safety purpose of the cord. 11) Only use caution when moving the cart to avoid injury or damage. 13) Unplug ...
English 1) Read these instructions. 2) Keep these instructions. 3) Heed all warnings. 4) Follow all servicing to the HD Monitor, be located in the vicinity of the lead-in any ventilation openings. Install in accordance with the manufacturer's instructions. 8) Do not install near water. 6) Clean only with a dry cloth. 7) Do not block any way, such as radiators, heat registers, stoves, or other apparatus (including amplifiers) that produce heat. 9) Do not attempt to bypass the safety purpose of the cord. 11) Only use caution when moving the cart to avoid injury or damage. 13) Unplug ...
User Manual
Page 6
...requirements and should be determined by turning the equipment off and on, the user is encouraged to try to correct the interference by Westinghouse Digital will not occur in the United States and Canada. If a BNC cable is not enclosed. This equipment generates, uses, ...and can be easily accessible. If this device. 4 However, there is connected. • Consult the Westinghouse Service Center or an experienced radio/Monitor technician for the LCD Monitor. English Safety Guidelines CAUTION: The power supply outlet should be located near the HD Monitor and should look...
...requirements and should be determined by turning the equipment off and on, the user is encouraged to try to correct the interference by Westinghouse Digital will not occur in the United States and Canada. If a BNC cable is not enclosed. This equipment generates, uses, ...and can be easily accessible. If this device. 4 However, there is connected. • Consult the Westinghouse Service Center or an experienced radio/Monitor technician for the LCD Monitor. English Safety Guidelines CAUTION: The power supply outlet should be located near the HD Monitor and should look...
User Manual
Page 7
...chemical cleaners have been reported to damage the screen and/or HD Monitor case. Wipe the screen with a clean, soft, lint-free cloth. Westinghouse Digital will not be liable for damage resulting from the use of any ammonia or alcohol-based cleaners on the HD Monitor screen or case... apply a small amount of non-ammonia, non-alcohol based glass cleaner onto a clean, soft, lint-free cloth, and wipe the screen. Disclaimer Westinghouse Digital does not recommend the use of any ammonia or alcohol-based cleaners. 5 English Cleaning the HD Video Monitor • MAKE SURE THE HD ...
...chemical cleaners have been reported to damage the screen and/or HD Monitor case. Wipe the screen with a clean, soft, lint-free cloth. Westinghouse Digital will not be liable for damage resulting from the use of any ammonia or alcohol-based cleaners on the HD Monitor screen or case... apply a small amount of non-ammonia, non-alcohol based glass cleaner onto a clean, soft, lint-free cloth, and wipe the screen. Disclaimer Westinghouse Digital does not recommend the use of any ammonia or alcohol-based cleaners. 5 English Cleaning the HD Video Monitor • MAKE SURE THE HD ...
User Manual
Page 8
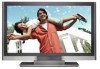
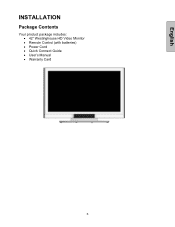
English INSTALLATION Package Contents Your product package includes: • 42" Westinghouse HD Video Monitor • Remote Control (with batteries) • Power Cord • Quick Connect Guide • User's Manual • Warranty Card 6
English INSTALLATION Package Contents Your product package includes: • 42" Westinghouse HD Video Monitor • Remote Control (with batteries) • Power Cord • Quick Connect Guide • User's Manual • Warranty Card 6
User Manual
Page 9
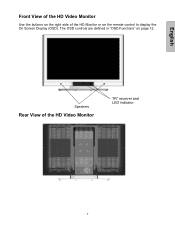
English Front View of the HD Video Monitor Use the buttons on the right side of the HD Video Monitor "IR" receiver and LED indicator 7 The OSD controls are defined in "OSD Functions" on the remote control to display the On Screen Display (OSD). Speakers Rear View of the HD Monitor or on page 12.
English Front View of the HD Video Monitor Use the buttons on the right side of the HD Video Monitor "IR" receiver and LED indicator 7 The OSD controls are defined in "OSD Functions" on the remote control to display the On Screen Display (OSD). Speakers Rear View of the HD Monitor or on page 12.

User Manual
Page 10
Power Button Turn Power ON/OFF 8 Volume + / - Input Select Active Video Input or choose a selection while in the OSD 4. OSD Selection T/S Highlight Menu. Side View of the HD Video Monitor English 1. Menu Turn OSD Menu ON/OFF 2. a control while in the OSD MENU. 5. Increase/Decrease sound volume or adjust a highlighted control while in the OSD Menu. 3.
Power Button Turn Power ON/OFF 8 Volume + / - Input Select Active Video Input or choose a selection while in the OSD 4. OSD Selection T/S Highlight Menu. Side View of the HD Video Monitor English 1. Menu Turn OSD Menu ON/OFF 2. a control while in the OSD MENU. 5. Increase/Decrease sound volume or adjust a highlighted control while in the OSD Menu. 3.
User Manual
Page 11
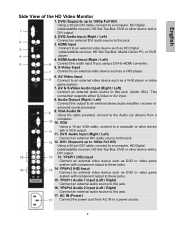
HDMI Audio Input (Right / Left) Connect the audio input if you using a DVI-to this jack; (Audio (R/L). VGA Audio IN Using the cable provided, connect to the Audio out (Green) from AC IN to a power source. 9 VGA Using a 15-pin VGA cable, connect to these jacks. 15. DVI2 (Supports up to 1080p Full HD) Using a 20-pin DVI cable, connect to a computer, HD Digital cable/satellite receiver, HD Set-Top-Box, DVD or other device with component output to a computer or other device with a DVI output. 2. DVI2 Audio Input (Right / Left) Connect an external DVI audio source to an external ...
HDMI Audio Input (Right / Left) Connect the audio input if you using a DVI-to this jack; (Audio (R/L). VGA Audio IN Using the cable provided, connect to the Audio out (Green) from AC IN to a power source. 9 VGA Using a 15-pin VGA cable, connect to these jacks. 15. DVI2 (Supports up to 1080p Full HD) Using a 20-pin DVI cable, connect to a computer, HD Digital cable/satellite receiver, HD Set-Top-Box, DVD or other device with component output to a computer or other device with a DVI output. 2. DVI2 Audio Input (Right / Left) Connect an external DVI audio source to an external ...
User Manual
Page 12
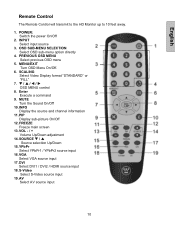
... "STANDARD" or "FILL" 7. POWER: Switch the power On/Off 2. OSD SUB-MENU SELECTION Select OSD sub-menu option directly 4. INFO Display the source and channel information 11. VOL - / + Volume Up/Down adjustment 14. Enter Execute a command 9. YPbPr Select YPbPr1 / YPbPr2 source input 16. MENU/EXIT Turn ... 18. S-Video Select S-Video source input 19. English Remote Control The Remote Control will transmit to the HD Monitor up to 10 feet away. 1. PIP Display sub-picture On/Off 12.
... "STANDARD" or "FILL" 7. POWER: Switch the power On/Off 2. OSD SUB-MENU SELECTION Select OSD sub-menu option directly 4. INFO Display the source and channel information 11. VOL - / + Volume Up/Down adjustment 14. Enter Execute a command 9. YPbPr Select YPbPr1 / YPbPr2 source input 16. MENU/EXIT Turn ... 18. S-Video Select S-Video source input 19. English Remote Control The Remote Control will transmit to the HD Monitor up to 10 feet away. 1. PIP Display sub-picture On/Off 12.
User Manual
Page 13
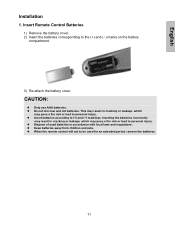
Insert Remote Control Batteries 1) Remove the battery cover. 2) Insert the batteries corresponding to (+) and (−) markings. z Do not mix new and old batteries. z Dispose of used for an extended period, remove the batteries. 11 z When the remote control will not to be used batteries in accordance with local laws and regulations. This may result in cracking or leakage, which may pose a fire risk or lead to personal injury. English Installation 1. z Insert batteries according to the (+) and (−) marks on the battery compartment. 3) Re-attach the battery cover. ...
Insert Remote Control Batteries 1) Remove the battery cover. 2) Insert the batteries corresponding to (+) and (−) markings. z Do not mix new and old batteries. z Dispose of used for an extended period, remove the batteries. 11 z When the remote control will not to be used batteries in accordance with local laws and regulations. This may result in cracking or leakage, which may pose a fire risk or lead to personal injury. English Installation 1. z Insert batteries according to the (+) and (−) marks on the battery compartment. 3) Re-attach the battery cover. ...
User Manual
Page 14
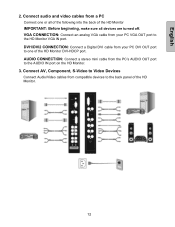
... port on the HD Monitor. 3. Connect AV, Component, S-Video to Video Devices Connect Audio/Video cables from your PC DVI OUT port to the back panel of the HD Monitor. 12 AUDIO CONNECTION: Connect a stereo mini cable from a PC Connect one of the HD Monitor IMPORTANT: Before beginning, make sure all...
... port on the HD Monitor. 3. Connect AV, Component, S-Video to Video Devices Connect Audio/Video cables from your PC DVI OUT port to the back panel of the HD Monitor. 12 AUDIO CONNECTION: Connect a stereo mini cable from a PC Connect one of the HD Monitor IMPORTANT: Before beginning, make sure all...
User Manual
Page 15
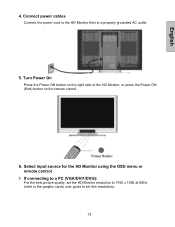
Select input source for the HD Monitor using the OSD menu or remote control 7. Turn Power On Press the Power ON button on the right side of the HD Monitor, or press the Power ON (Red) button on the remote control. 6. Connect power cables Connect the power cord to the HD Monitor then to set this resolution). 13 If connecting to a PC (VGA/DVI1/DVI2): For the best picture quality, set the HD Monitor resolution to 1920 x 1080 at 60Hz (refer to the graphic card's user guide to a properly grounded AC outlet. 5. English 4.
Select input source for the HD Monitor using the OSD menu or remote control 7. Turn Power On Press the Power ON button on the right side of the HD Monitor, or press the Power ON (Red) button on the remote control. 6. Connect power cables Connect the power cord to the HD Monitor then to set this resolution). 13 If connecting to a PC (VGA/DVI1/DVI2): For the best picture quality, set the HD Monitor resolution to 1920 x 1080 at 60Hz (refer to the graphic card's user guide to a properly grounded AC outlet. 5. English 4.
User Manual
Page 16
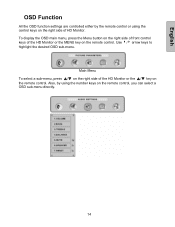
... desired OSD sub-menu. English OSD Function All the OSD function settings are controlled either by using the control keys on the remote control. To display the OSD main menu, press the Menu button on the right side of front control keys of the HD Monitor or the MENU key on...
... desired OSD sub-menu. English OSD Function All the OSD function settings are controlled either by using the control keys on the remote control. To display the OSD main menu, press the Menu button on the right side of front control keys of the HD Monitor or the MENU key on...
User Manual
Page 17
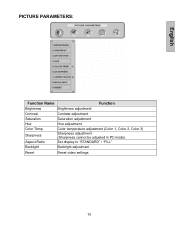
PICTURE PARAMETERS: English Function Name Function Brightness Brightness adjustment Contrast Contrast adjustment Saturation Saturation adjustment Hue Hue adjustment Color Temp Sharpness Aspect Ratio Color temperature adjustment (Color 1, Color 2, Color 3) Sharpness adjustment (Sharpness cannot be adjusted in PC mode) Set display to "STANDARD" / "FILL" Backlight Backlight adjustment Reset Reset video settings 15
PICTURE PARAMETERS: English Function Name Function Brightness Brightness adjustment Contrast Contrast adjustment Saturation Saturation adjustment Hue Hue adjustment Color Temp Sharpness Aspect Ratio Color temperature adjustment (Color 1, Color 2, Color 3) Sharpness adjustment (Sharpness cannot be adjusted in PC mode) Set display to "STANDARD" / "FILL" Backlight Backlight adjustment Reset Reset video settings 15
User Manual
Page 18
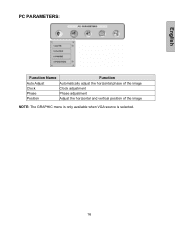
English PC PARAMETERS: Function Name Auto Adjust Clock Phase Position Function Automatically adjust the horizontal phase of the image Clock adjustment Phase adjustment Adjust the horizontal and vertical position of the image NOTE: The GRAPHIC menu is only available when VGA source is selected. 16
English PC PARAMETERS: Function Name Auto Adjust Clock Phase Position Function Automatically adjust the horizontal phase of the image Clock adjustment Phase adjustment Adjust the horizontal and vertical position of the image NOTE: The GRAPHIC menu is only available when VGA source is selected. 16
User Manual
Page 19
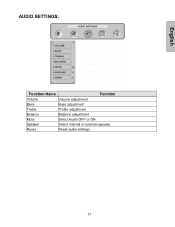
English AUDIO SETTINGS: Function Name Function Volume Volume adjustment Bass Bass adjustment Treble Treble adjustment Balance Balance adjustment Mute Select Audio OFF or ON Speaker Select internal or external speaker Reset Reset audio settings 17
English AUDIO SETTINGS: Function Name Function Volume Volume adjustment Bass Bass adjustment Treble Treble adjustment Balance Balance adjustment Mute Select Audio OFF or ON Speaker Select internal or external speaker Reset Reset audio settings 17

User Manual
Page 21
GENERAL SETTINGS: English Function Name Function Menu Position OSD horizontal/vertical position adjustment Menu Timeout Set the time to turn off the OSD automatically Language OSD language selection Sleep Timer Set sleep timer to turn off the power automatically Transparency Set OSD transparency level DPMS Select DPMS On/Off LED Turn the LED ON or OFF System Info Display Input source, type and signal Factory Reset Restore factory default settings 19
GENERAL SETTINGS: English Function Name Function Menu Position OSD horizontal/vertical position adjustment Menu Timeout Set the time to turn off the OSD automatically Language OSD language selection Sleep Timer Set sleep timer to turn off the power automatically Transparency Set OSD transparency level DPMS Select DPMS On/Off LED Turn the LED ON or OFF System Info Display Input source, type and signal Factory Reset Restore factory default settings 19
User Manual
Page 22
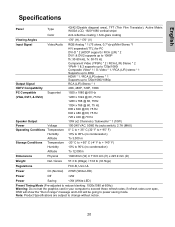
English Specifications Panel Type 42(42.02wable diagonal area), TFT (Thin Film Transistor), Active Matrix WXGA LCD, 1920*1080 vertical stripe Color Anti-reflective coating + Anti-glare coating Viewing Angles 176° (H) / 176° (V) Input Signal Output Signal HDTV Compatibility Video/Audio ...
English Specifications Panel Type 42(42.02wable diagonal area), TFT (Thin Film Transistor), Active Matrix WXGA LCD, 1920*1080 vertical stripe Color Anti-reflective coating + Anti-glare coating Viewing Angles 176° (H) / 176° (V) Input Signal Output Signal HDTV Compatibility Video/Audio ...
User Manual
Page 23
... of the computer. Loose or broken pins in a "Universal" Remote • Purchase a separate "learning" remote control or log on to : www.westinghousedigital.com • Contact Westinghouse Customer Service at (866) 287-5555 or write us at a time. Remote Control Buttons Do Not Work • Press only one button at service@westinghousedigital...
... of the computer. Loose or broken pins in a "Universal" Remote • Purchase a separate "learning" remote control or log on to : www.westinghousedigital.com • Contact Westinghouse Customer Service at (866) 287-5555 or write us at a time. Remote Control Buttons Do Not Work • Press only one button at service@westinghousedigital...
