

User Manual
Page 4
... selection criteria for a Class B digital device, pursuant to provide reasonable protection against harmful interference in a particular installation. If a BNC cable is used in Cord 18 AWG 16 AWG 14 AWG 18 AWG 17 AWG Maximum Current Rating of Conductors in the United States and ...Switzerland ..... However, there is no guarantee that are placed on , the user is not enclosed. If this HD Monitor is connected. • Consult the Westinghouse Service Center or an experienced radio/Monitor technician for the LCD Monitor. The female receptacle of the following guidelines if it is...
... selection criteria for a Class B digital device, pursuant to provide reasonable protection against harmful interference in a particular installation. If a BNC cable is used in Cord 18 AWG 16 AWG 14 AWG 18 AWG 17 AWG Maximum Current Rating of Conductors in the United States and ...Switzerland ..... However, there is no guarantee that are placed on , the user is not enclosed. If this HD Monitor is connected. • Consult the Westinghouse Service Center or an experienced radio/Monitor technician for the LCD Monitor. The female receptacle of the following guidelines if it is...
User Manual
Page 6
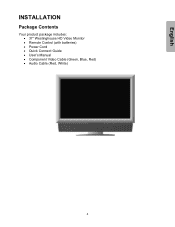
English INSTALLATION Package Contents Your product package includes: • 37" Westinghouse HD Video Monitor • Remote Control (with batteries) • Power Cord • Quick Connect Guide • User's Manual • Component Video Cable (Green, Blue, Red) • Audio Cable (Red, White) 4
English INSTALLATION Package Contents Your product package includes: • 37" Westinghouse HD Video Monitor • Remote Control (with batteries) • Power Cord • Quick Connect Guide • User's Manual • Component Video Cable (Green, Blue, Red) • Audio Cable (Red, White) 4
User Manual
Page 9
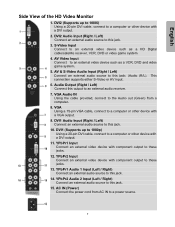
... up to 1080p) Using a 20-pin DVI cable, connect to a computer or other device with a DVI output. 11. S-Video Input Connect to these jacks. 12. This connection supports either S-Video or AV input. 6. VGA Using a 15-pin VGA cable, connect to a computer or other device with component output... 1. AV & S-Video Audio Input (Right / Left) Connect an external audio source to these jacks. 13. YPbPr1 Input Connect an external video device with a VGA output. 9. DVI1 (Supports up to 1080i) Using a 20-pin DVI cable, connect to a computer or other device with component output to this...
... up to 1080p) Using a 20-pin DVI cable, connect to a computer or other device with a DVI output. 11. S-Video Input Connect to these jacks. 12. This connection supports either S-Video or AV input. 6. VGA Using a 15-pin VGA cable, connect to a computer or other device with component output... 1. AV & S-Video Audio Input (Right / Left) Connect an external audio source to these jacks. 13. YPbPr1 Input Connect an external video device with a VGA output. 9. DVI1 (Supports up to 1080i) Using a 20-pin DVI cable, connect to a computer or other device with component output to this...
User Manual
Page 12
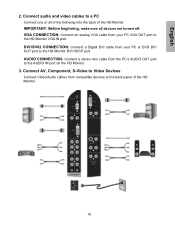
... on the HD Monitor. 3. AUDIO CONNECTION: Connect a stereo mini cable from your PC VGA OUT port to the back panel of the HD Monitor IMPORTANT: Before beginning, make sure all devices are turned off. VGA CONNECTION: Connect an analog VGA cable from compatible devices to the HD Monitor... VGA IN port. Connect audio and video cables to the HD Monitor DVI-HDCP port. Connect AV, Component, S-Video to Video Devices Connect Video/Audio cables from your PC or DVD DVI OUT...
... on the HD Monitor. 3. AUDIO CONNECTION: Connect a stereo mini cable from your PC VGA OUT port to the back panel of the HD Monitor IMPORTANT: Before beginning, make sure all devices are turned off. VGA CONNECTION: Connect an analog VGA cable from compatible devices to the HD Monitor... VGA IN port. Connect audio and video cables to the HD Monitor DVI-HDCP port. Connect AV, Component, S-Video to Video Devices Connect Video/Audio cables from your PC or DVD DVI OUT...
User Manual
Page 13
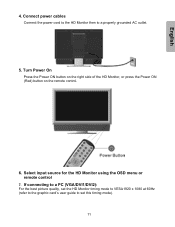
Turn Power On Press the Power ON button on the right side of the HD Monitor, or press the Power ON (Red) button on the remote control. 6. Select input source for the HD Monitor using the OSD menu or remote control 7. If connecting to a PC (VGA/DVI1/DVI2): For the best picture quality, set this timing mode). 11 Connect power cables Connect the power cord to the HD Monitor then to set the HD Monitor timing mode to VESA1920 x 1080 at 60Hz (refer to the graphic card's user guide to a properly grounded AC outlet. 5. English 4.
Turn Power On Press the Power ON button on the right side of the HD Monitor, or press the Power ON (Red) button on the remote control. 6. Select input source for the HD Monitor using the OSD menu or remote control 7. If connecting to a PC (VGA/DVI1/DVI2): For the best picture quality, set this timing mode). 11 Connect power cables Connect the power cord to the HD Monitor then to set the HD Monitor timing mode to VESA1920 x 1080 at 60Hz (refer to the graphic card's user guide to a properly grounded AC outlet. 5. English 4.
User Manual
Page 21
... batteries with new ones if necessary. How Can I Find More Help? • Log on the back of the video cable is connected securely. No Sound • Check the audio connection. • Press MUTE on the remote control, so that S-Video and Composite (AV) share the same audio source. ...Make sure the video cable connected to the HD Monitor is set to minimum. • Press the Volume + (Up) key on the remote control. • Make sure the speaker setting is tightly secured to the video output port on to: www.westinghousedigital.com • Contact Westinghouse Customer Service at (...
... batteries with new ones if necessary. How Can I Find More Help? • Log on the back of the video cable is connected securely. No Sound • Check the audio connection. • Press MUTE on the remote control, so that S-Video and Composite (AV) share the same audio source. ...Make sure the video cable connected to the HD Monitor is set to minimum. • Press the Volume + (Up) key on the remote control. • Make sure the speaker setting is tightly secured to the video output port on to: www.westinghousedigital.com • Contact Westinghouse Customer Service at (...

