
User Manual
Page 3
... Monitor emits smoke, abnormal noise, or a strange odor, immediately turn it from overheating, these openings must not be blocked or covered. • Do not block the openings by placing the HD Monitor on or pinched by Westinghouse Digital. • If the HD Monitor will not be used for... . To ensure reliable operation of time, unplug the HD Monitor and remove the batteries from direct sunlight to protect it off and contact the Westinghouse Service Center. • WARNING - Precautions • Avoid touching the screen. Skin oils are provided for a long period of the HD Monitor...
... Monitor emits smoke, abnormal noise, or a strange odor, immediately turn it from overheating, these openings must not be blocked or covered. • Do not block the openings by placing the HD Monitor on or pinched by Westinghouse Digital. • If the HD Monitor will not be used for... . To ensure reliable operation of time, unplug the HD Monitor and remove the batteries from direct sunlight to protect it off and contact the Westinghouse Service Center. • WARNING - Precautions • Avoid touching the screen. Skin oils are provided for a long period of the HD Monitor...

User Manual
Page 4
...limits are placed on , the user is encouraged to try to correct the interference by Westinghouse Digital will not occur in a particular installation. This equipment generates, uses, and can be determined by turning the equipment off and on a desk or table, type SVT or SJT cord sets... the table below for the selection criteria for a Class B digital device, pursuant to which the receiver is connected. • Consult the Westinghouse Service Center or an experienced radio/Monitor technician for your specific country. FCC Warning To assure continued FCC compliance, the user must use a ...
...limits are placed on , the user is encouraged to try to correct the interference by Westinghouse Digital will not occur in a particular installation. This equipment generates, uses, and can be determined by turning the equipment off and on a desk or table, type SVT or SJT cord sets... the table below for the selection criteria for a Class B digital device, pursuant to which the receiver is connected. • Consult the Westinghouse Service Center or an experienced radio/Monitor technician for your specific country. FCC Warning To assure continued FCC compliance, the user must use a ...
User Manual
Page 5
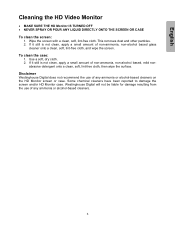
... dry cloth. 2. English Cleaning the HD Video Monitor • MAKE SURE THE HD Monitor IS TURNED OFF • NEVER SPRAY OR POUR ANY LIQUID DIRECTLY ONTO THE SCREEN OR CASE To clean the screen: 1. Disclaimer Westinghouse Digital does not recommend the use of non-ammonia, non-alcohol based, mild non...- Westinghouse Digital will not be liable for damage resulting from the use of non-ammonia, non-alcohol based...
... dry cloth. 2. English Cleaning the HD Video Monitor • MAKE SURE THE HD Monitor IS TURNED OFF • NEVER SPRAY OR POUR ANY LIQUID DIRECTLY ONTO THE SCREEN OR CASE To clean the screen: 1. Disclaimer Westinghouse Digital does not recommend the use of non-ammonia, non-alcohol based, mild non...- Westinghouse Digital will not be liable for damage resulting from the use of non-ammonia, non-alcohol based...
User Manual
Page 7
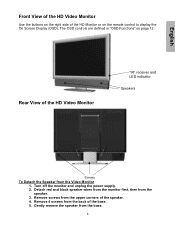
Turn off the monitor and unplug the power supply. 2. Remove 4 screws from the Video Monitor 1. The OSD controls are defined in "OSD Functions" on the remote ...
Turn off the monitor and unplug the power supply. 2. Remove 4 screws from the Video Monitor 1. The OSD controls are defined in "OSD Functions" on the remote ...
User Manual
Page 8
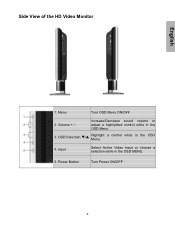
Input Select Active Video Input or choose a selection while in the OSD 4. a control while in the OSD MENU. 5. Power Button Turn Power ON/OFF 6 Volume + / - Increase/Decrease sound volume or adjust a highlighted control while in the OSD Menu. 3. Side View of the HD Video Monitor English 1. Menu Turn OSD Menu ON/OFF 2. OSD Selection T/S Highlight Menu.
Input Select Active Video Input or choose a selection while in the OSD 4. a control while in the OSD MENU. 5. Power Button Turn Power ON/OFF 6 Volume + / - Increase/Decrease sound volume or adjust a highlighted control while in the OSD Menu. 3. Side View of the HD Video Monitor English 1. Menu Turn OSD Menu ON/OFF 2. OSD Selection T/S Highlight Menu.
User Manual
Page 10
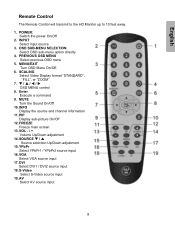
... Menu On/Off. 6. VGA Select VGA source input 17. S-Video Select S-Video source input 19. INPUT Select input source 3. MUTE Turn the Sound On/Off 10. SOURCE T / S Source selection Up/Down adjustment 15. T / S / W / X OSD MENU control 8. DVI Select DVI1 / DVI2 source input 18. POWER: Switch the ...
... Menu On/Off. 6. VGA Select VGA source input 17. S-Video Select S-Video source input 19. INPUT Select input source 3. MUTE Turn the Sound On/Off 10. SOURCE T / S Source selection Up/Down adjustment 15. T / S / W / X OSD MENU control 8. DVI Select DVI1 / DVI2 source input 18. POWER: Switch the ...
User Manual
Page 12
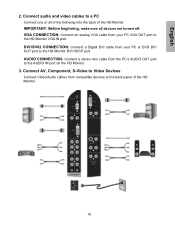
... port on the HD Monitor. 3. AUDIO CONNECTION: Connect a stereo mini cable from your PC VGA OUT port to a PC Connect one or all devices are turned off.
... port on the HD Monitor. 3. AUDIO CONNECTION: Connect a stereo mini cable from your PC VGA OUT port to a PC Connect one or all devices are turned off.
User Manual
Page 13
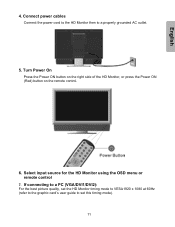
English 4. If connecting to a PC (VGA/DVI1/DVI2): For the best picture quality, set the HD Monitor timing mode to VESA1920 x 1080 at 60Hz (refer to the graphic card's user guide to a properly grounded AC outlet. 5. Connect power cables Connect the power cord to the HD Monitor then to set this timing mode). 11 Select input source for the HD Monitor using the OSD menu or remote control 7. Turn Power On Press the Power ON button on the right side of the HD Monitor, or press the Power ON (Red) button on the remote control. 6.
English 4. If connecting to a PC (VGA/DVI1/DVI2): For the best picture quality, set the HD Monitor timing mode to VESA1920 x 1080 at 60Hz (refer to the graphic card's user guide to a properly grounded AC outlet. 5. Connect power cables Connect the power cord to the HD Monitor then to set this timing mode). 11 Select input source for the HD Monitor using the OSD menu or remote control 7. Turn Power On Press the Power ON button on the right side of the HD Monitor, or press the Power ON (Red) button on the remote control. 6.

User Manual
Page 19
GENERAL SETTINGS: English Function Name Function Menu Position OSD horizontal/vertical position adjustment Menu Timeout Set the time to turn off the OSD automatically Language OSD language selection Sleep Timer Set sleep timer to turn off the power automatically Transparency Set OSD transparency level DPMS Select DPMS On/Off System Info Display Input source, type and signal Factory Reset Restore factory default settings 17
GENERAL SETTINGS: English Function Name Function Menu Position OSD horizontal/vertical position adjustment Menu Timeout Set the time to turn off the OSD automatically Language OSD language selection Sleep Timer Set sleep timer to turn off the power automatically Transparency Set OSD transparency level DPMS Select DPMS On/Off System Info Display Input source, type and signal Factory Reset Restore factory default settings 17


