
User Manual
Page 3
English Contents PRODUCT SAFETY INSTRUCTIONS 4 Antenna Installation Safety 5 Safety Guidelines 6 LCD TV Overview 7 Package Contents 7 Front View of the LCD TV 7 Rear View of the LCD TV 7 Side View of the LCD TV 8 Control Key 8 Input connector 9 Remote Control 10 Installation 12 Function adjustment 15 Viewing OSD Menu 15 Picture 16 AUDIO Setting 17 CHANNELS 19 SETTINGS 21 LOCKS 29 GUIDE 32 Product Specification 33 Troubleshooting 34 2
English Contents PRODUCT SAFETY INSTRUCTIONS 4 Antenna Installation Safety 5 Safety Guidelines 6 LCD TV Overview 7 Package Contents 7 Front View of the LCD TV 7 Rear View of the LCD TV 7 Side View of the LCD TV 8 Control Key 8 Input connector 9 Remote Control 10 Installation 12 Function adjustment 15 Viewing OSD Menu 15 Picture 16 AUDIO Setting 17 CHANNELS 19 SETTINGS 21 LOCKS 29 GUIDE 32 Product Specification 33 Troubleshooting 34 2
User Manual
Page 5
... ensure reliable operation of time, unplug the LCD TV and remove the batteries from the remote control. Your warranty does not cover repairs or attempted repairs by anyone not authorized by placing the LCD TV on the TV. 4 Your LCD TV contains high-voltage parts. English PRODUCT SAFETY INSTRUCTIONS Follow and obey all the safety and operating instructions before you touch them . Power Cord Protection Power supply cords should be...
... ensure reliable operation of time, unplug the LCD TV and remove the batteries from the remote control. Your warranty does not cover repairs or attempted repairs by anyone not authorized by placing the LCD TV on the TV. 4 Your LCD TV contains high-voltage parts. English PRODUCT SAFETY INSTRUCTIONS Follow and obey all the safety and operating instructions before you touch them . Power Cord Protection Power supply cords should be...
User Manual
Page 6
... purpose of the cord. 11) Only use attachments/accessories specified by the manufacturer. 12) Use only with the cart, stand, tripod, bracket, or table specified by the manufacturer, or sold with the LCD TV. type plug. Lightning For added protection for replacement of the obsolete outlet. 10) Protect the power cord from touching such power lines or circuits. 5 Turn off your wall outlet, consult an...
... purpose of the cord. 11) Only use attachments/accessories specified by the manufacturer. 12) Use only with the cart, stand, tripod, bracket, or table specified by the manufacturer, or sold with the LCD TV. type plug. Lightning For added protection for replacement of the obsolete outlet. 10) Protect the power cord from touching such power lines or circuits. 5 Turn off your wall outlet, consult an...
User Manual
Page 7
... female receptacle of the following guidelines if it is connected. • Consult the Westinghouse Service Center or an experienced radio/TV technician for the LCD TV. If this device.(LTV46w1 HD must use a grounded power supply cord.) 6 Also, any unauthorized changes or modifications not expressly approved by one or more of the cord set is enclosed and has been selected according to...
... female receptacle of the following guidelines if it is connected. • Consult the Westinghouse Service Center or an experienced radio/TV technician for the LCD TV. If this device.(LTV46w1 HD must use a grounded power supply cord.) 6 Also, any unauthorized changes or modifications not expressly approved by one or more of the cord set is enclosed and has been selected according to...
User Manual
Page 8
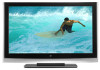
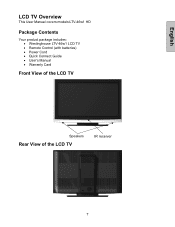
English LCD TV Overview This User Manual covers models:LTV-46w1 HD Package Contents Your product package includes: • Westinghouse LTV-46w1 LCD TV • Remote Control (with batteries) • Power Cord • Quick Connect Guide • User's Manual • Warranty Card Front View of the LCD TV Speakers Rear View of the LCD TV IR receiver 7
English LCD TV Overview This User Manual covers models:LTV-46w1 HD Package Contents Your product package includes: • Westinghouse LTV-46w1 LCD TV • Remote Control (with batteries) • Power Cord • Quick Connect Guide • User's Manual • Warranty Card Front View of the LCD TV Speakers Rear View of the LCD TV IR receiver 7

User Manual
Page 9
Volume + / - Side View of the LCD TV English Control Key MENU 1. Input source Select Active Video Input or choose selection while in the OSD Menu INPUT 4. Menu Turn OSD Menu ON/OFF Increase/Decrease sound volume or + VOL - 2. Channel ▲▼ highlight a control while in the OSD MENU a 5. Power Power ON/OFF 8 adjust a highlighted control while in the OSD Menu Channel up/down when input is TV or ▲ CH ▼ 3.
Volume + / - Side View of the LCD TV English Control Key MENU 1. Input source Select Active Video Input or choose selection while in the OSD Menu INPUT 4. Menu Turn OSD Menu ON/OFF Increase/Decrease sound volume or + VOL - 2. Channel ▲▼ highlight a control while in the OSD MENU a 5. Power Power ON/OFF 8 adjust a highlighted control while in the OSD Menu Channel up/down when input is TV or ▲ CH ▼ 3.
User Manual
Page 10
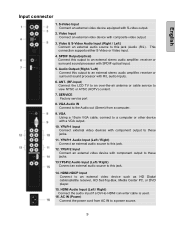
...) Connect an external audio source to view NTSC or ATSC (HDTV) content. 7. ANT. (RF-input) Connect the LCD TV to an over-the-air antenna or cable service to this jack. 14. SERVICE Factory service port 8. HDMI-HDCP input Connect to a power source. 9 S-Video Input Connect an external video device equipped with R/L audio Inputs. 6. Video Input Connect an external video device with composite video output. 3. VGA Audio IN Connect to the Audio out (Green) from AC IN to an external video device such as HD Digital cable/satellite receiver, HD Set-Top-Box, Media Center PC, or DVD player...
...) Connect an external audio source to view NTSC or ATSC (HDTV) content. 7. ANT. (RF-input) Connect the LCD TV to an over-the-air antenna or cable service to this jack. 14. SERVICE Factory service port 8. HDMI-HDCP input Connect to a power source. 9 S-Video Input Connect an external video device equipped with R/L audio Inputs. 6. Video Input Connect an external video device with composite video output. 3. VGA Audio IN Connect to the Audio out (Green) from AC IN to an external video device such as HD Digital cable/satellite receiver, HD Set-Top-Box, Media Center PC, or DVD player...
User Manual
Page 11
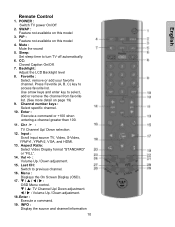
...: Closed Caption On/Off. 7. W / X : Volume Up / Down adjustment. 18. Enter : Execute a command. 19. SWAP : Feature not available on this model 4. Channel number keys : Select specific channel. 10. Vol +/- : Volume Up / Down adjustment. 15. English Remote Control 1. PIP : Feature not available on page 19) 9. Backlight: Adjust the LCD Backlight level 8. T / S / W / X : OSD Menu control. POWER : Switch TV power On/Off 2. Mute : Mute the sound 5. Press Favorite (A, B, C) key to select, add or remove the channel from favorite list...
...: Closed Caption On/Off. 7. W / X : Volume Up / Down adjustment. 18. Enter : Execute a command. 19. SWAP : Feature not available on this model 4. Channel number keys : Select specific channel. 10. Vol +/- : Volume Up / Down adjustment. 15. English Remote Control 1. PIP : Feature not available on page 19) 9. Backlight: Adjust the LCD Backlight level 8. T / S / W / X : OSD Menu control. POWER : Switch TV power On/Off 2. Mute : Mute the sound 5. Press Favorite (A, B, C) key to select, add or remove the channel from favorite list...
User Manual
Page 14
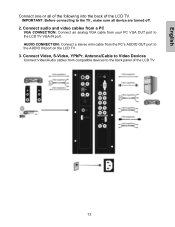
Connect audio and video cables from a PC VGA CONNECTION: Connect an analog VGA cable from the PC's AUDIO OUT port to the LCD TV VGA IN port. AUDIO CONNECTION: Connect a stereo mini cable from your PC VGA OUT port to the AUDIO IN port on the LCD TV. 3. Connect Video, S-Video, YPbPr, Antenna/Cable to Video Devices Connect Video/Audio cables from compatible devices to the TV , make sure all of the following into the back of the LCD TV. 13 IMPORTANT: Before connecting to the back panel of the LCD TV. English Connect one or all device are turned off. 2.
Connect audio and video cables from a PC VGA CONNECTION: Connect an analog VGA cable from the PC's AUDIO OUT port to the LCD TV VGA IN port. AUDIO CONNECTION: Connect a stereo mini cable from your PC VGA OUT port to the AUDIO IN port on the LCD TV. 3. Connect Video, S-Video, YPbPr, Antenna/Cable to Video Devices Connect Video/Audio cables from compatible devices to the TV , make sure all of the following into the back of the LCD TV. 13 IMPORTANT: Before connecting to the back panel of the LCD TV. English Connect one or all device are turned off. 2.
User Manual
Page 15
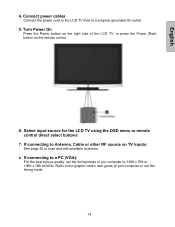
.... Connect power cables Connect the power cord to the LCD TV then to scan and edit available channels. 8. Select input source for the LCD TV using the OSD menu or remote control direct select buttons 7. Turn Power On Press the Power button on the right side of you computer to a PC (VGA): For the best picture quality, set this timing mode. 14 English 4. If connecting to Antenna, Cable or other RF source on the remote control. 6. Refer to the graphic card's user guide of...
.... Connect power cables Connect the power cord to the LCD TV then to scan and edit available channels. 8. Select input source for the LCD TV using the OSD menu or remote control direct select buttons 7. Turn Power On Press the Power button on the right side of you computer to a PC (VGA): For the best picture quality, set this timing mode. 14 English 4. If connecting to Antenna, Cable or other RF source on the remote control. 6. Refer to the graphic card's user guide of...
User Manual
Page 16
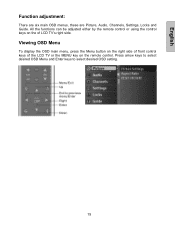
Press arrow keys to select desired OSD Menu and Enter keys to select desired OSD setting. 15 English Function adjustment: There are six main OSD menus, these are Picture, Audio, Channels, Settings, Locks and Guide. All the functions can be adjusted either by the remote control or using the control keys on the remote control. Viewing OSD Menu To display the OSD main menu, press the Menu button on the right side of front control keys of the LCD TV or the MENU key on the of LCD TV's right side.
Press arrow keys to select desired OSD Menu and Enter keys to select desired OSD setting. 15 English Function adjustment: There are six main OSD menus, these are Picture, Audio, Channels, Settings, Locks and Guide. All the functions can be adjusted either by the remote control or using the control keys on the remote control. Viewing OSD Menu To display the OSD main menu, press the Menu button on the right side of front control keys of the LCD TV or the MENU key on the of LCD TV's right side.

User Manual
Page 18
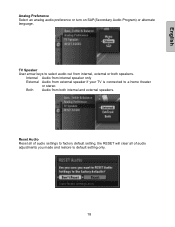
English Color Temp Use arrow key to adjust the bass, treble and balance. 17 Select "Don't Reset" button and Enter key to ignore RESET Picture and return to previous OSD menu AUDIO Setting Bass, Treble & Balance Use arrow keys to set the picture color temperature. RESET Picture: Reset picture settings to factory default setting, the RESET will only restore picture default settings only.
English Color Temp Use arrow key to adjust the bass, treble and balance. 17 Select "Don't Reset" button and Enter key to ignore RESET Picture and return to previous OSD menu AUDIO Setting Bass, Treble & Balance Use arrow keys to set the picture color temperature. RESET Picture: Reset picture settings to factory default setting, the RESET will only restore picture default settings only.
User Manual
Page 19
Reset Audio Reset all of audio settings to factory default setting, the RESET will clear all of audio adjustments you made and restore to select audio out from both speakers. English Analog Preference Select an analog audio preference or turn on SAP(Secondary Audio Program) or alternate language. Internal Audio from internal speaker only External Audio from external speaker if your TV is connected to a home theater or stereo Both Audio from internal, external or both internal and external speakers. TV Speaker User arrow keys to default setting only. 18
Reset Audio Reset all of audio settings to factory default setting, the RESET will clear all of audio adjustments you made and restore to select audio out from both speakers. English Analog Preference Select an analog audio preference or turn on SAP(Secondary Audio Program) or alternate language. Internal Audio from internal speaker only External Audio from external speaker if your TV is connected to a home theater or stereo Both Audio from internal, external or both internal and external speakers. TV Speaker User arrow keys to default setting only. 18
User Manual
Page 23
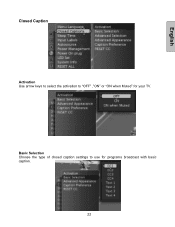
Basic Selection Choose the type of closed caption settings to "OFF" ,"ON" or "ON when Muted" for programs broadcast with basic caption. 22 English Closed Caption Activation Use arrow keys to select the activation to use for your TV.
Basic Selection Choose the type of closed caption settings to "OFF" ,"ON" or "ON when Muted" for programs broadcast with basic caption. 22 English Closed Caption Activation Use arrow keys to select the activation to use for your TV.

User Manual
Page 26
OFF The front LED is always off all power, resulting in longer boot up time. English Power Management Use arrow keys to set the power mode to Normal or Energy Saving Normal TV will boot within few sec. (default) Energy Saving TV will power on automatically when power is disconnected then reconnected. ON If last DC power status is on /off POWER ON PLUG function. LED Set Set the LED on . OFF Turn off ON The front LED is lit while the TV is on, TV will turn off . Power On plug Memorize the DC power status while AC power off. System Info 25
OFF The front LED is always off all power, resulting in longer boot up time. English Power Management Use arrow keys to set the power mode to Normal or Energy Saving Normal TV will boot within few sec. (default) Energy Saving TV will power on automatically when power is disconnected then reconnected. ON If last DC power status is on /off POWER ON PLUG function. LED Set Set the LED on . OFF Turn off ON The front LED is lit while the TV is on, TV will turn off . Power On plug Memorize the DC power status while AC power off. System Info 25

User Manual
Page 27
... to previous menu, Reset button to factory defaults. You must run Setup Wizard after Reset button is press. Reset All Reset all settings back to clear all settings you have made . Setup Wizard will delete all setting you may need the information when calling customer service or troubleshooting such as firmware version and micro version. Reset will be initialized after a reset. Setup Wizard Setup Wizard displays language, Time Zone, Daylight Saving, RF Input Source and Scanning Channel by...
... to previous menu, Reset button to factory defaults. You must run Setup Wizard after Reset button is press. Reset All Reset all settings back to clear all settings you have made . Setup Wizard will delete all setting you may need the information when calling customer service or troubleshooting such as firmware version and micro version. Reset will be initialized after a reset. Setup Wizard Setup Wizard displays language, Time Zone, Daylight Saving, RF Input Source and Scanning Channel by...

User Manual
Page 29
It may take a few minutes. 28 English RF Input Source Select your TV source from Antenna or cable via arrow keys, press Enter to set Antenna or cable source type, GO BACK button to previous Setup Wizard menu Scanning Channels Scanning channel searches available digital (HDTV) and analog (SDTV) channels of selected TV source, the numbers of available channels will show on the OSD menu.
It may take a few minutes. 28 English RF Input Source Select your TV source from Antenna or cable via arrow keys, press Enter to set Antenna or cable source type, GO BACK button to previous Setup Wizard menu Scanning Channels Scanning channel searches available digital (HDTV) and analog (SDTV) channels of selected TV source, the numbers of available channels will show on the OSD menu.
User Manual
Page 32
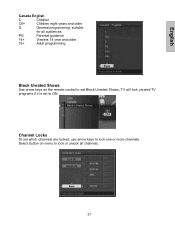
Select button on menu to lock or unlock all audiences PG Parental guidance 14+ Viewers 14 year and older 18+ Adult programming Block Unrated Shows Use arrow keys on the remote control to set Block Unrated Shows, TV will lock unrated TV programs if it is set which channels are locked, use arrow keys to ON. Channel Locks To set to lock one or more channels. English Canada English C Children C8+ Children eight years and older G General programming, suitable for all channels. 31
Select button on menu to lock or unlock all audiences PG Parental guidance 14+ Viewers 14 year and older 18+ Adult programming Block Unrated Shows Use arrow keys on the remote control to set Block Unrated Shows, TV will lock unrated TV programs if it is set which channels are locked, use arrow keys to ON. Channel Locks To set to lock one or more channels. English Canada English C Children C8+ Children eight years and older G General programming, suitable for all channels. 31
User Manual
Page 34
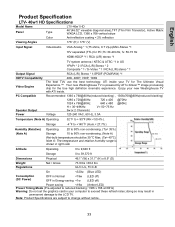
... A) Operating 32 oF to 39,370 ft Dimensions Weight Regulations Physical Net / Gross 46.1" (W) x 31.7" (H) x 8.9" (D) 73.9 lbs / 88.2 lbs UL/C-UL, FCC-B On English Product Specification LTV- 46w1 HD Specifications Model Name LTV-46w1 HD Panel Type 46"(46.02" viewable diagonal area),TFT (Thin Film Transistor), Active Matrix WXGA LCD, 1366 x 768 vertical stripe Color Anti-reflective coating < 2% reflection Viewing Angles 176° (H) / 176° (V) Input Signal Video/Audio VGA Analog...
... A) Operating 32 oF to 39,370 ft Dimensions Weight Regulations Physical Net / Gross 46.1" (W) x 31.7" (H) x 8.9" (D) 73.9 lbs / 88.2 lbs UL/C-UL, FCC-B On English Product Specification LTV- 46w1 HD Specifications Model Name LTV-46w1 HD Panel Type 46"(46.02" viewable diagonal area),TFT (Thin Film Transistor), Active Matrix WXGA LCD, 1366 x 768 vertical stripe Color Anti-reflective coating < 2% reflection Viewing Angles 176° (H) / 176° (V) Input Signal Video/Audio VGA Analog...
User Manual
Page 35
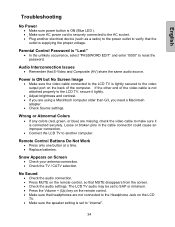
... or minimum. • Press the Volume + (Up) key on the LCD TV. • Make sure the speaker setting is supplying the proper voltage. Remote Control Buttons Do Not Work • Press only one button at a time. • Replace batteries. Parental Control Password is not attached properly to the LCD TV, secure it is tightly secured to the video output port on the back of the video cable is "Lost" • In...
... or minimum. • Press the Volume + (Up) key on the LCD TV. • Make sure the speaker setting is supplying the proper voltage. Remote Control Buttons Do Not Work • Press only one button at a time. • Replace batteries. Parental Control Password is not attached properly to the LCD TV, secure it is tightly secured to the video output port on the back of the video cable is "Lost" • In...


