User Manual
Page 4
English TABLE OF CONTENTS CABLE TV (CTV/DTV) CONNECTION 17 EXTERNAL DEVICE CONNECTIONS 18 POWER CONNECTION 20 CONNECTING AC POWER 20 INITIAL SETUP 20 BASIC OPERATIONS 21 TURNING THE POWER ON AND OFF 21 ADJUSTING THE VOLUME 21 CHANGING CHANNELS 22 SELECTING THE INPUT SOURCE 22 ADJUSTING THE DISPLAY FORMAT 23 ADJUSTING THE LED BACKLIGHT 23 SETUP MENUS 24 SETUP MENU OPERATION 24 PICTURE 25 AUDIO 29 VIEW MODE 33 VIEW MODE (VGA 33 TV PROGRAM 35 SETTINGS 39 WALL MOUNT OPTION 50 WALL MOUNT INSTALLATION REMINDERS 50 TROUBLESHOOTING 51 SPECIFICATIONS 54 ii
English TABLE OF CONTENTS CABLE TV (CTV/DTV) CONNECTION 17 EXTERNAL DEVICE CONNECTIONS 18 POWER CONNECTION 20 CONNECTING AC POWER 20 INITIAL SETUP 20 BASIC OPERATIONS 21 TURNING THE POWER ON AND OFF 21 ADJUSTING THE VOLUME 21 CHANGING CHANNELS 22 SELECTING THE INPUT SOURCE 22 ADJUSTING THE DISPLAY FORMAT 23 ADJUSTING THE LED BACKLIGHT 23 SETUP MENUS 24 SETUP MENU OPERATION 24 PICTURE 25 AUDIO 29 VIEW MODE 33 VIEW MODE (VGA 33 TV PROGRAM 35 SETTINGS 39 WALL MOUNT OPTION 50 WALL MOUNT INSTALLATION REMINDERS 50 TROUBLESHOOTING 51 SPECIFICATIONS 54 ii
User Manual
Page 6
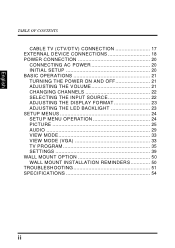
... operated with the original power supply. The exclamation inside . The lightning flash with a protective earthing connection. WARNING! Some examples are no user-serviceable parts inside an equilateral triangle symbol is intended to alert the user to rain or moisture. • Do not remove the rear cover. CSA • Japan - This device must be easily accessible. CAUTION: The power supply outlet should be located near the LED...
... operated with the original power supply. The exclamation inside . The lightning flash with a protective earthing connection. WARNING! Some examples are no user-serviceable parts inside an equilateral triangle symbol is intended to alert the user to rain or moisture. • Do not remove the rear cover. CSA • Japan - This device must be easily accessible. CAUTION: The power supply outlet should be located near the LED...
User Manual
Page 8
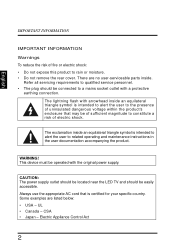
... determined by turning the equipment off and on, the user is encouraged to try to correct the interference by the manufacturer will not occur in accordance with the instructions. If a BNC cable is no guarantee that interference will void the user's authority to radio communications if not installed and used , use a grounded power supply cord and the provided shielded video interface cable with...
... determined by turning the equipment off and on, the user is encouraged to try to correct the interference by the manufacturer will not occur in accordance with the instructions. If a BNC cable is no guarantee that interference will void the user's authority to radio communications if not installed and used , use a grounded power supply cord and the provided shielded video interface cable with...
User Manual
Page 11
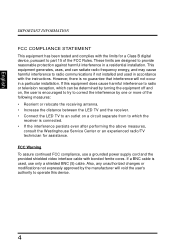
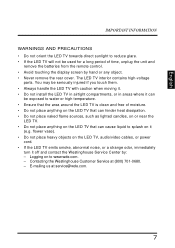
Logging on the LED TV, audio/video cables, or power cord. • If the LED TV emits smoke, abnormal noise, or a strange odor, immediately turn it off and contact the Westinghouse Service Center by hand or any object. • Never remove the rear cover. E-mailing us at (800) 701-0680. - Contacting the Westinghouse Customer Service at service@wde.com. 7 flower vase). • Do not place heavy...
Logging on the LED TV, audio/video cables, or power cord. • If the LED TV emits smoke, abnormal noise, or a strange odor, immediately turn it off and contact the Westinghouse Service Center by hand or any object. • Never remove the rear cover. E-mailing us at (800) 701-0680. - Contacting the Westinghouse Customer Service at service@wde.com. 7 flower vase). • Do not place heavy...
User Manual
Page 12
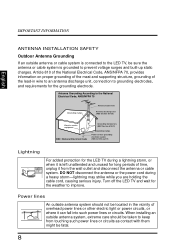
... Electrical Code Grounding Conductors (NEC Section 810-21) Grounding clamps Power service grounding electrode system (NEC Art 250 part H) Lightning Z Z Z For added protection for the LED TV during a heavy storm-lightning may strike while you are holding the cable cord, causing serious injury. IMPORTANT INFORMATION English ANTENNA INSTALLATION SAFETY Outdoor Antenna Grounding If an outside antenna or cable system is connected to the LED...
... Electrical Code Grounding Conductors (NEC Section 810-21) Grounding clamps Power service grounding electrode system (NEC Art 250 part H) Lightning Z Z Z For added protection for the LED TV during a heavy storm-lightning may strike while you are holding the cable cord, causing serious injury. IMPORTANT INFORMATION English ANTENNA INSTALLATION SAFETY Outdoor Antenna Grounding If an outside antenna or cable system is connected to the LED...
User Manual
Page 17
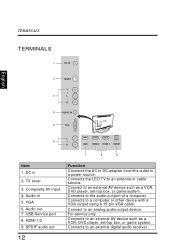
...VGA cable. VGA 6. USB Service port 8. Connects to an external AV device such as a VCR, DVD player, set -top box, or game system. Connect to a power source. DC in 5. For service only. Composite AV input 4. TV tuner 3. Audio out 7. SPDIF audio out Function Connects the AC to DC adapter from this outlet to an analog audio output device. Connects to an external digital audio receiver. 12 HDMI 1/2 9. TERMINALS English TERMINALS 1 DC IN 2 TUNER Y 3 L R 4 AUDIO IN 5 VGA L 6 R USB HDMI 2 HDMI 1 SPDIF 7 8 9 Item 1. Connects to the audio out port of...
...VGA cable. VGA 6. USB Service port 8. Connects to an external AV device such as a VCR, DVD player, set -top box, or game system. Connect to a power source. DC in 5. For service only. Composite AV input 4. TV tuner 3. Audio out 7. SPDIF audio out Function Connects the AC to DC adapter from this outlet to an analog audio output device. Connects to an external digital audio receiver. 12 HDMI 1/2 9. TERMINALS English TERMINALS 1 DC IN 2 TUNER Y 3 L R 4 AUDIO IN 5 VGA L 6 R USB HDMI 2 HDMI 1 SPDIF 7 8 9 Item 1. Connects to the audio out port of...
User Manual
Page 18
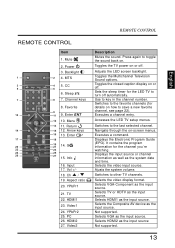
... through the on . Displays the Electronic Program Guide (EPG). Selects the video input source. Selects the Composite AV device as the input source Not supported. 13 Selects HDMI2 as the input source. Power 3. ZZZ MTS 5 Favorite 6 A 6. TV 22. Video2 Description Mutes the sound. Toggles the Multichannel Television Sound options. Sets the sleep timer for the LED TV to key in the channel number. Switches to the favorite channels (for the channel you're watching...
... through the on . Displays the Electronic Program Guide (EPG). Selects the video input source. Selects the Composite AV device as the input source Not supported. 13 Selects HDMI2 as the input source. Power 3. ZZZ MTS 5 Favorite 6 A 6. TV 22. Video2 Description Mutes the sound. Toggles the Multichannel Television Sound options. Sets the sleep timer for the LED TV to key in the channel number. Switches to the favorite channels (for the channel you're watching...
User Manual
Page 22
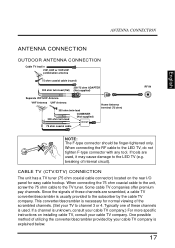
... more specific instructions on the rear I/O panel for normal viewing of these channels are used . When connecting the RF cable to the TV tuner. Some cable TV companies offer premium pay channels. One possible method of internal circuit). ANTENNA CONNECTION English ANTENNA CONNECTION OUTDOOR ANTENNA CONNECTION Cable TV lead in VHF, UHF or VHF/UHF combination antenna 75 ohm coaxial cable (round) 300-75 ohm ADAPTER 300 ohm twin-lead (flat) (Not supplied) Separate...
... more specific instructions on the rear I/O panel for normal viewing of these channels are used . When connecting the RF cable to the TV tuner. Some cable TV companies offer premium pay channels. One possible method of internal circuit). ANTENNA CONNECTION English ANTENNA CONNECTION OUTDOOR ANTENNA CONNECTION Cable TV lead in VHF, UHF or VHF/UHF combination antenna 75 ohm coaxial cable (round) 300-75 ohm ADAPTER 300 ohm twin-lead (flat) (Not supplied) Separate...
User Manual
Page 23
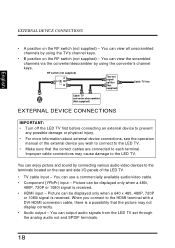
... output audio signals from the LED TV set signal splitter (Not supplied) Cable TV line Cable TV converter/descrambler (Not supplied) EXTERNAL DEVICE CONNECTIONS IMPORTANT: • Turn off the LED TV first before connecting an external device to prevent any possible damage or physical injury. • For more information about external device connections, see the operation manual of the LED TV. • TV cable input - You can use a commercially available audio/video cable. • Component (YPbPr) input - You can view...
... output audio signals from the LED TV set signal splitter (Not supplied) Cable TV line Cable TV converter/descrambler (Not supplied) EXTERNAL DEVICE CONNECTIONS IMPORTANT: • Turn off the LED TV first before connecting an external device to prevent any possible damage or physical injury. • For more information about external device connections, see the operation manual of the LED TV. • TV cable input - You can use a commercially available audio/video cable. • Component (YPbPr) input - You can view...
User Manual
Page 24
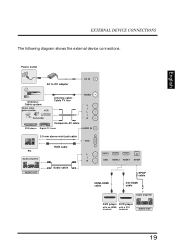
English EXTERNAL DEVICE CONNECTIONS The following diagram shows the external device connections. Power outlet AC to DC adapter DC IN Antenna / Cable system Home video game system VCR Antenna cable / Cable TV line TUNER Y L Camcorder R Composite AV cable DVD player Digital TV tuner AUDIO IN 3.5 mm stereo mini jack cable PC Audio amplifier AUDIO OUT RGB cable Audio cable VGA L R USB HDMI 2 HDMI 1 SPDIF HDMI-HDMI cable SPDIF cable DVI-HDMI cable Audio amplifier DVD player DVD player with an HDMI with a DVI terminal terminal AUDIO OUT 19
English EXTERNAL DEVICE CONNECTIONS The following diagram shows the external device connections. Power outlet AC to DC adapter DC IN Antenna / Cable system Home video game system VCR Antenna cable / Cable TV line TUNER Y L Camcorder R Composite AV cable DVD player Digital TV tuner AUDIO IN 3.5 mm stereo mini jack cable PC Audio amplifier AUDIO OUT RGB cable Audio cable VGA L R USB HDMI 2 HDMI 1 SPDIF HDMI-HDMI cable SPDIF cable DVI-HDMI cable Audio amplifier DVD player DVD player with an HDMI with a DVI terminal terminal AUDIO OUT 19
User Manual
Page 26
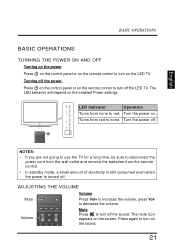
... standby mode, a small amount of electricity is still consumed even when the power is turned off the LED TV. Turn the power on the screen. Volume C.C. MENU VOL LED indicator Operation Turns from none to increase the volume; The LED behavior will depend on the enabled Power settings. Turning off the power Press on the control panel or on the remote control to turn off . ADJUSTING THE VOLUME Volume Mute Press Vol+ to red. CH INPUT C.C. English BASIC OPERATIONS BASIC OPERATIONS TURNING...
... standby mode, a small amount of electricity is still consumed even when the power is turned off the LED TV. Turn the power on the screen. Volume C.C. MENU VOL LED indicator Operation Turns from none to increase the volume; The LED behavior will depend on the enabled Power settings. Turning off the power Press on the control panel or on the remote control to turn off . ADJUSTING THE VOLUME Volume Mute Press Vol+ to red. CH INPUT C.C. English BASIC OPERATIONS BASIC OPERATIONS TURNING...
User Manual
Page 27
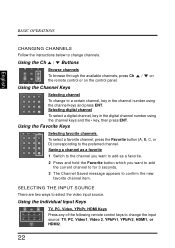
... the digital channel number using the channel keys and press ENT. BASIC OPERATIONS English CHANGING CHANNELS Follow the instructions below to change the input source: TV, PC, Video1, Video 2, YPbPr1, YPbPr2, HDMI1, or HDMI2. 22 Using the Ch / Buttons Input Vol Ch YPbPr1 HDMI1 Video1 TV Browse channels To browse through the available channels, press Ch / on the remote control or on the control panel. Using the Channel Keys Favorite A B C ENT D Selecting channel To change to...
... the digital channel number using the channel keys and press ENT. BASIC OPERATIONS English CHANGING CHANNELS Follow the instructions below to change the input source: TV, PC, Video1, Video 2, YPbPr1, YPbPr2, HDMI1, or HDMI2. 22 Using the Ch / Buttons Input Vol Ch YPbPr1 HDMI1 Video1 TV Browse channels To browse through the available channels, press Ch / on the remote control or on the control panel. Using the Channel Keys Favorite A B C ENT D Selecting channel To change to...
User Manual
Page 29
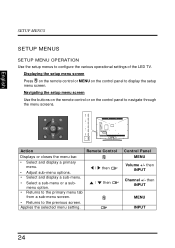
... a submenu option. • Returns to the primary menu tab from a sub-menu screen. / then • Returns to configure the various operational settings of the LED TV. then INPUT Channel +/- MENU VOL Enter CH - - - Displaying the setup menu screen Press on the remote control or MENU on the control panel to display the setup menu screen. then INPUT MENU INPUT 24 Applies the selected menu setting. Navigating the setup menu screen Use the buttons on the remote control or on the control panel to navigate through the menu screens. Control Panel MENU Volume +/-
... a submenu option. • Returns to the primary menu tab from a sub-menu screen. / then • Returns to configure the various operational settings of the LED TV. then INPUT Channel +/- MENU VOL Enter CH - - - Displaying the setup menu screen Press on the remote control or MENU on the control panel to display the setup menu screen. then INPUT MENU INPUT 24 Applies the selected menu setting. Navigating the setup menu screen Use the buttons on the remote control or on the control panel to navigate through the menu screens. Control Panel MENU Volume +/-
User Manual
Page 33
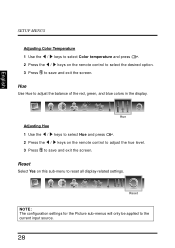
... on this sub-menu to the current input source. 28 Reset NOTE: The configuration settings for the Picture sub-menus will only be applied to reset all display-related settings. Hue Use Hue to adjust the balance of the red, green, and blue colors in the display. Hue Adjusting Hue 1 Use the / keys to select Hue and press . 2 Press the / keys on the remote control to adjust the hue level...
... on this sub-menu to the current input source. 28 Reset NOTE: The configuration settings for the Picture sub-menus will only be applied to reset all display-related settings. Hue Use Hue to adjust the balance of the red, green, and blue colors in the display. Hue Adjusting Hue 1 Use the / keys to select Hue and press . 2 Press the / keys on the remote control to adjust the hue level...

User Manual
Page 42
... stereo sound for the selected source. 37 Auto Search Select Auto Search and press . MTS Use MTS to save and exit the screen. Auto Search automatically creates a list of receivable channels for superior TV viewing experience. • SAP: Allows second audio program from the speakers while watching a scene in the original program. SETUP MENUS English The following options are receiving TV channels with an antenna (over the air). Adjusting MTS 1 Use...
... stereo sound for the selected source. 37 Auto Search Select Auto Search and press . MTS Use MTS to save and exit the screen. Auto Search automatically creates a list of receivable channels for superior TV viewing experience. • SAP: Allows second audio program from the speakers while watching a scene in the original program. SETUP MENUS English The following options are receiving TV channels with an antenna (over the air). Adjusting MTS 1 Use...

User Manual
Page 45
... (enable) or uncheck (disable) Adjust for closed captioning in TV programs. The following options are available: • Closed Captions: Can be set to ON or OFF. • Analog Type: Can be set to CC1,CC2, CC3, CC4, T1, T2, T3, or T4. • Digital Type: Can be set to CS1, CS2, CS3, CS4, CS5, or CS6. 40 English SETUP MENUS Adjusting Date and Time 1 Use the / keys to...
... (enable) or uncheck (disable) Adjust for closed captioning in TV programs. The following options are available: • Closed Captions: Can be set to ON or OFF. • Analog Type: Can be set to CC1,CC2, CC3, CC4, T1, T2, T3, or T4. • Digital Type: Can be set to CS1, CS2, CS3, CS4, CS5, or CS6. 40 English SETUP MENUS Adjusting Date and Time 1 Use the / keys to...
User Manual
Page 46
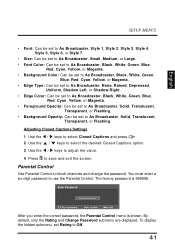
... correct password, the Parental Control menu is 999999. Parental Control Use Parental Control to block channels and change the password. By default, only the Rating and Change Password submenu are displayed. English SETUP MENUS • Font: Can be set to As Broadcaster, Style 1, Style 2, Style 3, Style 4, Style 5, Style 6, or Style 7. • Size: Can be set to As Broadcaster, Small, Medium, or Large. • Font Color: Can be set to As Broadcaster, Black, White, Green, Blue, Red...
... correct password, the Parental Control menu is 999999. Parental Control Use Parental Control to block channels and change the password. By default, only the Rating and Change Password submenu are displayed. English SETUP MENUS • Font: Can be set to As Broadcaster, Style 1, Style 2, Style 3, Style 4, Style 5, Style 6, or Style 7. • Size: Can be set to As Broadcaster, Small, Medium, or Large. • Font Color: Can be set to As Broadcaster, Black, White, Green, Blue, Red...
User Manual
Page 56
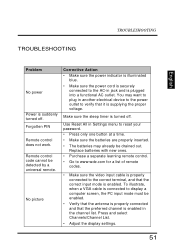
... correct input mode is supplying the proper voltage. Remote control code cannot be drained out. Forgotten PIN Remote control does not work. Make sure the sleep timer is enabled in Settings menu to display a computer screen, the PC input mode must be enabled. • Verify that the antenna is properly connected and that the preferred channel is turned off . To illustrate, when a VGA cable is connected to reset your password. • Press only one button at a time...
... correct input mode is supplying the proper voltage. Remote control code cannot be drained out. Forgotten PIN Remote control does not work. Make sure the sleep timer is enabled in Settings menu to display a computer screen, the PC input mode must be enabled. • Verify that the antenna is properly connected and that the preferred channel is turned off . To illustrate, when a VGA cable is connected to reset your password. • Press only one button at a time...
User Manual
Page 57
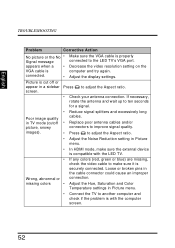
... your antenna connection. images). • Press to adjust the Aspect ratio. • Adjust the Noise Reduction setting in Picture menu. • In HDMI mode, make sure the external device is compatible with the LED TV. • Wrong, abnormal or missing colors • If any colors (red, green or blue) are missing, check the video cable to another computer and check if the problem is securely connected. to ten seconds for a signal...
... your antenna connection. images). • Press to adjust the Aspect ratio. • Adjust the Noise Reduction setting in Picture menu. • In HDMI mode, make sure the external device is compatible with the LED TV. • Wrong, abnormal or missing colors • If any colors (red, green or blue) are missing, check the video cable to another computer and check if the problem is securely connected. to ten seconds for a signal...
User Manual
Page 58
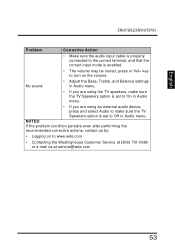
...; The volume may be muted, press or Vol+ key to turn on to www.wde.com • Contacting the Westinghouse Customer Service at (800) 701-0680 or e-mail us at service@wde.com 53 English TROUBLESHOOTING Problem Corrective Action • Make sure the audio input cable is properly connected to the correct terminal, and that the correct input mode is set to On in Audio menu.
...; The volume may be muted, press or Vol+ key to turn on to www.wde.com • Contacting the Westinghouse Customer Service at (800) 701-0680 or e-mail us at service@wde.com 53 English TROUBLESHOOTING Problem Corrective Action • Make sure the audio input cable is properly connected to the correct terminal, and that the correct input mode is set to On in Audio menu.


