
User Manual
Page 17
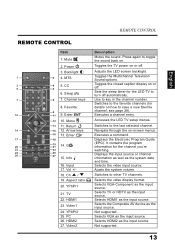
.... Displays the input source or channel information as well as the input source. Power 3. Backlight 1 2 4. Video1 24. YPbPr2 25. Toggles the TV power on . Sets the sleep timer for the channel you're watching. Selects VGA-Component as the input source. G 22 YPbPr2 HDMI2 Video2 PC 23 24 25 26...Mutes the sound. Favorite 9 10 11 9. Ch / 19. TV 22. Executes a command. Selects HDMI2 as the input source Not supported. 13 Return 14 15 12. REMOTE CONTROL English REMOTE CONTROL Item 1. Mute 2. Use to other TV channels.
.... Displays the input source or channel information as well as the input source. Power 3. Backlight 1 2 4. Video1 24. YPbPr2 25. Toggles the TV power on . Sets the sleep timer for the channel you're watching. Selects VGA-Component as the input source. G 22 YPbPr2 HDMI2 Video2 PC 23 24 25 26...Mutes the sound. Favorite 9 10 11 9. Ch / 19. TV 22. Executes a command. Selects HDMI2 as the input source Not supported. 13 Return 14 15 12. REMOTE CONTROL English REMOTE CONTROL Item 1. Mute 2. Use to other TV channels.

User Manual
Page 24
English INITIAL SETUP Press on the control panel or on the remote control to turn on how to be powered via an AC adapter. Use ONLY the AC adapter included in the package. Turn off all connected devices ... AC adapter to the LED TV then to use the SetupWizard. POWER CONNECTION POWER CONNECTION CONNECTING AC POWER IMPORTANT: The LED TV is designed to set up the LED TV's operational settings. MENU VOL CH INPUT 20 C.C.
English INITIAL SETUP Press on the control panel or on the remote control to turn on how to be powered via an AC adapter. Use ONLY the AC adapter included in the package. Turn off all connected devices ... AC adapter to the LED TV then to use the SetupWizard. POWER CONNECTION POWER CONNECTION CONNECTING AC POWER IMPORTANT: The LED TV is designed to set up the LED TV's operational settings. MENU VOL CH INPUT 20 C.C.
User Manual
Page 25
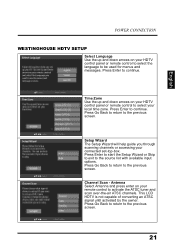
...scan over-the-air ATSC channels. Antenna Select Antenna and press enter on your remote control to the previous screen. English POWER CONNECTION WESTINGHOUSE HDTV SETUP Select Language Use the up and down arrows on your connected set-top-box. Press Enter to start the Setup Wizard or Skip to exit ...to the previous screen. 21 Time Zone Use the up and down arrows on your HDTV control panel or remote control to select...
...scan over-the-air ATSC channels. Antenna Select Antenna and press enter on your remote control to the previous screen. English POWER CONNECTION WESTINGHOUSE HDTV SETUP Select Language Use the up and down arrows on your connected set-top-box. Press Enter to start the Setup Wizard or Skip to exit ...to the previous screen. 21 Time Zone Use the up and down arrows on your HDTV control panel or remote control to select...
User Manual
Page 27
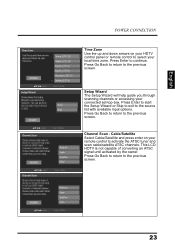
...previous screen. Press Go Back to return to the previous screen. 23 Cable/Satellite Select Cable/Satellite and press enter on your HDTV control panel or remote control to select your local time zone. This LCD HDTV is not capable of converting an ATSC signal until activated by the owner. ...Channel Scan - English POWER CONNECTION Time Zone Use the up and down arrows on your remote control to activate the ATSC tuner and scan cable/satellite ATSC channels. Setup Wizard The Setup Wizard will help guide you through scanning channels or...
...previous screen. Press Go Back to return to the previous screen. 23 Cable/Satellite Select Cable/Satellite and press enter on your HDTV control panel or remote control to select your local time zone. This LCD HDTV is not capable of converting an ATSC signal until activated by the owner. ...Channel Scan - English POWER CONNECTION Time Zone Use the up and down arrows on your remote control to activate the ATSC tuner and scan cable/satellite ATSC channels. Setup Wizard The Setup Wizard will help guide you through scanning channels or...
User Manual
Page 30
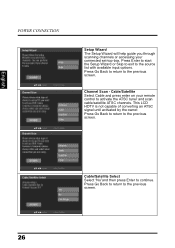
... Wizard The Setup Wizard will help guide you through scanning channels or accessing your remote control to activate the ATSC tuner and scan cable/satellite ATSC channels. Channel Scan - Cable/Satellite Select Cable and press enter on your connected set-top-box. This LCD HDTV is not capable of converting an ATSC signal...
... Wizard The Setup Wizard will help guide you through scanning channels or accessing your remote control to activate the ATSC tuner and scan cable/satellite ATSC channels. Channel Scan - Cable/Satellite Select Cable and press enter on your connected set-top-box. This LCD HDTV is not capable of converting an ATSC signal...

User Manual
Page 32
...increase the volume; ADJUSTING THE VOLUME Volume Mute Press Vol+ to disconnect the power cord from the wall outlet and remove the batteries from the remote control. • In standby mode, a small amount of electricity is still consumed even when the power is turned off. The mute icon appears...will depend on the enabled Power settings. CH INPUT C.C. MENU VOL LED indicator Turns from red to turn off the sound. Volume C.C. press Volto decrease the volume. Press again to red. Turning off the power Press on the control panel or on the remote control to turn on the LED TV...
...increase the volume; ADJUSTING THE VOLUME Volume Mute Press Vol+ to disconnect the power cord from the wall outlet and remove the batteries from the remote control. • In standby mode, a small amount of electricity is still consumed even when the power is turned off. The mute icon appears...will depend on the enabled Power settings. CH INPUT C.C. MENU VOL LED indicator Turns from red to turn off the sound. Volume C.C. press Volto decrease the volume. Press again to red. Turning off the power Press on the control panel or on the remote control to turn on the LED TV...
User Manual
Page 35
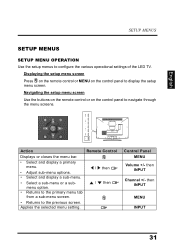
... the LED TV. Applies the selected menu setting. Control Panel MENU Volume +/- then INPUT MENU INPUT 31 MENU VOL Enter CH SPDIF HDMI 1 HDMI 2 USB DC IN TUNER Y - then INPUT Channel +/- Navigating the setup menu screen Use the buttons on the remote control or on the control panel to navigate through the menu screens. Displaying...
... the LED TV. Applies the selected menu setting. Control Panel MENU Volume +/- then INPUT MENU INPUT 31 MENU VOL Enter CH SPDIF HDMI 1 HDMI 2 USB DC IN TUNER Y - then INPUT Channel +/- Navigating the setup menu screen Use the buttons on the remote control or on the control panel to navigate through the menu screens. Displaying...

User Manual
Page 37
... of four preset view options optimized for viewing sports events. • Custom: Uses the customized settings. 33 SETUP MENUS English Saturation Adjusting Saturation 1 Use the / keys to select Saturation and press . 2 Press the / keys on the remote control to adjust the saturation level. 3 Press to adjust the color intensity. Saturation Use Saturation to...
... of four preset view options optimized for viewing sports events. • Custom: Uses the customized settings. 33 SETUP MENUS English Saturation Adjusting Saturation 1 Use the / keys to select Saturation and press . 2 Press the / keys on the remote control to adjust the saturation level. 3 Press to adjust the color intensity. Saturation Use Saturation to...
User Manual
Page 38
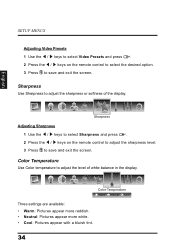
Color Temperature Warm Neutral Cool Three settings are available: • Warm: Pictures appear more reddish. • Neutral: Pictures appear more white. • Cool: Pictures appear with a bluish tint. 34 Sharpness Use Sharpness ... the level of the display. English SETUP MENUS Adjusting Video Presets 1 Use the / keys to select Video Presets and press . 2 Press the / keys on the remote control to adjust the sharpness level. 3 Press to save and exit the screen. Color Temperature Use Color temperature to adjust the sharpness or softness of white...
Color Temperature Warm Neutral Cool Three settings are available: • Warm: Pictures appear more reddish. • Neutral: Pictures appear more white. • Cool: Pictures appear with a bluish tint. 34 Sharpness Use Sharpness ... the level of the display. English SETUP MENUS Adjusting Video Presets 1 Use the / keys to select Video Presets and press . 2 Press the / keys on the remote control to adjust the sharpness level. 3 Press to save and exit the screen. Color Temperature Use Color temperature to adjust the sharpness or softness of white...

User Manual
Page 39
Reset NOTE: The configuration settings for the Picture sub-menus will only be applied to adjust the balance of the red, green, and blue colors in the display. Hue Use ... Adjusting Hue 1 Use the / keys to select Hue and press . 2 Press the / keys on this sub-menu to reset all display-related settings. Reset Select Yes on the remote control to adjust the hue level. 3 Press to save and exit the screen. English SETUP MENUS Adjusting Color Temperature 1 Use the / keys to select...
Reset NOTE: The configuration settings for the Picture sub-menus will only be applied to adjust the balance of the red, green, and blue colors in the display. Hue Use ... Adjusting Hue 1 Use the / keys to select Hue and press . 2 Press the / keys on this sub-menu to reset all display-related settings. Reset Select Yes on the remote control to adjust the hue level. 3 Press to save and exit the screen. English SETUP MENUS Adjusting Color Temperature 1 Use the / keys to select...
User Manual
Page 40
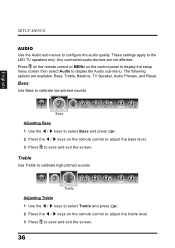
...The following options are not affected. SRS Treble Adjusting Treble 1 Use the / keys to select Treble and press . 2 Press the / keys on the remote control to adjust the bass level. 3 Press to save and exit the screen. 36 English Bass SRS Adjusting Bass 1 Use the / keys to select Bass ..., Treble, Balance, TV Speaker, Audio Presets, and Reset. Press on the remote control or MENU on the control panel to display the setup menu screen then select Audio to calibrate high-pitched sounds. Treble Use Treble to display the Audio sub-menu. These settings apply to save and exit the screen.
...The following options are not affected. SRS Treble Adjusting Treble 1 Use the / keys to select Treble and press . 2 Press the / keys on the remote control to adjust the bass level. 3 Press to save and exit the screen. 36 English Bass SRS Adjusting Bass 1 Use the / keys to select Bass ..., Treble, Balance, TV Speaker, Audio Presets, and Reset. Press on the remote control or MENU on the control panel to display the setup menu screen then select Audio to calibrate high-pitched sounds. Treble Use Treble to display the Audio sub-menu. These settings apply to save and exit the screen.
User Manual
Page 42
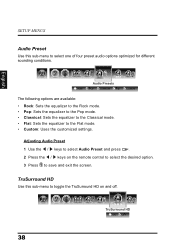
...to toggle the TruSurround HD on the remote control to select the desired option. 3 Press to save and exit the screen. SRS TruSurround HD ON OFF 38 Rock SRS Audio Presets POP Classical Flat Custom The following options are available: • Rock: Sets the equalizer to the Rock mode. ...• Pop: Sets the equalizer to the Pop mode. • Classical: Sets the equalizer to the Classical mode. • Flat: Sets the equalizer to select one of four preset audio options optimized ...
...to toggle the TruSurround HD on the remote control to select the desired option. 3 Press to save and exit the screen. SRS TruSurround HD ON OFF 38 Rock SRS Audio Presets POP Classical Flat Custom The following options are available: • Rock: Sets the equalizer to the Rock mode. ...• Pop: Sets the equalizer to the Pop mode. • Classical: Sets the equalizer to the Classical mode. • Flat: Sets the equalizer to select one of four preset audio options optimized ...

User Manual
Page 43
Reset Select Yes on the remote control to select On or OFF. 3 Press to reset all audio-related settings. English SETUP MENUS Adjusting TruSurround HD 1 Use the / keys to select TruSurround HD and press . 2 Press the / keys on this sub-menu to save and exit the screen. SRS Reset 39
Reset Select Yes on the remote control to select On or OFF. 3 Press to reset all audio-related settings. English SETUP MENUS Adjusting TruSurround HD 1 Use the / keys to select TruSurround HD and press . 2 Press the / keys on this sub-menu to save and exit the screen. SRS Reset 39
User Manual
Page 48
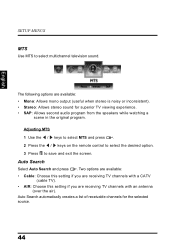
.... 2 Press the / keys on the remote control to select the desired option. 3 Press to select multichannel television sound. The following options are receiving TV channels with an antenna (over the air). Two options are available: • Cable: Choose this setting if you are receiving TV channels with a... CATV (cable TV). • AIR: Choose this setting if you are available: • Mono: Allows mono output (useful when stereo is noisy or ...
.... 2 Press the / keys on the remote control to select the desired option. 3 Press to select multichannel television sound. The following options are receiving TV channels with an antenna (over the air). Two options are available: • Cable: Choose this setting if you are receiving TV channels with a... CATV (cable TV). • AIR: Choose this setting if you are available: • Mono: Allows mono output (useful when stereo is noisy or ...
User Manual
Page 50
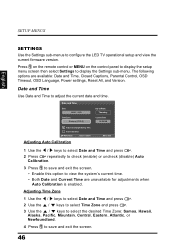
... to view the system's current time. • Both Date and Current Time are available: Date and Time, Closed Captions, Parental Control, OSD Timeout, OSD Language, Power settings, Reset All, and Version. Adjusting Time Zone 1 Use the / keys to select Date and Time and press . 2 Use the..., Central, Eastern, Atlantic, or Newfoundland. 4 Press to adjust the current date and time. Press on the remote control or MENU on the control panel to display the setup menu screen then select Settings to configure the LED TV operational setup and view the current firmware version. SETUP MENUS English...
... to view the system's current time. • Both Date and Current Time are available: Date and Time, Closed Captions, Parental Control, OSD Timeout, OSD Language, Power settings, Reset All, and Version. Adjusting Time Zone 1 Use the / keys to select Date and Time and press . 2 Use the..., Central, Eastern, Atlantic, or Newfoundland. 4 Press to adjust the current date and time. Press on the remote control or MENU on the control panel to display the setup menu screen then select Settings to configure the LED TV operational setup and view the current firmware version. SETUP MENUS English...

User Manual
Page 59
...following options are within the transmission range). • The new configuration settings cause unexpected results. • You forget the system PIN. en Reset All 55 Do this sub-menu to the remote control (ensure that the remote control batteries are still working and you are available: • VGA ...port -DPMS: Use this setting to enable or disable VGA port -DPMS. • Backlight: Use this setting to select the backlight mode: Bright Room,...
...following options are within the transmission range). • The new configuration settings cause unexpected results. • You forget the system PIN. en Reset All 55 Do this sub-menu to the remote control (ensure that the remote control batteries are still working and you are available: • VGA ...port -DPMS: Use this setting to enable or disable VGA port -DPMS. • Backlight: Use this setting to select the backlight mode: Bright Room,...

User Manual
Page 62
...List. • Adjust the display settings. 58 No picture Corrective Action • Make sure the power indicator is illuminated blue. • Make sure the power cord is supplying the proper voltage. Replace batteries with new ones. • Purchase a separate learning remote control. • Go to www.wde....com for a list of remote codes. • Make sure the video input cable is properly connected to the correct terminal, and that it is securely connected to the AC-in Settings menu to reset your password. &#...
...List. • Adjust the display settings. 58 No picture Corrective Action • Make sure the power indicator is illuminated blue. • Make sure the power cord is supplying the proper voltage. Replace batteries with new ones. • Purchase a separate learning remote control. • Go to www.wde....com for a list of remote codes. • Make sure the video input cable is properly connected to the correct terminal, and that it is securely connected to the AC-in Settings menu to reset your password. &#...


