
User Manual
Page 2
... BASE STAND TO THE LCD MONITOR 8 2. CONNECT AUDIO AND VIDEO CABLES TO A PC 8 3. English Table of Contents IMPORTANT PRODUCT SAFETY INSTRUCTIONS 1 SAFETY GUIDELINES ...2 FCC COMPLIANCE STATEMENT...2 CLEANING THE LCD MONITOR...3 FEATURES...4 POWER SAVER...4 PLUG & PLAY...4 INSTALLATION ...5 PACKAGE CONTENTS...5 FRONT VIEW OF THE LCD MONITOR ...6 REAR VIEW OF THE LCD MONITOR ...7 1. CONNECT POWER CABLES ...9 4. TURN THE POWER ON ...9 MOUNTING THE MONITOR ON A WALL 10 OSD MENU FUNCTIONS...11 IMAGE MENU ...12 AUDIO MENU ...13 COLOR MENU ...14 MISC MENU ...15 INFO MENU ...16 QUICK ADJUSTMENTS...
... BASE STAND TO THE LCD MONITOR 8 2. CONNECT AUDIO AND VIDEO CABLES TO A PC 8 3. English Table of Contents IMPORTANT PRODUCT SAFETY INSTRUCTIONS 1 SAFETY GUIDELINES ...2 FCC COMPLIANCE STATEMENT...2 CLEANING THE LCD MONITOR...3 FEATURES...4 POWER SAVER...4 PLUG & PLAY...4 INSTALLATION ...5 PACKAGE CONTENTS...5 FRONT VIEW OF THE LCD MONITOR ...6 REAR VIEW OF THE LCD MONITOR ...7 1. CONNECT POWER CABLES ...9 4. TURN THE POWER ON ...9 MOUNTING THE MONITOR ON A WALL 10 OSD MENU FUNCTIONS...11 IMAGE MENU ...12 AUDIO MENU ...13 COLOR MENU ...14 MISC MENU ...15 INFO MENU ...16 QUICK ADJUSTMENTS...
User Manual
Page 3
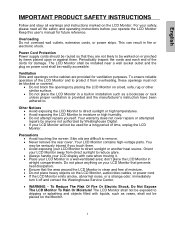
... overload wall outlets, extension cords, or power strips. The LCD Monitor shall be installed near a wall socket outlet and the plug on the Monitor. 1 Precautions • Avoid touching the screen. Skin oils are provided for future reference. Your LCD Monitor contains high-voltage parts. don't place the LCD Monitor in fire or electronic shock. The LCD Monitor shall not be seriously injured if you operate the LCD Monitor Keep this user's manual for...
... overload wall outlets, extension cords, or power strips. The LCD Monitor shall be installed near a wall socket outlet and the plug on the Monitor. 1 Precautions • Avoid touching the screen. Skin oils are provided for future reference. Your LCD Monitor contains high-voltage parts. don't place the LCD Monitor in fire or electronic shock. The LCD Monitor shall not be seriously injured if you operate the LCD Monitor Keep this user's manual for...
User Manual
Page 4
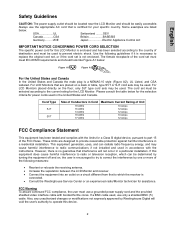
... installed and used . Always use a grounded power supply cord and the provided shielded video interface cable with bonded ferrite cores. FCC Warning To assure continued FCC compliance, the user must meet IEC-60320 requirements and should be selected according to which the receiver is connected. • Consult the Westinghouse Service Center or an experienced radio/Monitor technician for the LCD Monitor. English Safety Guidelines CAUTION: The power supply...
... installed and used . Always use a grounded power supply cord and the provided shielded video interface cable with bonded ferrite cores. FCC Warning To assure continued FCC compliance, the user must meet IEC-60320 requirements and should be selected according to which the receiver is connected. • Consult the Westinghouse Service Center or an experienced radio/Monitor technician for the LCD Monitor. English Safety Guidelines CAUTION: The power supply...
User Manual
Page 5
...-alcohol based, mild non- To clean the case: 1. Disclaimer Westinghouse Digital does not recommend the use of any ammonia or alcohol-based cleaners. 3 English Cleaning the LCD Monitor • MAKE SURE THE LCD MONITOR IS TURNED OFF • NEVER SPRAY OR POUR ANY LIQUID DIRECTLY ONTO THE SCREEN OR CASE To clean the screen: 1. Some chemical cleaners have been reported to damage the screen and/or LCD Monitor case. Use a soft...
...-alcohol based, mild non- To clean the case: 1. Disclaimer Westinghouse Digital does not recommend the use of any ammonia or alcohol-based cleaners. 3 English Cleaning the LCD Monitor • MAKE SURE THE LCD MONITOR IS TURNED OFF • NEVER SPRAY OR POUR ANY LIQUID DIRECTLY ONTO THE SCREEN OR CASE To clean the screen: 1. Some chemical cleaners have been reported to damage the screen and/or LCD Monitor case. Use a soft...
User Manual
Page 6
... save power, turn off the LCD monitor power when not in use your PC to the computer system, so the computer system can use . The LCD monitor is installed inside the LCD monitor. Your computer system will return the original screen image. You can automatically adjust the LCD monitor. 4 English FEATURES • Bright Display Image • Lightweight • Fast Response Time • Stereo Speakers • Power Saver • Kensington Security Lock Compatible • Safety Certifications Power Saver A power control...
... save power, turn off the LCD monitor power when not in use your PC to the computer system, so the computer system can use . The LCD monitor is installed inside the LCD monitor. Your computer system will return the original screen image. You can automatically adjust the LCD monitor. 4 English FEATURES • Bright Display Image • Lightweight • Fast Response Time • Stereo Speakers • Power Saver • Kensington Security Lock Compatible • Safety Certifications Power Saver A power control...

User Manual
Page 7
Male Stereo Audio Cable • User's Manual • Warranty Card 5 Male Cable • 3.5 mm Male - Package Contents Your product package includes: • 17" Westinghouse LCD Monitor • Detachable Base Stand • AC Power Cord • VGA (HD15) Male - Sleek and practical, this lightweight and wall-mountable LCD monitor delivers a crisp and clear display optimized for 1280 x 1024 display resolution. English INSTALLATION Congratulations on your purchase of a Westinghouse 19" LCD Monitor.
Male Stereo Audio Cable • User's Manual • Warranty Card 5 Male Cable • 3.5 mm Male - Package Contents Your product package includes: • 17" Westinghouse LCD Monitor • Detachable Base Stand • AC Power Cord • VGA (HD15) Male - Sleek and practical, this lightweight and wall-mountable LCD monitor delivers a crisp and clear display optimized for 1280 x 1024 display resolution. English INSTALLATION Congratulations on your purchase of a Westinghouse 19" LCD Monitor.

User Manual
Page 8
... the OSD is displayed. • Quick brightness adjustment and increase contrast/brightness. • Move a selection right when the OSD is displayed. • Enter and exit the OSD menu • Power On and Off button and indicator LED. • Blue: Normal • Orange: Power Saving • Off: Power Off • Audio Output. 6 Front View of the LCD Monitor to display the On Screen Display (OSD). English 7 1 2 3 7 6 5 4 1. The OSD controls are defined in "OSD Functions" on the front of the LCD Monitor Use the buttons on...
... the OSD is displayed. • Quick brightness adjustment and increase contrast/brightness. • Move a selection right when the OSD is displayed. • Enter and exit the OSD menu • Power On and Off button and indicator LED. • Blue: Normal • Orange: Power Saving • Off: Power Off • Audio Output. 6 Front View of the LCD Monitor to display the On Screen Display (OSD). English 7 1 2 3 7 6 5 4 1. The OSD controls are defined in "OSD Functions" on the front of the LCD Monitor Use the buttons on...

User Manual
Page 9
Rear View of the LCD Monitor English 1 2 1. DVI-D 4. Lock Hole 4 5 3 • Connect the power cord from AC IN to a power source. • Using the cable provided, connect to the Audio out (Green) from a computer. • Using a 24-pin DVI cable, connect to a computer or other device with a DVI output. • Use the enclosed 15-pin VGA cable, connect to a computer or other device with a VGA output. • For use with Kensington security locks. 7 D-SUB (VGA) 5. Audio-IN 3. AC IN (Power) 2.
Rear View of the LCD Monitor English 1 2 1. DVI-D 4. Lock Hole 4 5 3 • Connect the power cord from AC IN to a power source. • Using the cable provided, connect to the Audio out (Green) from a computer. • Using a 24-pin DVI cable, connect to a computer or other device with a DVI output. • Use the enclosed 15-pin VGA cable, connect to a computer or other device with a VGA output. • For use with Kensington security locks. 7 D-SUB (VGA) 5. Audio-IN 3. AC IN (Power) 2.

User Manual
Page 10
... are turned off. AUDIO CONNECTION: Connect a stereo mini cable from your PC VGA OUT port to a PC Connect one or all of the following into the back of the stand neck and remove the base. 2. To plug a DVI cable into place. DVI-D CONNECTION: Connect a Digital DVI cable from the PC's AUDIO-OUT port to the LCD Monitor DVI-D port. To remove the base stand, press the tabs on the LCD Monitor. English Installation 1. press in and snap into the port, remove the plastic cover below the port...
... are turned off. AUDIO CONNECTION: Connect a stereo mini cable from your PC VGA OUT port to a PC Connect one or all of the following into the back of the stand neck and remove the base. 2. To plug a DVI cable into place. DVI-D CONNECTION: Connect a Digital DVI cable from the PC's AUDIO-OUT port to the LCD Monitor DVI-D port. To remove the base stand, press the tabs on the LCD Monitor. English Installation 1. press in and snap into the port, remove the plastic cover below the port...

User Manual
Page 11
The LED light will turn blue if a signal input is detected or it will be orange if no input is detected. 9 Connect Power Cables Connect the AC power adapter cord to the LCD Monitor (to the connector labeled "AC-IN") and then connect the female AC power cord to the adapter. Turn the Power On Press the power button on the front of the LCD monitor. English 3. Plug the AC power cord into a properly grounded AC outlet. 4.
The LED light will turn blue if a signal input is detected or it will be orange if no input is detected. 9 Connect Power Cables Connect the AC power adapter cord to the LCD Monitor (to the connector labeled "AC-IN") and then connect the female AC power cord to the adapter. Turn the Power On Press the power button on the front of the LCD monitor. English 3. Plug the AC power cord into a properly grounded AC outlet. 4.
User Manual
Page 12
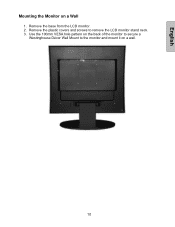
Remove the plastic covers and screws to the monitor and mount it on a wall. 10 Use the 100mm VESA hole pattern on a Wall 1. Remove the base from the LCD monitor. 2. English Mounting the Monitor on the back of the monitor to secure a Westinghouse Décor Wall Mount to remove the LCD monitor stand neck. 3.
Remove the plastic covers and screws to the monitor and mount it on a wall. 10 Use the 100mm VESA hole pattern on a Wall 1. Remove the base from the LCD monitor. 2. English Mounting the Monitor on the back of the monitor to secure a Westinghouse Décor Wall Mount to remove the LCD monitor stand neck. 3.
User Manual
Page 13
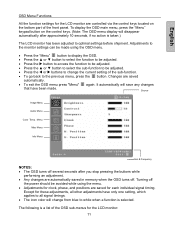
... an adjustment. • Any changes are saved automatically. • To exit the OSD menu press "Menu" again. Changes are automatically saved in memory when the OSD turns off the power should be adjusted. • Press the W or X buttons to change from blue to optimal settings before shipment. Turning off . The following is taken.) The LCD monitor has been adjusted to white when a function is selected. English OSD Menu Functions All the function settings for the LCD monitor: 11...
... an adjustment. • Any changes are saved automatically. • To exit the OSD menu press "Menu" again. Changes are automatically saved in memory when the OSD turns off the power should be adjusted. • Press the W or X buttons to change from blue to optimal settings before shipment. Turning off . The following is taken.) The LCD monitor has been adjusted to white when a function is selected. English OSD Menu Functions All the function settings for the LCD monitor: 11...
User Manual
Page 14
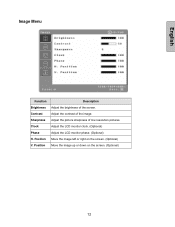
Image Menu English Function Description Brightness Adjust the brightness of low resolution pictures. Position Move the image left or right on the screen. (Optional) 12 Sharpness Adjust the picture sharpness of the screen. Clock Adjust the LCD monitor clock. (Optional) Phase Adjust the LCD monitor phase. (Optional) H. Contrast Adjust the contrast of the image. Position Move the image up or down on the screen. (Optional) V.
Image Menu English Function Description Brightness Adjust the brightness of low resolution pictures. Position Move the image left or right on the screen. (Optional) 12 Sharpness Adjust the picture sharpness of the screen. Clock Adjust the LCD monitor clock. (Optional) Phase Adjust the LCD monitor phase. (Optional) H. Contrast Adjust the contrast of the image. Position Move the image up or down on the screen. (Optional) V.

User Manual
Page 16
English Color Menu Function Description Color temp User/9300K/7500K/6500K/sRGB Red Adjust red color. Blue Adjust blue color. 14 Green Adjust green color.
English Color Menu Function Description Color temp User/9300K/7500K/6500K/sRGB Red Adjust red color. Blue Adjust blue color. 14 Green Adjust green color.
User Manual
Page 17
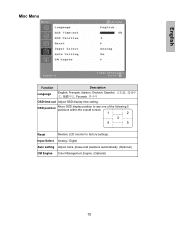
Misc Menu English Function Language Description English, Français, Italiano, Deutsch, Español OSD time-out Adjust OSD display time setting. OSD position Move OSD display position to any one of the following 5 positions within the overall screen. 1 2 3 4 5 Reset Restore LCD monitor to factory settings. Input Select Analog / Digital Auto setting Adjust clock, phase and positions automatically. (Optional) CM Engine Color Management Engine. (Optional) 15
Misc Menu English Function Language Description English, Français, Italiano, Deutsch, Español OSD time-out Adjust OSD display time setting. OSD position Move OSD display position to any one of the following 5 positions within the overall screen. 1 2 3 4 5 Reset Restore LCD monitor to factory settings. Input Select Analog / Digital Auto setting Adjust clock, phase and positions automatically. (Optional) CM Engine Color Management Engine. (Optional) 15
User Manual
Page 19
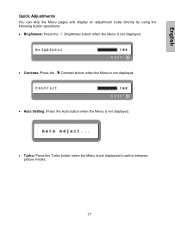
English Quick Adjustments You can skip the Menu pages and display an adjustment scale directly by using the following button operations: • Brightness: Press the Brightness button when the Menu is not displayed. • Contrast: Press the Contrast button when the Menu is not displayed. • Auto Setting: Press the Auto button when the Menu is not displayed. • Turbo: Press the Turbo button when the Menu is not displayed to switch between picture modes. 17
English Quick Adjustments You can skip the Menu pages and display an adjustment scale directly by using the following button operations: • Brightness: Press the Brightness button when the Menu is not displayed. • Contrast: Press the Contrast button when the Menu is not displayed. • Auto Setting: Press the Auto button when the Menu is not displayed. • Turbo: Press the Turbo button when the Menu is not displayed to switch between picture modes. 17
User Manual
Page 20
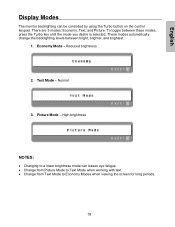
... Mode - Picture Mode - There are 3 modes: Economy, Text, and Picture. Reduced brightness 2. To toggle between bright, brighter, and brightest. 1. High brightness NOTES: • Changing to Economy Modes when viewing the screen for long periods. 18 Normal 3. English Display Modes The monitor backlighting can lessen eye fatigue. • Change from Picture Mode to Text Mode when working with text. • Change from Text Mode to a lower brightness mode can be controlled by using the Turbo button on the control keypad. Text Mode...
... Mode - Picture Mode - There are 3 modes: Economy, Text, and Picture. Reduced brightness 2. To toggle between bright, brighter, and brightest. 1. High brightness NOTES: • Changing to Economy Modes when viewing the screen for long periods. 18 Normal 3. English Display Modes The monitor backlighting can lessen eye fatigue. • Change from Picture Mode to Text Mode when working with text. • Change from Text Mode to a lower brightness mode can be controlled by using the Turbo button on the control keypad. Text Mode...

User Manual
Page 21
English Appendix Specifications Item Panel Size Type Optimum Resolution Response Time Contrast Ratio Maximum Brightness Viewing Angles Wall/Arm Mount Physical Input Signal Video Speaker Output Audio Power Voltage Operating Conditions Temperature Humidity Altitude Storage Conditions Temperature Humidity Altitude Dimensions Unit Carton Weight Unit Regulations Power consumption DC On DC Off Lamp Life Specification 17" Color TFT Active Matrix LCD. Anti-static and hard coated. 1280 x 1024 8 ms 450:1 300 Nits (typ...
English Appendix Specifications Item Panel Size Type Optimum Resolution Response Time Contrast Ratio Maximum Brightness Viewing Angles Wall/Arm Mount Physical Input Signal Video Speaker Output Audio Power Voltage Operating Conditions Temperature Humidity Altitude Storage Conditions Temperature Humidity Altitude Dimensions Unit Carton Weight Unit Regulations Power consumption DC On DC Off Lamp Life Specification 17" Color TFT Active Matrix LCD. Anti-static and hard coated. 1280 x 1024 8 ms 450:1 300 Nits (typ...
User Manual
Page 22
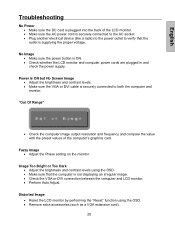
... No Screen Image • Adjust the brightness and contrast levels. • Make sure the VGA or DVI cable is ON. • Check whether the LCD monitor and computer power cords are plugged in and check the power supply. Fuzzy Image • Adjust the Phase setting on the monitor. Image Too Bright or Too Dark • Adjust the brightness and contrast levels using the OSD. • Remove extra accessories (such as a VGA extension cord). 20 No Image • Make sure the power button is securely connected to...
... No Screen Image • Adjust the brightness and contrast levels. • Make sure the VGA or DVI cable is ON. • Check whether the LCD monitor and computer power cords are plugged in and check the power supply. Fuzzy Image • Adjust the Phase setting on the monitor. Image Too Bright or Too Dark • Adjust the brightness and contrast levels using the OSD. • Remove extra accessories (such as a VGA extension cord). 20 No Image • Make sure the power button is securely connected to...
User Manual
Page 23
... Correct • Adjust the color setting using the OSD. • Check image size setting. No Sound • Check the audio connection. Mounting the LCD Monitor on a Wall • Check the Westinghouse Digital website for wall mounting solutions. • Use the 100mm VESA hole pattern to secure a mounting plate to the LCD monitor. • Use professional installation to reduce the risk of injury and damage. Additional Questions • See our website at www.westinghousedigital.com. • Contact Westinghouse Digital Customer Service at (866...
... Correct • Adjust the color setting using the OSD. • Check image size setting. No Sound • Check the audio connection. Mounting the LCD Monitor on a Wall • Check the Westinghouse Digital website for wall mounting solutions. • Use the 100mm VESA hole pattern to secure a mounting plate to the LCD monitor. • Use professional installation to reduce the risk of injury and damage. Additional Questions • See our website at www.westinghousedigital.com. • Contact Westinghouse Digital Customer Service at (866...


