
User Manual
Page 2
... the LCD Monitor 5 Rear View of the LCD Monitor 6 Installation 7 OSD Functions PICTURE PARAMETERS: Brightness / Contrast / Saturation / Hue / Color Temp / Sharpness / Aspect Ratio / Backlight / Reset 10 PC PARAMETERS: Auto Adjust / Clock / Phase / Position 11 AUDIO SETTINGS: Volume / Bass / Treble / Balance / Mute / Speaker / Reset 12 PICTURE-IN-PICTURE: Display Mode / Main Source / PIP Source / Swap / PIP Position / PIP Size / Audio From...........13 GENERAL SETTINGS: Menu Position / Menu Timeout / Language / Transparency / DPMS / LED / System Info / Factory Reset 14 Specifications 15...
... the LCD Monitor 5 Rear View of the LCD Monitor 6 Installation 7 OSD Functions PICTURE PARAMETERS: Brightness / Contrast / Saturation / Hue / Color Temp / Sharpness / Aspect Ratio / Backlight / Reset 10 PC PARAMETERS: Auto Adjust / Clock / Phase / Position 11 AUDIO SETTINGS: Volume / Bass / Treble / Balance / Mute / Speaker / Reset 12 PICTURE-IN-PICTURE: Display Mode / Main Source / PIP Source / Swap / PIP Position / PIP Size / Audio From...........13 GENERAL SETTINGS: Menu Position / Menu Timeout / Language / Transparency / DPMS / LED / System Info / Factory Reset 14 Specifications 15...

User Manual
Page 3
... cover repairs or attempted repairs by anyone not authorized by Westinghouse Digital. • If the LCD monitor will not be placed on power cord shall be seriously injured if you operate the LCD monitor Keep this user's manual for a long period of the LCD monitor and to protect it from direct sunlight to . The LCD monitor contains high-voltage parts. This can result in airtight compartments. The LCD monitor shall be installed near a wall...
... cover repairs or attempted repairs by anyone not authorized by Westinghouse Digital. • If the LCD monitor will not be placed on power cord shall be seriously injured if you operate the LCD monitor Keep this user's manual for a long period of the LCD monitor and to protect it from direct sunlight to . The LCD monitor contains high-voltage parts. This can result in airtight compartments. The LCD monitor shall be installed near a wall...
User Manual
Page 4
Always use a grounded power supply cord and the provided shielded video interface cable with the instructions. SEV Canada CSA Britain BASE/BS Germany..........VDE Japan Electric Appliance Control Act IMPORTANT NOTICE CONCERNING POWER CORD SELECTION The specific power cord for this LCD Display is enclosed and has been selected according to the country of destination and must be selected according to the current rating for the LCD Display. For LCD Display placed...
Always use a grounded power supply cord and the provided shielded video interface cable with the instructions. SEV Canada CSA Britain BASE/BS Germany..........VDE Japan Electric Appliance Control Act IMPORTANT NOTICE CONCERNING POWER CORD SELECTION The specific power cord for this LCD Display is enclosed and has been selected according to the country of destination and must be selected according to the current rating for the LCD Display. For LCD Display placed...
User Manual
Page 5
... still is not clean, apply a small amount of non-ammonia, non-alcohol based, mild non- English Cleaning the LCD Monitor • MAKE SURE THE LCD MONITOR IS TURNED OFF • NEVER SPRAY OR POUR ANY LIQUID DIRECTLY ONTO THE SCREEN OR CASE To clean the screen: 1. Use a soft, dry cloth. 2. Disclaimer Westinghouse Digital does not recommend the use of any ammonia or alcohol-based cleaners. 3 This removes dust and...
... still is not clean, apply a small amount of non-ammonia, non-alcohol based, mild non- English Cleaning the LCD Monitor • MAKE SURE THE LCD MONITOR IS TURNED OFF • NEVER SPRAY OR POUR ANY LIQUID DIRECTLY ONTO THE SCREEN OR CASE To clean the screen: 1. Use a soft, dry cloth. 2. Disclaimer Westinghouse Digital does not recommend the use of any ammonia or alcohol-based cleaners. 3 This removes dust and...
User Manual
Page 6
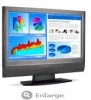
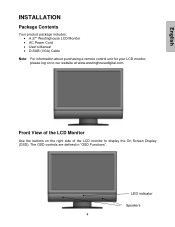
LED indicator Speakers 4 English INSTALLATION Package Contents Your product package includes: • A 27" Westinghouse LCD Monitor • AC Power Cord • User's Manual • D-SUB (VGA) Cable Note: For information about purchasing a remote control unit for your LCD monitor, please log on the right side of the LCD monitor to our website at www.westinghousedigital.com. The OSD controls are defined in "OSD Functions". Front View of the LCD Monitor Use the buttons on to display the On Screen Display (OSD).
LED indicator Speakers 4 English INSTALLATION Package Contents Your product package includes: • A 27" Westinghouse LCD Monitor • AC Power Cord • User's Manual • D-SUB (VGA) Cable Note: For information about purchasing a remote control unit for your LCD monitor, please log on the right side of the LCD monitor to our website at www.westinghousedigital.com. The OSD controls are defined in "OSD Functions". Front View of the LCD Monitor Use the buttons on to display the On Screen Display (OSD).
User Manual
Page 7
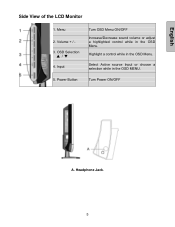
OSD Selection ▲ / ▼ 4. Highlight a control while in the OSD MENU. Headphone Jack. 5 Volume + / 3. Select Active source Input or choose a selection while in the OSD Menu. Turn Power ON/OFF A. Input 5. Power Button Turn OSD Menu ON/OFF Increase/Decrease sound volume or adjust a highlighted control while in the OSD Menu. English Side View of the LCD Monitor 1. Menu 2.
OSD Selection ▲ / ▼ 4. Highlight a control while in the OSD MENU. Headphone Jack. 5 Volume + / 3. Select Active source Input or choose a selection while in the OSD Menu. Turn Power ON/OFF A. Input 5. Power Button Turn OSD Menu ON/OFF Increase/Decrease sound volume or adjust a highlighted control while in the OSD Menu. English Side View of the LCD Monitor 1. Menu 2.
User Manual
Page 8
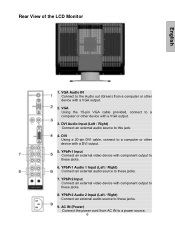
VGA Audio IN Connect to the Audio out (Green) from AC IN to a power source. 6 DVI Audio Input (Left / Right) Connect an external audio source to these jacks. 8. YPbPr1 Audio 1 Input (Left / Right) Connect an external audio source to these jacks. 7. YPbPr2 Audio 2 Input (Left / Right) Connect an external audio source to these jacks. 9. English Rear View of the LCD Monitor 1. DVI Using a 20-pin DVI cable, connect to these jacks. 6. VGA Using the 15-pin VGA cable provided, connect to a computer or other device with component output...
VGA Audio IN Connect to the Audio out (Green) from AC IN to a power source. 6 DVI Audio Input (Left / Right) Connect an external audio source to these jacks. 8. YPbPr1 Audio 1 Input (Left / Right) Connect an external audio source to these jacks. 7. YPbPr2 Audio 2 Input (Left / Right) Connect an external audio source to these jacks. 9. English Rear View of the LCD Monitor 1. DVI Using a 20-pin DVI cable, connect to these jacks. 6. VGA Using the 15-pin VGA cable provided, connect to a computer or other device with component output...
User Manual
Page 9
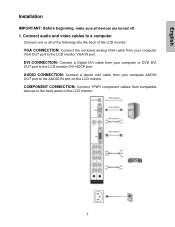
...AUDIO CONNECTION: Connect a stereo mini cable from your computer VGA OUT port to the AUDIO IN port on the LCD monitor. COMPONENT CONNECTION: Connect YPbPr component cables from compatible devices to the back panel of the LCD monitor: VGA CONNECTION: Connect the enclosed analog VGA cable from your computer or DVD DVI OUT port to a computer Connect one or all devices are turned off. 1. Connect audio and video cables to the LCD monitor DVI-HDCP port. DVI CONNECTION: Connect a Digital DVI cable from your computer AUDIO OUT port to the LCD monitor VGA IN port. English Installation...
...AUDIO CONNECTION: Connect a stereo mini cable from your computer VGA OUT port to the AUDIO IN port on the LCD monitor. COMPONENT CONNECTION: Connect YPbPr component cables from compatible devices to the back panel of the LCD monitor: VGA CONNECTION: Connect the enclosed analog VGA cable from your computer or DVD DVI OUT port to a computer Connect one or all devices are turned off. 1. Connect audio and video cables to the LCD monitor DVI-HDCP port. DVI CONNECTION: Connect a Digital DVI cable from your computer AUDIO OUT port to the LCD monitor VGA IN port. English Installation...
User Manual
Page 10
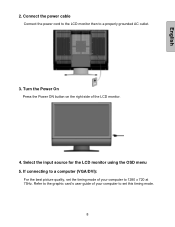
If connecting to a computer (VGA/DVI): For the best picture quality, set this timing mode. 8 Turn the Power On Press the Power ON button on the right side of your computer to a properly grounded AC outlet. 3. Connect the power cable Connect the power cord to the LCD monitor then to 1280 x 720 at 75Hz. Refer to the graphic card's user guide of your computer to set the timing mode of the LCD monitor. 4. English 2. Select the input source for the LCD monitor using the OSD menu 5.
If connecting to a computer (VGA/DVI): For the best picture quality, set this timing mode. 8 Turn the Power On Press the Power ON button on the right side of your computer to a properly grounded AC outlet. 3. Connect the power cable Connect the power cord to the LCD monitor then to 1280 x 720 at 75Hz. Refer to the graphic card's user guide of your computer to set the timing mode of the LCD monitor. 4. English 2. Select the input source for the LCD monitor using the OSD menu 5.
User Manual
Page 11
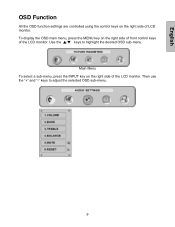
English OSD Function All the OSD function settings are controlled using the control keys on the right side of the LCD monitor. Use the ▲/▼ keys to adjust the selected OSD sub-menu. 9 Main Menu To select a sub-menu, press the INPUT key on the right side of front control keys of the LCD monitor. Then use the "+" and "-" keys to highlight the desired OSD sub-menu. To display the OSD main menu, press the MENU key on the right side of LCD monitor.
English OSD Function All the OSD function settings are controlled using the control keys on the right side of the LCD monitor. Use the ▲/▼ keys to adjust the selected OSD sub-menu. 9 Main Menu To select a sub-menu, press the INPUT key on the right side of front control keys of the LCD monitor. Then use the "+" and "-" keys to highlight the desired OSD sub-menu. To display the OSD main menu, press the MENU key on the right side of LCD monitor.
User Manual
Page 12
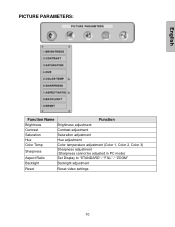
PICTURE PARAMETERS: English Function Name Function Brightness Contrast Saturation Hue Color Temp Sharpness Aspect Ratio Brightness adjustment Contrast adjustment Saturation adjustment Hue adjustment Color temperature adjustment (Color 1, Color 2, Color 3) Sharpness adjustment (Sharpness cannot be adjusted in PC mode) Set Display to "STANDARD" / "FILL" / "ZOOM" Backlight Backlight adjustment Reset Reset video settings 10
PICTURE PARAMETERS: English Function Name Function Brightness Contrast Saturation Hue Color Temp Sharpness Aspect Ratio Brightness adjustment Contrast adjustment Saturation adjustment Hue adjustment Color temperature adjustment (Color 1, Color 2, Color 3) Sharpness adjustment (Sharpness cannot be adjusted in PC mode) Set Display to "STANDARD" / "FILL" / "ZOOM" Backlight Backlight adjustment Reset Reset video settings 10

User Manual
Page 13
English PC PARAMETERS: NOTE: The PC PARAMETERS menu is only available when the VGA source is selected. Function Name Auto Clock Phase Position Function Automatically adjust the horizontal phase of the image Clock adjustment Phase adjustment Adjust the horizontal and vertical position of the image 11
English PC PARAMETERS: NOTE: The PC PARAMETERS menu is only available when the VGA source is selected. Function Name Auto Clock Phase Position Function Automatically adjust the horizontal phase of the image Clock adjustment Phase adjustment Adjust the horizontal and vertical position of the image 11
User Manual
Page 14
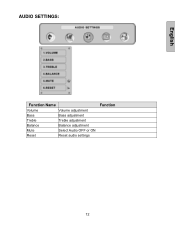
AUDIO SETTINGS: English Function Name Volume Volume adjustment Bass Bass adjustment Treble Treble adjustment Balance Balance adjustment Mute Select Audio OFF or ON Reset Reset audio settings Function 12
AUDIO SETTINGS: English Function Name Volume Volume adjustment Bass Bass adjustment Treble Treble adjustment Balance Balance adjustment Mute Select Audio OFF or ON Reset Reset audio settings Function 12
User Manual
Page 16
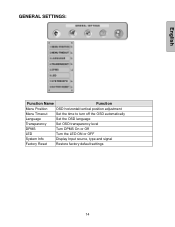
GENERAL SETTINGS: English Function Name Function Menu Position OSD horizontal/vertical position adjustment Menu Timeout Set the time to turn off the OSD automatically Language Set the OSD language Transparency Set OSD transparency level DPMS Turn DPMS On or Off LED Turn the LED ON or OFF System Info Display Input source, type and signal Factory Reset Restore factory default settings 14
GENERAL SETTINGS: English Function Name Function Menu Position OSD horizontal/vertical position adjustment Menu Timeout Set the time to turn off the OSD automatically Language Set the OSD language Transparency Set OSD transparency level DPMS Turn DPMS On or Off LED Turn the LED ON or OFF System Info Display Input source, type and signal Factory Reset Restore factory default settings 14
User Manual
Page 17
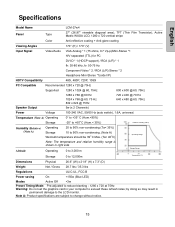
English Specifications Model Name LCM-27w4 Panel Type 27" (26.97" viewable diagonal area), TFT (Thin Film Transistor), Active Matrix WXGA LCD, 1280 x 720 vertical stripe Color Anti-reflective coating + Anti-glare coating Viewing Angles 170° (H) / 170° (V) Input Signal Video/Audio VGA Analog * 1 (75 ohms, 0.7 Vp-p)/Mini-Stereo *1 H/V separated (TTL) for PC DVI-D * 1 (HDCP support) / RCA (L/R) * 1 fh: 30-80 kHz, fv: 50-75 Hz Component Video * 2 / RCA (L/R) Stereo * 2 Headphone...
English Specifications Model Name LCM-27w4 Panel Type 27" (26.97" viewable diagonal area), TFT (Thin Film Transistor), Active Matrix WXGA LCD, 1280 x 720 vertical stripe Color Anti-reflective coating + Anti-glare coating Viewing Angles 170° (H) / 170° (V) Input Signal Video/Audio VGA Analog * 1 (75 ohms, 0.7 Vp-p)/Mini-Stereo *1 H/V separated (TTL) for PC DVI-D * 1 (HDCP support) / RCA (L/R) * 1 fh: 30-80 kHz, fv: 50-75 Hz Component Video * 2 / RCA (L/R) Stereo * 2 Headphone...

User Manual
Page 18
... the LCD monitor, secure it tightly. • Adjust brightness and contrast. • If you are not connected to the Headphone Jack on or volume level is supplying the proper voltage. How Can I Find More Help? • Log on the back of the video cable is connected securely. No Sound • Check the audio connection. • Check the audio settings (e.g. Power is ON but No Screen Image • Make sure the video cable connected to the LCD monitor...
... the LCD monitor, secure it tightly. • Adjust brightness and contrast. • If you are not connected to the Headphone Jack on or volume level is supplying the proper voltage. How Can I Find More Help? • Log on the back of the video cable is connected securely. No Sound • Check the audio connection. • Check the audio settings (e.g. Power is ON but No Screen Image • Make sure the video cable connected to the LCD monitor...

