
English Manual
Page 1
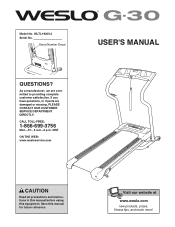
... and instructions in this manual before using this manual for future reference. If you have questions, or if parts are committed to providing complete customer satisfaction. Visit our website at www.weslo.com new products, prizes, fitness tips, and much more! Serial Number Decal USER'S MANUAL QUESTIONS? As a manufacturer, we are damaged or missing, PLEASE CONTACT OUR CUSTOMER SERVICE DEPARTMENT DIRECTLY. CALL TOLL-FREE...
... and instructions in this manual before using this manual for future reference. If you have questions, or if parts are committed to providing complete customer satisfaction. Visit our website at www.weslo.com new products, prizes, fitness tips, and much more! Serial Number Decal USER'S MANUAL QUESTIONS? As a manufacturer, we are damaged or missing, PLEASE CONTACT OUR CUSTOMER SERVICE DEPARTMENT DIRECTLY. CALL TOLL-FREE...

English Manual
Page 2
TABLE OF CONTENTS IMPORTANT PRECAUTIONS 3 BEFORE YOU BEGIN 5 ASSEMBLY 6 OPERATION AND ADJUSTMENT 9 HOW TO FOLD AND MOVE THE TREADMILL 12 MAINTENANCE AND TROUBLESHOOTING 13 CONDITIONING GUIDELINES 15 ORDERING REPLACEMENT PARTS Back Cover LIMITED WARRANTY Back Cover Note: A PART IDENTIFICATION CHART, an EXPLODED DRAWING, and a PART LIST are attached in the center of ICON IP, Inc. 2 WESLO is a registered trademark of this manual.
TABLE OF CONTENTS IMPORTANT PRECAUTIONS 3 BEFORE YOU BEGIN 5 ASSEMBLY 6 OPERATION AND ADJUSTMENT 9 HOW TO FOLD AND MOVE THE TREADMILL 12 MAINTENANCE AND TROUBLESHOOTING 13 CONDITIONING GUIDELINES 15 ORDERING REPLACEMENT PARTS Back Cover LIMITED WARRANTY Back Cover Note: A PART IDENTIFICATION CHART, an EXPLODED DRAWING, and a PART LIST are attached in the center of ICON IP, Inc. 2 WESLO is a registered trademark of this manual.
English Manual
Page 3
... precautions and information before using the treadmill (see your local WESLO dealer or call the toll-free 15. Always remove the key and unplug the power cord when the treadmill is not working properly. (See MAINTENANCE AND TROUBLESHOOTING on the front cover of this treadmill are standing on the same circuit. It is turned off. Never move the walking belt while the power is the responsibility of the owner to ensure...
... precautions and information before using the treadmill (see your local WESLO dealer or call the toll-free 15. Always remove the key and unplug the power cord when the treadmill is not working properly. (See MAINTENANCE AND TROUBLESHOOTING on the front cover of this treadmill are standing on the same circuit. It is turned off. Never move the walking belt while the power is the responsibility of the owner to ensure...
English Manual
Page 4
... cleaning the treadmill, and before using. Apply the decal in any commercial, rental, or institutional setting. Always unplug the power cord immediately after use this manual should be performed by an authorized service representative only. 25. Never remove the motor hood unless instructed to do so by or through the use only. Servicing other than the procedures in -home use of this or any opening. WARNING: Before...
... cleaning the treadmill, and before using. Apply the decal in any commercial, rental, or institutional setting. Always unplug the power cord immediately after use this manual should be performed by an authorized service representative only. 25. Never remove the motor hood unless instructed to do so by or through the use only. Servicing other than the procedures in -home use of this or any opening. WARNING: Before...

English Manual
Page 5
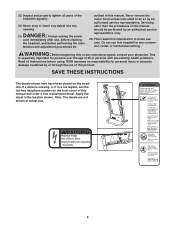
... not included) Console Handrail Storage Latch LEFT SIDE Walking Belt Foot Rail Key/Clip RIGHT SIDE Hood Circuit Breaker Power Cord Wheel Rear Roller Adjustment Bolts Incline Leg 5 To help us . And when you for any service needed under warranty, you enjoy an excellent form of cardiovascular exercise in the convenience and privacy of your benefit, read this manual. For your home. The G-30 treadmill combines advanced technology with the labeled parts. BEFORE YOU BEGIN...
... not included) Console Handrail Storage Latch LEFT SIDE Walking Belt Foot Rail Key/Clip RIGHT SIDE Hood Circuit Breaker Power Cord Wheel Rear Roller Adjustment Bolts Incline Leg 5 To help us . And when you for any service needed under warranty, you enjoy an excellent form of cardiovascular exercise in the convenience and privacy of your benefit, read this manual. For your home. The G-30 treadmill combines advanced technology with the labeled parts. BEFORE YOU BEGIN...
English Manual
Page 6
... own phillips screwdriver , adjustable wrenches , and wire cutters . Attach the six Base Pads (19) to the top of the treadmill walking belt is coated with high-performance lubricant. Set the treadmill in the position shown. If there is completed. Note: To identify small parts used during assembly, see the PART IDENTIFICATION CHART in the position shown. Do not remove the long wire is in the center...
... own phillips screwdriver , adjustable wrenches , and wire cutters . Attach the six Base Pads (19) to the top of the treadmill walking belt is coated with high-performance lubricant. Set the treadmill in the position shown. If there is completed. Note: To identify small parts used during assembly, see the PART IDENTIFICATION CHART in the position shown. Do not remove the long wire is in the center...

English Manual
Page 7
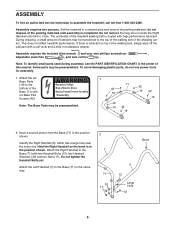
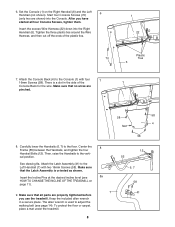
... shown. If it does not, turn freely. 55 Position the front of the Wire Harness and then try again. IF THE CONNECTORS ARE NOT CONNECTED PROPERLY, THE CONSOLE MAY BE DAMAGED WHEN THE POWER IS TURNED ON. 7 6 13 30 10 60 55 Connector 1 22 Plastic 6 Ties 22 Attach the Right Handrail to the outer ... second person, raise the Handrails 3 (6, 7) so the Base (71) is extending from the end of the Frame (55). Repeat this step on the back of the Right Handrail. 6 17 15 22 14 71 Wire 22 6 4. Insert the end of the treadmill. 5. Next, press the end of the Wire Harness into place.
... shown. If it does not, turn freely. 55 Position the front of the Wire Harness and then try again. IF THE CONNECTORS ARE NOT CONNECTED PROPERLY, THE CONSOLE MAY BE DAMAGED WHEN THE POWER IS TURNED ON. 7 6 13 30 10 60 55 Connector 1 22 Plastic 6 Ties 22 Attach the Right Handrail to the outer ... second person, raise the Handrails 3 (6, 7) so the Base (71) is extending from the end of the Frame (55). Repeat this step on the back of the Right Handrail. 6 17 15 22 14 71 Wire 22 6 4. Insert the end of the treadmill. 5. Next, press the end of the Wire Harness into place.
English Manual
Page 8
... lower the Handrails (6, 7) to adjust the walking belt (see HOW TO CHANGE THE INCLINE OF THE TREADMILL on the Right Handrail (6) and the Left Handrail (not shown). Center the Frame (55) between the Handrails, and tighten the four Handrail Bolts (12). Make sure that the Latch Assembly is a slot in a secure place. 6. Make sure that all four Console Screws, tighten them. Insert the Incline Pins at...
... lower the Handrails (6, 7) to adjust the walking belt (see HOW TO CHANGE THE INCLINE OF THE TREADMILL on the Right Handrail (6) and the Left Handrail (not shown). Center the Frame (55) between the Handrails, and tighten the four Handrail Bolts (12). Make sure that the Latch Assembly is a slot in a secure place. 6. Make sure that all four Console Screws, tighten them. Insert the Incline Pins at...
English Manual
Page 9
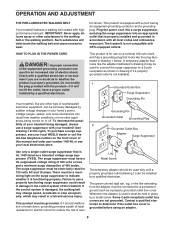
... part number 146148, or see drawing 1 at the right). This product must be seriously damaged by a qualified electrician. Whenever the adapter is used to connect the surge suppressor to indicate whether it should be used only until a properly grounded outlet (drawing 1) can be a monitoring light on the front cover of electric shock. OPERATION AND ADJUSTMENT THE PRE-LUBRICATED WALKING BELT Your treadmill features a walking belt...
... part number 146148, or see drawing 1 at the right). This product must be seriously damaged by a qualified electrician. Whenever the adapter is used to connect the surge suppressor to indicate whether it should be used only until a properly grounded outlet (drawing 1) can be a monitoring light on the front cover of electric shock. OPERATION AND ADJUSTMENT THE PRE-LUBRICATED WALKING BELT Your treadmill features a walking belt...
English Manual
Page 10
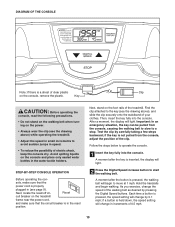
... display will change in the reset position. Important: In an emergency situation, the key can be pulled from the console, adjust the position of the clip. Follow the steps below to start the walking belt. if a button is in increments of electric shock, keep the console dry. sole, make sure that the power cord is pressed, the speed setting will light. 2 Press the Digital Speed increase button to operate the console...
... display will change in the reset position. Important: In an emergency situation, the key can be pulled from the console, adjust the position of the clip. Follow the steps below to start the walking belt. if a button is in increments of electric shock, keep the console dry. sole, make sure that the power cord is pressed, the speed setting will light. 2 Press the Digital Speed increase button to operate the console...

English Manual
Page 11
... into the incline legs. Next, fold the treadmill to flash. Then, switch the reset/off circuit breaker to the desired height, and fully reinsert Incline Pin the incline pin. As you have walked or run , the speed of the walking belt, or the approximate number of the display. The upper half of the incline legs. Adjust the other incline leg in a 11 Step onto the foot rails, press the Stop button, and remove the key from one...
... into the incline legs. Next, fold the treadmill to flash. Then, switch the reset/off circuit breaker to the desired height, and fully reinsert Incline Pin the incline pin. As you have walked or run , the speed of the walking belt, or the approximate number of the display. The upper half of the incline legs. Adjust the other incline leg in a 11 Step onto the foot rails, press the Stop button, and remove the key from one...
English Manual
Page 12
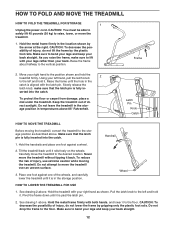
... injury, do not lower the frame by the arrow at the right. HOW TO FOLD AND MOVE THE TREADMILL HOW TO FOLD THE TREADMILL FOR STORAGE 1 Unplug the power cord. Handrail 1. Make sure to the desired location. Carefully move the treadmill without tipping it is past the latch pin. 2. Latch Pin Knob Catch HOW TO MOVE THE TREADMILL Before moving the treadmill. Tilt the treadmill back until it back. Move your left and...
... injury, do not lower the frame by the arrow at the right. HOW TO FOLD AND MOVE THE TREADMILL HOW TO FOLD THE TREADMILL FOR STORAGE 1 Unplug the power cord. Handrail 1. Make sure to the desired location. Carefully move the treadmill without tipping it is past the latch pin. 2. Latch Pin Knob Catch HOW TO MOVE THE TREADMILL Before moving the treadmill. Tilt the treadmill back until it back. Move your left and...
English Manual
Page 13
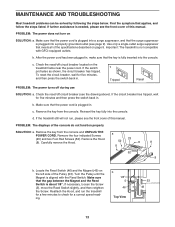
... cover of the Pulley (53). PROBLEM: The displays of this manual. Remove the key from the console. Locate the Reed Switch (46) and the Magnet (49) on page 9. c. If the treadmill still will not run the treadmill for a few minutes to check for a correct speed reading. Carefully remove the Hood. 23 52 8 8 8 52 8 b. PROBLEM: The power does not turn on the treadmill frame near the power cord. Make sure that the power cord is plugged...
... cover of the Pulley (53). PROBLEM: The displays of this manual. Remove the key from the console. Locate the Reed Switch (46) and the Magnet (49) on page 9. c. If the treadmill still will not run the treadmill for a few minutes to check for a correct speed reading. Carefully remove the Hood. 23 52 8 8 8 52 8 b. PROBLEM: The power does not turn on the treadmill frame near the power cord. Make sure that the power cord is plugged...
English Manual
Page 14
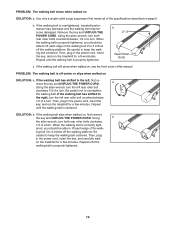
... the walking belt has shifted to the right, turn the left rear roller bolt counterclockwise 1/2 of this manual. If the walking belt slips when walked on , see the front cover of a turn . When the walking belt is off-center or slips when walked on page 9. Then, plug in the power cord, insert the key, and run the treadmill for a few minutes. SOLUTION: a. Use only a single-outlet surge suppressor that meets all of a turn . PROBLEM: The walking belt...
... the walking belt has shifted to the right, turn the left rear roller bolt counterclockwise 1/2 of this manual. If the walking belt slips when walked on , see the front cover of a turn . When the walking belt is off-center or slips when walked on page 9. Then, plug in the power cord, insert the key, and run the treadmill for a few minutes. SOLUTION: a. Use only a single-outlet surge suppressor that meets all of a turn . PROBLEM: The walking belt...
English Manual
Page 15
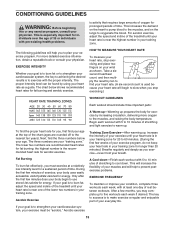
... your training zone. The key to make exercise a regular and enjoyable part of your exercise until your age. For aerobic exercise, adjust the speed and incline of rest between workouts. The chart below your heart rate is to success is near one day of the treadmill until your heart rate is in your training zone for 20 to five workouts each week, with pre-existing health problems. is the recommended heart rate...
... your training zone. The key to make exercise a regular and enjoyable part of your exercise until your age. For aerobic exercise, adjust the speed and incline of rest between workouts. The chart below your heart rate is to success is near one day of the treadmill until your heart rate is in your training zone for 20 to five workouts each week, with pre-existing health problems. is the recommended heart rate...
English Manual
Page 16
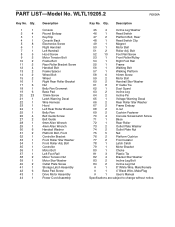
PART LIST-Model No. Bolt Controller Motor Bolt Left Foot Rail Motor Tension Nut Motor Star Washer Outlet Plate Screw Storage Latch Assembly Base Pad Screw Drive Motor Assembly Power Cord Assembly Key No. Qty. Bolt 52 10 Foot Rail Screw 53 1 Front Roller/Pulley 54 1 Right Foot Rail 55 1 Frame 56 1 Walking Belt 57 1 Walking Platform 58 6 16mm Screw 59 2 Motor Bolt 60 2 Handrail Star Washer 61 8 8" Cable Tie 62 1 Dust Guard 63 2 Incline Leg 64 2 Incline Pin 65 1 Voltage Warning Decal 66 2 Rear Roller Star Washer 67...
PART LIST-Model No. Bolt Controller Motor Bolt Left Foot Rail Motor Tension Nut Motor Star Washer Outlet Plate Screw Storage Latch Assembly Base Pad Screw Drive Motor Assembly Power Cord Assembly Key No. Qty. Bolt 52 10 Foot Rail Screw 53 1 Front Roller/Pulley 54 1 Right Foot Rail 55 1 Frame 56 1 Walking Belt 57 1 Walking Platform 58 6 16mm Screw 59 2 Motor Bolt 60 2 Handrail Star Washer 61 8 8" Cable Tie 62 1 Dust Guard 63 2 Incline Leg 64 2 Incline Pin 65 1 Voltage Warning Decal 66 2 Rear Roller Star Washer 67...
English Manual
Page 17
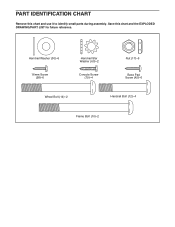
PART IDENTIFICATION CHART Remove this chart and the EXPLODED DRAWING/PART LIST for future reference. Handrail Washer (30)-6 16mm Screw (58)-6 Handrail Star Washer (60)-2 Console Screw (70)-4 Nut (17)-6 Base Pad Screw (42)-6 Wheel Bolt (14)-2 Handrail Bolt (12)-4 Frame Bolt (10)-2 Save this chart and use it to identify small parts during assembly.
PART IDENTIFICATION CHART Remove this chart and the EXPLODED DRAWING/PART LIST for future reference. Handrail Washer (30)-6 16mm Screw (58)-6 Handrail Star Washer (60)-2 Console Screw (70)-4 Nut (17)-6 Base Pad Screw (42)-6 Wheel Bolt (14)-2 Handrail Bolt (12)-4 Frame Bolt (10)-2 Save this chart and use it to identify small parts during assembly.

English Manual
Page 18
... 62 20 20 5 82 32 8 74 3 1 20 81 2 70 58 58 4 41 22 2 58 70 58 7 23 44 10 30 60 6 13 12 14 2 13 15 60 30 10 8 40 73 8 73 40 30 8 74 19 42 17 20 19 8 18 42 20 17 19 42 71 19 42 12 17 2 22 15...
... 62 20 20 5 82 32 8 74 3 1 20 81 2 70 58 58 4 41 22 2 58 70 58 7 23 44 10 30 60 6 13 12 14 2 13 15 60 30 10 8 40 73 8 73 40 30 8 74 19 42 17 20 19 8 18 42 20 17 19 42 71 19 42 12 17 2 22 15...
English Manual
Page 19
... the product (WESLO G-30 treadmill) • the SERIAL NUMBER of the product (see the front cover of this manual) • the KEY NUMBER and DESCRIPTION of the desired part(s) (see the front cover of this manual. If the product is authorized by ICON. This warranty gives you . ORDERING REPLACEMENT PARTS To order replacement parts, please see the PART LIST and the EXPLODED DRAWING in the center of this manual) LIMITED WARRANTY ICON Health & Fitness, Inc. (ICON), warrants...
... the product (WESLO G-30 treadmill) • the SERIAL NUMBER of the product (see the front cover of this manual) • the KEY NUMBER and DESCRIPTION of the desired part(s) (see the front cover of this manual. If the product is authorized by ICON. This warranty gives you . ORDERING REPLACEMENT PARTS To order replacement parts, please see the PART LIST and the EXPLODED DRAWING in the center of this manual) LIMITED WARRANTY ICON Health & Fitness, Inc. (ICON), warrants...


