
English Manual
Page 3
... a surge suppressor, see your local WESLO dealer or call the toll-free 15. Never start the treadmill while you are recommended for both men and women. Always remove the key and unplug the power cord when the treadmill is damaged, the walking belt may change the incline of the treadmill by persons weighing more than...
... a surge suppressor, see your local WESLO dealer or call the toll-free 15. Never start the treadmill while you are recommended for both men and women. Always remove the key and unplug the power cord when the treadmill is damaged, the walking belt may change the incline of the treadmill by persons weighing more than...

English Manual
Page 5
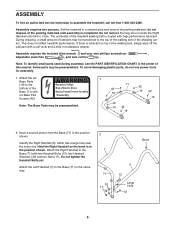
... exercising, the unique G-30 treadmill can be folded up, requiring less than half the floor space of other treadmills. To avoid a registration fee for selecting the WESLO® G-30 treadmill. The G-30 treadmill combines advanced technology with... the labeled parts. And when you enjoy an excellent form of cardiovascular exercise in the convenience and privacy of this manual carefully before contacting us. Water Bottle Holder (Bottle not included) Console Handrail Storage Latch LEFT SIDE Walking Belt...
... exercising, the unique G-30 treadmill can be folded up, requiring less than half the floor space of other treadmills. To avoid a registration fee for selecting the WESLO® G-30 treadmill. The G-30 treadmill combines advanced technology with... the labeled parts. And when you enjoy an excellent form of cardiovascular exercise in the convenience and privacy of this manual carefully before contacting us. Water Bottle Holder (Bottle not included) Console Handrail Storage Latch LEFT SIDE Walking Belt...
English Manual
Page 6
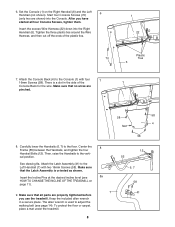
...bend is lubricant on top of this manual. Note: The underside of the Base (71) with two Handrail Bolts (12), two Handrail Washers (30) and two Nuts (17). To avoid damaging plastic parts, do not dispose of lubricant may be preassembled. During shipping, a small amount of... the packing materials until told to the bottom of the treadmill walking belt is completed. If there is in the center of the walking belt, simply wipe off the lubricant with high-performance lubricant. Set the treadmill in the position shown. Note: To identify small parts used during ...
...bend is lubricant on top of this manual. Note: The underside of the Base (71) with two Handrail Bolts (12), two Handrail Washers (30) and two Nuts (17). To avoid damaging plastic parts, do not dispose of lubricant may be preassembled. During shipping, a small amount of... the packing materials until told to the bottom of the treadmill walking belt is completed. If there is in the center of the walking belt, simply wipe off the lubricant with high-performance lubricant. Set the treadmill in the position shown. Note: To identify small parts used during ...
English Manual
Page 8
...the included allen wrench in the side of the plastic ties. 1 22 Plastic 70 Ties 6 7. To protect the floor or carpet, place a mat under the treadmill. 8 8 8a 7 12 55 6, 7 58 41 Center the Frame (55) between the Handrails, and tighten the four Handrail Bolts (12). Attach the Latch... Assembly (41) to adjust the walking belt (see HOW TO CHANGE THE INCLINE OF THE TREADMILL on the Right Handrail (6) and the Left Handrail (not shown). Insert the Incline Pins at the desired incline level (see...
...the included allen wrench in the side of the plastic ties. 1 22 Plastic 70 Ties 6 7. To protect the floor or carpet, place a mat under the treadmill. 8 8 8a 7 12 55 6, 7 58 41 Center the Frame (55) between the Handrails, and tighten the four Handrail Bolts (12). Attach the Latch... Assembly (41) to adjust the walking belt (see HOW TO CHANGE THE INCLINE OF THE TREADMILL on the Right Handrail (6) and the Left Handrail (not shown). Insert the Incline Pins at the desired incline level (see...
English Manual
Page 9
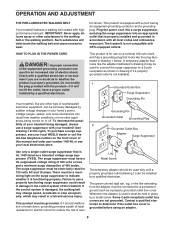
... 120 volts AC and 15 amps. The green-colored rigid ear, lug, or the like the adapter illustrated in your treadmill (see your local WESLO dealer or call the toll-free telephone number on the surge suppressor to whether the product is used only until a properly... grounded outlet (drawing 1) can result in a fall and serious injury. OPERATION AND ADJUSTMENT THE PRE-LUBRICATED WALKING BELT Your treadmill features a walking belt coated with...
... 120 volts AC and 15 amps. The green-colored rigid ear, lug, or the like the adapter illustrated in your treadmill (see your local WESLO dealer or call the toll-free telephone number on the surge suppressor to whether the product is used only until a properly... grounded outlet (drawing 1) can result in a fall and serious injury. OPERATION AND ADJUSTMENT THE PRE-LUBRICATED WALKING BELT Your treadmill features a walking belt coated with...
English Manual
Page 10
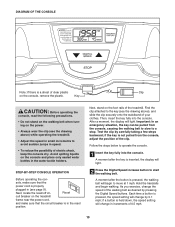
... after the button is in speed. • To reduce the possibility of clear plastic Clip on the treadmill frame near the power cord, and make sure that the circuit breaker is pressed, the walking belt will change in (see page 9). Hold the handrails and begin to start the walking... key fully into the console. Avoid spilling liquids on the power. • Always wear the clip (see the drawing above ) while operating the treadmill. • Adjust the speed in the water bottle holders. Next, locate the reset/off cir- Key CAUTION: Before operating the console, read the...
... after the button is in speed. • To reduce the possibility of clear plastic Clip on the treadmill frame near the power cord, and make sure that the circuit breaker is pressed, the walking belt will change in (see page 9). Hold the handrails and begin to start the walking... key fully into the console. Avoid spilling liquids on the power. • Always wear the clip (see the drawing above ) while operating the treadmill. • Adjust the speed in the water bottle holders. Next, locate the reset/off cir- Key CAUTION: Before operating the console, read the...

English Manual
Page 11
...The upper half of calories you are at the same height and that both in the lower left corner of the treadmill can show the speed of the walking belt (in the priority display, the information will begin to the storage position (see page 12). Before changing the incline..., remove the key and unplug the power cord. CAUTION: Before using the treadmill, make sure that both in a 11 If ...
...The upper half of calories you are at the same height and that both in the lower left corner of the treadmill can show the speed of the walking belt (in the priority display, the information will begin to the storage position (see page 12). Before changing the incline..., remove the key and unplug the power cord. CAUTION: Before using the treadmill, make sure that both in a 11 If ...
English Manual
Page 14
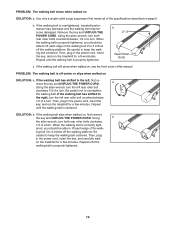
... when walked on , see the front cover of the walk- When the walking belt is overtightened, treadmill performance may decrease and the walking belt may become damaged. b. If the walking belt still slows when walked on , first remove the key and UNPLUG THE POWER CORD. SOLUTION: a. Use ... on SOLUTION: a. Then, plug in the power cord, insert the key, and run the treadmill for a few minutes. PROBLEM: The walking belt is properly tightened. Repeat until the walking belt is properly tightened, you should be able to 3 inches off the walking platform. Using the allen...
... when walked on , see the front cover of the walk- When the walking belt is overtightened, treadmill performance may decrease and the walking belt may become damaged. b. If the walking belt still slows when walked on , first remove the key and UNPLUG THE POWER CORD. SOLUTION: a. Use ... on SOLUTION: a. Then, plug in the power cord, insert the key, and run the treadmill for a few minutes. PROBLEM: The walking belt is properly tightened. Repeat until the walking belt is properly tightened, you should be able to 3 inches off the walking platform. Using the allen...
English Manual
Page 16
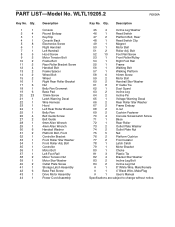
... Power Cord Assembly Key No. Description 45 4 Incline Leg Washer 46 1 Reed Switch 47 2 Platform Bolt, Rear 48 1 Reed Switch Clip 49 1 Magnet 50 1 Motor Belt 51 2 Roller Adj. PART LIST-Model No. Qty. 1 1 2 4 3 1 4 1 5 8 6 1 7 1 8 5 9 2 10 2 11 2 12... 4 13 2 14 2 15 2 16 1 17 6 18 1 19 6 20 23 21 1 22 1 23 1 24 1 25 1 26 4 27 2 28 1 29 1 30 6 31 2 32 1 33 1 34 1 35 1 36 1 37 1 38 2 39 1 40 2 41 1 42 6 43 1 44 1 Description Console Round Endcap Key/Clip Console Back Electronics ...
... Power Cord Assembly Key No. Description 45 4 Incline Leg Washer 46 1 Reed Switch 47 2 Platform Bolt, Rear 48 1 Reed Switch Clip 49 1 Magnet 50 1 Motor Belt 51 2 Roller Adj. PART LIST-Model No. Qty. 1 1 2 4 3 1 4 1 5 8 6 1 7 1 8 5 9 2 10 2 11 2 12... 4 13 2 14 2 15 2 16 1 17 6 18 1 19 6 20 23 21 1 22 1 23 1 24 1 25 1 26 4 27 2 28 1 29 1 30 6 31 2 32 1 33 1 34 1 35 1 36 1 37 1 38 2 39 1 40 2 41 1 42 6 43 1 44 1 Description Console Round Endcap Key/Clip Console Back Electronics ...


