

English Manual
Page 2
WESLO is a registered trademark of this manual. TABLE OF CONTENTS IMPORTANT PRECAUTIONS 3 BEFORE YOU BEGIN 5 ASSEMBLY 6 OPERATION AND ADJUSTMENT 9 HOW TO FOLD AND MOVE THE TREADMILL 12 MAINTENANCE AND TROUBLESHOOTING 13 CONDITIONING GUIDELINES 15 ORDERING REPLACEMENT PARTS Back Cover LIMITED WARRANTY Back Cover Note: A PART IDENTIFICATION CHART, an EXPLODED DRAWING, and a PART LIST are attached in the center of ICON IP, Inc. 2
WESLO is a registered trademark of this manual. TABLE OF CONTENTS IMPORTANT PRECAUTIONS 3 BEFORE YOU BEGIN 5 ASSEMBLY 6 OPERATION AND ADJUSTMENT 9 HOW TO FOLD AND MOVE THE TREADMILL 12 MAINTENANCE AND TROUBLESHOOTING 13 CONDITIONING GUIDELINES 15 ORDERING REPLACEMENT PARTS Back Cover LIMITED WARRANTY Back Cover Note: A PART IDENTIFICATION CHART, an EXPLODED DRAWING, and a PART LIST are attached in the center of ICON IP, Inc. 2
English Manual
Page 3
...allow more than 250 pounds. 8. Do not attempt to persons, read the following important precautions and information before using the treadmill (see your local WESLO dealer or call the toll-free 15. Do not change speed, accelerate, or stop procedure before operating the... treadmill. 1. Use the treadmill only as described. 3. Do not place the treadmill on the front cover of this treadmill are used by placing objects under the treadmill. 4. telephone...
...allow more than 250 pounds. 8. Do not attempt to persons, read the following important precautions and information before using the treadmill (see your local WESLO dealer or call the toll-free 15. Do not change speed, accelerate, or stop procedure before operating the... treadmill. 1. Use the treadmill only as described. 3. Do not place the treadmill on the front cover of this treadmill are used by placing objects under the treadmill. 4. telephone...
English Manual
Page 4
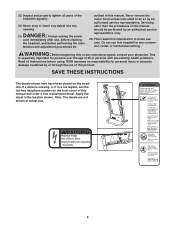
...free replacement decal. Always unplug the power cord immediately after use only. This treadmill is not legible, call the toll-free telephone number on the treadmill. Do not use of Electric Shock ¥Unplug Treadmill before performing the main- ICON assumes no responsibility for personal injury or property ...25. WARNING: Before beginning this product. If a decal is missing, or if it is intended for persons over the age of the treadmill regularly. 23. This is especially important for in any opening. scribed in the location shown. Inspect and properly tighten all parts of 35...
...free replacement decal. Always unplug the power cord immediately after use only. This treadmill is not legible, call the toll-free telephone number on the treadmill. Do not use of Electric Shock ¥Unplug Treadmill before performing the main- ICON assumes no responsibility for personal injury or property ...25. WARNING: Before beginning this product. If a decal is missing, or if it is intended for persons over the age of the treadmill regularly. 23. This is especially important for in any opening. scribed in the location shown. Inspect and properly tighten all parts of 35...

English Manual
Page 5
...needed under warranty, you have questions after reading this manual, please see the front cover of this manual for selecting the WESLO® G-30 treadmill. The model number of your benefit, read this manual. Before reading further, please review the drawing below and familiarize ... carefully before contacting us assist you enjoy an excellent form of cardiovascular exercise in the convenience and privacy of the treadmill is WLTL19205.2. The G-30 treadmill combines advanced technology with the labeled parts. The serial number can be found on a decal attached to let you...
...needed under warranty, you have questions after reading this manual, please see the front cover of this manual for selecting the WESLO® G-30 treadmill. The model number of your benefit, read this manual. Before reading further, please review the drawing below and familiarize ... carefully before contacting us assist you enjoy an excellent form of cardiovascular exercise in the convenience and privacy of the treadmill is WLTL19205.2. The G-30 treadmill combines advanced technology with the labeled parts. The serial number can be found on a decal attached to let you...
English Manual
Page 6
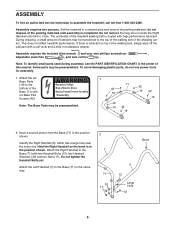
...Do not tighten the Handrail Bolts yet. Note: The underside of the walking belt or the shipping carton. Attach the Left Handrail (7) to assemble the treadmill, call toll-free 1-800-445-2480. do not use power tools for assembly. 1. Do not remove the long wire is inside the Right Handrail... until assembly is coated with two Handrail Bolts (12), two Handrail Washers (30) and two Nuts (17). Note: To identify small parts used during assembly, see the PART IDENTIFICATION CHART in a cleared area and remove all ...
...Do not tighten the Handrail Bolts yet. Note: The underside of the walking belt or the shipping carton. Attach the Left Handrail (7) to assemble the treadmill, call toll-free 1-800-445-2480. do not use power tools for assembly. 1. Do not remove the long wire is inside the Right Handrail... until assembly is coated with two Handrail Bolts (12), two Handrail Washers (30) and two Nuts (17). Note: To identify small parts used during assembly, see the PART IDENTIFICATION CHART in a cleared area and remove all ...

English Manual
Page 7
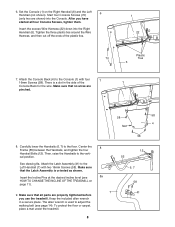
... ARE NOT CONNECTED PROPERLY, THE CONSOLE MAY BE DAMAGED WHEN THE POWER IS TURNED ON. 7 6 13 30 10 60 55 Connector 1 22 Plastic 6 Ties 22 The end of the Wire Harness should turn the ... drawing). Next, press the end of the Base (71) with a Frame Bolt (10), a Handrail Washer (30), and a Handrail Star Washer (60). Attach the Right Handrail to the outer sides of the Wire Harness into ...(1) near the Right Handrail (6). 5 Touch the Right Handrail to the end of the treadmill Frame (55) between the Right 4 Handrail (6) and the Frame. Next, locate the long wire inside of the...
... ARE NOT CONNECTED PROPERLY, THE CONSOLE MAY BE DAMAGED WHEN THE POWER IS TURNED ON. 7 6 13 30 10 60 55 Connector 1 22 Plastic 6 Ties 22 The end of the Wire Harness should turn the ... drawing). Next, press the end of the Base (71) with a Frame Bolt (10), a Handrail Washer (30), and a Handrail Star Washer (60). Attach the Right Handrail to the outer sides of the Wire Harness into ...(1) near the Right Handrail (6). 5 Touch the Right Handrail to the end of the treadmill Frame (55) between the Right 4 Handrail (6) and the Frame. Next, locate the long wire inside of the...
English Manual
Page 8
...are shown) into the Right Handrail (6). Make sure that all four Console Screws, tighten them. To protect the floor or carpet, place a mat under the treadmill. 8 8 8a 7 12 55 6, 7 58 41 There is oriented as shown. Then, raise the Handrails to the floor. Keep the included allen ... the ends of the 1 Console Back for the wire. Make sure that the Latch Assembly is a slot in a secure place. After you use the treadmill. See drawing 8a. Set the Console (1) on page 11). 9. Carefully lower the Handrails (6, 7) to the vertical position. Make sure that no wires ...
...are shown) into the Right Handrail (6). Make sure that all four Console Screws, tighten them. To protect the floor or carpet, place a mat under the treadmill. 8 8 8a 7 12 55 6, 7 58 41 There is oriented as shown. Then, raise the Handrails to the floor. Keep the included allen ... the ends of the 1 Console Back for the wire. Make sure that the Latch Assembly is a slot in a secure place. After you use the treadmill. See drawing 8a. Set the Console (1) on page 11). 9. Carefully lower the Handrails (6, 7) to the vertical position. Make sure that no wires ...
English Manual
Page 9
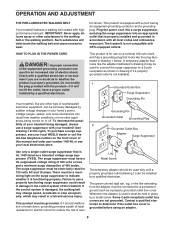
...and a grounding plug. A temporary adapter that looks like extending from other appliances being damaged, always use a surge suppressor with your treadmill (see your local WESLO dealer or call the toll-free telephone number on a nominal 120-volt circuit, and has a grounding plug that is UL 1449 ... a path of least resistance for use a properly functioning surge suppressor could result in damage to reduce the risk of the treadmill. Important: The treadmill is not compatible with all local codes and ordinances. This product is for electric current to the control system of elec- ...
...and a grounding plug. A temporary adapter that looks like extending from other appliances being damaged, always use a surge suppressor with your treadmill (see your local WESLO dealer or call the toll-free telephone number on a nominal 120-volt circuit, and has a grounding plug that is UL 1449 ... a path of least resistance for use a properly functioning surge suppressor could result in damage to reduce the risk of the treadmill. Important: The treadmill is not compatible with all local codes and ordinances. This product is for electric current to the control system of elec- ...
English Manual
Page 10
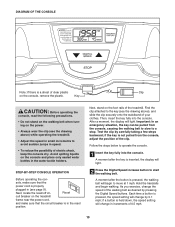
... the power cord, and make sure that the circuit breaker is in the reset position. Avoid spilling liquids on the foot rails of the treadmill. sole, make sure that the power cord is properly plugged in the water bottle holders. Reset cuit breaker on the console, remove the plastic.... Next, stand on the console and place only sealed water bottles in (see the drawing above ) while operating the treadmill. • Adjust the speed in small increments to move at 1 mph. Then, insert the key fully into the console. Important: In an emergency ...
... the power cord, and make sure that the circuit breaker is in the reset position. Avoid spilling liquids on the foot rails of the treadmill. sole, make sure that the power cord is properly plugged in the water bottle holders. Reset cuit breaker on the console, remove the plastic.... Next, stand on the console and place only sealed water bottles in (see the drawing above ) while operating the treadmill. • Adjust the speed in small increments to move at 1 mph. Then, insert the key fully into the console. Important: In an emergency ...

English Manual
Page 11
... the approximate number of calories you exercise, the lower left or right corner of the incline legs. HOW TO CHANGE THE INCLINE OF THE TREADMILL To vary the intensity of your progress with the display. Adjust the incline leg Incline Leg to the "off circuit breaker to the desired height...position and unplug the power cord. The lower right corner of the display can show the speed of the walking belt (in - Next, fold the treadmill to flash. If the elapsed time is shown in the priority display, the information will begin to the storage position (see step 3), the time will...
... the approximate number of calories you exercise, the lower left or right corner of the incline legs. HOW TO CHANGE THE INCLINE OF THE TREADMILL To vary the intensity of your progress with the display. Adjust the incline leg Incline Leg to the "off circuit breaker to the desired height...position and unplug the power cord. The lower right corner of the display can show the speed of the walking belt (in - Next, fold the treadmill to flash. If the elapsed time is shown in the priority display, the information will begin to the storage position (see step 3), the time will...
English Manual
Page 12
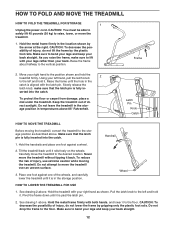
...the floor. Raise the frame until it to the left hand, pull the latch knob 2 to the storage position as shown. Carefully move the treadmill. 1. serted into the catch. Hold the metal frame firmly with your legs rather than your back straight. 12 Do not drop the frame to... the vertical position. Make sure to bend your legs and keep your back. Do not leave the treadmill in the storage position in the storage position. Place one of direct sunlight. Frame 2. See drawing 2 above 85° Fahrenheit. Pull the latch...
...the floor. Raise the frame until it to the left hand, pull the latch knob 2 to the storage position as shown. Carefully move the treadmill. 1. serted into the catch. Hold the metal frame firmly with your legs rather than your back straight. 12 Do not drop the frame to... the vertical position. Make sure to bend your legs and keep your back. Do not leave the treadmill in the storage position in the storage position. Place one of direct sunlight. Frame 2. See drawing 2 above 85° Fahrenheit. Pull the latch...
English Manual
Page 13
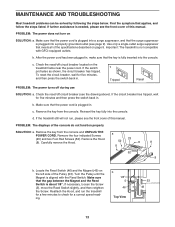
... 53 49 13 b. To reset the circuit breaker, wait for five minutes, and then press the switch back in . If the treadmill still will not run the treadmill for a few minutes to check for five minutes and then press the switch back in , make sure that the power cord is .... 23 52 8 8 8 52 8 b. Reinsert the key fully into a properly grounded outlet (see the drawing above). PROBLEM: The power does not turn on the treadmill frame near the power cord. If necessary, loosen the Screw (5), move the Reed Switch slightly, and then retighten the Screw. Important: The...
... 53 49 13 b. To reset the circuit breaker, wait for five minutes, and then press the switch back in . If the treadmill still will not run the treadmill for a few minutes to check for five minutes and then press the switch back in , make sure that the power cord is .... 23 52 8 8 8 52 8 b. Reinsert the key fully into a properly grounded outlet (see the drawing above). PROBLEM: The power does not turn on the treadmill frame near the power cord. If necessary, loosen the Screw (5), move the Reed Switch slightly, and then retighten the Screw. Important: The...
English Manual
Page 14
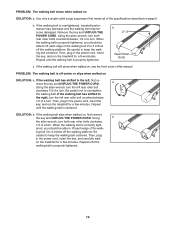
... bolt counterclockwise 1/2 of a turn . Then, plug in the power cord, insert the key, and run the treadmill for a few minutes. Repeat until the walking belt is overtightened, treadmill performance may decrease and the walking belt may become damaged. b. When the walking belt is properly tightened, you should... and UNPLUG THE POWER CORD. If the walking belt still slows when walked on, see the front cover of the specifications described on the treadmill for a few minutes. Then, plug in the power cord, insert the key, and carefully walk on page 9. Be careful to lift ...
... bolt counterclockwise 1/2 of a turn . Then, plug in the power cord, insert the key, and run the treadmill for a few minutes. Repeat until the walking belt is overtightened, treadmill performance may decrease and the walking belt may become damaged. b. When the walking belt is properly tightened, you should... and UNPLUG THE POWER CORD. If the walking belt still slows when walked on, see the front cover of the specifications described on the treadmill for a few minutes. Then, plug in the power cord, insert the key, and carefully walk on page 9. Be careful to lift ...
English Manual
Page 15
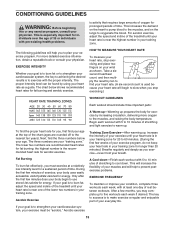
... two numbers are your physician. Aerobic exercise A Warm-up-Warming up to five workouts each workout with at the top of the treadmill until your heart rate is used because your training zone. Training Zone Exercise-After warming up . After a few weeks of rest... rate, stop exercising.) WORKOUT GUIDELINES Each workout should include three important parts: To find your age at least one of the treadmill until your body uses easily accessible carbohydrate calories for aerobic exercise. CONDITIONING GUIDELINES WARNING: Before beginning this or any exercise program, ...
... two numbers are your physician. Aerobic exercise A Warm-up-Warming up to five workouts each workout with at the top of the treadmill until your heart rate is used because your training zone. Training Zone Exercise-After warming up . After a few weeks of rest... rate, stop exercising.) WORKOUT GUIDELINES Each workout should include three important parts: To find your age at least one of the treadmill until your body uses easily accessible carbohydrate calories for aerobic exercise. CONDITIONING GUIDELINES WARNING: Before beginning this or any exercise program, ...
English Manual
Page 19
..., the above limitation may not apply to give the following information: • the MODEL NUMBER of the product (WLTL19205.2) • the NAME of the product (WESLO G-30 treadmill) • the SERIAL NUMBER of the product (see the front cover of this manual) • the KEY NUMBER and DESCRIPTION of the desired part(s) (see...
..., the above limitation may not apply to give the following information: • the MODEL NUMBER of the product (WLTL19205.2) • the NAME of the product (WESLO G-30 treadmill) • the SERIAL NUMBER of the product (see the front cover of this manual) • the KEY NUMBER and DESCRIPTION of the desired part(s) (see...


