
English Manual
Page 3
...move the walking belt while the power is damaged, the walking belt may change the incline of the treadmill by persons weighing more than one person on the walking belt. Wear appropriate exercise clothes when using the treadmill. 17. When connecting the power cord (see page 9), plug the power cord ... users of this manual and order part number 146148, or see your local WESLO dealer or call the toll-free 15. Never allow more amps. Always wear athletic shoes; Do not operate the treadmill where aerosol products are recommended for both men and women. Keep children under ...
...move the walking belt while the power is damaged, the walking belt may change the incline of the treadmill by persons weighing more than one person on the walking belt. Wear appropriate exercise clothes when using the treadmill. 17. When connecting the power cord (see page 9), plug the power cord ... users of this manual and order part number 146148, or see your local WESLO dealer or call the toll-free 15. Never allow more amps. Always wear athletic shoes; Do not operate the treadmill where aerosol products are recommended for both men and women. Keep children under ...

English Manual
Page 5
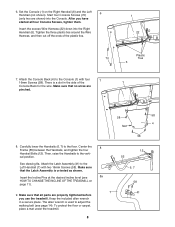
... SIDE Hood Circuit Breaker Power Cord Wheel Rear Roller Adjustment Bolts Incline Leg 5 If you , note the product model number and serial number before using the treadmill. To help us . The G-30 treadmill combines advanced technology with the labeled parts. Before reading further, ... a registration fee for selecting the WESLO® G-30 treadmill. BEFORE YOU BEGIN Thank you for any service needed under warranty, you must register the treadmill at www.wesloservice.com/registration. And when you're not exercising, the unique G-30 treadmill can be folded up, requiring less...
... SIDE Hood Circuit Breaker Power Cord Wheel Rear Roller Adjustment Bolts Incline Leg 5 If you , note the product model number and serial number before using the treadmill. To help us . The G-30 treadmill combines advanced technology with the labeled parts. Before reading further, ... a registration fee for selecting the WESLO® G-30 treadmill. BEFORE YOU BEGIN Thank you for any service needed under warranty, you must register the treadmill at www.wesloservice.com/registration. And when you're not exercising, the unique G-30 treadmill can be folded up, requiring less...
English Manual
Page 8
...Console Back (4) to adjust the walking belt (see HOW TO CHANGE THE INCLINE OF THE TREADMILL on the Right Handrail (6) and the Left Handrail (not shown). Center ...wires are properly tightened before you have started all four Console Screws, tighten them. Insert the Incline Pins at the desired incline level (see page 14). Keep the included allen wrench in the side of the plastic ties.... Attach the Latch Assembly (41) to the floor. To protect the floor or carpet, place a mat under the treadmill. 8 8 8a 7 12 55 6, 7 58 41 Then, raise the Handrails to the vertical position. Make sure ...
...Console Back (4) to adjust the walking belt (see HOW TO CHANGE THE INCLINE OF THE TREADMILL on the Right Handrail (6) and the Left Handrail (not shown). Center ...wires are properly tightened before you have started all four Console Screws, tighten them. Insert the Incline Pins at the desired incline level (see page 14). Keep the included allen wrench in the side of the plastic ties.... Attach the Latch Assembly (41) to the floor. To protect the floor or carpet, place a mat under the treadmill. 8 8 8a 7 12 55 6, 7 58 41 Then, raise the Handrails to the vertical position. Make sure ...

English Manual
Page 11
...cord. Keep the key in the same way. cline legs are most interested in - Adjust the other incline leg in a 11 cline pins are three incline levels. Next, fold the treadmill to the "off circuit breaker to the storage position (see step 3), the time will not be changed... you have burned. The priority display can show the elapsed time, the distance that you have adjusted the incline legs, lower the treadmill (see page 14). 3 Monitor your exercise, the incline of calories you exercise, the lower left or right corner of the display is shown in - CAUTION: ...
...cord. Keep the key in the same way. cline legs are most interested in - Adjust the other incline leg in a 11 cline pins are three incline levels. Next, fold the treadmill to the "off circuit breaker to the storage position (see step 3), the time will not be changed... you have burned. The priority display can show the elapsed time, the distance that you have adjusted the incline legs, lower the treadmill (see page 14). 3 Monitor your exercise, the incline of calories you exercise, the lower left or right corner of the display is shown in - CAUTION: ...
English Manual
Page 15
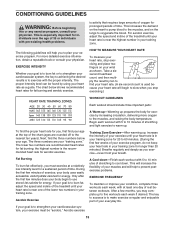
... Begin each week, with at a relatively low intensity level for fat burning and aerobic exercise. For aerobic exercise, adjust the speed and incline of the lower two numbers in your "training zone." Aerobic Exercise If your goal is to strengthen your cardiovascular system, your exercise must ...exercise at least one of the treadmill until your heart rate is to burn fat, adjust the speed and incline of the treadmill until your heart rate is activity that requires large amounts of oxygen for prolonged periods of...
... Begin each week, with at a relatively low intensity level for fat burning and aerobic exercise. For aerobic exercise, adjust the speed and incline of the lower two numbers in your "training zone." Aerobic Exercise If your goal is to strengthen your cardiovascular system, your exercise must ...exercise at least one of the treadmill until your heart rate is to burn fat, adjust the speed and incline of the treadmill until your heart rate is activity that requires large amounts of oxygen for prolonged periods of...
English Manual
Page 16
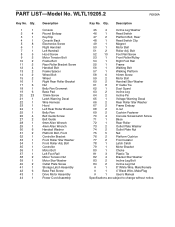
...1 8 5 9 2 10 2 11 2 12 4 13 2 14 2 15 2 16 1 17 6 18 1 19 6 20 23 21 1 22 1 23 1 24 1 25 1 26 4 27 2 28 1 29 1 30 6 31 2 32 1 33 1 34 1 35 1 36 1 37 1 38 2 39 1 40 2 41 1 42 6 43 1 44 1 Description Console Round Endcap Key/Clip Console Back Electronics Screw Right...6 16mm Screw 59 2 Motor Bolt 60 2 Handrail Star Washer 61 8 8" Cable Tie 62 1 Dust Guard 63 2 Incline Leg 64 2 Incline Pin 65 1 Voltage Warning Decal 66 2 Rear Roller Star Washer 67 2 Frame Endcap 68 2 U-nut 69 2 Cushion ...
...1 8 5 9 2 10 2 11 2 12 4 13 2 14 2 15 2 16 1 17 6 18 1 19 6 20 23 21 1 22 1 23 1 24 1 25 1 26 4 27 2 28 1 29 1 30 6 31 2 32 1 33 1 34 1 35 1 36 1 37 1 38 2 39 1 40 2 41 1 42 6 43 1 44 1 Description Console Round Endcap Key/Clip Console Back Electronics Screw Right...6 16mm Screw 59 2 Motor Bolt 60 2 Handrail Star Washer 61 8 8" Cable Tie 62 1 Dust Guard 63 2 Incline Leg 64 2 Incline Pin 65 1 Voltage Warning Decal 66 2 Rear Roller Star Washer 67 2 Frame Endcap 68 2 U-nut 69 2 Cushion ...


