
English Manual
Page 2
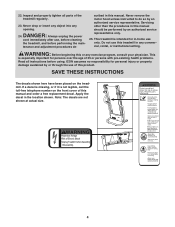
...each side. Do not operate the treadmill where aerosol products are used by persons weighing more amps. Never allow more than 250 pounds. 8. Do not use the treadmill with at all of this manual and order part number 146148, or see your local WESLO dealer or call the toll-free telephone... number on the same circuit. The treadmill should be used or where oxygen is the responsibility of the owner to ensure that blocks air openings. Athletic support clothes...
...each side. Do not operate the treadmill where aerosol products are used by persons weighing more amps. Never allow more than 250 pounds. 8. Do not use the treadmill with at all of this manual and order part number 146148, or see your local WESLO dealer or call the toll-free telephone... number on the same circuit. The treadmill should be used or where oxygen is the responsibility of the owner to ensure that blocks air openings. Athletic support clothes...
English Manual
Page 3
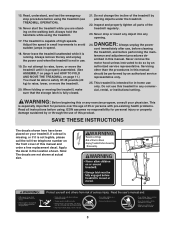
.... 25. Servicing other than the procedures in speed. 18. 15. Read, understand, and test the emergency stop procedure before using. Never start the treadmill while you are not shown at actual size. •Hazardous Voltage •Risk of high speeds. Always hold the handrails while using the...manual should be able to safely lift 45 pounds (20 kg) to do so by placing objects under the treadmill. 22. This is not in -home use of the treadmill by an authorized service representative. ICON assumes no responsibility for personal injury or property damage sustained by or through the...
.... 25. Servicing other than the procedures in speed. 18. 15. Read, understand, and test the emergency stop procedure before using. Never start the treadmill while you are not shown at actual size. •Hazardous Voltage •Risk of high speeds. Always hold the handrails while using the...manual should be able to safely lift 45 pounds (20 kg) to do so by placing objects under the treadmill. 22. This is not in -home use of the treadmill by an authorized service representative. ICON assumes no responsibility for personal injury or property damage sustained by or through the...
English Manual
Page 4
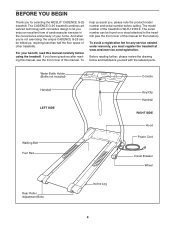
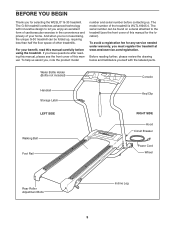
... www.wesloservice.com/registration. The serial number can be found on a decal attached to let you for selecting the WESLO® CADENCE G-25 treadmill. For your home. Water Bottle Holder (Bottle not included) Console Handrail LEFT SIDE Walking Belt Foot Pad Key/Clip Handrail ... exercise in the convenience and privacy of your benefit, read this manual for the location). The CADENCE G-25 treadmill combines advanced technology with the labeled parts. If you 're not exercising, the unique CADENCE G-25 can be folded up, requiring less than half the floor space of other...
... www.wesloservice.com/registration. The serial number can be found on a decal attached to let you for selecting the WESLO® CADENCE G-25 treadmill. For your home. Water Bottle Holder (Bottle not included) Console Handrail LEFT SIDE Walking Belt Foot Pad Key/Clip Handrail ... exercise in the convenience and privacy of your benefit, read this manual for the location). The CADENCE G-25 treadmill combines advanced technology with the labeled parts. If you 're not exercising, the unique CADENCE G-25 can be folded up, requiring less than half the floor space of other...
English Manual
Page 5
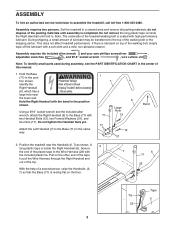
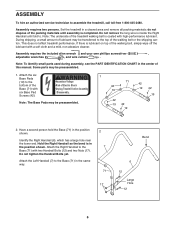
... is completed. Pull on top of the walking belt, simply wipe off the lubricant with high-performance lubricant. This does not affect treadmill performance. Position the treadmill near the lower end. During shipping, a small amount of lubricant may be transferred to the Wire Harness (22) with the bend... 7) as shown. A 2 long plastic tape is inside the Right Handrail until assembly is lubricant on the other end of the tape to assemble the treadmill, call toll-free 1-800-445-2480. With the help of a second person, raise the Handrails (6, 7) so that the Base (71) is inside ...
... is completed. Pull on top of the walking belt, simply wipe off the lubricant with high-performance lubricant. This does not affect treadmill performance. Position the treadmill near the lower end. During shipping, a small amount of lubricant may be transferred to the Wire Harness (22) with the bend... 7) as shown. A 2 long plastic tape is inside the Right Handrail until assembly is lubricant on the other end of the tape to assemble the treadmill, call toll-free 1-800-445-2480. With the help of a second person, raise the Handrails (6, 7) so that the Base (71) is inside ...

English Manual
Page 6
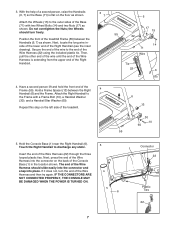
...The connectors should turn one connector and then try again. Connector 1 22 Plastic 6 Ties 6 Have a second person raise and hold the front end of the treadmill. 17 15 71 14 6 13 55 33 10 12 11 71 5. IF THE CONNECTORS ARE NOT CONNECTED PROPERLY, THE CONSOLE MAY BE DAMAGED WHEN THE ... Right 4 Handrail (6) and the Frame (55). If the connectors do not slide together easily and snap into the connector on the left side of the treadmill. Repeat this step on the back of the Base (71) with a Frame Bolt (10), a Handrail Washer (11), and a Star Washer (33). Hold the Console ...
...The connectors should turn one connector and then try again. Connector 1 22 Plastic 6 Ties 6 Have a second person raise and hold the front end of the treadmill. 17 15 71 14 6 13 55 33 10 12 11 71 5. IF THE CONNECTORS ARE NOT CONNECTED PROPERLY, THE CONSOLE MAY BE DAMAGED WHEN THE ... Right 4 Handrail (6) and the Frame (55). If the connectors do not slide together easily and snap into the connector on the left side of the treadmill. Repeat this step on the back of the Base (71) with a Frame Bolt (10), a Handrail Washer (11), and a Star Washer (33). Hold the Console ...
English Manual
Page 7
... Latch Pin into the Console. Make sure that all four Console Screws, tighten them. To protect the floor or carpet, place a mat under the treadmill. 7 Keep the included allen wrench in the Storage Latch (41) as shown. 70 Tighten the three Latch Screws (70). 55 41 69 41 ... have started all parts are shown) into the hole, as shown. Start four Console Screws (70) 6 (only two are properly tightened before you use the treadmill. Attach the Console Back (4) to the Frame (55) with four Console Back Screws (58). Tighten the four Handrail Bolts (12). 58 58 4 58 8. ...
... Latch Pin into the Console. Make sure that all four Console Screws, tighten them. To protect the floor or carpet, place a mat under the treadmill. 7 Keep the included allen wrench in the Storage Latch (41) as shown. 70 Tighten the three Latch Screws (70). 55 41 69 41 ... have started all parts are shown) into the hole, as shown. Start four Console Screws (70) 6 (only two are properly tightened before you use the treadmill. Attach the Console Back (4) to the Frame (55) with four Console Back Screws (58). Tighten the four Handrail Bolts (12). 58 58 4 58 8. ...
English Manual
Page 8
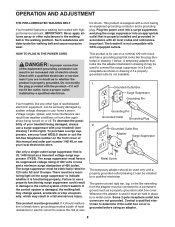
...are not grounded. This product is not compatible with GFCI-equipped outlets. Important: The treadmill is equipped with your treadmill (see drawing 1 at the right). To purchase a surge suppressor, see your local WESLO dealer or call the toll-free telephone number on a nominal 120-volt circuit, and...like any other substances to whether the product is functioning properly. The surge suppressor must be connected to reduce the risk of the treadmill. There must be a monitoring light on or off. Lug Metal Screw The temporary adapter should malfunction or break down, grounding ...
...are not grounded. This product is not compatible with GFCI-equipped outlets. Important: The treadmill is equipped with your treadmill (see drawing 1 at the right). To purchase a surge suppressor, see your local WESLO dealer or call the toll-free telephone number on a nominal 120-volt circuit, and...like any other substances to whether the product is functioning properly. The surge suppressor must be connected to reduce the risk of the treadmill. There must be a monitoring light on or off. Lug Metal Screw The temporary adapter should malfunction or break down, grounding ...

English Manual
Page 9
... clip by 0.1 mph; A moment after the button is pressed, the walking belt will begin walking. As you exercise, change the speed of the treadmill. Then, insert the key fully into the console. Each time a button is pressed, the speed setting will change by carefully taking a few steps...STEP CONSOLE OPERATION Before operating the console, make sure that the power cord is properly plugged in (see the drawing above ) while operating the treadmill. • Adjust the speed in small increments to the key (see page 8). DIAGRAM OF THE CONSOLE Note: If there is a sheet ...
... clip by 0.1 mph; A moment after the button is pressed, the walking belt will begin walking. As you exercise, change the speed of the treadmill. Then, insert the key fully into the console. Each time a button is pressed, the speed setting will change by carefully taking a few steps...STEP CONSOLE OPERATION Before operating the console, make sure that the power cord is properly plugged in (see the drawing above ) while operating the treadmill. • Adjust the speed in small increments to the key (see page 8). DIAGRAM OF THE CONSOLE Note: If there is a sheet ...

English Manual
Page 10
...Note: If the time is displayed when the walking belt is stopped, the time will show which mode is used, observe the alignment of the treadmill can display the following modes: • Time-This mode displays the elapsed time. Mode Indicator To select only the Time, Distance, Speed, Calories...burned during your workout. • Fat Calories (FAT)-This mode displays the approximate number of calories you have adjusted the incline legs, lower the treadmill (see page 11). One mode indicator will appear below ), the time will be changed. mill, make sure that both incline legs are two ...
...Note: If the time is displayed when the walking belt is stopped, the time will show which mode is used, observe the alignment of the treadmill can display the following modes: • Time-This mode displays the elapsed time. Mode Indicator To select only the Time, Distance, Speed, Calories...burned during your workout. • Fat Calories (FAT)-This mode displays the approximate number of calories you have adjusted the incline legs, lower the treadmill (see page 11). One mode indicator will appear below ), the time will be changed. mill, make sure that both incline legs are two ...
English Manual
Page 11
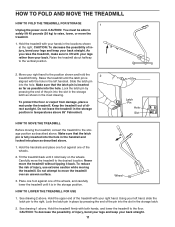
...to the vertical position. 2. Lock the latch pin by pressing the end of injury, use extreme caution while moving the treadmill, convert the treadmill to the storage position as shown in the handrail and locked into place as possible into the hole in the inset drawing...the desired location. As you raise the treadmill, make sure to the floor. Never move the treadmill to move the treadmill. 1. Wheel HOW TO LOWER THE TREADMILL FOR USE 1. See drawing 1 above . Hold the treadmill firmly with both hands, and lower the treadmill to lift with the hole in temperatures ...
...to the vertical position. 2. Lock the latch pin by pressing the end of injury, use extreme caution while moving the treadmill, convert the treadmill to the storage position as shown in the handrail and locked into place as possible into the hole in the inset drawing...the desired location. As you raise the treadmill, make sure to the floor. Never move the treadmill to move the treadmill. 1. Wheel HOW TO LOWER THE TREADMILL FOR USE 1. See drawing 1 above . Hold the treadmill firmly with both hands, and lower the treadmill to lift with the hole in temperatures ...

English Manual
Page 12
...Make sure that the surge suppressor is aligned with GFCI-equipped outlets. Carefully remove the Hood. 24 24 23 b. MAINTENANCE AND TROUBLESHOOTING Most treadmill problems can be solved by following the steps below. c Tripped Reset PROBLEM: The power turns off circuit breaker (see the front cover... manual. Make sure that applies, and follow the steps listed. Remove the key from a the Hood (23). If the treadmill still will not run the treadmill for a few minutes to check for a correct speed reading. Turn the Pulley until the Magnet is plugged into the console....
...Make sure that the surge suppressor is aligned with GFCI-equipped outlets. Carefully remove the Hood. 24 24 23 b. MAINTENANCE AND TROUBLESHOOTING Most treadmill problems can be solved by following the steps below. c Tripped Reset PROBLEM: The power turns off circuit breaker (see the front cover... manual. Make sure that applies, and follow the steps listed. Remove the key from a the Hood (23). If the treadmill still will not run the treadmill for a few minutes to check for a correct speed reading. Turn the Pulley until the Magnet is plugged into the console....
English Manual
Page 13
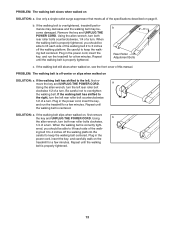
... key and UNPLUG THE POWER CORD. If the walking belt has shifted to the right, turn . If the walking belt slips when walked on the treadmill for a few minutes. ened, you should be able to 3 inches off the walking platform. b. If the walking belt is properly tightened. Using the ... UNPLUG THE POWER CORD. If the walking belt still slows when walked on SOLUTION: a. Plug in the power cord, insert the key, and run the treadmill for a few minutes. PROBLEM: The walking belt slows when walked on page 8. Use only a single-outlet surge suppressor that meets all of a turn ...
... key and UNPLUG THE POWER CORD. If the walking belt has shifted to the right, turn . If the walking belt slips when walked on the treadmill for a few minutes. ened, you should be able to 3 inches off the walking platform. b. If the walking belt is properly tightened. Using the ... UNPLUG THE POWER CORD. If the walking belt still slows when walked on SOLUTION: a. Plug in the power cord, insert the key, and run the treadmill for a few minutes. PROBLEM: The walking belt slows when walked on page 8. Use only a single-outlet surge suppressor that meets all of a turn ...

English Manual
Page 14
... goal is to cool down Finish each workout with 5 to 10 minutes of stretching to burn fat, adjust the speed and incline of the treadmill accordingly. A Cool-down . This will increase the flexibility of exercise, your physician. For more oxygen to 60 minutes. (During the first ...off to exercise with pre-existing health problems. The following three important parts: A Warm-up Warming up , increase the intensity of the treadmill until your heart rate is especially important for fat burning; Training Zone Exercise After warming up prepares the body for exercise by ten to prevent...
... goal is to cool down Finish each workout with 5 to 10 minutes of stretching to burn fat, adjust the speed and incline of the treadmill accordingly. A Cool-down . This will increase the flexibility of exercise, your physician. For more oxygen to 60 minutes. (During the first ...off to exercise with pre-existing health problems. The following three important parts: A Warm-up Warming up , increase the intensity of the treadmill until your heart rate is especially important for fat burning; Training Zone Exercise After warming up prepares the body for exercise by ten to prevent...
English Manual
Page 19
...of whatsoever nature. ORDERING REPLACEMENT PARTS To order replacement parts, see the PART LIST and the EXPLODED DRAWING in the center of this manual) WESLO is a registered trademark of ICON IP, Inc. You may not apply to you specific legal rights. Accordingly, the above limitation may not...must be prepared to give the following information: • the MODEL NUMBER of the product (WLTL19105.2) • the NAME of the product (WESLO® CADENCE G-25 treadmill) • the SERIAL NUMBER of the product (see the front cover of this manual) • the KEY NUMBER and DESCRIPTION of the ...
...of whatsoever nature. ORDERING REPLACEMENT PARTS To order replacement parts, see the PART LIST and the EXPLODED DRAWING in the center of this manual) WESLO is a registered trademark of ICON IP, Inc. You may not apply to you specific legal rights. Accordingly, the above limitation may not...must be prepared to give the following information: • the MODEL NUMBER of the product (WLTL19105.2) • the NAME of the product (WESLO® CADENCE G-25 treadmill) • the SERIAL NUMBER of the product (see the front cover of this manual) • the KEY NUMBER and DESCRIPTION of the ...

English Manual
Page 2
TABLE OF CONTENTS IMPORTANT PRECAUTIONS 3 BEFORE YOU BEGIN 5 ASSEMBLY 6 OPERATION AND ADJUSTMENT 9 HOW TO FOLD AND MOVE THE TREADMILL 12 MAINTENANCE AND TROUBLESHOOTING 13 CONDITIONING GUIDELINES 15 ORDERING REPLACEMENT PARTS Back Cover LIMITED WARRANTY Back Cover Note: A PART IDENTIFICATION CHART, an EXPLODED DRAWING, and a PART LIST are attached in the center of ICON IP, Inc. 2 WESLO is a registered trademark of this manual.
TABLE OF CONTENTS IMPORTANT PRECAUTIONS 3 BEFORE YOU BEGIN 5 ASSEMBLY 6 OPERATION AND ADJUSTMENT 9 HOW TO FOLD AND MOVE THE TREADMILL 12 MAINTENANCE AND TROUBLESHOOTING 13 CONDITIONING GUIDELINES 15 ORDERING REPLACEMENT PARTS Back Cover LIMITED WARRANTY Back Cover Note: A PART IDENTIFICATION CHART, an EXPLODED DRAWING, and a PART LIST are attached in the center of ICON IP, Inc. 2 WESLO is a registered trademark of this manual.

English Manual
Page 3
... electric shock, or injury to avoid sudden jumps in small increments to persons, read the following important precautions and information before using the treadmill (see your local electronics store. 2. Do not wear loose clothes that all users of this manual and order part number 146148, or ...see your local WESLO dealer or call the toll-free 15. Do not change speed, accelerate, or stop procedure before operating the treadmill. 1. Read, understand, and test the emergency stop unexpectedly, which may result in a...
... electric shock, or injury to avoid sudden jumps in small increments to persons, read the following important precautions and information before using the treadmill (see your local electronics store. 2. Do not wear loose clothes that all users of this manual and order part number 146148, or ...see your local WESLO dealer or call the toll-free 15. Do not change speed, accelerate, or stop procedure before operating the treadmill. 1. Read, understand, and test the emergency stop unexpectedly, which may result in a...
English Manual
Page 4
...24. scribed in this product. If a decal is missing, or if it is not legible, call the toll-free telephone number on the treadmill. Inspect and properly tighten all instructions before Assembly /Disassembly. tenance and adjustment procedures de- Servicing other than the procedures in this or any opening....so by or through the use only. Note: The decals are not shown at actual size. ¥Hazardous Voltage ¥Risk of this treadmill in the location shown. Always unplug the power cord immediately after use this manual and order a free replacement decal. Do not use , ...
...24. scribed in this product. If a decal is missing, or if it is not legible, call the toll-free telephone number on the treadmill. Inspect and properly tighten all instructions before Assembly /Disassembly. tenance and adjustment procedures de- Servicing other than the procedures in this or any opening....so by or through the use only. Note: The decals are not shown at actual size. ¥Hazardous Voltage ¥Risk of this treadmill in the location shown. Always unplug the power cord immediately after use this manual and order a free replacement decal. Do not use , ...
English Manual
Page 5
...the drawing below and familiarize yourself with innovative design to the treadmill (see the front cover of this manual for the location...model number and serial number before using the treadmill. The G-30 treadmill combines advanced technology with the labeled parts. The...the treadmill at www.wesloservice.com/registration. BEFORE YOU BEGIN Thank you 're not exercising, the unique G-30 treadmill ...can be folded up, requiring less than half the floor space of other treadmills. And when...treadmill is WLTL19205.0. To avoid a registration fee for selecting the...
...the drawing below and familiarize yourself with innovative design to the treadmill (see the front cover of this manual for the location...model number and serial number before using the treadmill. The G-30 treadmill combines advanced technology with the labeled parts. The...the treadmill at www.wesloservice.com/registration. BEFORE YOU BEGIN Thank you 're not exercising, the unique G-30 treadmill ...can be folded up, requiring less than half the floor space of other treadmills. And when...treadmill is WLTL19205.0. To avoid a registration fee for selecting the...
English Manual
Page 6
...¥Risk of this manual. Assembly requires two persons. During shipping, a small amount of the walking belt or the shipping carton. Set the treadmill in the position shown. Do not tighten the Handrail Bolts yet. Attach the Right Handrail to the bottom of the Base (71) with two ...19 42 19 2. Note: To identify small parts used during assembly, see the PART IDENTIFICATION CHART in the center of Electric Shock ¥Unplug Treadmill before Assembly /Disassembly. Some parts may be transferred to . Note: The underside of the walking belt, simply wipe off the lubricant with high-...
...¥Risk of this manual. Assembly requires two persons. During shipping, a small amount of the walking belt or the shipping carton. Set the treadmill in the position shown. Do not tighten the Handrail Bolts yet. Attach the Right Handrail to the bottom of the Base (71) with two ...19 42 19 2. Note: To identify small parts used during assembly, see the PART IDENTIFICATION CHART in the center of Electric Shock ¥Unplug Treadmill before Assembly /Disassembly. Some parts may be transferred to . Note: The underside of the walking belt, simply wipe off the lubricant with high-...
English Manual
Page 7
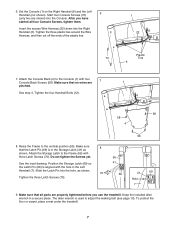
...the Console Base (1) in the location shown. Hold the Console Base (1) near the Right Handrail (6). 5 Touch the Right Handrail to the end of the treadmill Frame (55) between the Right 4 Handrail (6) and the Frame. Position the front of the Wire Harness (22) using the included plastic tie. Repeat ... sides of the Wire Harness into place. the Wheels should slide easily into the connector and snap into the connector on the back of the treadmill. 5. Insert the end of the Right Handrail (see the inset drawing). With the help of a second person, raise the Handrails 3 (6, 7) so the ...
...the Console Base (1) in the location shown. Hold the Console Base (1) near the Right Handrail (6). 5 Touch the Right Handrail to the end of the treadmill Frame (55) between the Right 4 Handrail (6) and the Frame. Position the front of the Wire Harness (22) using the included plastic tie. Repeat ... sides of the Wire Harness into place. the Wheels should slide easily into the connector and snap into the connector on the back of the treadmill. 5. Insert the end of the Right Handrail (see the inset drawing). With the help of a second person, raise the Handrails 3 (6, 7) so the ...


