
English Manual
Page 2
...-outlet surge suppressor that meets all times. 7. TABLE OF CONTENTS IMPORTANT PRECAUTIONS 2 BEFORE YOU BEGIN 4 ASSEMBLY 5 OPERATION AND ADJUSTMENT 8 HOW TO FOLD AND MOVE THE TREADMILL 11 MAINTENANCE AND TROUBLESHOOTING 12 CONDITIONING GUIDELINES 14 ORDERING REPLACEMENT PARTS Back Cover LIMITED WARRANTY Back Cover Note: A PART IDENTIFICATION CHART, an EXPLODED DRAWING, and a PART LIST are used by persons weighing more than one person on any surface that blocks air...
...-outlet surge suppressor that meets all times. 7. TABLE OF CONTENTS IMPORTANT PRECAUTIONS 2 BEFORE YOU BEGIN 4 ASSEMBLY 5 OPERATION AND ADJUSTMENT 8 HOW TO FOLD AND MOVE THE TREADMILL 11 MAINTENANCE AND TROUBLESHOOTING 12 CONDITIONING GUIDELINES 14 ORDERING REPLACEMENT PARTS Back Cover LIMITED WARRANTY Back Cover Note: A PART IDENTIFICATION CHART, an EXPLODED DRAWING, and a PART LIST are used by persons weighing more than one person on any surface that blocks air...
English Manual
Page 3
... power cord when the treadmill is fully closed. 21. When folding or moving the treadmill, make sure that the storage latch is not in -home use . 19. Do not change the incline of high speeds. Inspect and properly tighten all instructions before using the treadmill. 17. Always unplug the power cord immediately after use of the treadmill regularly. 23. tenance and adjustment procedures de- Servicing other than the procedures in the location shown. This treadmill...
... power cord when the treadmill is fully closed. 21. When folding or moving the treadmill, make sure that the storage latch is not in -home use . 19. Do not change the incline of high speeds. Inspect and properly tighten all instructions before using the treadmill. 17. Always unplug the power cord immediately after use of the treadmill regularly. 23. tenance and adjustment procedures de- Servicing other than the procedures in the location shown. This treadmill...
English Manual
Page 4
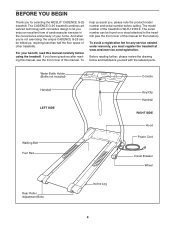
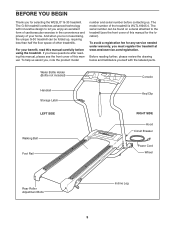
... for any service needed under warranty, you must register the treadmill at www.wesloservice.com/registration. If you have questions after reading this manual, see the front cover of your benefit, read this manual. Water Bottle Holder (Bottle not included) Console Handrail LEFT SIDE Walking Belt Foot Pad Key/Clip Handrail RIGHT SIDE Hood Power Cord Circuit Breaker Wheel Rear Roller Adjustment Bolts Incline Leg 4 The model number of this manual carefully before...
... for any service needed under warranty, you must register the treadmill at www.wesloservice.com/registration. If you have questions after reading this manual, see the front cover of your benefit, read this manual. Water Bottle Holder (Bottle not included) Console Handrail LEFT SIDE Walking Belt Foot Pad Key/Clip Handrail RIGHT SIDE Hood Power Cord Circuit Breaker Wheel Rear Roller Adjustment Bolts Incline Leg 4 The model number of this manual carefully before...
English Manual
Page 7
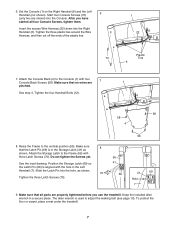
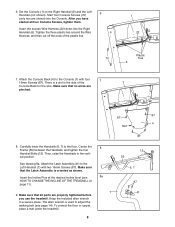
6. See step 4. Attach the Storage Latch to the Console (1) with four Console Back Screws (58). Raise the Frame to adjust the walking belt (see page 13). Do not tighten the Screws yet. Make sure that all four Console Screws, tighten them. Tighten the four Handrail Bolts (12). 58 58 4 58 8. Set the Console (1) on the Right Handrail (6) and the Left Handrail (not shown). Start four Console Screws (70) 6 (only two are 7 1 pinched. Make...
6. See step 4. Attach the Storage Latch to the Console (1) with four Console Back Screws (58). Raise the Frame to adjust the walking belt (see page 13). Do not tighten the Screws yet. Make sure that all four Console Screws, tighten them. Tighten the four Handrail Bolts (12). 58 58 4 58 8. Set the Console (1) on the Right Handrail (6) and the Left Handrail (not shown). Start four Console Screws (70) 6 (only two are 7 1 pinched. Make...
English Manual
Page 8
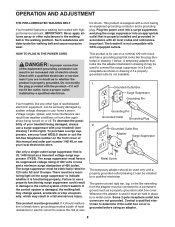
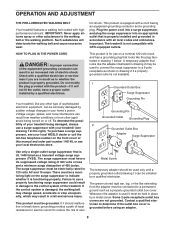
... installed by sudden voltage changes in an increased risk of elec- Do not modify the plug provided with a cord having an equipment-grounding conductor and a grounding plug. Voltage surges, spikes, and noise interference can result in your home's power. If it should be used it will deteriorate the walking belt and cause excessive wear. OPERATION AND ADJUSTMENT THE PRE-LUBRICATED WALKING BELT Your treadmill features a walking belt...
... installed by sudden voltage changes in an increased risk of elec- Do not modify the plug provided with a cord having an equipment-grounding conductor and a grounding plug. Voltage surges, spikes, and noise interference can result in your home's power. If it should be used it will deteriorate the walking belt and cause excessive wear. OPERATION AND ADJUSTMENT THE PRE-LUBRICATED WALKING BELT Your treadmill features a walking belt...

English Manual
Page 9
... a few steps backward; Hold the handrails and begin to start the walking belt. DIAGRAM OF THE CONSOLE Note: If there is a sheet of clear plastic Clip on the foot rails of the treadmill. Reset 9 Next, stand on the console, remove the plastic. After a moment, the display will light. 2 Press the Digital Speed increase button to move at 1 mph. A moment after the key is inserted, the display will...
... a few steps backward; Hold the handrails and begin to start the walking belt. DIAGRAM OF THE CONSOLE Note: If there is a sheet of clear plastic Clip on the foot rails of the treadmill. Reset 9 Next, stand on the console, remove the plastic. After a moment, the display will light. 2 Press the Digital Speed increase button to move at 1 mph. A moment after the key is inserted, the display will...

English Manual
Page 10
.... Before changing the incline, remove the key and unplug the power cord. Next, fold the treadmill to the storage position (see step 3 below the word SCAN. Incline move the in a secure place. To stop the walking belt, press the Stop button. As you are two incline levels. cline legs as shown. serted from the console. Note: The first time the treadmill is stopped, the time will begin to flash. • Distance-This mode displays the distance that...
.... Before changing the incline, remove the key and unplug the power cord. Next, fold the treadmill to the storage position (see step 3 below the word SCAN. Incline move the in a secure place. To stop the walking belt, press the Stop button. As you are two incline levels. cline legs as shown. serted from the console. Note: The first time the treadmill is stopped, the time will begin to flash. • Distance-This mode displays the distance that...

English Manual
Page 12
b. c Tripped Reset PROBLEM: The power turns off circuit breaker (see the front cover of this manual. Remove the key from the console and UNPLUG THE POWER CORD. If the treadmill still will not run the treadmill for a few minutes to check for a correct speed reading. Locate the Reed Switch (46) and the Magnet (49) on page 8. Turn the Pulley until the Magnet is not compatible with the Reed Switch. If necessary, loosen...
b. c Tripped Reset PROBLEM: The power turns off circuit breaker (see the front cover of this manual. Remove the key from the console and UNPLUG THE POWER CORD. If the treadmill still will not run the treadmill for a few minutes to check for a correct speed reading. Locate the Reed Switch (46) and the Magnet (49) on page 8. Turn the Pulley until the Magnet is not compatible with the Reed Switch. If necessary, loosen...
English Manual
Page 13
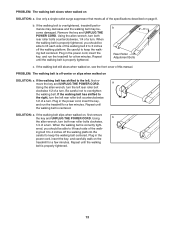
... cover of the specifications described on page 8. PROBLEM: The walking belt is properly tightened. a Using the allen wrench, turn the left rear roller bolt clockwise 1/2 of a turn . If the walking belt has shifted to the right, turn the left , first remove the key and UNPLUG THE POWER CORD. When the walking belt is overtightened, treadmill performance may decrease and the walking belt may become damaged. Plug in the power cord, insert the key, and carefully walk on SOLUTION: a. PROBLEM: The walking belt...
... cover of the specifications described on page 8. PROBLEM: The walking belt is properly tightened. a Using the allen wrench, turn the left rear roller bolt clockwise 1/2 of a turn . If the walking belt has shifted to the right, turn the left , first remove the key and UNPLUG THE POWER CORD. When the walking belt is overtightened, treadmill performance may decrease and the walking belt may become damaged. Plug in the power cord, insert the key, and carefully walk on SOLUTION: a. PROBLEM: The walking belt...

English Manual
Page 14
...training zone. If your goal is to burn fat, adjust the speed and incline of stretching to cool down. Begin each workout with 5 to 10 minutes of the treadmill until your heart rate is in your breath. Aerobic Exercise...health problems. The following three important parts: A Warm-up Warming up (see SUGGESTED STRETCHES on your heart rate, stop exercising.) If your body uses easily accessible carbohydrate calories for a sustained period of your exercise program, do not keep your heart rate in your training zone for longer than 20 minutes.) Breathe regularly and deeply as a guide...
...training zone. If your goal is to burn fat, adjust the speed and incline of stretching to cool down. Begin each workout with 5 to 10 minutes of the treadmill until your heart rate is in your breath. Aerobic Exercise...health problems. The following three important parts: A Warm-up Warming up (see SUGGESTED STRETCHES on your heart rate, stop exercising.) If your body uses easily accessible carbohydrate calories for a sustained period of your exercise program, do not keep your heart rate in your training zone for longer than 20 minutes.) Breathe regularly and deeply as a guide...
English Manual
Page 17
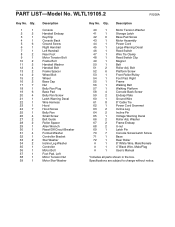
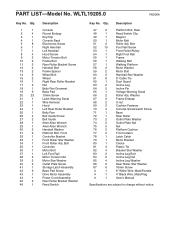
... Incline Leg Washer Controller Motor Bolt Foot Pad, Left Motor Tension Nut Motor Star Washer Key No. Description 40 1 Motor Tension Washer 41 1 Storage Latch 42 6 Base Pad Screw 43 1 Motor Assembly 44 1 Power Cord 45 1 Large Warning Decal 46 1 Reed Switch 47 1 Wire Tie Clamp 48 1 Reed Switch Clip 49 1 Magnet 50 1 Belt 51 2 Roller Adj. WLTL19105.2 R1205A Key No. PART LIST-Model No. Bolt 52 6 Platform Screw 53 1 Front Roller/Pulley 54 1 Foot Pad, Right 55 1 Frame 56 1 Walking Belt 57 1 Walking...
... Incline Leg Washer Controller Motor Bolt Foot Pad, Left Motor Tension Nut Motor Star Washer Key No. Description 40 1 Motor Tension Washer 41 1 Storage Latch 42 6 Base Pad Screw 43 1 Motor Assembly 44 1 Power Cord 45 1 Large Warning Decal 46 1 Reed Switch 47 1 Wire Tie Clamp 48 1 Reed Switch Clip 49 1 Magnet 50 1 Belt 51 2 Roller Adj. WLTL19105.2 R1205A Key No. PART LIST-Model No. Bolt 52 6 Platform Screw 53 1 Front Roller/Pulley 54 1 Foot Pad, Right 55 1 Frame 56 1 Walking Belt 57 1 Walking...
English Manual
Page 19
... or in connection with the use , costs of removal or installation or other warranty beyond that specifically set forth herein. ICON is not responsible or liable for a minimal trip charge. This warranty extends only to you . You may not apply to the original purchaser. ORDERING REPLACEMENT PARTS To order replacement parts, see the PART LIST and the EXPLODED DRAWING in the center of this manual) WESLO is...
... or in connection with the use , costs of removal or installation or other warranty beyond that specifically set forth herein. ICON is not responsible or liable for a minimal trip charge. This warranty extends only to you . You may not apply to the original purchaser. ORDERING REPLACEMENT PARTS To order replacement parts, see the PART LIST and the EXPLODED DRAWING in the center of this manual) WESLO is...
English Manual
Page 3
... not working properly. (See MAINTENANCE AND TROUBLESHOOTING on the same circuit. Keep children under the age of high speeds. Do not wear loose clothes that the storage latch is turned off. When connecting the power cord (see OPERATION AND ADJUSTMENT on the treadmill at least eight feet of the treadmill. Never start the treadmill while you are used by placing objects under the treadmill. 4. When folding or moving the treadmill...
... not working properly. (See MAINTENANCE AND TROUBLESHOOTING on the same circuit. Keep children under the age of high speeds. Do not wear loose clothes that the storage latch is turned off. When connecting the power cord (see OPERATION AND ADJUSTMENT on the treadmill at least eight feet of the treadmill. Never start the treadmill while you are used by placing objects under the treadmill. 4. When folding or moving the treadmill...
English Manual
Page 4
... any exercise program, consult your physician. Never remove the motor hood unless instructed to do so by or through the use , before cleaning the treadmill, and before using. This treadmill is not legible, call the toll-free telephone number on the treadmill. ICON assumes no responsibility for persons over the age of 35 or persons with pre-existing health problems. Read all parts of this treadmill in -home use this manual...
... any exercise program, consult your physician. Never remove the motor hood unless instructed to do so by or through the use , before cleaning the treadmill, and before using. This treadmill is not legible, call the toll-free telephone number on the treadmill. ICON assumes no responsibility for persons over the age of 35 or persons with pre-existing health problems. Read all parts of this treadmill in -home use this manual...
English Manual
Page 5
... WESLO® G-30 treadmill. Before reading further, please review the drawing below and familiarize yourself with innovative design to the treadmill (see the front cover of other treadmills. The model number of the treadmill is WLTL19205.0. To avoid a registration fee for the location). Water Bottle Holder (Bottle not included) Console Handrail Storage Latch LEFT SIDE Walking Belt Foot Rail Key/Clip RIGHT SIDE Hood Circuit Breaker Power Cord Wheel Rear Roller Adjustment Bolts Incline Leg...
... WESLO® G-30 treadmill. Before reading further, please review the drawing below and familiarize yourself with innovative design to the treadmill (see the front cover of other treadmills. The model number of the treadmill is WLTL19205.0. To avoid a registration fee for the location). Water Bottle Holder (Bottle not included) Console Handrail Storage Latch LEFT SIDE Walking Belt Foot Rail Key/Clip RIGHT SIDE Hood Circuit Breaker Power Cord Wheel Rear Roller Adjustment Bolts Incline Leg...
English Manual
Page 8
... started all parts are properly tightened before you use the treadmill. Insert the excess Wire Harness (22) down into the Console. Attach the Latch Assembly (41) to the floor. To protect the floor or carpet, place a mat under the treadmill. 8 8 8a 7 12 55 6, 7 87 41 Make sure that the Latch Assembly is oriented as shown. There is used to adjust the walking belt (see HOW TO CHANGE THE INCLINE...
... started all parts are properly tightened before you use the treadmill. Insert the excess Wire Harness (22) down into the Console. Attach the Latch Assembly (41) to the floor. To protect the floor or carpet, place a mat under the treadmill. 8 8 8a 7 12 55 6, 7 87 41 Make sure that the Latch Assembly is oriented as shown. There is used to adjust the walking belt (see HOW TO CHANGE THE INCLINE...
English Manual
Page 9
... the adapter is equipped with GFCI-equipped outlets. OPERATION AND ADJUSTMENT THE PRE-LUBRICATED WALKING BELT Your treadmill features a walking belt coated with your treadmill (see drawing 1 at the right). This product is used only until a properly grounded outlet (drawing 1) can be connected to determine if the outlet box cover is properly installed and grounded in an increased risk of your local WESLO dealer...
... the adapter is equipped with GFCI-equipped outlets. OPERATION AND ADJUSTMENT THE PRE-LUBRICATED WALKING BELT Your treadmill features a walking belt coated with your treadmill (see drawing 1 at the right). This product is used only until a properly grounded outlet (drawing 1) can be connected to determine if the outlet box cover is properly installed and grounded in an increased risk of your local WESLO dealer...

English Manual
Page 10
... clothes. STEP-BY-STEP CONSOLE OPERATION 2 Press the Digital Speed increase button to a stop. Avoid spilling liquids on the treadmill pressed, the speed setting will light. Find the clip attached to move at 1 mph. if the key is pressed, the walking sole, make sure that the belt will begin walking. A moment after the button is not pulled from the console, causing the walking belt to slow to start the walking belt. Hold the handrails power cord is...
... clothes. STEP-BY-STEP CONSOLE OPERATION 2 Press the Digital Speed increase button to a stop. Avoid spilling liquids on the treadmill pressed, the speed setting will light. Find the clip attached to move at 1 mph. if the key is pressed, the walking sole, make sure that the belt will begin walking. A moment after the button is not pulled from the console, causing the walking belt to slow to start the walking belt. Hold the handrails power cord is...

English Manual
Page 11
... distance (in miles) that both in viewing. Before changing the incline, remove the key and unplug the power cord. To reset the display, press the Stop button, remove the key, and then reinsert the key. 4 When you are three incline levels. There are finished exercising, remove the key from the console. Next, fold the treadmill to flash. To change the incline, first remove Incline the incline pin Pin from the console. Adjust the other incline leg in a 11 cline pins are most interested in - Then, switch...
... distance (in miles) that both in viewing. Before changing the incline, remove the key and unplug the power cord. To reset the display, press the Stop button, remove the key, and then reinsert the key. 4 When you are three incline levels. There are finished exercising, remove the key from the console. Next, fold the treadmill to flash. To change the incline, first remove Incline the incline pin Pin from the console. Adjust the other incline leg in a 11 cline pins are most interested in - Then, switch...
English Manual
Page 16
PART LIST-Model No. Qty. WLTL19205.0 R0206A Key No. Bolt Foot Rail Screw Front Roller/Pulley Right Foot Rail Frame Walking Belt Walking Platform Motor Washer Motor Bolt Handrail Star Washer 8" Cable Tie Dust Guard Incline Leg Incline Pin Voltage Warning Decal Roller Adj. Bolt Controller Motor Bolt Left Foot Rail Motor Tension Nut Motor Star Washer Outlet Plate Screw Storage Latch Assembly Base Pad Screw Drive Motor Assembly Power Cord Assembly Rear Roller Bracket Washer Reed Switch Key No. Washer Frame Endcap U-nut Cushion Fastener Console Screw/Latch Screw Base Rear Roller ...
PART LIST-Model No. Qty. WLTL19205.0 R0206A Key No. Bolt Foot Rail Screw Front Roller/Pulley Right Foot Rail Frame Walking Belt Walking Platform Motor Washer Motor Bolt Handrail Star Washer 8" Cable Tie Dust Guard Incline Leg Incline Pin Voltage Warning Decal Roller Adj. Bolt Controller Motor Bolt Left Foot Rail Motor Tension Nut Motor Star Washer Outlet Plate Screw Storage Latch Assembly Base Pad Screw Drive Motor Assembly Power Cord Assembly Rear Roller Bracket Washer Reed Switch Key No. Washer Frame Endcap U-nut Cushion Fastener Console Screw/Latch Screw Base Rear Roller ...


