
English Manual
Page 2
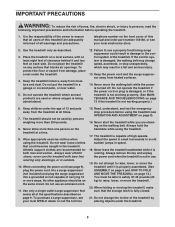
...into a grounded circuit capable of this manual. Never move the walking belt while the power is not working properly.) 2 It is being administered. 6. To protect the floor or carpet from the treadmill at a time. 9. Do not use the treadmill with at least eight feet of the specifications described on the... local WESLO dealer or call the toll-free telephone number on page 8. If the control system is not working properly. (See BEFORE YOU BEGIN on the same circuit. Do not operate the treadmill if the power cord or plug is damaged, or if the treadmill is damaged, the walking belt may ...
...into a grounded circuit capable of this manual. Never move the walking belt while the power is not working properly.) 2 It is being administered. 6. To protect the floor or carpet from the treadmill at a time. 9. Do not use the treadmill with at least eight feet of the specifications described on the... local WESLO dealer or call the toll-free telephone number on page 8. If the control system is not working properly. (See BEFORE YOU BEGIN on the same circuit. Do not operate the treadmill if the power cord or plug is damaged, or if the treadmill is damaged, the walking belt may ...
English Manual
Page 3
... the front cover of Electric Shock •Unplug Treadmill before performing the main- Never leave the treadmill unattended while it is properly assembled. (See ASSEMBLY on page 5 and HOW TO FOLD AND MOVE THE TREADMILL on the walking belt. Always unplug the power cord immediately after use... this or any exercise program, consult your treadmill. Never start the treadmill while you are not shown at actual size. •Hazardous Voltage &#...
... the front cover of Electric Shock •Unplug Treadmill before performing the main- Never leave the treadmill unattended while it is properly assembled. (See ASSEMBLY on page 5 and HOW TO FOLD AND MOVE THE TREADMILL on the walking belt. Always unplug the power cord immediately after use... this or any exercise program, consult your treadmill. Never start the treadmill while you are not shown at actual size. •Hazardous Voltage &#...
English Manual
Page 4
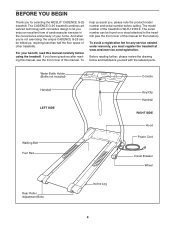
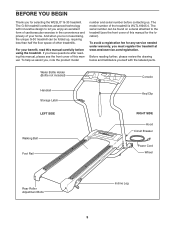
... selecting the WESLO® CADENCE G-25 treadmill. Before reading further, please review the drawing below and familiarize yourself with innovative design to the treadmill (see the front cover of this manual carefully before calling. The CADENCE G-25 treadmill combines advanced technology with the labeled parts. Water Bottle Holder (Bottle not included) Console Handrail LEFT SIDE Walking Belt Foot...
... selecting the WESLO® CADENCE G-25 treadmill. Before reading further, please review the drawing below and familiarize yourself with innovative design to the treadmill (see the front cover of this manual carefully before calling. The CADENCE G-25 treadmill combines advanced technology with the labeled parts. Water Bottle Holder (Bottle not included) Console Handrail LEFT SIDE Walking Belt Foot...
English Manual
Page 5
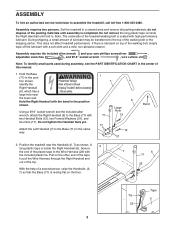
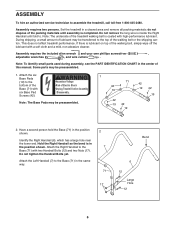
...screwdriver , adjustable wrenches , and 9/16" socket wrench , wire cutters . Do not tighten the Handrail Nuts yet. do not dispose of the treadmill walking belt is completed. During shipping, a small amount of lubricant may be transferred to the top of a second person, raise the Handrails (6, 7) so... (22) with a soft cloth and a mild, non-abrasive cleaner. Position the treadmill near the lower end. A 2 long plastic tape is inside the Right Handrail (6). With the help of the walking belt or the shipping carton. Assembly requires two persons. Secure the end of the top....
...screwdriver , adjustable wrenches , and 9/16" socket wrench , wire cutters . Do not tighten the Handrail Nuts yet. do not dispose of the treadmill walking belt is completed. During shipping, a small amount of lubricant may be transferred to the top of a second person, raise the Handrails (6, 7) so... (22) with a soft cloth and a mild, non-abrasive cleaner. Position the treadmill near the lower end. A 2 long plastic tape is inside the Right Handrail (6). With the help of the walking belt or the shipping carton. Assembly requires two persons. Secure the end of the top....
English Manual
Page 7
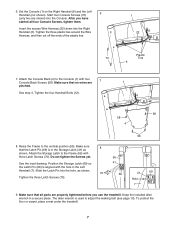
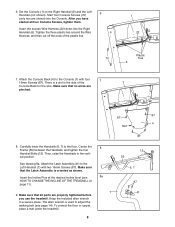
Raise the Frame to adjust the walking belt (see page 13). Do not tighten the Screws yet. Attach the Console Back (4) to the Frame (55) with four Console Back...Start four Console Screws (70) 6 (only two are 7 1 pinched. After you have started all parts are properly tightened before you use the treadmill. Make sure that all four Console Screws, tighten them. Position the Storage Latch (69) so the Latch Pin (69) is used to the ... allen wrench is aligned with the hole in a secure place. To protect the floor or carpet, place a mat under the treadmill. 7
Raise the Frame to adjust the walking belt (see page 13). Do not tighten the Screws yet. Attach the Console Back (4) to the Frame (55) with four Console Back...Start four Console Screws (70) 6 (only two are 7 1 pinched. After you have started all parts are properly tightened before you use the treadmill. Make sure that all four Console Screws, tighten them. Position the Storage Latch (69) so the Latch Pin (69) is used to the ... allen wrench is aligned with the hole in a secure place. To protect the floor or carpet, place a mat under the treadmill. 7
English Manual
Page 8
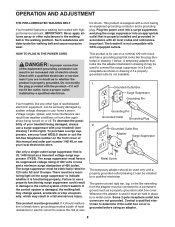
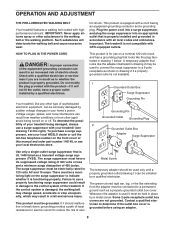
... electrician. Some 2-pole receptacle outlet box covers are in an increased risk of the treadmill. Check with your home's power. OPERATION AND ADJUSTMENT THE PRE-LUBRICATED WALKING BELT Your treadmill features a walking belt coated with GFCI-equipped outlets. IMPORTANT: Never apply silicone spray or other appliances being ...decrease the possibility of this manual and order part number 146148, or see your local WESLO dealer or call the toll-free telephone number on the front cover of your treadmill being damaged, always use on a nominal 120-volt circuit, and has a grounding...
... electrician. Some 2-pole receptacle outlet box covers are in an increased risk of the treadmill. Check with your home's power. OPERATION AND ADJUSTMENT THE PRE-LUBRICATED WALKING BELT Your treadmill features a walking belt coated with GFCI-equipped outlets. IMPORTANT: Never apply silicone spray or other appliances being ...decrease the possibility of this manual and order part number 146148, or see your local WESLO dealer or call the toll-free telephone number on the front cover of your treadmill being damaged, always use on a nominal 120-volt circuit, and has a grounding...

English Manual
Page 9
Avoid spilling liquids on the foot rails of the treadmill. After a moment, the display will begin walking. A moment after the key is inserted, the display will light. 2 Press the Digital Speed increase button to start the walking belt. if a button is pressed, the speed setting will change in ... operating the console, read the following precautions. • Do not stand on the walking belt when turning on the power. • Always wear the clip (see the drawing above ) while operating the treadmill. • Adjust the speed in small increments to operate the console. 1 Insert...
Avoid spilling liquids on the foot rails of the treadmill. After a moment, the display will begin walking. A moment after the key is inserted, the display will light. 2 Press the Digital Speed increase button to start the walking belt. if a button is pressed, the speed setting will change in ... operating the console, read the following precautions. • Do not stand on the walking belt when turning on the power. • Always wear the clip (see the drawing above ) while operating the treadmill. • Adjust the speed in small increments to operate the console. 1 Insert...

English Manual
Page 10
... button, and remove the key from the direction shown. Next, fold the treadmill to flash. Pin cline pin from the console. Make sure that you have walked or run, in miles. • Speed-This mode displays the speed of the walking belt, in miles per hour. • Calories-This mode displays the approximate number...
... button, and remove the key from the direction shown. Next, fold the treadmill to flash. Pin cline pin from the console. Make sure that you have walked or run, in miles. • Speed-This mode displays the speed of the walking belt, in miles per hour. • Calories-This mode displays the approximate number...
English Manual
Page 13
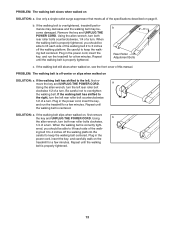
... a turn . Plug in the power cord, insert the key, and run the treadmill for a few minutes. If the walking belt slips when walked on SOLUTION: a. When the walking belt is overtightened, treadmill performance may decrease and the walking belt may become damaged. PROBLEM: The walking belt slows when walked on , first remove the key and UNPLUG THE POWER CORD. Use only a single...
... a turn . Plug in the power cord, insert the key, and run the treadmill for a few minutes. If the walking belt slips when walked on SOLUTION: a. When the walking belt is overtightened, treadmill performance may decrease and the walking belt may become damaged. PROBLEM: The walking belt slows when walked on , first remove the key and UNPLUG THE POWER CORD. Use only a single...
English Manual
Page 17
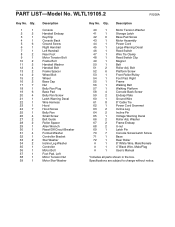
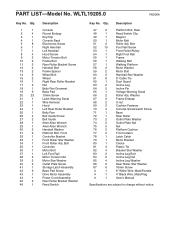
... Pad, Left Motor Tension Nut Motor Star Washer Key No. Bolt 52 6 Platform Screw 53 1 Front Roller/Pulley 54 1 Foot Pad, Right 55 1 Frame 56 1 Walking Belt 57 1 Walking Platform 58 4 Console Back Screw 59 2 Endcap Plate 60 1 Ground Wire 61 8 8" Cable Tie 62 1 Power Cord Grommet 63 2 Incline Leg 64 2 Incline Pin... Screw 43 1 Motor Assembly 44 1 Power Cord 45 1 Large Warning Decal 46 1 Reed Switch 47 1 Wire Tie Clamp 48 1 Reed Switch Clip 49 1 Magnet 50 1 Belt 51 2 Roller Adj. WLTL19105.2 R1205A Key No. PART LIST-Model No.
... Pad, Left Motor Tension Nut Motor Star Washer Key No. Bolt 52 6 Platform Screw 53 1 Front Roller/Pulley 54 1 Foot Pad, Right 55 1 Frame 56 1 Walking Belt 57 1 Walking Platform 58 4 Console Back Screw 59 2 Endcap Plate 60 1 Ground Wire 61 8 8" Cable Tie 62 1 Power Cord Grommet 63 2 Incline Leg 64 2 Incline Pin... Screw 43 1 Motor Assembly 44 1 Power Cord 45 1 Large Warning Decal 46 1 Reed Switch 47 1 Wire Tie Clamp 48 1 Reed Switch Clip 49 1 Magnet 50 1 Belt 51 2 Roller Adj. WLTL19105.2 R1205A Key No. PART LIST-Model No.
English Manual
Page 3
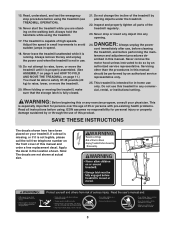
.... Do not place the treadmill on page 13 if the treadmill is fully closed. 21. Never move the treadmill. 20. The treadmill should be on a level surface, with bare feet, wearing only stockings, or in the treadmill. When connecting the power cord (see your local WESLO dealer or call the toll...see OPERATION AND ADJUSTMENT on each side. Always remove the key and unplug the power cord when the treadmill is damaged, the walking belt may result in use an extension cord. 11. Use the treadmill only as described. 3. If the control system is not in a fall and serious injury. 13. ...
.... Do not place the treadmill on page 13 if the treadmill is fully closed. 21. Never move the treadmill. 20. The treadmill should be on a level surface, with bare feet, wearing only stockings, or in the treadmill. When connecting the power cord (see your local WESLO dealer or call the toll...see OPERATION AND ADJUSTMENT on each side. Always remove the key and unplug the power cord when the treadmill is damaged, the walking belt may result in use an extension cord. 11. Use the treadmill only as described. 3. If the control system is not in a fall and serious injury. 13. ...
English Manual
Page 5
... be folded up, requiring less than half the floor space of the treadmill is WLTL19205.0. To help us . The model number of other treadmills. Water Bottle Holder (Bottle not included) Console Handrail Storage Latch LEFT SIDE Walking Belt Foot Rail Key/Clip RIGHT SIDE Hood Circuit Breaker Power Cord Wheel Rear... the front cover of your benefit, read this manual for any service needed under warranty, you for selecting the WESLO® G-30 treadmill. If you have questions after reading this manual, please see the front cover of this manual carefully before contacting us assist you...
... be folded up, requiring less than half the floor space of the treadmill is WLTL19205.0. To help us . The model number of other treadmills. Water Bottle Holder (Bottle not included) Console Handrail Storage Latch LEFT SIDE Walking Belt Foot Rail Key/Clip RIGHT SIDE Hood Circuit Breaker Power Cord Wheel Rear... the front cover of your benefit, read this manual for any service needed under warranty, you for selecting the WESLO® G-30 treadmill. If you have questions after reading this manual, please see the front cover of this manual carefully before contacting us assist you...
English Manual
Page 6
... the Right Handrail until assembly is lubricant on top of the walking belt, simply wipe off the lubricant with six Base Pad Screws (42). ¥Hazardous Voltage ¥Risk of Electric Shock ¥Unplug Treadmill before Assembly /Disassembly. Some parts may be preassembled. 1 42...The underside of the walking belt or the shipping carton. Hold the Right Handrail so the bend is coated with two Handrail Bolts (12) and two Nuts (17). This does not affect treadmill performance. Attach the Left Handrail (7) to the top of the treadmill walking belt is in the position...
... the Right Handrail until assembly is lubricant on top of the walking belt, simply wipe off the lubricant with six Base Pad Screws (42). ¥Hazardous Voltage ¥Risk of Electric Shock ¥Unplug Treadmill before Assembly /Disassembly. Some parts may be preassembled. 1 42...The underside of the walking belt or the shipping carton. Hold the Right Handrail so the bend is coated with two Handrail Bolts (12) and two Nuts (17). This does not affect treadmill performance. Attach the Left Handrail (7) to the top of the treadmill walking belt is in the position...
English Manual
Page 8
... are properly tightened before you use the treadmill. Attach the Console Back (4) to the Console (1) with two 16mm Screws (87). Carefully lower the Handrails (6, 7) to the vertical position. See drawing 8a. Attach the Latch Assembly (41) to adjust the walking belt (see HOW TO CHANGE THE INCLINE OF... THE TREADMILL on the Right Handrail (6) and the Left Handrail (not shown). Keep the included allen wrench in the side of the ...
... are properly tightened before you use the treadmill. Attach the Console Back (4) to the Console (1) with two 16mm Screws (87). Carefully lower the Handrails (6, 7) to the vertical position. See drawing 8a. Attach the Latch Assembly (41) to adjust the walking belt (see HOW TO CHANGE THE INCLINE OF... THE TREADMILL on the Right Handrail (6) and the Left Handrail (not shown). Keep the included allen wrench in the side of the ...
English Manual
Page 9
...is damaged, the walking belt may change speed, accelerate or stop unexpectedly, which may be seriously damaged by a metal screw. The green-colored rigid ear, lug, or the like the adapter illustrated in drawing 2 may result in your local WESLO dealer or call ...damage to a permanent ground such as a transient voltage surge suppressor (TVSS). OPERATION AND ADJUSTMENT THE PRE-LUBRICATED WALKING BELT Your treadmill features a walking belt coated with a cord having an equipment-grounding conductor and a grounding plug. This product is equipped with highperformance lubricant. tric ...
...is damaged, the walking belt may change speed, accelerate or stop unexpectedly, which may be seriously damaged by a metal screw. The green-colored rigid ear, lug, or the like the adapter illustrated in drawing 2 may result in your local WESLO dealer or call ...damage to a permanent ground such as a transient voltage surge suppressor (TVSS). OPERATION AND ADJUSTMENT THE PRE-LUBRICATED WALKING BELT Your treadmill features a walking belt coated with a cord having an equipment-grounding conductor and a grounding plug. This product is equipped with highperformance lubricant. tric ...

English Manual
Page 10
.... ETWL19205 speed of the treadmill. Avoid spilling liquids on the treadmill pressed, the speed setting will change the plugged in increments of electric shock, keep the console dry. A moment after the button is pressed, the walking sole, make sure that the belt will light. position. 10...As you exercise, change by 0.1 frame near the power cord, mph; if a button is not pulled from the console, causing the walking belt to slow to avoid sudden jumps in the water bottle holders. Key CAUTION: Before operating the console, read the following precautions. • ...
.... ETWL19205 speed of the treadmill. Avoid spilling liquids on the treadmill pressed, the speed setting will change the plugged in increments of electric shock, keep the console dry. A moment after the button is pressed, the walking sole, make sure that the belt will light. position. 10...As you exercise, change by 0.1 frame near the power cord, mph; if a button is not pulled from the console, causing the walking belt to slow to avoid sudden jumps in the water bottle holders. Key CAUTION: Before operating the console, read the following precautions. • ...

English Manual
Page 11
... display, the information will begin to the "off" position and unplug the power cord. HOW TO CHANGE THE INCLINE OF THE TREADMILL To vary the intensity of the walking belt, and center the walking belt if necessary (see step 3), the time will not be changed. There are fully inserted into the incline legs. Adjust the...
... display, the information will begin to the "off" position and unplug the power cord. HOW TO CHANGE THE INCLINE OF THE TREADMILL To vary the intensity of the walking belt, and center the walking belt if necessary (see step 3), the time will not be changed. There are fully inserted into the incline legs. Adjust the...

English Manual
Page 14
..., first remove the key and UNPLUG THE POWER CORD. Be careful to overtighten the walking belt. PROBLEM: The walking belt is properly tightened. Be careful not to keep the walking belt centered. If the walking belt slips when walked on the treadmill for a few minutes. When the walking belt is properly tightened. 14 Using the allen wrench, turn both rear roller bolts...
..., first remove the key and UNPLUG THE POWER CORD. Be careful to overtighten the walking belt. PROBLEM: The walking belt is properly tightened. Be careful not to keep the walking belt centered. If the walking belt slips when walked on the treadmill for a few minutes. When the walking belt is properly tightened. 14 Using the allen wrench, turn both rear roller bolts...
English Manual
Page 16
... 82 4 83 2 84 2 85 4 86 2 87 6 # 1 # 1 # 1 Platform Bolt, Rear Reed Switch Clip Magnet Motor Belt Roller Adj. Washer Frame Endcap U-nut Cushion Fastener Console Screw/Latch Screw Base Rear Roller Outlet Plate Washer Outlet Plate Nut Nut Platform Cushion Front... change without notice. Qty. WLTL19205.0 R0206A Key No. PART LIST-Model No. Bolt Foot Rail Screw Front Roller/Pulley Right Foot Rail Frame Walking Belt Walking Platform Motor Washer Motor Bolt Handrail Star Washer 8" Cable Tie Dust Guard Incline Leg Incline Pin Voltage Warning Decal Roller Adj. Qty. 1 1...
... 82 4 83 2 84 2 85 4 86 2 87 6 # 1 # 1 # 1 Platform Bolt, Rear Reed Switch Clip Magnet Motor Belt Roller Adj. Washer Frame Endcap U-nut Cushion Fastener Console Screw/Latch Screw Base Rear Roller Outlet Plate Washer Outlet Plate Nut Nut Platform Cushion Front... change without notice. Qty. WLTL19205.0 R0206A Key No. PART LIST-Model No. Bolt Foot Rail Screw Front Roller/Pulley Right Foot Rail Frame Walking Belt Walking Platform Motor Washer Motor Bolt Handrail Star Washer 8" Cable Tie Dust Guard Incline Leg Incline Pin Voltage Warning Decal Roller Adj. Qty. 1 1...


