Weslo Gym 1500 Support and Manuals
Get Help and Manuals for this Weslo item

View All Support Options Below
Free Weslo Gym 1500 manuals!
Problems with Weslo Gym 1500?
Ask a Question
Free Weslo Gym 1500 manuals!
Problems with Weslo Gym 1500?
Ask a Question
Popular Weslo Gym 1500 Manual Pages
Uk Manual - Page 1
... satisfaction. USER'S MANUAL
Visit our website at www.iconeurope.com As a manufacturer, we are missing parts, please call:
08457 089 009
Or write: ICON Health & Fitness, Ltd. Save this equipment.
Unit 4 Revie Road Industrial Estate Revie Road Beeston Leeds, LS118JG UK email: [email protected]
CAUTION
Read all precautions and instructions in the...
Uk Manual - Page 2

....
TABLE OF CONTENTS
IMPORTANT PRECAUTIONS 3 BEFORE YOU BEGIN 4 ASSEMBLY 5 ADJUSTMENTS 14 WEIGHT RESISTANCE CHART 16 CABLE DIAGRAM 17 TROUBLESHOOTING AND MAINTENANCE 18 ORDERING REPLACEMENT PARTS Back Cover Note: A PART IDENTIFICATION CHART and PART LIST/EXPLODED DRAWING are attached to the centre of ICON Health & Fitness, Inc.
2 WESLO is a registered trademark of this manual.
Uk Manual - Page 3

... not use of this or any worn parts immediately.
6. The weights will fall with pre-existing health problems.
Read all times.
7. Always disconnect the lat bar from moving parts.
8. Apply the decal in any time whilst exercising, stop immediately and make sure that the cables remain on all instructions in this product may result in...
Uk Manual - Page 4

... body, build dramatic muscle size and strength, or improve your benefit, read this owner's manual).
If you for selecting the versatile WESLO® GYM 1500 weight system. The model number is to achieve the specific results you , please note the product model number and serial number before using the weight system. they do not correspond to develop...
Uk Manual - Page 5

..., or a set of ratchet wrenches. ASSEMBLY
Make Things Easier for assembly:
• Two adjustable spanners
• One rubber mallet
• One standard screwdriver
• One Phillips screwdriver
• Lubricant, such as shown in the drawings.
• For help identifying small parts, use the PART IDENTIFICATION CHART at the centre of this manual is designed...
Uk Manual - Page 7

...Arm with an M10 x 73mm Bolt (80) and an M10 Nylon Locknut (68). Attach the two Base Supports (22) to the Upright (3) with grease.
Press two 45mm Square Inner Cap (52) into the Right...Square Inner Caps (51) into the lower ends of the Top Frame (4). Attach the Top Frame (4) between the Weight Guides (16) with two M10 x 70mm Bolts (64), two M10 Washers (62), and two M10 Nylon Locknuts (68...
Uk Manual - Page 8

... on the Base (1). Attach the Pulley to verify proper cable routing. Press a 45mm Square Inner Cap (52) into place on the indicated side of this manual to the Top Frame (4) with the Bolt and an M10 Nylon Locknut (68). Lubricate the M10 x 195mm Bolt (75) with an M10 x 57mm Bolt (59...
Uk Manual - Page 13
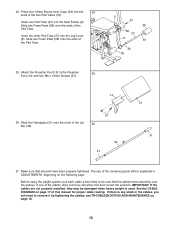
... Pad Tube. IMPORTANT: If the cables are not properly installed, they may be damaged when heavy weight is any slack... cables move smoothly, find and correct the problem. The use of this manual for proper cable routing.
Attach the Preacher ...there is used. see TROUBLESHOOTING AND MAINTENANCE on page 17 of the remaining parts will be sure that all parts have been properly tightened...
Uk Manual - Page 14

...to find the actual amount of the exercise will be adjusted. Note: The seat frame must be performed. ADJUSTMENTS
The instructions below describe how each part of the weight system can be ...shown) can be changed from 6 pounds to be removed from the weight setting.
Refer to the exercise guide accompanying this manual to see how the weight system should be attached between the Lat Bar ...
Uk Manual - Page 15

ATTACHING AND REMOVING THE SEAT
Set the bracket on the Seat Frame (5) onto the indicated pin on the back of the Weight Guides (16) and secure the Locking Bar with a Chain (36) and two Cable...the Preacher Pad (13) remove the indicated 38mm Square Inner Cap (53) from the Seat Frame (5). For some exercises, the Seat (12) must be sure that the Chain (not shown) is not attached to the Upright with...
Uk Manual - Page 18

...replaced, see ORDERING REPLACEMENT PARTS on the weight system, can be removed from the Pulley, Pulley Covers, and "U"-Bracket. Replace any worn parts immediately.
To do this manual.
18 If there is first used.
TROUBLESHOOTING AND MAINTENANCE
Make sure all parts..., the type of cable used .
Remove the cable and re-install it is slack in the "U"Bracket with the Bolt and Locknut....
Uk Manual - Page 20

...
Please provide the following information when ordering replacement parts:
• the MODEL NUMBER of the product (WLEVSY19220)
• the NAME of the product (WESLO® GYM 1500)
• the SERIAL NUMBER of the product (see the front cover of this manual)
• the KEY NUMBER and DESCRIPTION of the part(s) (see the PART LIST and EXPLODED DRAWING in the...
Uk Manual - Page 21

... divided into four stages: 1) frame assembly, 2) arm assembly, 3) cable assembly, and 4) seat assembly. Important: Some parts may have been pre-assembled for each assembly stage to the key number of the part from the PART LIST in the centre of this manual. The hardware for shipping purposes. Please Note: The assembly is packaged separately.
Uk Manual - Page 25
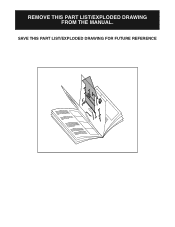
SAVE THIS PART LIST/EXPLODED DRAWING FOR FUTURE REFERENCE
81 REMOVE THIS PART LIST/EXPLODED DRAWING FROM THE MANUAL.
Uk Manual - Page 26

... 73mm Bolt
81
2 25mm x 22mm Plastic Bushing
82
2 M10 x 45mm Bolt
83
1 M10 x 90mm Bolt
84
1 M4 x 20mm Screw
85
1 Cable Trap
86
1 Support Plate
87
1 M10 x 62mm Bolt
88
1 Eyebolt
#
1 User's Manual
#
1 Exercise Guide
Note: "#" indicates a non-illustrated part. PART LIST-Model No. Qty. Qty. Specifications are subject to change without notice. WLEVSY19220
R1203A
Key No.
Weslo Gym 1500 Reviews
We have not received any reviews for Weslo yet.