

English Manual
Page 2
....: • s9on!yva ttl,4lusted anrgc. t :41; TABLE OF CONTENTS IMPORTANT PRECAUTIONS BEFORE YOU BEGIN ASSEMBLY OPERATION AND ADJUSTMENT HOW TO FOLD AND MOVE THE TREADMILL TROUBLE-SHOOTING CONDITIONING GUIDELINES ORDERING REPLACEMENT PARTS LIMITED WARRANTY 2 4 5 7 11 12 14 Back Cover Back Cover Note: An EXPLODED DRAWING and a PART LIST are 'Os...
....: • s9on!yva ttl,4lusted anrgc. t :41; TABLE OF CONTENTS IMPORTANT PRECAUTIONS BEFORE YOU BEGIN ASSEMBLY OPERATION AND ADJUSTMENT HOW TO FOLD AND MOVE THE TREADMILL TROUBLE-SHOOTING CONDITIONING GUIDELINES ORDERING REPLACEMENT PARTS LIMITED WARRANTY 2 4 5 7 11 12 14 Back Cover Back Cover Note: An EXPLODED DRAWING and a PART LIST are 'Os...
English Manual
Page 3
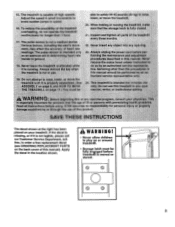
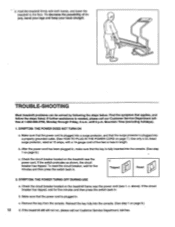
Adjust the speed in small increments to raise, lower, or move the treadmill 20. when eili tt0100 per, move the mblad (See py able to safely lift 45 pounds (20 kg) to avoid sudden.jumps in speed. . . When ... ofr at the right has been placed on or around treadmill. • Storage latch must be fully engaged before treadmill is not legible, please call our Customer Service Department, tollfree, to play on your treadmill. Apply the decal In the location shown. The treadmill is missing, or if it .Ai.tct..lniloiitcir;ig!idiaiil1H...
Adjust the speed in small increments to raise, lower, or move the treadmill 20. when eili tt0100 per, move the mblad (See py able to safely lift 45 pounds (20 kg) to avoid sudden.jumps in speed. . . When ... ofr at the right has been placed on or around treadmill. • Storage latch must be fully engaged before treadmill is not legible, please call our Customer Service Department, tollfree, to play on your treadmill. Apply the decal In the location shown. The treadmill is missing, or if it .Ai.tct..lniloiitcir;ig!idiaiil1H...
English Manual
Page 4
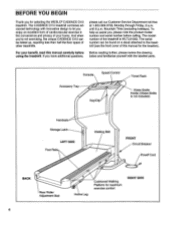
..., please review the drawing below and familiarize yourself with innovative design to the treadmill (see the front cover of your benefit, read this manual for the location). The CADENCE Ct10 treadmill combines advanced technology with the labeled parts. The serial number can be found... Belt FRONT Circuit Breaker Powef Cord BACK Rear Roller Adjustment Bolt 4 Incline Leg Cushioned Walking Platform for selecting the WESLO® CADENCE Ct10 treadmill. And when you enjoy an excellent form of cardiovascular exercise in the convenience and privacy of this manual carefully before...
..., please review the drawing below and familiarize yourself with innovative design to the treadmill (see the front cover of your benefit, read this manual for the location). The CADENCE Ct10 treadmill combines advanced technology with the labeled parts. The serial number can be found... Belt FRONT Circuit Breaker Powef Cord BACK Rear Roller Adjustment Bolt 4 Incline Leg Cushioned Walking Platform for selecting the WESLO® CADENCE Ct10 treadmill. And when you enjoy an excellent form of cardiovascular exercise in the convenience and privacy of this manual carefully before...
English Manual
Page 5
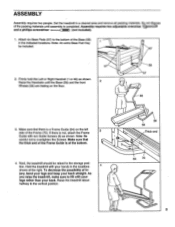
...Note: Be careful not to the vertical position. 4 ( 64 70 5 Hold the treadmill with your hands in the locations shown at the bottom. 56 58 Thick end 3 4. As you raise the treadmill, make sure to the storage position. Assembly requires two adjustable wrenches and a phillips ...screwdriver .0.=1:3::=3) (not included). 1. Next, the treadmill should be included. 57 57 2. Raise the treadmill about halfway to overtighten the Screws. Note: An extra Base Pad may be raised to lift with two Guide ...
...Note: Be careful not to the vertical position. 4 ( 64 70 5 Hold the treadmill with your hands in the locations shown at the bottom. 56 58 Thick end 3 4. As you raise the treadmill, make sure to the storage position. Assembly requires two adjustable wrenches and a phillips ...screwdriver .0.=1:3::=3) (not included). 1. Next, the treadmill should be included. 57 57 2. Raise the treadmill about halfway to overtighten the Screws. Note: An extra Base Pad may be raised to lift with two Guide ...

English Manual
Page 6
... of this page. Remove the paper backing from the Adhesive Clip (19). Note: To protect the floor or carpet, place a mat under the treadmill. 6 70 96 19 Raise the treadmill until the Frame Guide (64) is past the Storage Latch. Slide the Stabilizer Pad (62) onto the bottom of the...indi- 8 cated location. Press the Allen Wrench (96) into the Adhesive Clip. Make sure that all parts are tightened before you use the treadmill. Lower the treadmill to assembly drawing 5 at the top of injury, bend your legs and keep your right hand to the position shown at the right. Press...
... of this page. Remove the paper backing from the Adhesive Clip (19). Note: To protect the floor or carpet, place a mat under the treadmill. 6 70 96 19 Raise the treadmill until the Frame Guide (64) is past the Storage Latch. Slide the Stabilizer Pad (62) onto the bottom of the...indi- 8 cated location. Press the Allen Wrench (96) into the Adhesive Clip. Make sure that all parts are tightened before you use the treadmill. Lower the treadmill to assembly drawing 5 at the top of injury, bend your legs and keep your right hand to the position shown at the right. Press...

English Manual
Page 7
...adapter should malfunction or break down, grounding provides a path of least resistance for use a surge protector (not In- Ott Otok: ctrfca Your treadmill, like extending from the adapter must be held in drawing 2 if a properly grounded outlet is for electric current to a 2-pole receptacle as...grounding conductor and a grounding plug. OPERATION AND ADJUSTMENT THE PERFORMANT LUBET'A WALKING BELT Your treadmill features a walking belt coated with a 14-gauge cord of five feet or less in your treadmill being turned on a nominal 120-volt circuit, HOW TO PLUG IN THE POWER CORD...
...adapter should malfunction or break down, grounding provides a path of least resistance for use a surge protector (not In- Ott Otok: ctrfca Your treadmill, like extending from the adapter must be held in drawing 2 if a properly grounded outlet is for electric current to a 2-pole receptacle as...grounding conductor and a grounding plug. OPERATION AND ADJUSTMENT THE PERFORMANT LUBET'A WALKING BELT Your treadmill features a walking belt coated with a 14-gauge cord of five feet or less in your treadmill being turned on a nominal 120-volt circuit, HOW TO PLUG IN THE POWER CORD...
English Manual
Page 9
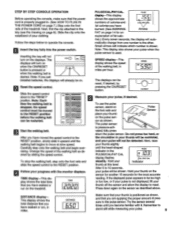
... have burned. (See BURNING Arrows FAT on page 7.) Step onto the foot rails of the walking belt as shown. Change the speed of the treadmill. This display shows the total distance that you have moved the speed control to the RESET position, slowly slide it . DISTANCE rs U . _iLi...raise your thumb slightly until you have walked or run on the displays. sure to stand still while measuring your pulse will turn on the treadmill. STEP BY STEP CONSOLE OPERATION Before operating the console, make sure that the power cord is pressure-acti- Start the walking belt. Do ...
... have burned. (See BURNING Arrows FAT on page 7.) Step onto the foot rails of the walking belt as shown. Change the speed of the treadmill. This display shows the total distance that you have moved the speed control to the RESET position, slowly slide it . DISTANCE rs U . _iLi...raise your thumb slightly until you have walked or run on the displays. sure to stand still while measuring your pulse will turn on the treadmill. STEP BY STEP CONSOLE OPERATION Before operating the console, make sure that the power cord is pressure-acti- Start the walking belt. Do ...
English Manual
Page 10
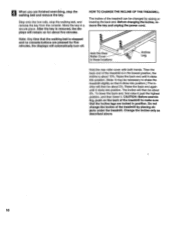
... Incline Leg -V; Hold the rear roller cover with both hands. Raise the back end again until it . Do not change the incline of the treadmill by raising or lowering the back end. Change the incline only as described above. 10 Then the back end of the... Before exercising, push on for five minutes, the displays will then be changed by placing objects under the treadmill. HOW TO CHANGE THE INCLINE OF THE TREADMILL The incline of the treadmill to shake the treadmill slightly so that it clicks into position.) The incline will automatically turn off. Raise the back end until...
... Incline Leg -V; Hold the rear roller cover with both hands. Raise the back end again until it . Do not change the incline of the treadmill by raising or lowering the back end. Change the incline only as described above. 10 Then the back end of the... Before exercising, push on for five minutes, the displays will then be changed by placing objects under the treadmill. HOW TO CHANGE THE INCLINE OF THE TREADMILL The incline of the treadmill to shake the treadmill slightly so that it clicks into position.) The incline will automatically turn off. Raise the back end until...

English Manual
Page 11
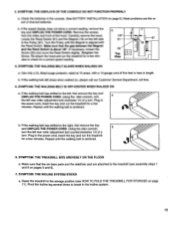
... hand as shown. 2. Storage Latch Frame Guide Closed oo O Base Front Wheels Storage Latch Opened 11 To decrease the possibility of the treadmill with your right hand to the storage position as described above 85° Fahrenheit. Move your hands in the storage position. Caution: You... In order to the vertical position. 2. Place one foot on the base as shown. Pivot the treadmill slightly until the storage latch closes over the frame guide. Hold the treadmill with your back straight. Make sure that the storage latch closes fully over the frame guide. Do not...
... hand as shown. 2. Storage Latch Frame Guide Closed oo O Base Front Wheels Storage Latch Opened 11 To decrease the possibility of the treadmill with your right hand to the storage position as described above 85° Fahrenheit. Move your hands in the storage position. Caution: You... In order to the vertical position. 2. Place one foot on the base as shown. Pivot the treadmill slightly until the storage latch closes over the frame guide. Hold the treadmill with your back straight. Make sure that the storage latch closes fully over the frame guide. Do not...
English Manual
Page 12
...If the circuit breaker has tripped, wait for five minutes and then press the switch back in. until 6 p.m. Check the circuit breaker located on the treadmill near the power cord (see 1. above). c. Reinsert the key fully into a properly grounded outlet. (See HOW TO PLUG IN THE POWER CORD on...Check the circuit breaker located on page 9.) 12 d. SYMPTOM: THE POWER TURNS OFF DURING USE a. - 2. Mountain Time (excluding holidays). 1. Hold the treadmill firmly with a 14-gauge cord of in . Find the symptom that the power cord is plugged into the console. (See step 1 on the...
...If the circuit breaker has tripped, wait for five minutes and then press the switch back in. until 6 p.m. Check the circuit breaker located on the treadmill near the power cord (see 1. above). c. Reinsert the key fully into a properly grounded outlet. (See HOW TO PLUG IN THE POWER CORD on...Check the circuit breaker located on page 9.) 12 d. SYMPTOM: THE POWER TURNS OFF DURING USE a. - 2. Mountain Time (excluding holidays). 1. Hold the treadmill firmly with a 14-gauge cord of in . Find the symptom that the power cord is plugged into the console. (See step 1 on the...
English Manual
Page 13
... BELT SLOWS WHEN WALKED ON a. If the walking belt has shifted to the storage position (see assembly steps 1 and 6 on page 11). Raise the treadmill to the right, first remove the key and UNPLUG THE POWER CORD. Use only a UL-listed surge protector, rated at 15 amps, with the Reed... UNPLUG THE POWER CORD. If the walking belt has shifted to break in the power cord, insert the key and run the treadmill for a correct speed reading. SYMPTOM: THE TREADMILL SITS UNEVENLY ON THE FLOOR a. Using the alien wrench, turn . SYMPTOM: THE DISPLAYS OF THE CONSOLE DO NOT FUNCTION PROPERLY a. ...
... BELT SLOWS WHEN WALKED ON a. If the walking belt has shifted to the storage position (see assembly steps 1 and 6 on page 11). Raise the treadmill to the right, first remove the key and UNPLUG THE POWER CORD. Use only a UL-listed surge protector, rated at 15 amps, with the Reed... UNPLUG THE POWER CORD. If the walking belt has shifted to break in the power cord, insert the key and run the treadmill for a correct speed reading. SYMPTOM: THE TREADMILL SITS UNEVENLY ON THE FLOOR a. Using the alien wrench, turn . SYMPTOM: THE DISPLAYS OF THE CONSOLE DO NOT FUNCTION PROPERLY a. ...
English Manual
Page 14
...8222;:„.. your physician. For more rhythmic stretches to oxygenate the blood. Next, find the proper heart rate for prolonged periods of the treadmill until your heart rate is near the last number in your heart rate is to help you , first find your age on the console... 14 To measure your heart rate during exercise, use stored fat calories for energy. For aerobic exercise, adjust the speed and incline of the treadmill until your heart rate is the recommended heart rate for a sustained period of your training zone. Begin with the proper intensity. n0l0din- WORKOUT ...
...8222;:„.. your physician. For more rhythmic stretches to oxygenate the blood. Next, find the proper heart rate for prolonged periods of the treadmill until your heart rate is near the last number in your heart rate is to help you , first find your age on the console... 14 To measure your heart rate during exercise, use stored fat calories for energy. For aerobic exercise, adjust the speed and incline of the treadmill until your heart rate is the recommended heart rate for a sustained period of your training zone. Begin with the proper intensity. n0l0din- WORKOUT ...

English Manual
Page 16
... be prepared to give the following information: • The MODEL NUMBER OF THE PRODUCT (WLTL91063). • The NAME OF THE PRODUCT (WESLO® CADENCE Ct10 treadmill). • The SERIAL NUMBER OF THE PRODUCT (see the front cover of this manual). • The KEY NUMBER OF THE PART(S) ..., call our Customer Service Department toll-free at one of purchase. until 6 p.m. Mountain Time (excluding holidays). If possible, place the treadmill near your telephone for commercial or rental purposes, or to you specific legal rights. ICON's obligation under normal use or performance of the ...
... be prepared to give the following information: • The MODEL NUMBER OF THE PRODUCT (WLTL91063). • The NAME OF THE PRODUCT (WESLO® CADENCE Ct10 treadmill). • The SERIAL NUMBER OF THE PRODUCT (see the front cover of this manual). • The KEY NUMBER OF THE PART(S) ..., call our Customer Service Department toll-free at one of purchase. until 6 p.m. Mountain Time (excluding holidays). If possible, place the treadmill near your telephone for commercial or rental purposes, or to you specific legal rights. ICON's obligation under normal use or performance of the ...


