
English Manual
Page 4
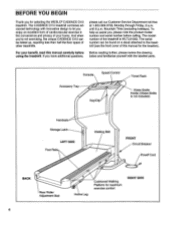
And when you're not exercising, the unique CADENCE Ct10 can be folded up, requiring less than half the floor space of the treadmill is not included) Handrails Storage Latch LEFT SIDE Foot Rails Walking Belt FRONT Circuit Breaker Powef Cord BACK Rear Roller Adjustment Bolt 4 Incline Leg Cushioned Walking Platform for the location). Before reading further...
And when you're not exercising, the unique CADENCE Ct10 can be folded up, requiring less than half the floor space of the treadmill is not included) Handrails Storage Latch LEFT SIDE Foot Rails Walking Belt FRONT Circuit Breaker Powef Cord BACK Rear Roller Adjustment Bolt 4 Incline Leg Cushioned Walking Platform for the location). Before reading further...

English Manual
Page 7
OPERATION AND ADJUSTMENT THE PERFORMANT LUBET'A WALKING BELT Your treadmill features a walking belt coated with your treadmill. 0 Grounding Plug Grounding Plug Surge protectors are not grounded. Whenever the adapter is used it must be used only until a properly grounded outlet (drawing 1) can be connected to the walking belt or the walking platform. Some 2-pole receptacle outlet box covers are sold...
OPERATION AND ADJUSTMENT THE PERFORMANT LUBET'A WALKING BELT Your treadmill features a walking belt coated with your treadmill. 0 Grounding Plug Grounding Plug Surge protectors are not grounded. Whenever the adapter is used it must be used only until a properly grounded outlet (drawing 1) can be connected to the walking belt or the walking platform. Some 2-pole receptacle outlet box covers are sold...
English Manual
Page 9
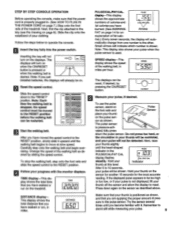
... the clip onto the waistband of the treadmill. Insert the key fully into the power switch. Note: If you have moved the speed control to the RESET position, slowly slide it . After you are applying the proper amount of the walking belt as shown. Change the speed of pres...pulse sensor. Carefully step onto the walking belt and begin exercising. This display shows the total distance that you have walked or run on page 14 for the most accurate reading. fat calories you have burned. (See BURNING Arrows FAT on the treadmill. Small arrows will not be reset,...
... the clip onto the waistband of the treadmill. Insert the key fully into the power switch. Note: If you have moved the speed control to the RESET position, slowly slide it . After you are applying the proper amount of the walking belt as shown. Change the speed of pres...pulse sensor. Carefully step onto the walking belt and begin exercising. This display shows the total distance that you have walked or run on page 14 for the most accurate reading. fat calories you have burned. (See BURNING Arrows FAT on the treadmill. Small arrows will not be reset,...
English Manual
Page 10
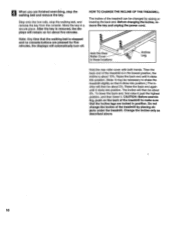
... clicks into position. Do not change the incline of the treadmill to shake the treadmill slightly so that the incline legs are finished exercising, stop the walking belt, and remove the key from the console. Step onto the foot rails, stop the walking belt and remove the key. After the key is stopped and... to make sure that it clicks into position. (Note: It may be about five minutes. HOW TO CHANGE THE INCLINE OF THE TREADMILL The incline of the treadmill is in the lowest position, the incline is about 3%. Hold the Rear Roller Cover in a secure place. Then the back end ...
... clicks into position. Do not change the incline of the treadmill to shake the treadmill slightly so that the incline legs are finished exercising, stop the walking belt, and remove the key from the console. Step onto the foot rails, stop the walking belt and remove the key. After the key is stopped and... to make sure that it clicks into position. (Note: It may be about five minutes. HOW TO CHANGE THE INCLINE OF THE TREADMILL The incline of the treadmill is in the lowest position, the incline is about 3%. Hold the Rear Roller Cover in a secure place. Then the back end ...
English Manual
Page 13
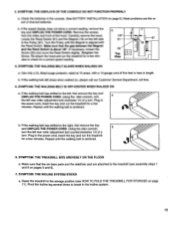
... on pages 5 and 6). 7. If the walking belt still slows when walked on page 11). Repeat until the walking belt is centered. 6. Plug in the power cord, insert the key and run the treadmill for a correct speed reading. SYMPTOM: THE TREADMILL SITS UNEVENLY ON THE FLOOR a. Check the batteries...20 Top View V .4( 67 18 r 4. b. Using the alien wrench, turn . Raise the treadmill to check for a few minutes. SYMPTOM: THE WALKING BELT IS OFF-CENTER WHEN WALKED ON a. If the walking belt has shifted to the right, first remove the key and UNPLUG THE POWER CORD. Remove the screws ...
... on pages 5 and 6). 7. If the walking belt still slows when walked on page 11). Repeat until the walking belt is centered. 6. Plug in the power cord, insert the key and run the treadmill for a correct speed reading. SYMPTOM: THE TREADMILL SITS UNEVENLY ON THE FLOOR a. Check the batteries...20 Top View V .4( 67 18 r 4. b. Using the alien wrench, turn . Raise the treadmill to check for a few minutes. SYMPTOM: THE WALKING BELT IS OFF-CENTER WHEN WALKED ON a. If the walking belt has shifted to the right, first remove the key and UNPLUG THE POWER CORD. Remove the screws ...


